


Page 6-14
G1000 / GFC 700 System Maintenance Manual - 300/B300 Series King Air
Revision 1
190-00716-01
Removal:
1.
Gain access to the avionics shelf in the tail area.
2.
Remove the Philips head screw which holds the locking lever down.
3.
Lift the locking lever up to unlock the unit from the mounting rack.
4.
Remove the unit from the mounting rack.
Reinstallation:
1.
Visually inspect the connectors to ensure there are no bent or damaged pins. Repair any damage
.
2.
Insert the unit into the installation rack.
CAUTION:
Do not use excessive force when inserting the GDL 59 into the rack. This may cause
damage to occur to the connectors, unit, and/or unit rack. If heavy resistance is felt
during installation, stop! Remove the GDL 59 and identify the source of resistance.
The rear plate is designed to float in the unit rack. Check to ensure the rear plate is
not bound by the connector harness.
3.
Lock the GDL 59 in place using the lever-locking handle. Fasten the handle to the GDL 59 body
using the provided Phillips screw.
CAUTION:
Start the handle screw into the hole carefully to avoid cross-
threading. Do not apply torque in excess of 14 in-lbs to the handle
screw. The application of torque exceeding 14 in-lbs to this screw
will damage the LRU case and/or retaining hardware.
4.
If new unit is installed, register with Garmin Flight Data Services per Section 7.27.
5.
Configure the GDL 59 per Section 3.23 and 3.24. Test the GDL 59 per Section 7.28.
6.35 GSR 56 Satellite Receiver
Removal:
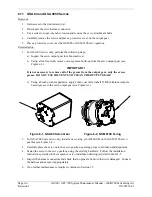
1.
Gain access to the avionics shelf in the tail area.
2.
Unlock the unit from the rack by loosening the ratcheting latch mechanism.
3.
Remove the unit from the rack.
Reinstallation:
1.
Visually inspect the connectors to ensure there are no bent or damaged pins. Repair any damage.
2.
Insert the unit into the installation rack.
CAUTION:
Do not use excessive force when inserting the GSR 56 into the rack.
This may cause damage to occur to the connectors, unit, and/or
unit rack. If heavy resistance is felt during installation, stop!
Remove the GSR 56 and identify the source of resistance.
3.
Lock the unit into the rack by using the ratcheting latch mechanism.
4.
If new unit is installed, register with Garmin Flight Data Services per Section 7.27.
5.
No configuration is required for the GSR 56. Test the GSR 56 according to Section 7.29.
Summary of Contents for Cessna Caravan G1000
Page 2: ...This page intentionally left blank...
Page 89: ......