When the device memory is full, a message appears. The
device does not automatically delete or overwrite your history.
You can upload your history to Garmin Connect (
) or
BaseCamp (
) periodically to keep track of all your activity
data.
Viewing an Activity
You can view the history or a map of your fitness activity.
1
Select the action key.
2
Select
FIT History
.
A list of your activities appears by date.
3
Select an activity.
4
Select
Details
or
View Map
.
Saving an Activity as a Track
You can save an activity as a track using GPS. This allows you
to perform GPS functions with the activity, such as navigation
and routes.
1
Select the action key.
2
Select
FIT History
.
3
Select an activity.
4
Select
Save as Track
.
Deleting an Activity
1
Select the action key.
2
Select
FIT History
.
3
Select an activity.
4
Select
Delete
>
Yes
.
Using Garmin Connect
1
Connect the device to your computer using the USB cable.
2
Go to
3
Follow the on-screen instructions.
ANT+ Sensors
The device is compatible with these optional, wireless ANT+
accessories.
• Heart rate monitor (
• GSC™ 10 speed and cadence sensor (
)
• tempe wireless temperature sensor (
For information about compatibility and purchasing additional
sensors, go to
.
Pairing Your ANT+ Sensors
Before you can pair, you must put on the heart rate monitor or
install the sensor.
Pairing is the connecting of ANT+ wireless sensors, for
example, connecting a heart rate monitor with your Garmin
device.
1
Bring the device with range (3 m) of the sensor.
NOTE:
Stay 10 m away from other ANT+ sensors while
pairing.
2
Select the action key.
3
Select
Setup
>
ANT Sensor
.
4
Select your sensor.
5
Select
New Search
.
When the sensor is paired with your device, the sensor
status changes from
Searching
to
Connected
. Sensor data
appears in the data page loop or a custom data field.
tempe
The tempe is an ANT+ wireless temperature sensor. You can
attach the sensor to a secure strap or loop where it is exposed
to ambient air, and therefore, provides a consistent source of
accurate temperature data. You must pair the tempe with your
device to display temperature data from the tempe.
Putting On the Heart Rate Monitor
NOTE:
If you do not have a heart rate monitor, you can skip this
task.
You should wear the heart rate monitor directly on your skin,
just below your breastplate. It should be snug enough to stay in
place during your activity.
1
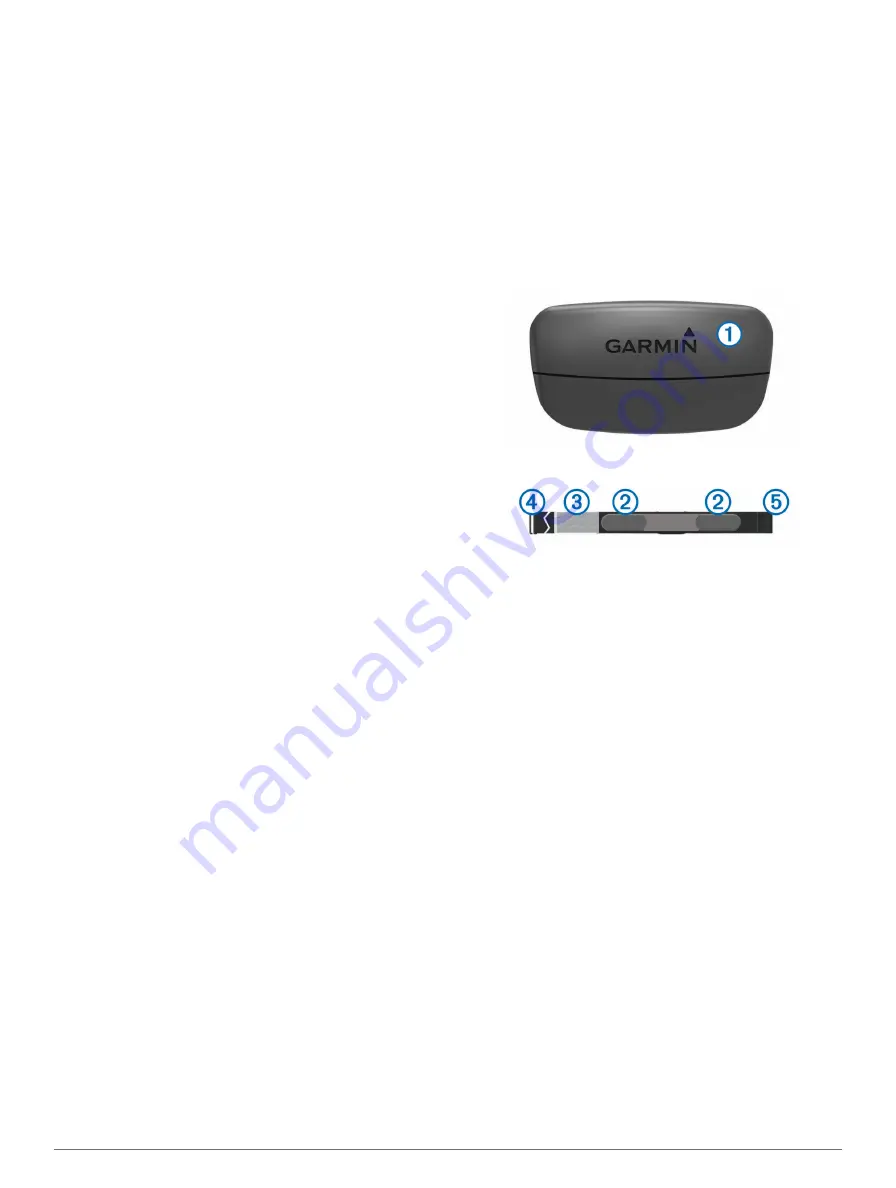
Snap the heart rate monitor module
À
onto the strap.
2
Wet both electrodes
Á
on the back of the strap to create a
strong connection between your chest and the transmitter.
3
If the heart rate monitor has a contact patch
Â
, wet the
contact patch.
4
Wrap the strap around your chest, and connect the strap
hook
Ã
to the loop.
The Garmin logo should be right-side up.
5
Bring the device within range (3 m) of the heart rate monitor.
After you put on the heart rate monitor, it is on standby and
ready to send data.
TIP:
If the heart rate data is erratic or does not appear, see
.
About Heart Rate Zones
Many athletes use heart rate zones to measure and increase
their cardiovascular strength and improve their level of fitness. A
heart rate zone is a set range of heartbeats per minute. The five
commonly accepted heart rate zones are numbered from 1 to 5
according to increasing intensity. Generally, heart rate zones
are calculated based on percentages of your maximum heart
rate.
Fitness Goals
Knowing your heart rate zones can help you measure and
improve your fitness by understanding and applying these
principles.
• Your heart rate is a good measure of exercise intensity.
• Training in certain heart rate zones can help you improve
cardiovascular capacity and strength.
• Knowing your heart rate zones can prevent you from
overtraining and can decrease your risk of injury.
If you know your maximum heart rate, you can use the table
(
) to determine the best heart rate zone for your
fitness objectives.
If you do not know your maximum heart rate, use one of the
calculators available on the Internet. Some gyms and health
centers can provide a test that measures maximum heart rate.
12
ANT+ Sensors


