background image

Dakota Series Owner’s Manual 

23

Customizing the Dakota

4. Connect the Dakota to your 

computer with the included USB 

cable. The bitmap file is saved 

in the Garmin\scrn folder on the 

Dakota drive.

Map Setup

On the Main menu, touch 

Setup

 > 

Map

.

orientation

—select how the map 

is shown on the page. 

North Up 

shows north at the top of the page. 

Track Up 

shows your current 

direction of travel toward the top of 

the page. 

Automotive Mode 

shows 

an automotive perspective with 

next-turn information to use while 

driving.

Auto Zoom

—automatically selects 

the appropriate zoom level for 

optimal use on your map. When 

off


is selected, you must zoom in or out 

manually.

Show


Data Fields

—hide or show 

data fields on the Map page.

Advanced Map Setup

—set the 

zoom levels, the text size, and the 

detail level of the map.
• 

Zoom Levels

—select the zoom 

level for map items. 

• 

Text Size

—select the text size for 

map items.

• 

Detail

—select the amount 

of detail shown on the map. 

Showing more detail may cause 

the map to redraw more slowly.

• 

Shaded Relief

—turn on shaded 

relief maps if available.

Map Information

—touch the check 

box to display a map. This can be 

helpful if several maps are loaded on 

the Dakota.

Summary of Contents for DAKOTA 10

Page 1: ...Dakota 10 and 20 owner s manual...

Page 2: ...e trademarks of Garmin Ltd or its subsidiaries registered in the USA and other countries myGarmin is a trademark of Garmin Ltd or its subsidiaries These trademarks may not be used without the express...

Page 3: ...uch to return to the Main menu Touch or on the Map page to zoom in or zoom out Touch to accept a change Touch to search near a location Touch to view the keyboard Manual Conventions When you are instr...

Page 4: ...cessing Applications from the Main Menu 4 Creating Waypoints 4 Navigating to a Destination 5 Stop Navigating 7 Using the Map 7 Using the Compass 9 Bearing and Course Pointers 10 Managing Waypoints Rou...

Page 5: ...ompass 27 Altimeter Setup 28 Pairing the Dakota 29 Reset 30 Viewing Your Dakota Information 30 Appendix 31 Specifications 31 Using Demo Mode 32 Connecting Your Dakota to a Computer 33 Installing a mic...

Page 6: ...iv Dakota Series Owner s Manual Introduction Power key Touchscreen mini USB connector under weather cap Latch Mounting spine Battery cover...

Page 7: ...In the UK contact Garmin Europe Ltd by phone at 0808 2380000 In Europe go to www garmin com support and click Contact Support for in country support information or contact Garmin Europe Ltd by phone a...

Page 8: ...attery cover 2 Insert the battery Align the positive and negative markings on the device with the battery 3 Replace the battery cover To select the battery type 1 Touch Setup System Battery Type 2 Tou...

Page 9: ...nt screen touches 1 Press and quickly release 2 Touch Lock Screen or Unlock Screen Acquiring GPS Satellite Signals Before the Dakota can find your current location and navigate a route you must acquir...

Page 10: ...cations Creating Waypoints Waypoints are locations you record and store in the Dakota To mark your current location as a waypoint 1 Touch Mark Waypoint 2 Touch Save and Edit 3 Touch an item from the l...

Page 11: ...waypoints page 4 Tracks a list of tracks page 14 Routes a list of routes page 13 All POI Points of Interest if supported by the preloaded or optional mapping various POIs may be listed Coordinates en...

Page 12: ...vigate to a point on the map 1 Touch Map 2 Touch a point on the map 3 Touch the information button at the top of the screen Information button 4 Touch Go Compass 5 Use the compass to navigate to your...

Page 13: ...ination as indicated on page 9 Stop Navigating To stop navigating touch Where To Stop Navigation Using the Map To use the map 1 Touch Map Your current location is indicated by a location marker 2 Touc...

Page 14: ...Map Show Data Fields 2 Touch Never When Navigating or Always To change the Map page data fields 1 On the Map page touch one of the data fields 2 Touch a data type To save a waypoint on the Map page 1...

Page 15: ...If you maintain a higher speed such as traveling in an automobile the compass uses GPS signals to determine your direction To turn the electronic compass off see page 28 To open the Compass page Touch...

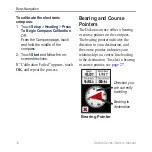
Page 16: ...ctions If Calibration Failed appears touch OK and repeat the process Bearing and Course Pointers The Dakota can use either a bearing or course pointer on the compass The bearing pointer indicates the...

Page 17: ...on indicator The course pointer provides an indication of drift right or left according to the scale shown at the edge of the compass ring The scale refers to the distance between dots on the course d...

Page 18: ...int 1 Touch Waypoint Manager 2 Touch the waypoint 3 Touch the attribute 4 Touch letters numbers or symbols to make the changes 5 Touch except when changing a symbol Change other attributes if necessar...

Page 19: ...t until the route is complete 6 Touch to save the route 7 Touch Where To Routes to navigate the route Viewing Stored Routes To view a route on the map 1 Touch Route Planner 2 Touch the route you want...

Page 20: ...ute To delete a route 1 Touch Route Planner 2 Touch the route you want to delete Delete Route Viewing the Active Route 1 Touch Active Route The points on your current route are shown 2 Touch a point f...

Page 21: ...t page 16 for your current track Save Track saves your current route Save Portion allows you to select a portion of your current track to save To clear your current track Touch Setup Reset Clear Curre...

Page 22: ...page 28 1 Touch Elevation Plot to open the Elevation Plot page 2 To adjust the distance or time scale touch the scale and then touch or 3 To display elevation data touch a point on the plot The time d...

Page 23: ...unit indicates when it is ready to receive data 4 On the sending unit touch Send 5 On the sending unit touch the category of data to send 6 On the sending unit touch an item to send and touch Send 7...

Page 24: ...w the on screen instructions Waypoint Averaging refine a waypoint location with multiple samples to achieve the most accurate location possible Follow the on screen instructions For more information r...

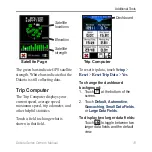
Page 25: ...current speed average speed maximum speed trip odometer and other helpful statistics Touch a field to change what is shown in that field Trip Computer Dashboard To reset trip data touch Setup Reset Re...

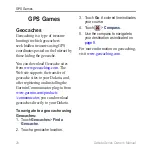
Page 26: ...ansfer of geocache sites to your Dakota and after registering and installing the Garmin Communicator plug in from www garmin com products communicator you can download geocaches directly to your Dakot...

Page 27: ...tically as part of your current profile Setting Up Profiles To change a profile 1 On the Main menu touch Profile Change Your current profile is indicated on the screen 2 Touch the profile you want to...

Page 28: ...age select the text language on the Dakota Changing the text language does not change the language of user entered data or map data such as street names Battery Type select the type of battery you are...

Page 29: ...n to use while driving Auto Zoom automatically selects the appropriate zoom level for optimal use on your map When Off is selected you must zoom in or out manually Show Data Fields hide or show data f...

Page 30: ...tation of your tracks Interval select a track log recording rate Recording points more frequently creates a more detailed track but fills the track log faster Customizing the Main Menu You can rearran...

Page 31: ...your routes Lock On Road lock the current location marker on the nearest road compensating for variances in map position accuracy requires routable maps Off Road Transitions select a transition method...

Page 32: ...d when you drift more than a specified distance Off Course Alarm set an alarm to sound when you are a specified distance off course Deep Water set an alarm to sound when you enter an area of water tha...

Page 33: ...ading shown on the compass Directional Letters sets the Compass page reading to directional letters N S E W Numeric Degrees sets the Compass page reading to degrees 0 359 Mils sets the Compass page re...

Page 34: ...low the altimeter to self calibrate each time you turn the Dakota on Barometer Mode select Variable Elevation used when moving or Fixed Elevation used when stationary allowing the altimeter to functio...

Page 35: ...used with an optional Garmin heart rate monitor to display your heart rate It can also be used with an optional Garmin cadence bike sensor to display your pedaling cadence When connected to the appro...

Page 36: ...new 5 A Connected message appears Note To prevent your Dakota from communicating with wireless sensors touch Setup Fitness Heart Rate Monitor or Bike Cadence Sensor Off Reset 1 Touch Setup Reset 2 To...

Page 37: ...re rating of the Dakota may exceed the usable range of some batteries Some batteries can rupture at high temperatures Power Source Two AA batteries alkaline NiMH or lithium Battery Life Up to 20 hours...

Page 38: ...and Southern latitudes Resolution 1 degree Altimeter Accuracy 10 ft 3 m Resolution 1 ft 3 m Range from 2 000 ft to 30 000 ft from 610 to 9144 m Subject to proper user calibration Using Demo Mode Demo...

Page 39: ...ng a microSD Card note The microSD option is unavailable with the Dakota 10 The Dakota microSD data card tray is located beneath the AA batteries You can purchase microSD memory cards from an electron...

Page 40: ...d the battery cover In addition to map and data storage the microSD card can be used to store files such as images cartridges geocaches routes waypoints and custom POIs Transferring Files to Your Comp...

Page 41: ...98 Me or NT It is also not compatible with Mac OS 10 3 or earlier To load a file onto the Dakota or microSD card 1 Remove the battery cover and insert a microSD card page 33 2 Connect the USB cable t...

Page 42: ...3 Using a backlight level above 50 of maximum level for a prolonged period of time will significantly decrease battery life Select a shorter backlight timeout page 22 Turn tones off if not needed pag...

Page 43: ...n place To remove the clip lift the bottom of the clip and slide the clip off the mounting spine Calibrating the Touchscreen The Dakota screen does not normally require calibration However if the butt...

Page 44: ...t treaties You further acknowledge that the structure organization and code of the Software are valuable trade secrets of Garmin and that the Software in source code form remains a valuable trade secr...

Page 45: ...eout 22 barometer mode 28 battery 2 optimal battery type 36 replacing 2 bearing 27 C cadence sensor 29 calculator 17 calendar 17 calibration altimeter 29 compass 9 carabiner 37 Communicator Garmin 20...

Page 46: ...5 mark waypoint 4 microSD card installing 33 loading files 35 mils 27 N navigation 5 stop 7 north reference compass 27 north up 23 numeric degrees 27 O off road 24 off road transitions 25 on road for...

Page 47: ...soundings 25 stop navigating 7 stopwatch 18 sun and moon 17 T text size maps 23 timeout backlight 22 time zone 26 tones 22 tracks clearing current 15 recording 24 setup 24 viewing 15 track up 23 trip...

Page 48: ...9 2010 Garmin Ltd or its subsidiaries Garmin International Inc 1200 East 151st Street Olathe Kansas 66062 USA Garmin Europe Ltd Liberty House Hounsdown Business Park Southampton Hampshire SO40 9LR UK...

Reviews: