background image

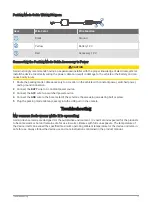
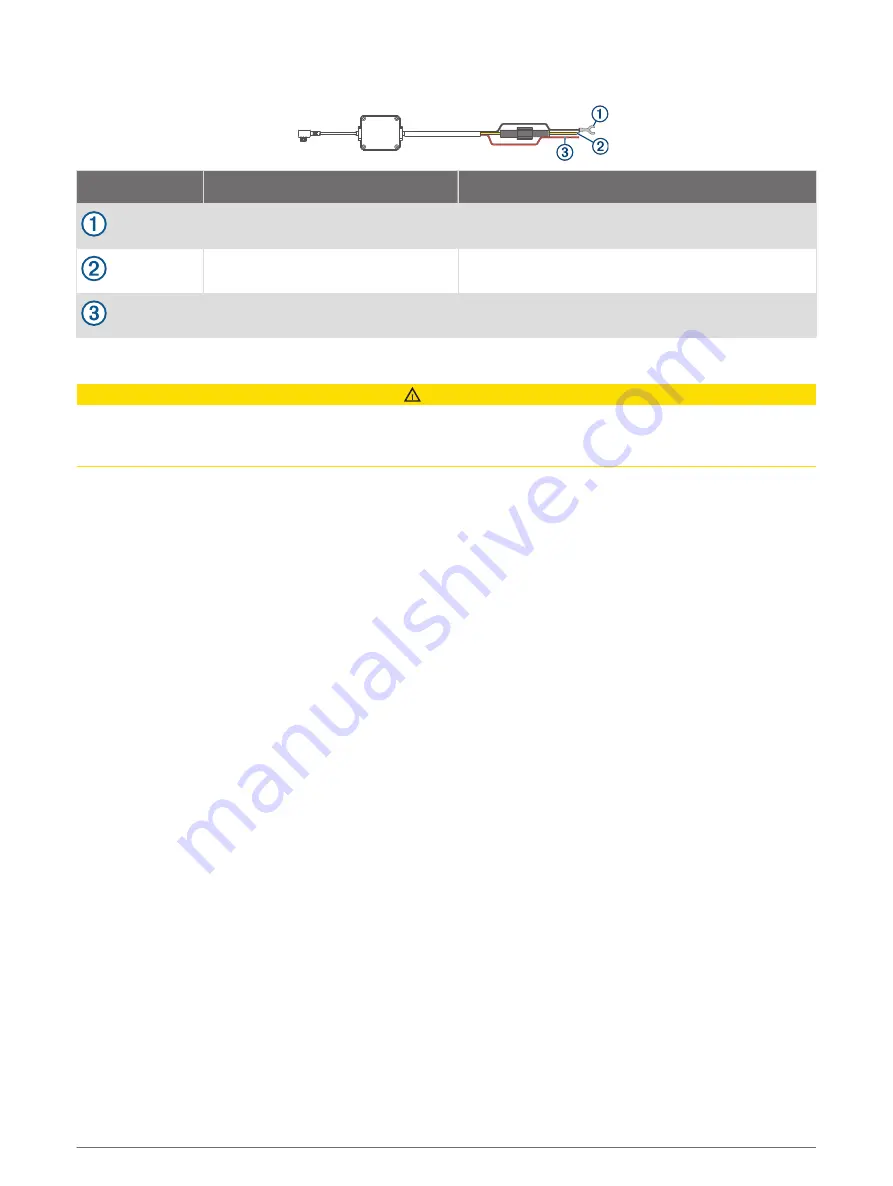
Parking Mode Cable Wiring Diagram

Item

Wire Color

Wire Function

Black

Ground

Yellow

Battery 12 V

Red

Accessory 12 V

Connecting the Parking Mode Cable Accessory to Power

 CAUTION

Garmin strongly recommends having an experienced installer with the proper knowledge of electrical systems 
install the device. Incorrectly wiring the power cable can result in damage to the vehicle or the battery and can 
cause bodily injury.

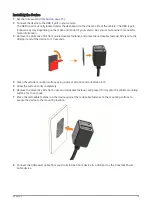
Route the parking mode cable accessory to a location in the vehicle with constant power, switched power, 

and a ground connection.

Connect the BATT wire to a constant power source.
Connect the ACC wire to a switched power source.
Connect the GND wire to the bare metal of the vehicle's chassis using an existing bolt or screw.
Plug the parking mode cable accessory into the USB port on the camera.

Troubleshooting

My camera feels warm while it is operating

Garmin dash cameras are designed for the automotive environment. It is normal and expected for the products 
to become warm or hot and remain safe for use in warm climates with full sun exposure. The temperature of 
the device itself can exceed the specified maximum operating ambient temperature for the device and remain 
safe for use. Always follow the device use and care instructions contained in the product manual.

Troubleshooting

17

Summary of Contents for Dash Cam Mini 2

Page 1: ...GARMINDASHCAM MINI2 Owner sManual ...

Page 2: ...dates and supplemental information concerning the use of this product Garmin and the Garmin logo are trademarks of Garmin Ltd or its subsidiaries registered in the USA and other countries Garmin Dash Cam Garmin Drive and Garmin Express are trademarks of Garmin Ltd or its subsidiaries These trademarks may not be used without the express permission of Garmin The BLUETOOTH word mark and logos are own...

Page 3: ... Connecting the Camera to Your Computer 9 Vault Storage 9 Sharing a Video 9 Removing a Video from the Vault 9 Upgrading Your Vault Subscription 10 Multiple Camera Network 10 Creating Picture in Picture Multi Camera Videos 10 Settings 10 Camera Settings in the Garmin Drive App 11 Renaming a Camera 11 Device Information 12 Status LEDs 12 Cleaning the Camera Lens 13 Updating Your Device Using the Gar...

Page 4: ......

Page 5: ... page 13 A memory card is included with some device models 1 Insert the memory card into the slot 2 Press it in until it clicks Removing the Memory Card NOTICE Removing the memory card while the camera is turned on can result in a loss of data or damage to the camera 1 Disconnect the power cable from the camera 2 Wait for both status LEDs to turn off 3 Press the memory card in until it clicks 4 Re...

Page 6: ...to enable or disable audio recording Hold to format the memory card Formatting the Memory Card page 5 Press to save a picture and a video clip Hold to enter pairing mode Pairing with Your Smartphone page 5 2 Getting Started ...

Page 7: ...100 F 1 Clean the windshield using water or alcohol and a lint free cloth The windshield must be free of dust wax oils or coatings 2 Remove the protective film from the mount adhesive 3 Position the mount over the mounting location TIP The adhesive is extremely sticky Avoid touching the adhesive to the windshield until the mount is properly positioned and aligned 4 Press the mount firmly onto the ...

Page 8: ...h Cam Mini 2 power cable into the included power adapter 4 Plug the power adapter into a power outlet in your vehicle 5 If necessary turn on the vehicle ignition switch to provide power to the power outlet in your vehicle The device turns on Turning Off the Device Manually The camera does not have a power button It turns on automatically when it receives power and it turns off when it stops receiv...

Page 9: ... app license agreements If you are pairing an additional Garmin device or camera with your smartphone select Add Another Device 5 Follow the on screen instructions to complete the pairing and setup process The main app dashboard appears After the devices are paired they connect automatically when they are turned on and within range Connecting Your Camera to a Wi Fi Network NOTICE Connecting to a p...

Page 10: ...Say a command To save a video say Save Video To take a picture say Take a Picture To record audio with the video say Record Audio To record video without audio say Stop Audio The camera plays a tone when it recognizes your command Turning Voice Control On or Off You can turn voice control on or off from the Garmin Drive app on your smartphone From the device settings menu select Voice Commands and...

Page 11: ...ponsibility to know and follow all laws and restrictions for your jurisdiction The device can record audio using the integrated microphone while recording video You can turn audio recording on or off at any time Press TIP You can also use voice controls to enable or disable audio recording Voice Control page 6 The microphone LED turns red while audio is recording Event Detection By default the dev...

Page 12: ...ure in the Garmin Drive app 1 From the Garmin Drive app on your smartphone select Live View The app scans for available cameras 2 If necessary select your camera from the list of available devices The live view appears Editing and Exporting a Video You can trim the length of your video to remove unnecessary footage before exporting it to the Vault 1 While viewing a video drag the trimming handles ...

Page 13: ...tomatically when the device detects an incident 101PHOTO Contains photos 102SAVED Contains videos saved manually by the user 103PARKM Contains videos saved while parked 104UNSVD Contains unsaved video footage The device overwrites the oldest unsaved video when the storage space for unsaved videos is full Vault Storage You can upload manage and share dash camera footage on a secure online storage d...

Page 14: ...ecorded at the same time on two cameras 1 From the Garmin Drive app select Review Footage 2 Select a multi camera video Multi camera videos are indicated by multiple camera icons on the video thumbnail The app automatically combines video recorded at the same time into one multi camera video icon 3 Select and to choose the camera footage to use for the fullscreen portion of the video 4 Drag the ha...

Page 15: ...ootage When the Delete When Full option is selected the device deletes the oldest unsaved video when the memory card storage is full When the Promptly Delete option is selected the device continually deletes unsaved video more than three minutes old and deletes all unsaved video each time it is powered off This is useful to help protect data privacy Parking Guard Enables parking guard and adjusts ...

Page 16: ...nected to a computer in mass storage mode The memory card is being formatted Flashing green The device is preparing to record Flashing green alternating with microphone LED An update is being installed Red Video is recording Flashing red A photo or video is being saved Flashing red slowly The device is in Parking Guard mode Alternating red and yellow The memory card is low on space or is underperf...

Page 17: ... the device turns off 3 Connect the device to power The device installs the software update NOTE Footage is not recorded while the software is updating Product Updates On your computer install Garmin Express www garmin com express This provides easy access to these services for Garmin devices Software updates Product registration Setting Up Garmin Express 1 Connect the device to your computer usin...

Page 18: ... connects to the OBD II port in your vehicle The device can power up to two dash cameras for a selected length of time after you turn off your vehicle For more information or to purchase a Constant Power Cable go to garmin com Getting Started WARNING When installing the device in a vehicle you must install the device securely so it does not interfere with the vehicle operating controls such as the...

Page 19: ...ress the reclosable fastener firmly onto the USB port end of the device for 10 seconds 4 Clean the vehicle mounting surface using water or alcohol and a lint free cloth 5 Allow the surface to dry completely 6 Remove the protective film from a second reclosable fastener and press it firmly onto the vehicle mounting surface for 10 seconds 7 Press the reclosable fastener on the device against the rec...

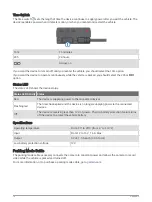
Page 20: ...us Red The device is supplying power to the connected devices Flashing red The timer has expired and the device is no longer supplying power to the connected devices Off The device is receiving less than 12 V of power The low battery protection feature turns off the device to protect the vehicle battery Specifications Operating temperature From 20 to 45 C from 4 to 113 F Input From 12 to 16 V 1 6 ...

Page 21: ...t the BATT wire to a constant power source 3 Connect the ACC wire to a switched power source 4 Connect the GND wire to the bare metal of the vehicle s chassis using an existing bolt or screw 5 Plug the parking mode cable accessory into the USB port on the camera Troubleshooting My camera feels warm while it is operating Garmin dash cameras are designed for the automotive environment It is normal a...

Page 22: ...r capacity memory cards are overwritten less frequently they usually last longer Use a high quality memory card with a speed rating of class 10 or higher Purchase your replacement memory card from a high quality manufacturer and a reputable vendor My video recordings are blurry Clean the camera lens Cleaning the Camera Lens page 13 Clean the windshield in front of the camera Verify the area of the...

Page 23: ...lling 1 microSD card 1 13 18 mobile app 5 mounting windshield 3 multi factor authentication 6 multiple cameras 10 O operating temperature 17 P pairing phone 5 parking guard 14 parking mode cable 17 phone pairing 5 photos viewing 9 power key 4 S settings 10 11 setup 4 smartphone features connecting 5 software updating 13 T troubleshooting 17 18 U updating software 13 V video deleting 8 editing 10 l...

Page 24: ...support garmin com GUID 8EFC497C 4031 46EE AC26 B0AE4B3CE8BD v1 June 2021 ...

Reviews: