background image

2

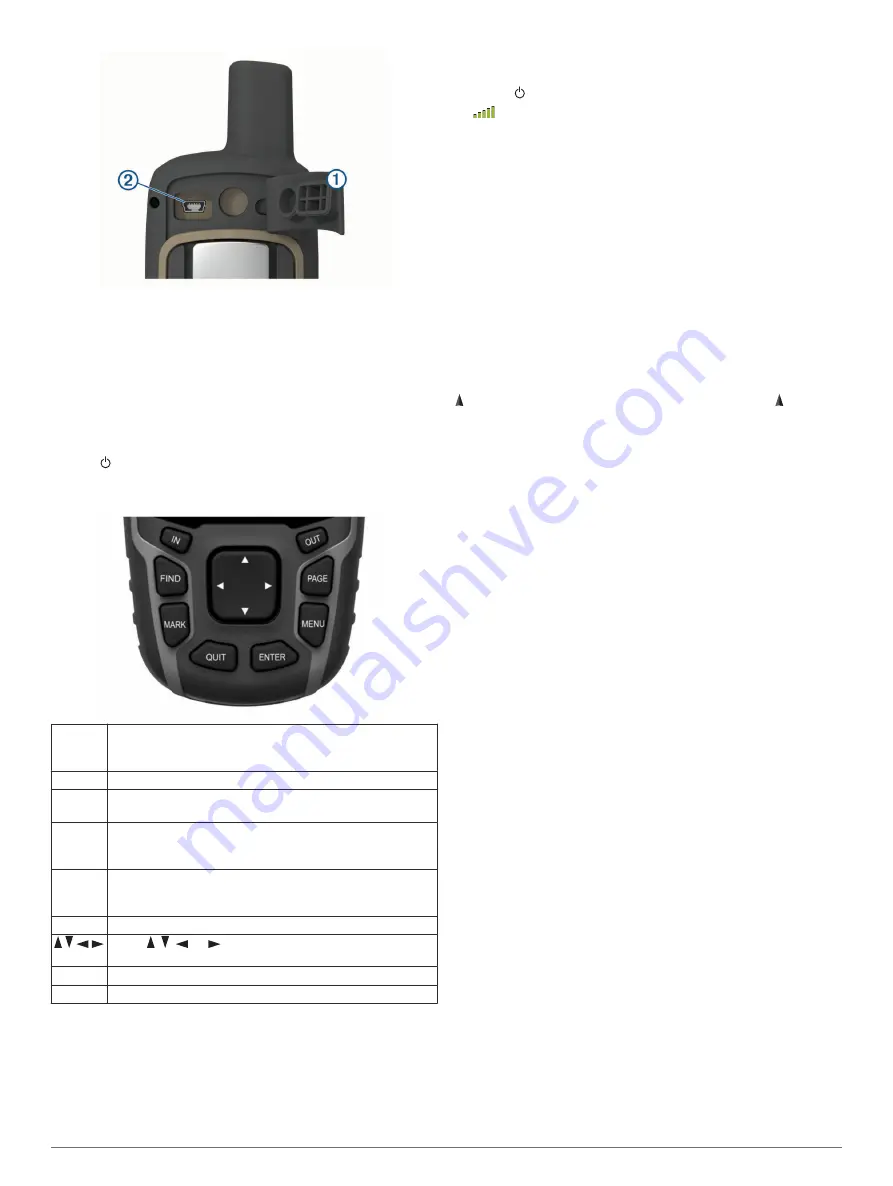
Plug the small end of the USB cable into the mini-USB port.

3

Plug the USB end of the cable into an AC adapter or a 

computer USB port.

4

If necessary, plug the AC adapter into a standard wall outlet.
When you connect the device to a power source, the device 

turns on.

5

Charge the battery completely.

Turning On the Device

Hold  .

Buttons

FIND

Select to open the search menu.
Hold to mark your current location as a man overboard 
(MOB) location and activate navigation.

MARK

Select to save your current location as a waypoint.

QUIT

Select to cancel or return to the previous menu or page.
Select to scroll through the main pages.

ENTER

Select to choose options and acknowledge messages.
Select to control the current activity recording (from the Map, 
Compass, Altimeter, and Trip Computer pages).

MENU

Select to open the options menu for the page that is 
currently open.
Select twice to open the main menu (from any page).

PAGE

Select to scroll through the main pages.


Select  ,  ,  , or   to select menu options and move the 
map cursor.

IN

Select to zoom in on the map.

OUT

Select to zoom out on the map.

Acquiring Satellite Signals

It may take 30 to 60 seconds to acquire satellite signals.

1

Go outdoors to an open area.

2

If necessary, turn on the device.

3

Wait while the device searches for satellites.

A question mark flashes while the device determines your 

location.

4

Select   to open the status page.

 shows the satellite signal strength.

When the bars are full, the device has acquired satellite signals.

Using the Main Pages

The information needed to operate this device is found on the 

main menu, map, compass, trip computer, and elevation plot 

pages.

Select 

PAGE

 to choose the active main page.

Opening the Main Menu

The main menu gives you access to tools and setup screens for 

waypoints, activities, routes, and more (

Additional Main Menu 

Tools

, page 7

).

From any page, select 

MENU

 twice.

Map

 represents your location on the map. As you travel,   moves 

and displays your path. Depending on your zoom level, waypoint 

names and symbols may appear on the map. You can zoom in 

on the map to see more detail. When you are navigating to a 

destination, your route is marked with a colored line on the map.

Changing the Map Orientation

1

From the map, select 

MENU

.

2

Select 

Setup Map

 > 

Orientation

.

3

Select an option:
• Select 

North Up

 to show north at the top of the page.

• Select 

Track Up

 to show your current direction of travel at 

the top of the page.

• Select 

Automotive Mode

 to show an automotive 

perspective with the direction of travel at the top.

Measuring Distance on the Map

You can measure the distance between two locations.

1

From the map, select a location.

2

Select 

MENU

 > 

Measure Distance

.

3

Move the pin to another location on the map.

Map Settings

Select 

Setup

 > 

Map

.

Orientation

: Adjusts how the map is shown on the page. North 

Up shows north at the top of the page. Track Up shows a top-

down view with your current direction of travel toward the top 

of the page. Automotive Mode shows an 3D automotive view 

with the direction of travel at the top.

Data Fields

: Customizes the data fields and dashboards of the 

map, compass, elevation plot, and trip computer.

Advanced Map Setup

: Enables you to open advanced map 

settings (

Advanced Map Settings

, page 2

).

Map Information

: Enables or disables the maps currently 

loaded on the device.

Advanced Map Settings

Select 

Setup

 > 

Map

 > 

Advanced Map Setup

.

Auto Zoom

: Automatically selects the appropriate zoom level 

for optimal use on your map. When Off is selected, you must 

zoom in or out manually.

Zoom Levels

: Adjusts the zoom level at which map items will 

appear. The map items will not appear when the map zoom 

level is higher than the selected level.

2

Using the Main Pages

Summary of Contents for Drivesmart 65

Page 1: ...GPSMAP 65 65S Owner sManual...

Page 2: ...irp Garmin Connect Garmin Explore Garmin Express HomePort and tempe are trademarks of Garmin Ltd or its subsidiaries These trademarks may not be used without the express permission of Garmin The BLUET...

Page 3: ...Proximity Alarm 6 Selecting a Profile 6 Area Calculation 6 Calculating the Size of an Area 6 Satellite Page 6 GPS Satellite Settings 6 Garmin Adventures 6 Sending Files to BaseCamp 6 Creating an Adve...

Page 4: ...Troubleshooting 13 Restarting the Device 13 Viewing Device Information 13 Restoring All Default Settings 13 Index 14 ii Table of Contents...

Page 5: ...es are removed Installing AA Batteries Instead of the optional NiMH battery pack Installing a NiMH Battery Pack page 1 you can use two alkaline NiMH or lithium batteries This is useful when you are on...

Page 6: ...ls and setup screens for waypoints activities routes and more Additional Main Menu Tools page 7 From any page select MENU twice Map represents your location on the map As you travel moves and displays...

Page 7: ...he compass settings Select Setup Heading Display Sets the type of directional heading shown on the compass North Reference Sets the north reference used on the compass Go To Line Pointer Sets the beha...

Page 8: ...s a straight colored line on the map Editing a Waypoint 1 Select Waypoint Manager 2 Select a waypoint 3 Select an item to edit such as the name 4 Enter the new information and select Done Deleting a W...

Page 9: ...using clues and GPS coordinates Downloading Geocaches Using a Computer You can load geocaches manually onto your device using a computer Transferring Files to Your Device page 12 You can place the geo...

Page 10: ...cond removable drive On Mac computers the device and memory card appear as mounted volumes NOTE Some computers with multiple network drives may not display device drives properly See your operating sy...

Page 11: ...from the app store on your smartphone or you can go to explore garmin com Additional Main Menu Tools Select MENU Alarm Clock Sets an audible alarm If you are not currently using the device you can se...

Page 12: ...ll areas Always rely on posted road signs for actual speed limits Speed Maximum The highest speed reached since the last reset Speed Moving Avg The average speed while moving since the last reset Spee...

Page 13: ...f time before the backlight turns off Battery Save Saves the battery power and prolongs the battery life by turning off the screen when the backlight times out Colors Changes the appearance of the dis...

Page 14: ...ometric pressure should only change due to weather Pressure Trending Sets how the device records pressure data Save Always records all pressure data which can be helpful when you are watching for pres...

Page 15: ...strap through the loop and pull it tight Device Care NOTICE Avoid chemical cleaners solvents and insect repellents that can damage plastic components and finishes Do not store the device where prolong...

Page 16: ...lect a file 4 Press the Delete key on your keyboard NOTE If you are using an Apple computer you must empty the Trash folder to completely remove the files Disconnecting the USB Cable If your device is...

Page 17: ...y each time it is activated This process occurs automatically when you turn on the Garmin device and only takes a few seconds when the accessories are activated and functioning correctly When paired y...

Page 18: ...rchasing 5 settings 2 updating 11 zoom 2 marine alarms setup 9 settings 9 measuring distances 2 memory card 11 microSD card See memory card Multi Band 9 N navigating 3 navigation 3 stopping 4 notifica...

Page 19: ......

Page 20: ...support garmin com GUID EA40F185 39D1 4C3B B512 7AA823FA3DB5 v1 September 2020...

Reviews: