background image

Connecting the Device to a Transducer

Go to 

garmin.com/transducers

 or contact your local Garmin dealer to determine the appropriate type of 

transducer for your needs.
NOTE: If you use an existing transducer and the transducer cable pin connector does not match the device port, 
you may be able to use a transducer cable adapter to connect your existing transducer to this device. Go to 

garmin.com

 for more information about transducer accessories.
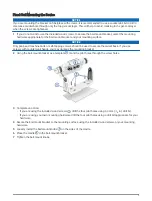
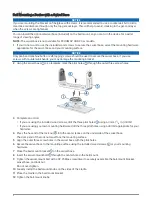
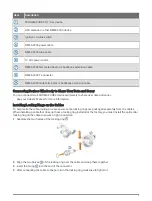
Follow the instructions provided with your transducer to correctly install it on your boat.
Route the transducer cable to the back of your device, away from sources of electrical interference.
Connect the transducer cable to the appropriate port on the cradle.
If the device behaves erratically, the cable connector may not be fully seated. Disconnect the cable connector 
from the port, check the pin alignment, and firmly push the connector into the port.

NMEA 2000 Considerations

NOTICE

If you are connecting to an existing NMEA 2000 network, identify the NMEA 2000 power cable. Only one NMEA 
2000 power cable is required for the NMEA 2000 network to operate properly.
A NMEA 2000 Power Isolator (010-11580-00) should be used in installations where the existing NMEA 2000 
network manufacturer is unknown.
If you are installing a NMEA 2000 power cable, you must connect it to the boat ignition switch or through 
another in-line switch. NMEA 2000 devices will drain your battery if the NMEA 2000 power cable is connected to 
the battery directly.

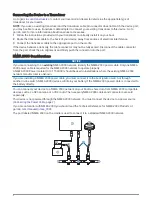
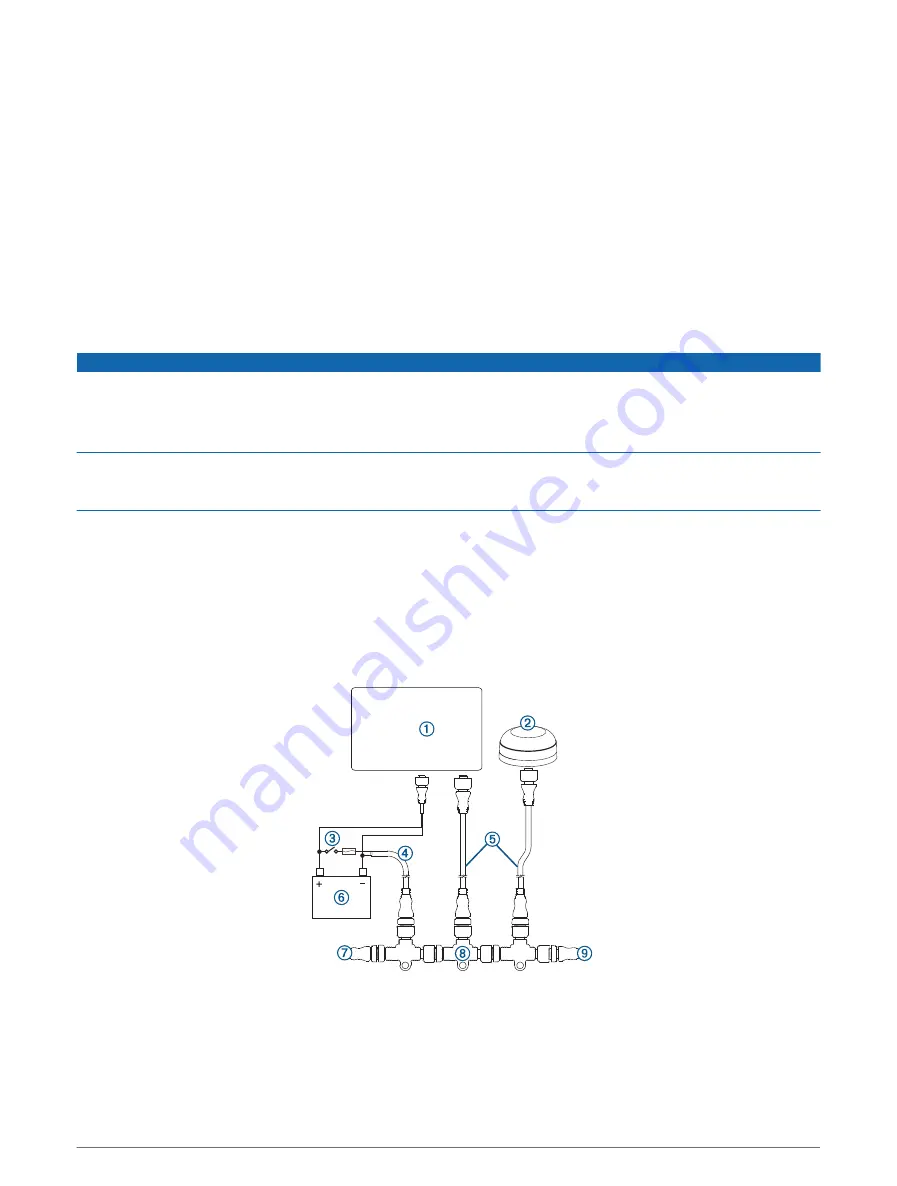
You can connect your device to a NMEA 2000 network on your boat to share data from NMEA 2000 compatible 
devices such as a GPS antenna or a VHF radio. The necessary NMEA 2000 cables and connectors are sold 
separately.
This device is not powered through the NMEA 2000 network. You must connect the device to a power source 
(

Connecting the Power Cable, page 7

).

If you are unfamiliar with NMEA 2000, you should read the Technical Reference for NMEA 2000 Products at 

garmin.com/manuals/nmea_2000

.

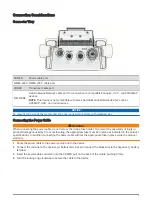
The port labeled NMEA 2000 on the cradle is used to connect it to a standard NMEA 2000 network.

8

Summary of Contents for ECHOMAP UHD2 6 SV

Page 1: ...and vessel disconnect the vessel s power supply before beginning to install the device To avoid possible personal injury or damage to the device or vessel before applying power to the device make sure...

Page 2: ...ilt the device NOTE The swivel base is not available for ECHOMAP UHD2 9 sv models Flush mount You can mount the device in the dashboard which provides a more integrated installation Before permanently...

Page 3: ...apping screws should be used to secure the swivel base If you use screws with countersunk heads you may damage the mounting bracket 2 Using the bail mount bracket as a template mark the pilot holes th...

Page 4: ...s a template mark the pilot holes through the outer three screw holes 3 Complete an action If you are using the included wood screws drill the three pilot holes using a 3 mm 1 8 in drill bit If you ar...

Page 5: ...the solid line on the template to prepare the mounting surface for cutting 4 Using a rotary cutting tool or jigsaw cut the mounting surface along the inside of the solid line indicated on the template...

Page 6: ...9 sv models the top and bottom gasket pieces are not interchangeable and are labeled to help install correctly Be sure to use the appropriate gasket pieces on the top and bottom to avoid water ingres...

Page 7: ...ecting the power cable do not remove the in line fuse holder To prevent the possibility of injury or product damage caused by fire or overheating the appropriate fuse must be in place as indicated in...

Page 8: ...If you are connecting to an existing NMEA 2000 network identify the NMEA 2000 power cable Only one NMEA 2000 power cable is required for the NMEA 2000 network to operate properly A NMEA 2000 Power Iso...

Page 9: ...and sonar See your Owner s Manual for more information Installing Locking Rings on the Cables To help make the cable routing process easier some locking rings are packaged separately from the cables W...

Page 10: ...ntil the device clicks in place On a 6xsv device press the device into the cradle until it clicks in place Removing the Device from the Cradle 1 Perform an action On a 7 sv or 9 sv device press the bu...

Page 11: ...701 m 2 300 ft at 77 kHz 6Xsv Models Dimensions device and cradle only W x H x D 206 x 131 x 67 mm 81 8 x 53 16 x 25 8 in Dimensions in bail mount with sun cover W x H x D 244 x 155 x 99 mm 95 8 x 61...

Page 12: ...draw at 12 Vdc RMS 1 52 A Max current draw at 12 Vdc peak 3 2 A Compass safe distance 25 5 cm 10 in 9Xsv Models Dimensions device only W x H x D 264 x 166 x 80 mm 103 8 x 69 16 x 33 16 in Dimensions...

Page 13: ...2 SJ T11364 GB T26572 GB T26572 391 A 37 021 60737675 400 819 1899 68 02 2642 8999 02 2642 9199 3 8 2 13...

Page 14: ...rmin Ltd or its subsidiaries registered in the USA and other countries ECHOMAP is a trademark of Garmin Ltd or its subsidiaries These trademarks may not be used without the express permission of Garmi...

Reviews: