background image

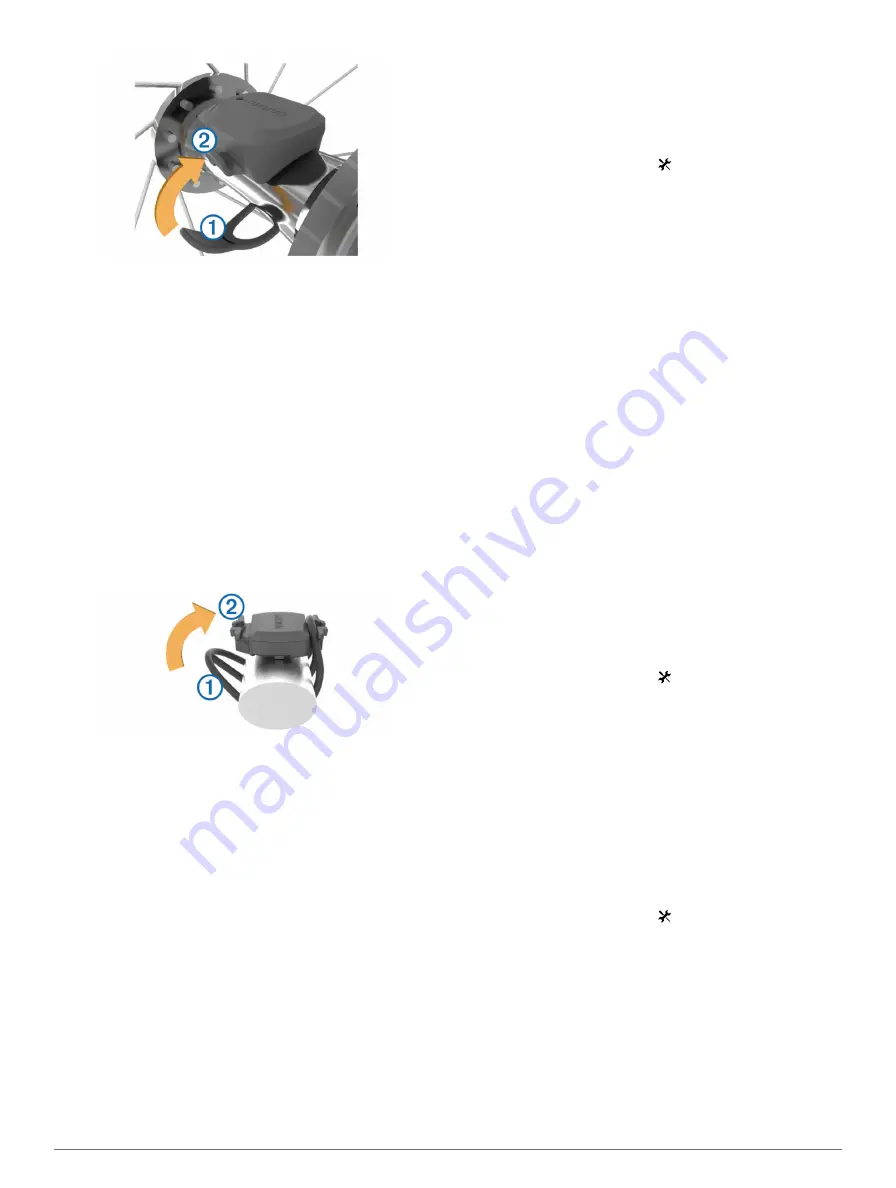
The sensor may be tilted when installed on an asymmetrical 

hub. This does not affect operation.

3

Rotate the wheel to check for clearance.
The sensor should not contact other parts of your bike.

NOTE: 

The LED flashes green for five seconds to indicate 

activity after two revolutions.

Installing the Cadence Sensor

NOTE: 

If you do not have this sensor, you can skip this task.

TIP: 

Garmin recommends you secure your bike on a stand 

while installing the sensor.

1

Select the band size that fits your crank arm securely.
The band you select should be the smallest one that 

stretches across the crank arm.

2

On the non-drive side, place and hold the flat side of the 

cadence sensor on the inside of the crank arm.

3

Pull the bands 

À

 around the crank arm, and attach them to 

the hooks 

Á

 on the sensor.

4

Rotate the crank arm to check for clearance.
The sensor should not contact the chain stay, other parts of 

your bike, or your shoe.

NOTE: 

The LED flashes green for five seconds to indicate 

activity after two revolutions.

About the Speed and Cadence Sensors

Cadence data from the cadence sensor is always recorded. If 

no speed and cadence sensors are paired with the device, GPS 

data is used to calculate the speed and distance.
Cadence is your rate of pedaling or “spinning” measured by the 

number of revolutions of the crank arm per minute (rpm).

Data Averaging for Cadence or Power

The non-zero data-averaging setting is available if you are 

training with an optional cadence sensor or power meter. The 

default setting excludes zero values that occur when you are 

not pedaling.
You can change the value of this setting (

Data Recording 

Settings

).

Pairing Your ANT+ Sensors

Before you can pair, you must put on the heart rate monitor or 

install the sensor.

Pairing is the connecting of ANT+ wireless sensors, for 

example, connecting a heart rate monitor with your Garmin 

device.

1

Bring the device within 3 m (10 ft.) of the sensor.

NOTE: 

Stay 10 m (33 ft.) away from other riders' ANT+ 

sensors while pairing.

2

From the home screen, select   > 

Sensors

 > 

Add Sensor

.

3

Select an option:
• Select a sensor type.
• Select 

Search All

 to search for all nearby sensors.

A list of available sensors appears.

4

Select one or more sensors to pair with your device.

5

Select 

Add

.

6

If necessary, select 

Connect

.

When the sensor is paired with your device, the sensor 

status is 

Connected

. You can customize a data field to 

display sensor data.

Training with Power Meters

• Go to 

www.garmin.com/intosports

 for a list of ANT+ sensors 

that are compatible with your device (such as Vector™).

• For more information, see the owner's manual for your power 

meter.

• Adjust your power zones to match your goals and abilities 

(

Setting Your Power Zones

).

• Use range alerts to be notified when you reach a specified 

power zone (

Setting Range Alerts

).

• Customize the power data fields (

Customizing the Data 

Pages

).

Setting Your Power Zones

The values for the zones are default values and may not match 

your personal abilities. You can manually adjust your zones on 

the device or using Garmin Connect. If you know your functional 

threshold power (FTP) value, you can enter it and allow the 

software to calculate your power zones automatically.

1

From the home screen, select   > 

Training Zones

 > 

Power 

Zones

.

2

Enter your FTP value.

3

Select 

Based On:

.

4

Select an option:
• Select 

Watts

 to view and edit the zones in watts.

• Select 

% FTP

 to view and edit the zones as a percentage 

of your functional threshold power.

Calibrating Your Power Meter

Before you can calibrate your power meter, it must be properly 

installed, paired with your device, and actively recording data.
For calibration instructions specific to your power meter, refer to 

the manufacturer's instructions.

1

From the home screen, select   > 

Sensors

 > 

Power

 > 

Calibrate

.

2

Keep your power meter active by pedaling until the message 

appears.

3

Follow the on-screen instructions.

Using Shimano® Di2™ Shifters

Before you can use Di2 electronic shifters, you must pair them 

with your device (

Pairing Your ANT+ Sensors

). You can 

customize the optional Di2 data fields (

Customizing the Data 

Pages

). The Edge device displays current adjustment values 

when the sensor is in adjustment mode.

ANT+ Sensors

7

Summary of Contents for Edge 1000

Page 1: ...Edge 1000 Owner s Manual March 2014 190 01694 00_0A Printed in Taiwan ...

Page 2: ...td or its subsidiaries These trademarks may not be used without the express permission of Garmin The Bluetooth word mark and logos are owned by the Bluetooth SIG Inc and any use of such marks by Garmin is under license Mac is a registered trademark of Apple Computer Inc microSD is a trademark of SD 3C LLC New Leaf is a registered trademark of the Angeion Corporation Training Stress Score TSS Inten...

Page 3: ... Deleting a Ride 8 Viewing Data Totals 8 Sending Your Ride to Garmin Connect 8 Garmin Connect 8 Bluetooth Connected Features 8 Wi Fi Connected Features 8 Data Recording 9 Changing the Data Storage Location 9 Installing a Memory Card 9 Data Management 9 Connecting the Device to Your Computer 9 Transferring Files to Your Device 9 Deleting Files 9 Disconnecting the USB Cable 9 Navigation 9 Locations ...

Page 4: ... Device 15 Clearing User Data 15 Maximizing Battery Life 15 Using Auto Sleep 15 Improving GPS Satellite Reception 15 Getting More Information 15 Temperature Readings 15 Viewing Device Information 15 Replacement O rings 15 Updating the Software 15 Appendix 15 Registering Your Device 15 Data Fields 15 Heart Rate Zone Calculations 17 Wheel Size and Circumference 17 Software License Agreement 17 Index...

Page 5: ...y About the Battery WARNING This device contains a lithium ion battery See the Important Safety and Product Information guide in the product box for product warnings and other important information Installing the Standard Mount For the best GPS reception position the bike mount so the front of the device is oriented toward the sky You can install the bike mount on the stem or the handlebars 1 Sele...

Page 6: ... timer overlay allows you to return to the home screen during a ride Select to save your changes and close the page Select to close the page and return to the previous page Select to return to the previous page Select to return to the home screen Select and to scroll Select to search near a location Select to search by name Select to delete an item Viewing the Connections Page The connections page...

Page 7: ...ps if audible tones are turned on Setting the Device Tones Workouts You can create custom workouts that include goals for each workout step and for varied distances times and calories You can create workouts using Garmin Connect and transfer them to your device You can also create and save a workout directly on your device You can schedule workouts using Garmin Connect You can plan workouts in adv...

Page 8: ...create a course you must have history with GPS track data saved to your device 1 From the home screen select Courses Create New 2 Select an activity on which to base your course 3 Enter a name for the course and select 4 Select The course appears in the list 5 Select the course and review the course data 6 If necessary select Settings to edit the course features For example you can change the name...

Page 9: ... Calendar The calendar on your device is an extension of the training calendar or schedule you set up in Garmin Connect After you have added a few workouts or courses to the Garmin Connect calendar you can send them to your device All scheduled activities sent to the device appear in the calendar When you select a day in the calendar you can view a summary of each scheduled workout course or compl...

Page 10: ...heart rate zones are numbered from 1 to 5 according to increasing intensity Generally heart rate zones are calculated based on percentages of your maximum heart rate Tips for Erratic Heart Rate Data If the heart rate data is erratic or does not appear you can try these tips Reapply moisture to the electrodes and contact patch You can use water saliva or electrode gel Tighten the strap on your ches...

Page 11: ...ile pairing 2 From the home screen select Sensors Add Sensor 3 Select an option Select a sensor type Select Search All to search for all nearby sensors A list of available sensors appears 4 Select one or more sensors to pair with your device 5 Select Add 6 If necessary select Connect When the sensor is paired with your device the sensor status is Connected You can customize a data field to display...

Page 12: ...at activity to Garmin Connect and keep it as long as you want Analyze your data You can view more detailed information about your activity including time distance elevation heart rate calories burned cadence an overhead map view pace and speed charts and customizable reports NOTE Some data requires an optional accessory such as a heart rate monitor Plan your training You can choose a fitness goal ...

Page 13: ...mall end of the USB cable into the USB port on the device 3 Plug the large end of the USB cable into a computer USB port Your device and memory card optional appear as removable drives in My Computer on Windows computers and as mounted volumes on Mac computers Transferring Files to Your Device 1 Connect the device to your computer On Windows computers the device appears as a removable drive or a p...

Page 14: ...ion by projecting the distance and bearing from a marked location to a new location 1 From the home screen select Where To Saved Locations 2 Select a location 3 Select the location information at the top of the screen 4 Select Project Location 5 Enter the bearing and distance to the projected location 6 Select Editing Locations 1 From the home screen select Where To Saved Locations 2 Select a loca...

Page 15: ...rientation 1 Select Activity Profiles 2 Select a profile 3 Select Navigation Map Orientation 4 Select an option Select North Up to show north at the top of the page Select Track Up to show your current direction of travel at the top of the page Select 3D Mode to display the map in three dimensions Advanced Map Settings Select Activity Profiles select a profile and select Navigation Map Map Visibil...

Page 16: ...s an individual who has trained intensely for many years with the exception of minor injuries and has a resting heart rate of 60 beats per minute bpm or less Bluetooth Settings Select Bluetooth Enable Enables Bluetooth wireless technology NOTE Other Bluetooth settings appear only when Bluetooth is enabled Friendly Name Allows you to enter a friendly name that identifies your devices with Bluetooth...

Page 17: ...S off when you are training indoors or to save battery life From the home screen select System GPS GPS Mode Off When GPS is off speed and distance are not available unless you have an optional sensor that sends speed and distance data to the device such as a speed or cadence monitor The next time you turn on the device it will search for satellite signals again Setting Your Elevation If you have a...

Page 18: ...r damage may result Avoid chemical cleaners and solvents that can damage plastic components Secure the weather cap tightly to prevent damage to the USB port Cleaning the Device 1 Wipe the device using a cloth dampened with a mild detergent solution 2 Wipe it dry Caring for the Heart Rate Monitor NOTICE You must unsnap and remove the module before cleaning the strap A build up of sweat and salt on ...

Page 19: ...a away from tall buildings and trees Remain stationary for several minutes Getting More Information Go to www garmin com intosports Go to www garmin com learningcenter Go to http buy garmin com or contact your Garmin dealer for information about optional accessories and replacement parts Temperature Readings The device may display temperature readings that are higher than the actual air temperatur...

Page 20: ...The average heart rate for the current activity HR Avg HRR The average percentage of heart rate reserve maximum heart rate minus resting heart rate for the current activity HR Avg Max The average percentage of maximum heart rate for the current activity HR Graph A line graph showing your current heart rate zone 1 to 5 HR Lap The average heart rate for the current lap HR Lap HRR The average percent...

Page 21: ...obic training reduces stress 2 60 70 Comfortable pace slightly deeper breathing conversation possible Basic cardiovascular training good recovery pace 3 70 80 Moderate pace more difficult to hold conversation Improved aerobic capacity optimal cardiovascular training 4 80 90 Fast pace and a bit uncomfortable breathing forceful Improved anaerobic capacity and threshold improved speed 5 90 100 Sprint...

Page 22: ... and code of the Software for which source code is not provided are valuable trade secrets of Garmin and or its third party providers and that the Software in source code form remains a valuable trade secret of Garmin and or its third party providers You agree not to decompile disassemble modify reverse assemble reverse engineer or reduce to human readable form the Software or any part thereof or ...

Page 23: ... maps 4 finding locations 10 orientation 11 purchasing 11 settings 11 topographical 11 zoom 11 memory card 9 microSD card See memory card mounting the device 1 N navigation 9 10 back to start 10 stopping 10 O O rings See bands on screen buttons 2 P pairing 2 ANT sensors 7 personal records 5 deleting 5 points of interest POI 11 finding 10 power zones 7 power force alerts 3 meters 7 product registra...

Page 24: ...5 00800 4412 454 44 2380 662 915 35 1214 447 460 386 4 27 92 500 0861 GARMIN 427 646 27 0 11 251 9999 34 93 275 44 97 49 0 180 6 427646 20 ct Anruf a d deutschen Festnetz Mobilfunk max 60 ct Anruf 46 7744 52020 Garmin International Inc 1200 East 151st Street Olathe Kansas 66062 USA Garmin Europe Ltd Liberty House Hounsdown Business Park Southampton Hampshire SO40 9LR UK Garmin Corporation No 68 Zh...

Reviews: