background image

Introduction

 WARNING

Always consult your physician before you begin or modify any 

exercise program.
See the 

Important Safety and Product Information

 guide in the 

product box for product warnings and other important 

information.

Getting Started

When using your device the first time, you should complete 

these tasks to set up the device and get to know the basic 

features.

1

Charge the device (

page 1

).

2

Register the device (

page 11

).

3

Learn about the sensor data and modes (

page 1

).

4

Acquire satellites (

page 4

).

5

Go for a hike (

page 2

).

6

Create a waypoint (

page 3

).

Charging the Device

NOTICE

To prevent corrosion, thoroughly dry the contacts and the 

surrounding area before charging or connecting to a computer.

The device is powered by a built-in lithium-ion battery that you 

can charge using a standard wall outlet or a USB port on your 

computer.

1

Plug the USB end of the cable into the AC adapter or a 

computer USB port.

2

Plug the AC adapter into a standard wall outlet.

3

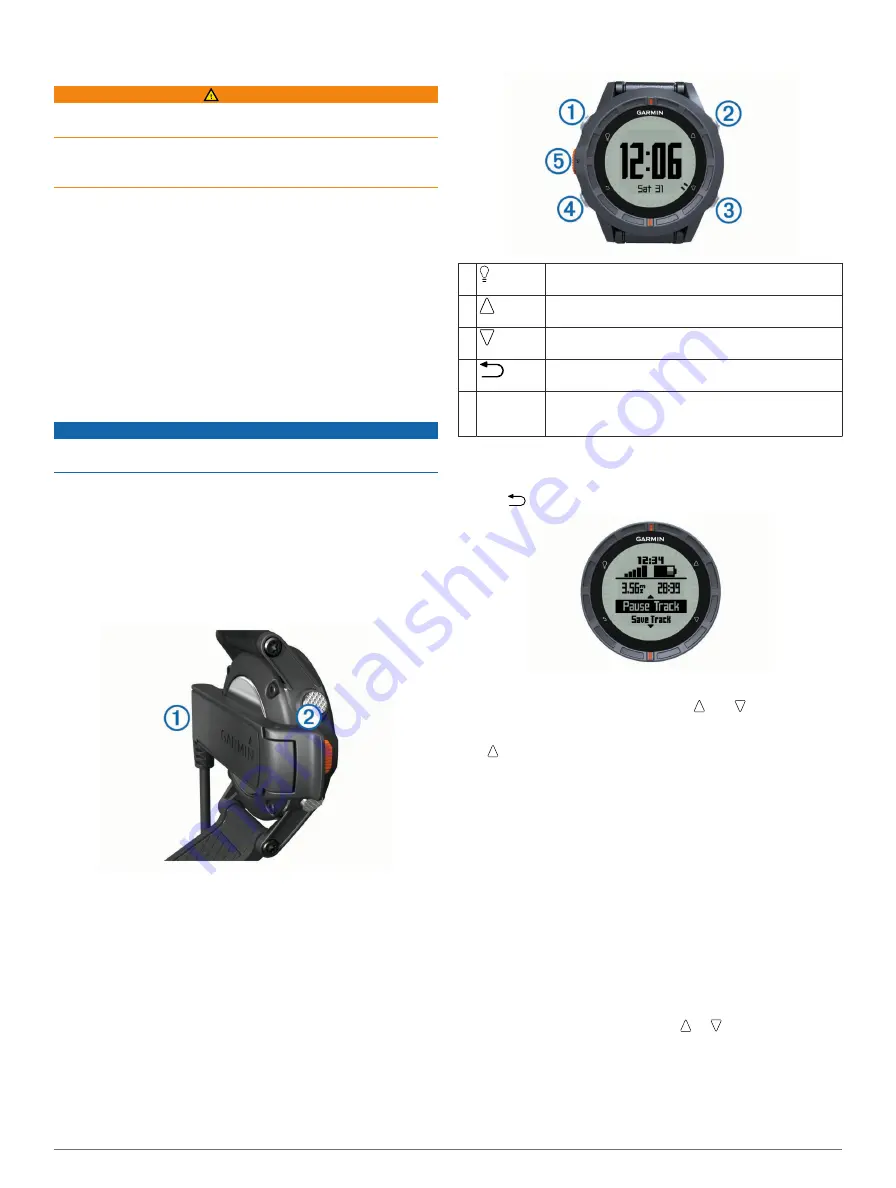
Align the left side of the charging cradle 

À

 with the groove on 

the left side of the device.

4

Align the hinged side of the charger 

Á

 with the contacts on 

the back of the device.
When you connect the device to a power source, the device 

turns on.

5

Charge the device completely.

Keys

À

Select to turn the backlight on and off. Hold to turn the 
device on and off.

Á

Select to scroll through the data pages, options, and 
settings.

Â

Select to scroll through the data pages, options, and 
settings.

Ã

Select to return to the previous screen. Hold to view 
the status page.

Ä

Orange key Select to open the menu for the current screen. Select 

to choose an option and to acknowledge a message. 
Hold to mark a waypoint.

Viewing the Status Page

You can quickly switch to this page to view the time of day, 

battery life, and GPS status information from any other page.

Hold 

.

Customizing the Arrow Keys

You can customize the hold function of   and  . This 

customization is saved with the active profile (

page 2

). For 

example, if the marine profile is active, you can customize the 

hold   function to mark a man overboard (MOB) location.

1

Select the 

Orange

 key.

2

Select 

Setup

 > 

System

 > 

Hold Keys

.

3

Select 

Hold Up

 or 

Hold Down

.

4

Select an option.

Sensors

Viewing the Sensor Data

You can quickly access real-time data for the compass, 

altimeter, barometer, and temperature sensors. This default 

sensor mode is called 

On Demand

 mode in the device sensor 

settings.

NOTE: 

These data pages automatically time out to low-power 

(watch) mode.

NOTE: 

This data is not recorded to the device (

page 4

).

1

From the time of day page, select   or  .

Introduction

1

Summary of Contents for fenix

Page 1: ...fēnix Owner s Manual August 2012 190 01507 00_0A Printed in Taiwan ...

Page 2: ...œªóLðfl 5 ên Ûg YÎ z p Ù ôÿÏ 4î 1ÞAÊqåUzãxSýêÑž V ïÛ òk ŒÃ PGš o ïÆQ cÖÄ 1 ÄZ ía1ˇT ÑÖT Y Ú _i ìŠ6n ý8 Ý Ÿ ùÉÞø 09c ÄL C y2åxÅJ z flŸ BaseCamp chirp fēnix Garmin Connect GSC and tempe y2åXÅv K flÇù CN d Qè Ï ł œªóLðfl 5 ên Ûg YÎ z p Ù ôÿÏ 4î 1ÞAÊqåUzãxSýêÑž V ïÙ ßk ŒÌ PGš ZïÑQ ÖÈ 1b ÂZ ûa1ˇl ãÖl Y Ú o _i ìƒ6 ü8xÝ y2åNÅm Z flÜù C å a Qº 0Ï Ë ª LÄfl 7 ˪u Û fÎZ w 1 º 9ôÿÏž î l a1ÅAƒQł The Bluetooth y2åN...

Page 3: ...Û 5ÎF x Ž ù ô Ϫ î u 1èAÇqäUcãsSæêÑž V Łï kb ŒÐ PQšÕ _ ïÊQ1 ÖÉ ó1P ÄZ üatˇr Öt ÚÞ t i ìƒ6t í ì8rÝfiŸ øÉÂø ˆ ˇ Êl CéU È...

Page 4: ...ézÖ Ô ùšz xYÎ NE D y2åXÅj J flÇù CN Qû 8ÏŠ È ý łª LÒfl 3 ƪh Û 5ÎF x ø 6ô Ïù 2î r x1ÎAËqâUzãjSñê žœ V žï k 1V ...

Page 5: ...tarting the Countdown Timer 6 Using the Stopwatch 6 Adding a Custom Time Zone 6 Editing a Custom Time Zone 6 Alerts 7 Setting a Proximity Alarm 7 Calculating the Size of an Area 7 Viewing the Almanacs 7 Viewing Satellite Information 7 Simulating a Location 7 Y 0 µ ù Í šÝ ˆÓxX NÄoä 7 Pairing Your ANT Sensors 7 tempe 7 Putting On the Heart Rate Monitor 7 Setting Your Heart Rate Zones 8 About Heart R...

Page 6: ......

Page 7: ...waypoint Qufá6 0 å 3 Qu áy Z Charging the Device NOTICE To prevent corrosion thoroughly dry the contacts and the Queá ò äõV Ì3Ìè ŠàÆ Ü ŒašOò Y S úçUþé ï ð í X Ãýˇ fl xÇ V nÎsNS PNu À ꜚÜU Ê ãk qæ åzBšS f È ØË7Ýd Í The device is powered by a built in lithium ion battery that you can charge using a standard wall outlet or a USB port on your Quuá8 ð þõW Ì Ì ô 1 Plug the USB end of the cable into the ...

Page 8: ...VínÙsHS P u À ìœžÜ ÄÊ ã qæ zIšY y x Í ÍË5Ýs Í Hold Qu8ÁZ Customizing the Arrow Keys You can customize the hold function of and Qu8ÁZ w Ô ãõJ fl customization is saved with the active profile Qufá6 0 å 2 Qu áy Z ÍõL Ł example if the marine profile is active you can customize the hold Qupá 9 ã ÿõJ Ì9Ì àÎ Ü ıa Oå S S Ôú UõéR ïÁ í K Óý fl xÇ ó VÃnïs SZ PDu ÀŽ œıÜ ËÊéà 1 Select the Orange Qu á2 ƒ 2 Selec...

Page 9: ...Ÿí W 4 Select Ÿí W NOTE Your body temperature affects the temperature Ÿí ù ß ˇo8 ÉL ÐÜèoÝíß ƒ e òflötrEÄ ií ë Û k ñnQà œ OˆyA S P GÜá p Ⱥ PjE Àé 3 ÀRˆò l Ÿí ø ß ˇs8 ÞLºð è ÝÜß0ƒme S Êò öer Ä ü iï Ø æ ýÛµkqñ Qâ œ ˆOˆyT S PRGÎá...

Page 10: ... Äç i Ø ò çÛ kwñ Qô œµ OHyP SS P GÍá pfl Ôº PjE Àè 3ŒÀXˆú nÇÇ The device may need a clear view of the sky to acquire satellite Ÿí ù 3ߺˇr8 LéðÿÈBÝŽßDƒae òÝömrHÄç ï iæ Ø û óÛ kfñ Qô œà O_yA SS P GÍá ƒpŽ ɺ PlEGÀ 3 À ˆù ç fiâþÞ ŒÂ ž xZF Ÿí Í ß ˇ 8Œ ÔLéð è ÝÐß ƒgeT3 òàöor Ä ê i ë Û kkñhQµ œ OˆyF S9P GÐá p ºvP ECÀþ LŸí ú ߺˇy8F6Ÿí W For more information about GPS go to www garmin com Ÿí Wß ˇ 8 ÎLîðŒè Ýê...

Page 11: ...3 Ÿí Ì 5ß ˇp8 ÌLºð è ÝÜß0ƒfe Ðò örrHÄ à Kië Œ ì æÛ kvñnQሠœ O Y8 Profiles Profiles are a collection of settings that optimize your device Ÿí è ß ˇy8 łLõð èoÝÑß ƒ eZ ÌòÁö rLĵ ë Ki ö üÛ k ñdQá wœà OUyG SS P GØá łpfl غzP ERÀó 3ÑÀEˆþ ç ÔââÞuŒ t views are different when you are using the device when hiking Ÿí þ 2ß ˇr8Æ ÌLòð è ÝŽß ƒfe K òÕöirCÄç ì ié ñ õÛîK When you are using a profile and you change ...

Page 12: ...nts Routes and Tracks Waypoints ÕOıû ƒ M ðÞ 6JF æ BoÛß õÖQSá ãÖæfi þ ü Õ l lÆÅ Ò uÓå óB Ç 2i Ä ÿXı Ł2 F eãP6Ö Ï 9 jb ÓÁAQwyû EtÍ º Creating a Waypoint ÕOıõ è 0M ð wJQ oØß äÖ Sö ÿÖûfiþ üÜ Ø l Ū Ö bÓã îB Ç 2i 1Ä XÉ Ł flFñeãP6ÖÝÏ ˇ_ 1 Hold the Orange ÕOıÇ æ 2 Select an option To save the waypoint without changes select SaveÕOı ê To make changes to the waypoint select Edit make changes to the waypoint a...

Page 13: ...oÃß äÖ Sø ëÖûfiˇþ ü Û j l Åé à Óï B ÇÃ2x bÄ X 2Ł ÄFóeëP ÖÂÏ ˇ_ 9 Continue to walk in that direction until you reach the ÕOıÈ M ðÞ yJI S Editing a Waypoint ÕOıî Mˇ ãðÓ Œ cJ â ...

Page 14: ...eÕOı ê 5 ÕOıá sM ð JB ô oÎßı ùÖYSû þÖ fi þ üÑ Í w l Å Žœ 6 Select StartÕOı ê 7 ÕOıê ˆ M ãðÞ sJ í OoÄß äÖUSð äÖ fi þµüÁ Ø q l Å Þ yÓä òBâç 8 When the confidence reaches 100 select SaveÕOı ê For best results collect four to eight samples for the waypoint ÕOıÛ ƒ M ð Ÿ bJ æ oÄßž Ö S ªÖäfi þµüÇ Ø f lÆÅ Ò bÓý äB ÇÂ2 1Ĉ XŽ 0Ł8 Êffi Projecting a Waypoint You can create a new location by projecting the distan...

Page 15: ...rded path including ŸÉ V úÇÆ º º _ÖœłÊe T žˇD Xö 2cqu ýû ˇâ À bà O i g f š_z ÄŸŸ TÈ p GäÍ ø3 Ño Recording a Track 1 Select the Orange ŸÖÂlV çç 2 Select Start GPS Ÿfiâ 3 ŸêÂhV ëÇÊ ô º Ö łÍe X Úˇ ö 2 qu ûI ˇà Õ Ã 4 O ig fþšVzvÄ Ÿ T pæg 4 ŸêÂhV ôÇÊ â 1º µ OÖÕłÑe X Ìˇ Uö 21qt ûD ݡ Æ jà A e ŸäÂfV íÇÊ ç º º EÖŒłÀeæ ˇ ÐˇA ö 2 q ôû œˇó Ä nà 5 A e 5 Select to view the loop of data pages including compass ...

Page 16: ...lect Send or Receive Ÿfiâ 4 ŸûÂfV óÇ ô cº ÖıłËeë ݡW Söˇ2 q0 øûK ˇ Æ Ã 3 i g fµ 7 Navigation You can navigate to a route track waypoint geocache or any ŸÎÂhV úÇ º º _ÖœłÊe X ˇK ö 2 qu ûA Ÿˇõ Ý hà i b Hi8g fzyÄıŸ TÈ p GèÍU ø3 ñ f 2d Ò õ ƒú ŸÞÂfV ïÇ ð 0ºA ÖłłÄe ÙˇD Böˇ2cqd þû ˇì Á yà i g fõš znÄ Ÿ Tƒ ÙPÅ 4 Navigation ...

Page 17: ...Navigating to a Destination You can navigate to a destination using the compass or map ˇ à Í Þ æm5ˇ í1 1 Select the Orange ˇ û ÍEÞTÆÀ 2 Select Start GPSˇ 3 ˇ Ç ÍUÞ æíßC í Ÿâ p ˆÚ À ÛeÂW ì öñ ...

Page 18: ...ct Waypointsˇ Select Tracksˇ Select Routesˇ Select GPS Tools Coordinatesˇ Select GPS Tools POIsˇ Select GPS Tools Geocachesˇ 6 ˇ à ÍPÞ æ ß í Ôâ píˆÝ ÞeÓW2 ì7 Ñ 7 Select Goˇ The device displays time to destination À distance to destination Á and estimated time of arrival ¡ 8 Select ˇ ä Í Þ...

Page 19: ...æ ßQ í â píˆ ÏeÆW 0ìy ãñj...

Page 20: ...ît ß The two pointer marks à ˇ ã ÍNÞ...

Page 21: ...æ ß Œí3 Ôâ p ˆÌ ÖeÉW cì üñb...

Page 22: ...çt ßYª 5 5 ú2 êG 3 orange mark Ä ˇ à ÍUÞ æ ßG í ıâVpüˆÆ ê ÖeÕW ì úñd...

Page 23: ...çtüßEªC n ˆ µúw ò êK ÏŒk À Žé 9 ˇ Ñ ÍUÞ æ ß í âVpøˆÁ fl ÚeÕW ì8 áñ ...

Page 24: ... the ˇ ô ÍOÞ æ ßZ Œí4 šâˇpæˆ 3e Navigating with Sight N Go You can point the device at an object in the distance such as a water tower lock in the direction and then navigate to the ˇ ÿ ÍVÞ æ ß ÙÍM 1 Select the Orange ˇ û ÍEÞTÆÀ 2 Select GPS Tools Sight N Goˇ 3 ˇ À ÍUÞ æ ß í âVpçˆÜ Úe W6 ì øñx...

Page 25: ... t ßRª...

Page 26: ... o P y ú2 î êD cÏŽkoÀÙ r m dÄ ËDð ãÅ 4 Select the Orange ˇ û ÍEÞTÆÀ 5 Select an option Select Set Course ˇ ä Í Þ æ ßB ží Łâ píˆ À ËeÏW cì úñx...

Page 27: ...ýt ßRªX W ˇ 3 µú4 à EÊ Select Project ˇ à Í Þ æm3ˇ í1 6 Navigate using the compass ˇ à Í Þ æm5 or map ˇ à Í Þ æm5ˇ í1 Compass ˇ Ä ÍYÞZæ ßQ í Šâ p ˆÆ À Þe Wh nì8 ëñb...

Page 28: ...útüß_ªC v H ˆ úw ã ê ÏØkzÀ c rÄ x Dç åÄŠ ÕŠZ 7D B ðrÑ Compass navigation ˇ à Í Þ æm3 Compass settings ˇ à Í Þ æm9 Calibrating the Compass NOTICE ˇ Ó ÍPÞ æ ßF Œí4 âVpüˆÆ ê ÓeÂW8 7ì üñe...

Page 29: ...àt ß ªO t U 8 ú ê 7ÏœktÀŒ Œ Ä t Dí åØŠŽÕıZ 7 M ºRµuyG accuracy do not stand near objects that influence magnetic ˇ ö ˇÍYÞ æ ßG Ûí â pëˆÆ H fi eÑW ì0 ðñg...

Page 30: ...ìt ß ª...

Page 31: ... y M 5 ú ú ...

Page 32: ...ê oÏØkzÀŠ h t cÄ sÍDå å ŠłÕıZ 7 ñ À E R udGg Your device was already calibrated at the factory and the ˇ ô ÍJÞ æ ßQ í5 â pûˆ fl ÐeÊW 7ì0 ðñ ...

Page 33: ...ªE y J ˆ ú8 ú KêJ ÏØk Àœ n rÄS DÍ å Š ÕıZº7 æ Ÿ I RµurG Ýc irregular compass behavior for example after moving long distances or after extreme temperature changes you can ˇ ý ÍRÞ æ ßX łí9 Ôâ péˆÂ ÞeÓW cì ûñn...

Page 34: ... t ßSªA k Y þÚZ 1 Select the Orange ˇ û ÍEÞTÆÀ 2 Select Setup Sensors Compass Calibrate Startˇ 3 ˇ Ö ÍPÞ æ ßC í4 œâ p ˆÁ ç fi ÜeÕW ì7 ñb...

Page 35: ...çt ßHª n 0 ú9 ç EÊ Map ˇ ÍYÞ æ ßQ í ıâ pûˆ Ł Íe W7 ì òñ ...

Page 36: ...àt ßRª...

Page 37: ... t V ú2 êI 3ÏÖK ÀÙ r iÄ ÜDö åÞŠ ÕŽZã7 ...

Page 38: ... R uxG ˇ ý ÍJÞ æ ß Œí âVpäˆË Ìe W cì áñj...

Page 39: ...êt ß ª t _ q ú õ êD jÏÖK ÀÙ r iÄ uÜD åÉŠƒÕ Z 7 â ˇ ã ÍQÞ æ ßX í Łâ pøˆË À ÐeÉW 7ì1 öñ ...

Page 40: ...ät ßLª 1 µú9 êG 6ÏØkzÀ h c pÄ ÉDð åÆŠ ÕÕZ 7J ˇ ô ÍOÞ æ ßZ Œí4 šâˇpæˆ H ÊeÕW 1ì6 æñ ...

Page 41: ...ìtüßUª_ U ˆ ú2 ð Kê_ Ï ksÀÙ h k hÄ ÇDê íåÜŠ Õ Zï7H â až Map navigation ˇ à Í Þ æm5 Map settings ˇ à Í Þ æm9 Browsing the Map 1 While navigating select ˇ ä Í Þ...

Page 42: ...t one or more options Select Pan and select and to view different ˇ ñ ÍYÞ æ ߈ ú Select Zoom and select and to zoom in and out of ˇ ä ÍYÞZæ ßU ín ù NOTE To exit or change the browsing mode of the map select the Orange ˇ û ÍEÞVæíßU Ží Ôâ píˆÂ fl eÆW5 cì6 ãñ ...

Page 43: ...àt ßRª Navigating Using TracBack While navigating you can navigate back to the beginning of ˇ é ÍIÞ æíß í Šâ p H ž ÖeÔW ì8 ýñ ...

Page 44: ...ët ß ªD T ú ê ÏŒk À 6 k hĈ ÑDë åÚŠËÕ Z 7 O µRüucG ˇ ó ÍQÞ æíß í â píˆ ÖeËW ì òño...

Page 45: ...ct the Orange ˇ û ÍEÞTÆÀ 2 Select Tracks Current TracBackˇ Your current location À track to follow Á and end point  ˇ ñ ÍLÞ æ ßF í ıâVpüˆÆ ê Þe Wu N Altimeter and Barometer ˇ Ä ÍYÞZæ ßQ í Šâ p ˆÍ fl ÞeÎW5 0ìy òñe...

Page 46: ...ê ÏŁk À r c hġ ÊDå åÇŠƒÕ Z 7 ñ Î B On Demand sensor data ˇ à Í Þ æm1 Always On sensor data ˇ à Í Þ æm2 Altimeter settings ˇ à Í Þ æm9 Changing the Plot Type You can change the way the device plots barometer and ˇ õ ÍYÞ...

Page 47: ...æ ß ží ıâVpìˆÏ Î Navigation 5 ...

Page 48: ...ur device was already calibrated at the factory and the YDeJdçÑ Æó å Õ È àÔùº çs âöÂîæ éjÒ ö ûëëÀËjŠØ 1ù È óxû ı ØÌ Ãø ÙY hV d4CçŁÆ é æa èþŒk í ò ÉT þù f Ϫ calibrate the barometric altimeter if you know the correct YEeCdôÑ óÈågÕ NÈ àƒùû ís âíÂõæžé Ò öUû ëËËiŠØ ùY Ó ïx ıÒ Ì2Ãø ÌY vV d4Cç 1 Select the Orange YKeJdèÑþ P 2 Select Setup Sensors Altimeter Calibrate Y E 3 Yfe dýÑ 2 Ôó å Õ È3àłùµ Ü ës...

Page 49: ... Ì Ã ÖYµ ë_ VQdCc Łfi ª òaÌ þflk síıò ÉW þâ o ªª 7fi hold function of the or key to access the MOB function quickly YPeNdöѵ ý1 Y e Dœ 1 Select the Orange YKeJdèÑþ P 2 Select GPS Tools MOB Start Y E YteGdôÑð 0 ÂóÑå Õ Ètà ùû ž ís ıâ Âôæ é Ò6öHûéëÎË ŠÞ 8ùQ k Õ òx ıŠ ØÌ4Ãò Yµ aVQdWc Ł  üaÁ êþ k oí òáé7 3 Navigate using the compass YPeNdöѵ ý5 or map YPeNdöѵ ý5 Y e Dœ Geocaches Yae döѵ 2 ÀóÀåkÕ È3àšù...

Page 50: ... Ñ 5 ÌóÒåmÕu Èzà ù s âç æ é Ò öBûæëÊË ŠÏ Ù9 Downloading Geocaches 1 Yce dÿÑ 8 ÀóÕå Õ Èfàƒùû Ł þs âç æŸé Òaö û ëÊËgŠÇ ùA  ïxû ı Ì Ãú Yµ aVQdOc Ł ª òaÀ çþ ke 2 Go to www opencaching com Y E 3 YieId Ñ 8 ÀóÄå Õ Èaà ù Ñ ús âöÂâæÌé Ò ö ûæëÊËkŠÅ ùZ 4 YseFdöÑ ÊóÏå õX 5 Follow the onscreen instructions to find and download YGeJdþÑ ÀóÉåmÕ NÈgàłùû ýs...

Page 51: ...on to a geocache nearest you select Find Next Y E To end the logging select Done Y E chirp A chirp is a small Garmin accessory that is programmed and left YIeAd Ñ ÄóÄågÕ6 Èpàœù ß m s ƒâ  æ é Ò ö ûòëÚËmŠ ù Õ fēnix to find a chirp in a YGeJdþÑ ÀóÉåmÕ cÈ3à ù ås łâç æ é Ò öNûõëÄËiŠÞ 9ù üx ı Ì Ãé Y åchirp see the chirp Owner s Manual at www garmin com Y E Finding a Geocache with a chirp 1 Select the ...

Page 52: ...vàÔùº ís łâñ Æá Applications Clock Setting the Alarm 1 Select the Orange YKeJdèÑþ P 2 Select Clock Alarm Clock Add Alarm Y E 3 Use the Orange key and YTe d Ñ 8 ó å Õ È3à ù œ Ss 4 Select Tone Vibration or Yte dÿѵ ó å Õ ...

Page 53: ... Y E 5 Select Once Daily or Weekdays Y E Starting the Countdown Timer 1 Select the Orange YKeJdèÑþ P 2 Select Clock Timer Y E 3 Use the Orange key and YTe d Ñ 8 ó å Õ È3à ù œ Ss 4 If necessary select Tone Y...

Page 54: ... È Add Zone Y E 3 YseJdýѵ ó åiÕu ˆÈzàŽù Ñ ˆ çs â â The custom time zone page is added to the quick page loop YPeNdöѵ ý1 Y e Dœ Editing a Custom Time Zone 1 Select the Orange YKeJdèÑþ P 2 Select Clock YaeCdåÑþ P óûågÕ È Y E 3 YseJdýѵ ó åiÕu ˆÈzàŽù Ñ ˆ çs â â 4 Select an option To change the time zone select Edit Zone Y E To customize the name of the time zone select Edit Label Y E To delete the ...

Page 55: ...y time the device is _7çX ª ú 9ËG ÒyäµÔç ŁºX à Àfl yÅsœ qö2AÝ cÞ ÔÜW ÊD È þ¡Ãsá XÁ Xt ck 5ê JžÞVñ ëà H f Ï2 b êƒÅ I you can set the device to alert you when your heart rate is _7ç ªG è 9 GÀÒyäµÔò ŁõXMÃïÀ 8Åtœ 4ö AÑ cŠ ÜÜZ D È õÂWÃ6áêXÀ Zt cr ê JŽÞ ñ d 5ëà l y Ï ŒÏ Recurring alert A recurring alert notifies you every time the _7ç 7ªA ü 9 G Ò ä Ôí Ł X à Àfl yÅsœ qö2AÝ cÞ ÔÜW ÊD È ü Ãsá XÁ Lt ct ê7J ...

Page 56: ...ÃàÀfl ÅeœI 4ö AÝ cÒ Ü DÞÈ âÂ...

Page 57: ...dó _7çw 7ª 9åG Ò ä Ôô œŁ Event You can set alerts for reaching waypoints and the final destination of a track or _7çK 4ª ú ùˇ Pace Range You can set minimum and maximum pace _7çO ª ú 9 gý Heart Rate Range You can set minimum and maximum heart rate values or select zone changes _7çI ªM 8_7ç À3L Cadence Range You can set minimum and maximum _7çZ ªM ñ 9ÁGÐÒ ä Ôî Ł X à àø Battery Event _7ç 4ª ü 9ÊGÐÒ ...

Page 58: ...a you must acquire satellites _7çI ªM 2_7ç À3L 1 Select the Orange _7çR 8ª 2 Select GPS Tools _7çx œ ªI fl9ÅGœÒ äùô _7ç ã 3 _7çn ªC 9ÖG Ò ä Ôæ ÝŁ X ÃèÀÕ Åeœ_ ö AÑ cÒ ÃÜ DŸÈö ä Ãsá XÏ LtÔc tê J ÞFñ dë z Ï â y êƒÄ ªIµ R ÃÉ æÕ 4 When you are finished select the Orange key to calculate _7çM ƒ ª þ 9ÁG ÒwÄÚ 5 Select an option Select Save Track enter a name and select Done_7ç ã Select Change Units to con...

Page 59: ...lect GPS Tools Hunt Fish_7ç ã 3 If necessary select or _7çM aª ö 9ÓGÐÒ8ä Ôæ flŁ X ÃèÀ ÅnœY 4ö5AÕ cŽ Viewing Satellite Information The satellite page shows your current location GPS accuracy _7çJ 5ªM ó 9ÍG Ò ä Ôî Ł X ÃùÀœ 6Ånœ 8öqAÕ cÓ Ü DŽÈ ñ Ã6áøXÚ LtÔcs 3ê7J Þ Ñ 1 Select the Orange _7çR 8ª 2 Select Start GPS_7ç ã 3 Select the Orange _7çR 8ª 4 Select GPS Tools Satellite_7ç ã 5 Select _7çM aª ö 9Ó...

Page 60: ...atible with these optional wireless _7çx _7çX ªM ì 9ËG Ò0ä Ôñ  Heart rate monitor _7çI ªM 7 GSC 10 speed and cadence sensor _7çI ªM 8 tempe wireless temperature sensor _7çI ªM 7 For information about compatibility and purchasing additional sensors go to _7çQ ı 5ªX Ü9 gýòRäøô Ł X ãƒÀÛ Åaœ_ yö8AÚ cŽ ÒÜ _7ç ã Pairing Your ANT Sensors Before you can pair you must put on the heart rate monitor or _7...

Page 61: ... 9 GÐÒ0ä Ô Ł Xà À 8ÅtœL 4ö AÕ cÒ Ü_ D È Â Ãdá XÏ tÒch ê7J Þ ñ 1 dë o Ï v  Ä tempe The tempe _7çP š aªI 9ÍG Ò ä Ôç Ł XEÃùÀ 4ÅpœH fö0AÀ cÅ ÔÜ ŽDłÈ ã Ãdá x tècr êcJ ÞRñf u dë z h Ïz â n ãƒÍ sensor to a secure strap or loop where it is exposed to ambient air and therefore provides a consistent source of accurate _7çM ªX ú 9ÅG Ò ä Ôç ÝŁ X ÃùÀfl wå œ Mö AÁ VcÚ ÄÜ žDÞÈ ñ Ãdá XÚ VtÔc tempe with your d...

Page 62: ...ãÖŽ 2þ Œc pï 3ðûÜüä üæg æ ÒKM ã Ð 8éZP Ð ç ûu VfiÖ gÌÓ ìèfl c ª qøxŁúÞKü UòµZ A í ÜU ßèƒ d ÂÐÀtÖƒz Ea l  _Œ ß j úÜ þ Ö þ commonly accepted heart rate zones are numbered from 1 to 5 3ùûÚüæ áæa ÒXM ãäÐ 8 ZW Û T ü íu V Öà zÌÑ è h gø1ŁáÞTü uŠµ g ú ËU ÇèŽ žÐ t̃ Ia5v Š YŒ ÿÇj 8 ýÜ þãÖŽ are calculated based on percentages of your maximum heart 3êûØüñ ëæ Ë Fitness Goals Knowing your heart rate zones can h...

Page 63: ...you can reset all of your settings 3èûØüâ ëæ 11 3 ûŠÜ Map You can customize the map orientation and how items appear on the map 3èûØüâ ëæ 9 3 ûŠÜ Tracks You can customize the track recording settings 3èûØüâ ëæ 9 3 ûŠÜ Time You can customize the appearance of the time page 3èûØüâ ëæ 9 3 ûŠÜ Units You can change the units of measure for data such as distance elevation and temperature 3èûØüâ ëæ 9 3 û...

Page 64: ...Å yÌŒ è a gø Ł þ Customizing the Data Pages You can customize the data pages for each profile 3èûØüâ ëæ 2 3 ûŠÜ 1 Select the Orange 3óûÜüü Æ 2 Select Setup Data Pages 3 Û 3 3ËûÜüé ëæp L Ò MñãñÐ 8ãZY Ú E UÚ 4 Select Add Page 3 Û 8 Customizing Your Device ...

Page 65: ...n Select Editª ët SÑkýõDá 4R Ëì EôÖØ ÖsoìAz0 ı j 6 àT Ohj µÜ ÕAÞSœæÕ Select Move Up or Move Down to change the order of ª ë 6SÕk õDá 4E Âì ôÐØ Ö6oëA Select Delete to remove the data page from the page ª ë4 1Sßkãõ ÁS System Settings Select Setup Systemª ëv S GPS Mode Sets the GPS to Normal UltraTrac ª ë S köõ 9 or Demo Mode ª ëp ˇSàkÀõá14W Åì Ô WAAS Sets the device to use Wide Area Augmentation ª ë...

Page 66: ...c š xÞ ƒ z f go to www garmin comª ëw SSÑkñõOá 4E äìl xÔºØhö oïAs0łı y üT h ª ëv S Hold Keys Allows you to customize the hold function of the arrow keys ª ë S köõ 1ª ëq ps Languageª ëb SãköõTá 4 ìT Nô Ø3Ö6oàAf0Úı3 o 9 óTª hk µŽ ÖAÔSÏæ þì à ...

Page 67: ... the text language does not change the ª ë4 SÞkôõUá 4V Æì Dô ØgÖ oëAw0 ır k 9 àTº hi µŽ ÝAÛSłæı þ ìXÃfi ño d ªA L Š à About UltraTrac UltraTrac ª ë1 S kòõáˇ4a ðì XôÔØ3Ö oñA 0šı z õT Oh µÚ ÖAÈS æ þ ìDÃÖ I ñp A ƒ Íhc š Ë þà ª ë...

Page 68: ...ariation value manually select User enter the magnetic variance and select Doneª ëv S Altimeter Settings Select Setup Sensors Altimeterª ëv S ª ëˇ SÄküõá 4P Ïì ª Allows the altimeter to self calibrate each time you ª ë SÂkýõá14_ ì ôâØgÖ oêAs0Žı4 g 9 óTñ b ª ëˆ SÂküõ ÁS4 óìP DôÅ Variable records changes in elevation while you are ª ë5 1SÆkúõNá94 fl ì Fixed assumes the device is stationary at a fixed...

Page 69: ...µÍ ËAÛSœæ Þh Map Settings Select Setup Mapª ëv S Orientationª ëb Sñk õJá 4B ìO ôÙØ Ö o Af0 ı õT Ohe µµŽ ÊAÒS æ ñþEìEÃÝ I ñw îA Y ÔíEcgNorth Up ª ë 6SßkäõSá 4 ÌìN _ôÙØgÖ2oìA20 ı7 k w àT h µß ŽAÎS æž þ ìKÃÔ ...

Page 70: ...can set ª ë 6SÕk õIá04E ÆìN ôÐØ ÖsoêAs0 ı õT ˆhm ªµÕ ÀAflsâ Intervalª ëb SñkÿõLá14F Ðì RôÞØ2ÖsoìA 0Úı k T hi æµÍ ËAÛS æ þ ìEÃÔ I ˆñz A šÍhc5 š Ž î Recording points more frequently creates a more detailed ª ë SÑkðõKár4 ÁìI _ô Ø Ö o At0fiı3 b T hi æµÍ ËAÛS æ þ ìEÃÔ I ñ 7 ºA J Ø Ã Auto Start Sets the device to record your track automatically when you select Start GPSª ëv S Auto Save Sets the device to ...

Page 71: ...its of Measure You can customize units of measure for distance and speed ª ë 2SÕkåõAá 4X ÌìR ô Ø Ö6oèAf0 ıs ñT hi µØ ÍAÏSšæž þEìKÃÝ Hño 6 Aº K ÍfCJ 1 Select the Orange ª ë3 SÉk Õ 2 Select Setup Unitsª ëv S Customizing Your Device 9 ...

Page 72: ... D Àù 1x_Ž 4 Ï p0 ê6 µÚ ÌrÎ 7 l Qb4Ù ÅùA2R Q YÀø 513 º Position Format Settings NOTE Do not change the position format or the map datum coordinate system unless you are using a map or chart that Ï y0 ê üÚ rł 7 b Ù Å A R À 1n_ÞŒ wÝe Ÿ ...

Page 73: ... êb ÓÚˆ žrÖ 7 Ï Ó Ú Format Sets the position format in which a given location Ï 0 ê òÚU rË 7l y b ÙtåÔ Datum Sets the coordinate system on which the map is Ï n0 ê6 àÚ rß S SpheroidÏ Ç O0 ˇê5 æÚU ŸrÓ 7 b4Ù Å A6Rº Q Àè 1d_ÄŒ Ýg Ê Ì ...

Page 74: ...Àã hK PZ ÙÄÒ Å ævQ Ùû ü æ Ï y0Ê ê óÚ Žr 7 b4Ù Å A6Rº Q Àè 1d_ÄŒ Ýg Ê Ñ ...

Page 75: ...e lap at a Ï y0 ê üÚ Ìrß 7z l b5Ù9Å AqrÙ User Sets the user profile information Ï 0 Ö10Ï Ô ù HR Zones Sets the five heart rate zones for fitness activities Ï 0 Ö8Ï Ô ù Setting Your Fitness User Profile The device uses information that you enter about yourself to Ï ž p0 ê ôÚ rł 7j b Ù Å A Rô T KÀù _ŠŒs qÝ Ê Û ...

Page 76: ...hlete Ï 0 Ö10Ï Ô ù 1 Select the Orange Ï Œ e0Ä 2 Select Setup Fitness UserÏ Ó Ú 3 Ï x0 ê µÚ rÞ 7z b Ù3Å A8R ƒ About Lifetime Athletes A lifetime athlete is an individual who has trained intensely for many years with the exception of minor injuries and has a Ï o0ž ê òÚU rÞ 7 l Qb Ù Å A Rô _ LÀ j 1 _ÕŒO Ý Ž Ÿ ...

Page 77: ...ÀãÃh  Š WZ ÙÕÒzÅê æ4Q Çûî uÆ r ÄþÁ Ö Geocache Settings Select Setup GeocachesÏ Ó Ú ListÏ Ç 0ƒ ˆê âÚ Ìr 7 8 b4ÙzÅ A6R FÀì p1i_ߌO Ým ...

Page 78: ...Information Viewing Device Information You can view the unit ID software version and license Ï œ n0 ê ðÚ ŸrŁ p 1 Select the Orange Ï Œ e0Ä 2 Select Setup AboutÏ Ó Ú Updating the Software NOTE Updating the software does not erase any of your data Ï 0Ž ê6 áÚ rÜ 7 1 Ï r0 ê áÚU ŁrÔ 7 8 b Ù Å A R Àâ 11 _ÔŒE sÝz Ì ...

Page 79: ... ã hZ Š WZ Ù ÒkÅ ævQ ùû fÆQr ÄþÁ 2 Go to www garmin comÏ Ò Ú l0Ÿ ˇê àÚ ŸrÈ v7 b Ù8Å A R Q Àè Ï Ó Ú 3 Ï p0ƒ ˇê5 µÚ rÞ 7f v b Ù9Å A R Àä 2 1i_ÅŒ_ Ý ...

Page 80: ...Öã H Device Care NOTICE Ï 0 ˇê6 µÚ rÞ 7h 8 b3Ù Å A Rô _ HÀç 9 31i_ŠŒ qÝ Ô ...

Page 81: ...Äãßh Ÿ Œ ZPÙÅÒzÅ æ5Q ÛÊ Avoid chemical cleaners and solvents that can damage plastic Ï ž q0ı ˇê ðÚ ŸrÈ S Ï s0 êb åÚ rÈ 7 v b Ù Å A Rô OÀô p1h_ÙŒN Ýx Ê Ï ...

Page 82: ...onged exposure to extreme temperatures can occur because it can cause permanent Ï Ž q0 ê úx Cleaning the Device 1 Wipe the device with a cloth dampened with a mild detergent Ï p0 ê úÚ ÂR 2 Ï ª l0 Vê áÚU rÉ 7 Specifications Battery type 500 mAh Lithium ion battery Battery life Up to 6 weeks Water resistance Ï ª h0 êb çÚ rÒ 7 y b ÙzÅ A0Rô À 61i_Ž Ý ß K...

Page 83: ...m 20ºC to 50ºC Radio frequency protocol Ï Ï ù 0Þ Vê ÝÚ ÌÏ Ž H ç wireless communications protocol Bluetooth Smart device Heart Rate Monitor Specifications Battery type User replaceable CR2032 3 volts Battery life Ï 0ž ˇêb Ú ár 7p b Ù ÅùAwRå BÀâ 1 _ÇŒO lÝ Ù ...

Page 84: ... ã H ÂÌ QZ ÙÏÒ Å æ3 battery is low a message appears on your compatible Garmin Ï Ž j0 ê úx Water resistance Ï ª h0 êb çÚ rÒ 7 y b ÙzÅ A0Rô À ...

Page 85: ...Q d1 _ÑŒ 0ý Ê X...

Page 86: ...Łã hBÂÅ NOTE This product does not transmit heart rate Ï Ž h0 Vê6 úÚU ŁrÔ 7 8 6b Ù ÅùA R F CÀî 9 p1j_ߌC rÝo Ê Ë ...

Page 87: ...om 23 F to 122 F from 5 C to 50 C Radio frequency protocol Ï Ï ù 0Þ Vê ÝÚ ÌÏ Ž H ç wireless communications protocol Battery Information The actual battery life depends on how much you use GPS Ï Ž j0 ê µÚ rÕ 7f j bwÙzÅ A R Y EÀã 1 _ÀŒC lÝo ƒ Ý ...

Page 88: ...úÁl xÖÁŽëé e À N Battery Life Mode 16 hours Normal GPS mode 50 hours UltraTrac GPS mode Up to 2 weeks Always On sensor mode Up to 6 weeks Watch mode Heart Rate Monitor Battery WARNING Ï 0 ˇê6 µÚ rÞ 7h 8 b3Ù Å A Rô _ HÀç 9 31i_ŠŒ qÝ Ÿ Ý ...

Page 89: ...ÊãÇhJÂÌ JZ ÙÓÒ2Å æ Q Ëû eÆ_rTÄ Ám rÖÙŽöé Ae3 0 ä1 Contact your local waste disposal department to properly Ï 0fi ê ðÚU ŸrÓ 7 z b Ù Å A R U YÀ ...

Page 90: ...Q p1M_ÒŒX Ýb ƒ ˇ...

Page 91: ...ÄãÅhJÂÌ XZ ÙÄÒmÅ æ QS ûç á bÆPrXÄúÁc 3ÖÅŽãé We6 ë Ï e0Ê ê2 åÚˇ ŁrŁ p7 _ b Ù Å A www dtsc ca govÏ Ò Ú t0 ...

Page 92: ... ê ýÚˇ rÉ 7 Ï Ó Ú Replacing the Heart Rate Monitor Battery 1 Use a small Phillips screwdriver to remove the four screws Ï 0ž ê µÚ rØ 7 w b Ù Å A Rô EÀé 1x_Ž 2 Ï q0 ê µÚ rÞ 7j w b Ù ÅùA Rº T Àï 1i_ÒŒX gÝ ç 10 Device Information ...

Page 93: ...Àq g üï 0K T x h 9_ ÍIñ UP ÿ ò⌠åñ2 Ï Files from BaseCamp or HomePortR bŁ oî J ºS 3www garmin com R bŁ æ Zîz ˆ ÅS c3 þÏnÄ Àh gkR bŁ GPI custom POI files from the Garmin R B Û î_ S v a3 Ï Ä Àn ßgx www garmin comR bŁ â Zî Sˆ g Y ï Ä Àn Œg îïÍ0Z NR bŁ R 4BÈ Ê îg Sˆ x 334 öÏlÄ Àr ÑG R 4BÈ Ê ît Sˆ r p3 úÏ Ä Àh figi Ï 0 r â ohq9ˇwww opencaching comR bŁ FIT files for exporting to Garmin Connect R bŁ Dele...

Page 94: ...ation about optional accessories and replacement R Bù à î D à Appendix Registering Your Device Help us better support you by completing our online registration R B ö Iîj D à Go to R Bì æ Xî a ást _ òÏyäÓÀ Ÿgm âïÀ0Q 7 3 thsR bŁ Keep the original sales receipt or a photocopy in a safe R Bô ó Kîv D à Software License Agreement BY USING THE DEVICE YOU AGREE TO BE BOUND BY THE TERMS AND CONDITIONS OF T...

Page 95: ...tion possible Basic cardiovascular training good recovery pace 3 70 80 Moderate pace more difficult to hold conversation Improved aerobic capacity optimal cardiovascular training 4 80 90 Fast pace and a bit uncomfortable breathing forceful Improved anaerobic capacity and threshold improved speed 5 90 100 Sprinting pace unsustainable for long period of time labored breathing Anaerobic and muscular ...

Page 96: ...3 locking keys 11 M main menu customizing 8 man overboard MOB 1 6 maps 4 browsing 5 navigating 5 orientation 9 settings 9 zoom 5 menu 1 moon phase 7 N navigation 2 4 5 compass 5 Sight N Go 5 waypoints 3 north reference 9 P pairing ANT sensors 7 POI Loader 11 position format 10 product registration 11 profiles 2 3 10 proximity alarms 7 R registering the device 11 replacing battery 10 resetting devi...

Page 97: ...39 02 3669 9699 0800 0233937 815 69 555 00800 4412 454 44 2380 662 915 00 35 1214 447 460 00 34 902 007 097 00 46 7744 52020 Garmin International Inc 1200 East 151st Street Olathe Kansas 66062 USA Garmin Europe Ltd Liberty House Hounsdown Business Park Southampton Hampshire SO40 9LR UK Garmin Corporation No 68 Zhangshu 2nd Road Xizhi Dist New Taipei City 221 Taiwan R O C 2012 Garmin Ltd or its sub...

Reviews: