Introduction
WARNING
Always consult your physician before you begin or modify any
exercise program.
See the
Important Safety and Product Information
guide in the
product box for product warnings and other important
information.
Device Overview
Before you use your Forerunner the first time, take a moment to
familiarize yourself with the available features.
Four-key interface
: Allows you to quickly access the features
of the Forerunner.
NOTE:
Some keys have more than one function (
Run timer
: Records your time, distance, pace, and calories
while you run (
).
Run/walk interval timer
: Allows you to use timed walking
breaks at regular intervals during a run/walk training session
Virtual Pacer™
: Helps you maintain your pace by alerting you
when you are running too fast or too slow (
).
Auto Lap®
: Marks a lap after each mile or kilometer. This
feature is enabled by default (
).
Auto Pause®
: Pauses the timer when you stop moving
Clip-on charger
: Charges the Forerunner using your computer
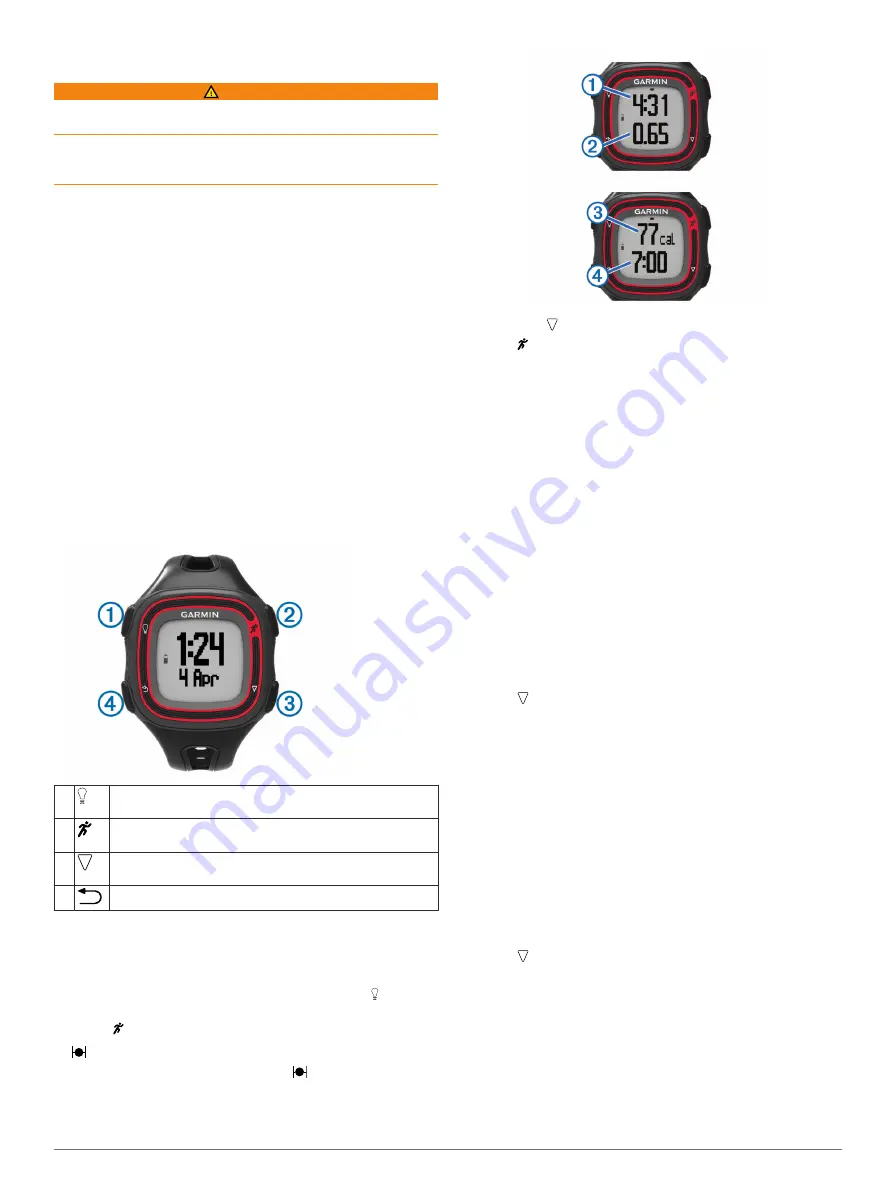
Keys
À
Turn on the device.
Turn on the backlight.
Á
Start and stop the timer.
Select the highlighted menu item.
Â
Move to the next item in the menu.
Move to the next data page when the timer is running.
Ã
Go back without making a selection.
Going for a Run
The device comes partially charged. You may need to charge
the device (
) before going for a run.
NOTE:
The device turns on automatically while charging. If you
do not charge the device before going for a run, hold to turn
on the device.
1
Select .
2
flashes while the device finds your location.
When the device finds your location, displays solid.
3
Select
Start
to start the timer.
Time
À
, distance
Á
, calories burned
Â
, and pace
Ã
are
recorded while the timer is running.
TIP:
Select to view your calories burned and pace.
4
Select to stop the timer after you complete your run.
5
Select an option:
• Select
Resume
to restart the timer.
• Select
Save
to save the run and reset the timer. You can
now upload your run to Garmin Connect™ (
).
• Select
Discard
to delete the run.
Using Garmin Connect
You can upload all of your activity data to Garmin Connect for
comprehensive analysis. With Garmin Connect, you can view a
map of your activity, and share your activities with friends.
1
Connect the device to your computer using the USB cable
(
).
2
3
Select
Getting Started
.
4
Follow the on-screen instructions.
Using Run and Walk Intervals
NOTE:
You must set up the run/walk feature before starting a
run. After you start the run timer, you cannot change the
settings.
1
Select >
Run Options
>
Run/Walk
>
Turn On
.
2
Set the run time for each interval.
3
Set the walk time for each interval.
4
Go for a run.
After you turn on the run/walk feature, it is used every time you
go for a run unless you turn it off or enable Virtual Pacer
(
).
Virtual Pacer
Virtual Pacer is a training tool designed to help you improve
your performance by encouraging you to run at the pace you
set.
Running With Virtual Pacer
NOTE:
You must set up Virtual Pacer before starting a run.
After you start the run timer, you cannot change the settings.
1
Select >
Run Options
>
Virtual Pacer
.
2
Select
Turn On
or
Edit Pace
to set the pace.
3
Enter your pace.
After you turn on Virtual Pacer, it is used every time you go for a
run unless you turn it off or enable run/walk (
Using Auto Lap
You can set your device to use Auto Lap, which automatically
marks a lap at every mile (kilometer), or you can mark laps
manually. This feature is helpful for comparing your
performance over different parts of an activity.
2


