2
GDL 30/30A Owner’s Manual
I
NSTALLING
THE
GDL 30/30A
To obtain the best possible performance, install the GDL 30/30A according to the following
instructions. If you experience difficulty during the installation, contact Garmin Product Support or
seek the advice or a professional installer.
Mounting the GDL 30/30A
Mount the GDL 30/30A in a location that is dry and well-ventilated. Avoid mounting the unit
where it may become submerged or exposed to extreme temperatures. Verify there is enough
clearance to attach the cables to the unit. If you want to view the blink codes, make sure the
Status LED is visible.
To mount the GDL 30/30A:
1. Using the unit as a template, mark the location of the mounting holes. If needed, additional
holes can be drilled in the side mounting flanges.
2. Secure the GDL 30/30A using the appropriate fasteners.
Connecting the Power Cable
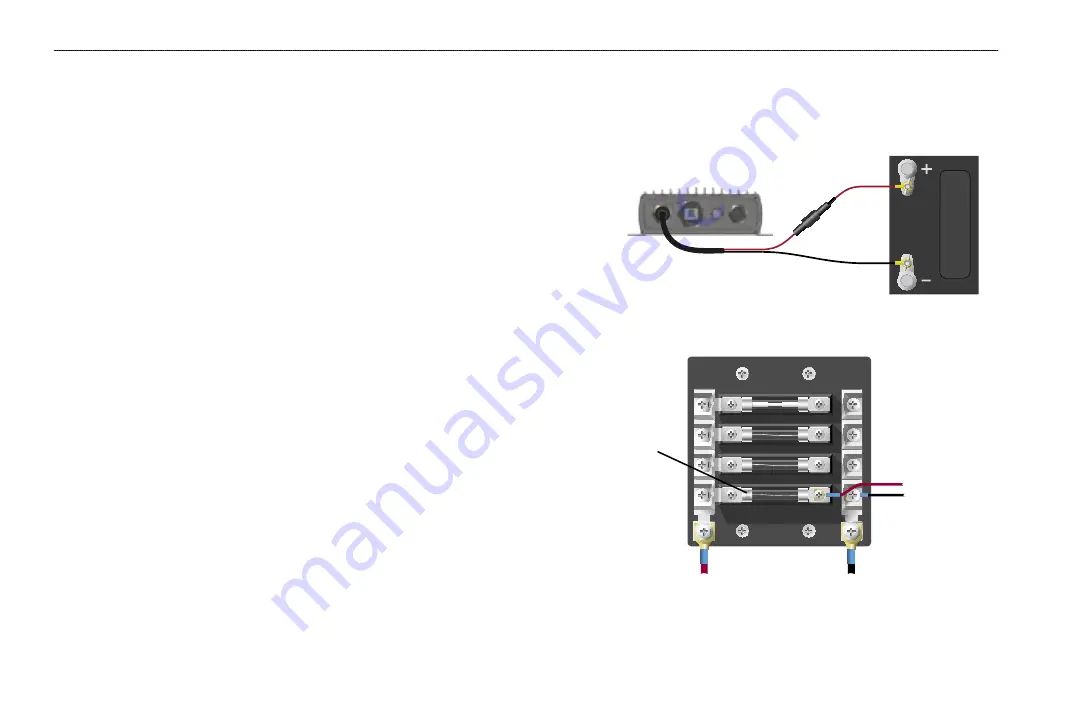
The Power Cable can be connected directly to the vessel’s battery or through an open
connector on the fuse block.
To connect the power cable to a battery:
1. Connect the Red wire to the positive (+) terminal of the battery. Do not remove the
AGC/3AG 2.0 amp fuse holder from the Red wire.
2. Connect the Black wire to the negative (-) terminal of the battery.
3. Connect the power cable to the GDL 30/30A 7-pin connector labeled
POWER.
To connect the power cable to a fuse block:
1. Remove the AGC/3AG 2.0 amp fuse holder from the Red wire.
2. Connect the Red wire to an open fuse holder in the fuse block. Make sure that the
Red wire is connected to the positive side of the fuse block.
3. Connect the Black wire to the negative side of the fuse block.
4. Install a 2.0 amp fuse in the fuse holder.
5. Connect the power cable to the GDL 30/30A 7-pin connector labeled
POWER.
G
ETTING
S
TARTED
>
I
NSTALLING
THE
GDL
30/30
A
To GDL 30/30A
B
Battery -
Connecting to a fuse block
2 amp fuse
Connecting to a battery
10-35 Volts


