12
NOTE:
The optical sensor is located on the back of the
• See
Tips for Erratic Heart Rate Data
information about wrist-based heart rate.
• See
Tips for Erratic Pulse Oximeter Data
, page 20
for more
information about the pulse oximeter sensor.
• For more information about accuracy, go to
garmin.com
/ataccuracy
.
• For more information about device wear and care, go to
www.garmin.com/fitandcare
.
Tips for Erratic Heart Rate Data
If the heart rate data is erratic or does not appear, you can try
these tips.
• Clean and dry your arm before putting on the device.
• Avoid wearing sunscreen, lotion, and insect repellent under
the device.
• Avoid scratching the heart rate sensor on the back of the
device.
• Wear the device above your wrist bone. The device should
be snug but comfortable.
• Wait until the icon is solid before starting your activity.
• Warm up for 5 to 10 minutes and get a heart rate reading
before starting your activity.
NOTE:
In cold environments, warm up indoors.
• Rinse the device with fresh water after each workout.
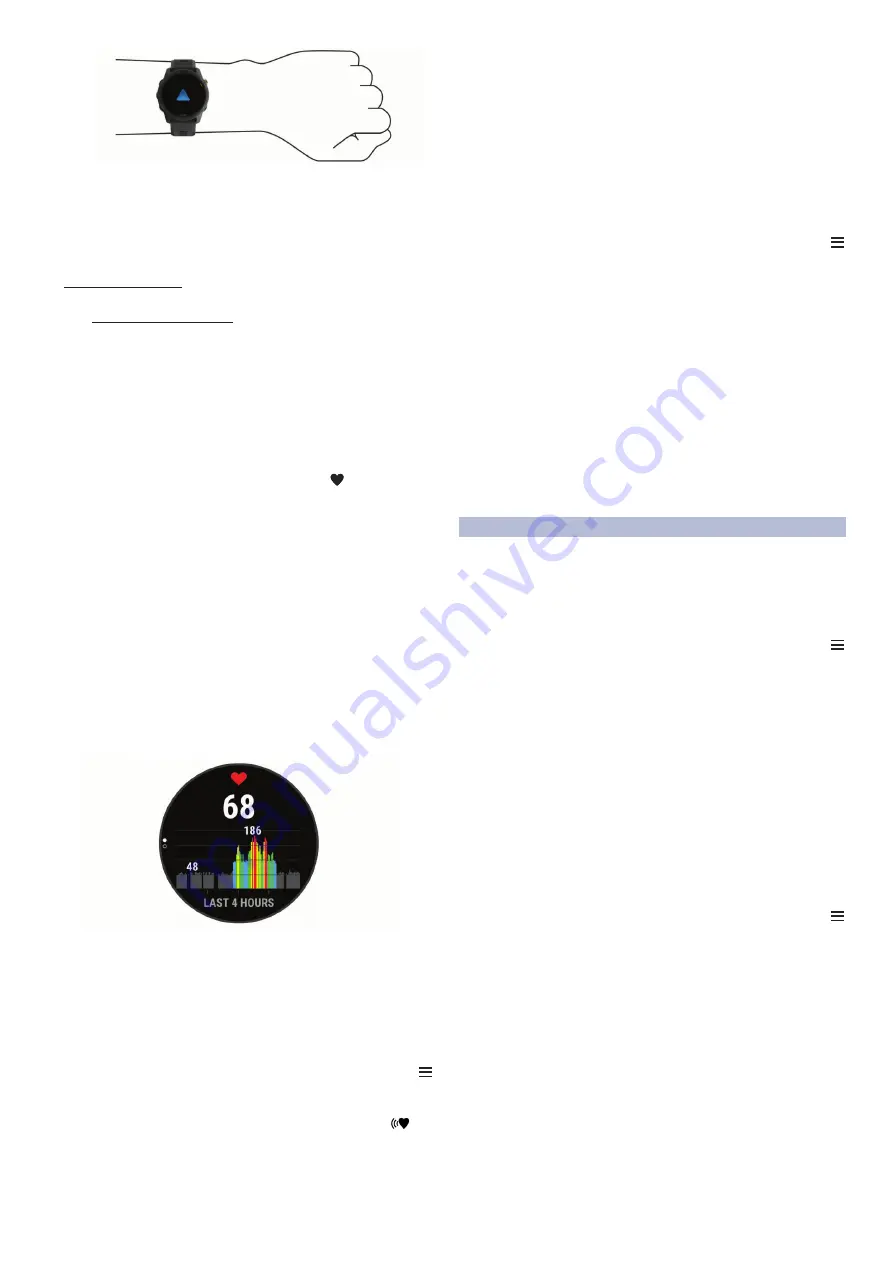
Viewing the Heart Rate Widget
1
From the watch face, press
UP
or
DOWN
to view the heart
rate widget.
NOTE:
You may need to add the widget to your widget loop
(
Customizing the Widget Loop
, page 30
).
2
Press
START
to view your current heart rate in beats per
minute (bpm) and a graph of your heart rate for the last 4
hours.
3
Press
DOWN
to view your average resting heart rate values
for the last 7 days.
Broadcasting Heart Rate Data to Garmin
®
Devices
You can broadcast your heart rate data from your Forerunner
device and view it on paired Garmin devices.
NOTE:
Broadcasting heart rate data decreases battery life.
1
From the heart rate widget, hold .
2
Select
Options
>
Broadcast Heart Rate
.
The Forerunner device starts broadcasting your heart rate
data, and
appears.
NOTE:
You can view only the heart rate widget while
broadcasting heart rate data from the heart rate widget.
3
Pair your Forerunner device with your Garmin ANT+
compatible device.
NOTE:
The pairing instructions differ for each Garmin
compatible device. See your owner's manual.
TIP:
To stop broadcasting your heart rate data, press any
button, and select Yes.
Broadcasting Heart Rate Data During an Activity
You can set up your Forerunner device to broadcast your heart
rate data automatically when you begin an activity. For example,
you can broadcast your heart rate data to an Edge device while
cycling, or to a VIRB action camera during an activity.
NOTE:
Broadcasting heart rate data decreases battery life.
1
From the heart rate widget, hold .
2
Select
Options
.
3
Begin an activity (
Starting an Activity
, page 2
).
The Forerunner device starts broadcasting your heart rate
data in the background.
NOTE:
There is no indication that the device is broadcasting
your heart rate data during an activity.
4
Pair your Forerunner device with your Garmin ANT+
compatible device.
NOTE:
The pairing instructions differ for each Garmin
compatible device. See your owner's manual.
TIP:
To stop broadcasting your heart rate data, stop the
activity (
Stopping an Activity
, page 2
).
Setting an Abnormal Heart Rate Alert
CAUTION
This feature only alerts you when your heart rate exceeds or
drops below a certain number of beats per minute, as selected
by the user, after a period of inactivity. This feature does not
notify you of any potential heart condition and is not intended to
treat or diagnose any medical condition or disease. Always defer
to your health care provider for any heart-related issues.
You can set the heart rate threshold value.
1
From the heart rate widget, hold .
2
Select
Options
>
Abnormal Heart Rate Alerts
.
3
Select
High Alert
or
Low Alert
.
4
Set the heart rate threshold value.
Each time your heart rate exceeds or drops below the threshold
value, a message appears and the device vibrates.
Turning Off the Wrist-based Heart Rate Monitor
The default value for the Wrist Heart Rate setting is Auto. The
device automatically uses the wrist-based heart rate monitor
unless you pair an ANT+ heart rate monitor to the device.
NOTE:
Disabling the wrist-based heart rate monitor also
disables the wrist-based pulse oximeter sensor. You can
perform a manual reading from the pulse oximeter widget.
1
From the heart rate widget, hold .
2
Select
Options
>
Status
>
Off
.
Chest Heart Rate While Swimming
The HRM-Pro, HRM-Swim, and HRM-Tri heart rate accessories
record and store your heart rate data while you are swimming.
To view your heart rate data, you can add heart rate data fields
(
Customizing the Data Screens
, page 31
).
NOTE:
Chest heart rate data is not visible on compatible
Forerunner devices while the heart rate monitor is underwater.
You must start a timed activity on your paired Forerunner device
to view stored heart rate data later. During rest intervals when
out of the water, the heart rate accessory sends your heart rate
data to your Forerunner device. Your Forerunner device
12
Heart Rate Features
FONTOS!
Az érzékelő a karóra hátulján található.
• További információkat lásd az alábbi,
Javaslatok irreális pulzusszám ada
tok megjelenése esetén, 13. oldal
• További információkat lásd a
Tippek hibás pulzoximéter adatok megjele
szakaszban.
• A csukló alapú pulzusmérés pontosságáról további információkat a
garmin.com/ataccuracy oldalon olvashatunk.
• A készülék viselésével és gondozásával kapcsolatos további információ
-
kat a www.garmin.com/fitandcare oldalon olvashatjuk.
Javaslatok irreális pulzusszám értékek megjelenése esetén
Amennyiben a pulzusszám nem jelenik meg, vagy irreális értékeket kapunk,
az alábbiakat tehetjük:
• Az óra felvétele előtt tisztítsuk meg, és töröljük szárazra karunkat.
• A készülék alatti bőrfelületre ne vigyünk fel naptejet, testápolót, rovarri
-
asztó krémet.
• Ne karcoljuk meg a készülék hátulján található pulzusmérőt.
• Az órát a csuklócsont felett hordjuk, a szíjat húzzuk szorosra.
• A tevékenység megkezdése előtt várjunk, amíg az
The heart rate sensor is located on the back of the
device.
Tips for Erratic Heart Rate Data
, page 5
for more
information about wrist-based heart rate.
•
For more information about the accuracy of wrist-based heart
rate, go to
garmin.com/ataccuracy
.
Tips for Erratic Heart Rate Data
If the heart rate data is erratic or does not appear, you can try
these tips.
•
Clean and dry your arm before putting on the device.
•
Avoid wearing sunscreen, lotion, and insect repellent under
the device.
•
Avoid scratching the heart rate sensor on the back of the
device.
•
Wear the device above your wrist bone. The device should
be snug but comfortable.
•
Wait until the icon is solid before starting your activity.
•
Warm up for 5 to 10 minutes and get a heart rate reading
before starting your activity.
NOTE:
In cold environments, warm up indoors.
•
Rinse the device with fresh water after each workout.
•
While exercising, use a silicone band.
Viewing the Heart Rate Widget
The widget displays your current heart rate in beats per minute
(bpm), your resting heart rate for today, and a graph of your
heart rate for the last 4 hours.
1
From the watch face, select
DOWN
.
2
Select to view your average resting heart rate values for
the last 7 days.
Broadcasting Heart Rate Data to Garmin Devices
You can broadcast your heart rate data from your
fēnix
5/5S
device and view it on paired Garmin devices. For example, you
can broadcast your heart rate data to an Edge
®
device while
cycling, or to a VIRB
®
action camera during an activity.
NOTE:
Broadcasting heart rate data decreases battery life.
1
From the heart rate widget, hold
MENU
.
2
Select
Options
.
3
Select an option:
•
Select
Broadcast Heart Rate
rate data now.
•
Select
Broadcast During Activity
to broadcast heart rate
during timed activities (
Starting an Activity
, page 2
).
The
fēnix
5/5S device starts broadcasting your heart rate
data, and
appears.
NOTE:
You can view only the heart rate widget while
broadcasting heart rate data.
4
Pair your
fēnix
5/5S device with your Garmin ANT+
compatible device.
NOTE:
The pairing instructions differ for each Garmin
compatible device. See your owner's manual.
TIP:
To stop broadcasting your heart rate data, select any
key, and select Yes.
Turning Off the Wrist Heart Rate Monitor
The default value for the Wrist Heart Rate setting is Auto. The
device automatically uses the wrist-based heart rate monitor
unless you pair an ANT+ heart rate monitor to the device.
1
From the heart rate widget, hold
MENU
.
>
Off
.
Putting On the Heart Rate Monitor
You should wear the heart rate monitor directly on your skin, just
below your sternum. It should be snug enough to stay in place
during your activity.
1
If necessary, attach the strap extender to the heart rate
monitor.
2
Wet the electrodes
À
on the back of the heart rate monitor to
create a strong connection between your chest and the
transmitter.
3
Wear the heart rate monitor with the Garmin logo facing right-
side up.
The loop
Á
and hook
Â
connection should be on your right
side.
4
Wrap the heart rate monitor around your chest, and connect
the strap hook to the loop.
NOTE:
Make sure the care tag does not fold over.
After you put on the heart rate monitor, it is active and sending
data.
Pool Swimming
NOTICE
Hand wash the heart rate monitor after exposure to chlorine or
other pool chemicals. Prolonged exposure to these substances
can damage the heart rate monitor.
The HRM-Tri accessory is designed primarily for open water
swimming, but it can be used occasionally for pool swimming.
The heart rate monitor should be worn under a swim suit or
triathlon top during pool swimming. Otherwise, it may slide down
your chest when pushing off the pool wall.
Heart Rate While Swimming
NOTE:
Wrist-based heart rate is not available while swimming.
The HRM-Tri accessory and the HRM-Swim accessory record
and store your heart rate data while swimming. Heart rate data
Heart Rate Features
5
ikon folytonosan
láthatóvá nem válik (nem villog).
• Az edzés megkezdése előtt végezzünk el egy 5-10 perces bemelegítést,
valamint az edzés előtt mérjük meg pulzusszámunkat.
NE FELEDJÜK!
Hideg környezetben beltérben melegítsünk be.
• Minden egyes edzés után öblítsük át a készüléket.
Pulzusszám widget
A widget az aktuális pulzusszámunkat mutatja percenkénti szívdobbanás
szerint (BPM), valamint az aznapi legalacsonyabb nyugalmi pulzusszámot
és az elmúlt négy órás intervallumot lefedő pulzusszám grafikont.
1.
Az óra számlapon nyomjuk meg az
UP
vagy
DOWN
gombot.
MEGJEGYZÉS!
Előfordulhat, hogy a widgetet hozzá kell adnunk a widget
sorhoz.
2.
Nyomjuk meg a
START
gombot az aktuális pulzusszámunk, valamint az
elmúlt 4 órai pulzusszámunkat ábrázoló grafikon percenkénti szívdobba
-
násban (BPM) történő megtekintéséhez.
NOTE:
The optical sensor is located on the back of the
device.
• See
Tips for Erratic Heart Rate Data
, page 12
for more
information about wrist-based heart rate.
• See
Tips for Erratic Pulse Oximeter Data
, page 20
for more
information about the pulse oximeter sensor.
• For more information about accuracy, go to
garmin.com
/ataccuracy
.
• For more information about device wear and care, go to
Tips for Erratic Heart Rate Data
If the heart rate data is erratic or does not appear, you can try
these tips.
• Clean and dry your arm before putting on the device.
• Avoid wearing sunscreen, lotion, and insect repellent under
the device.
• Avoid scratching the heart rate sensor on the back of the
device.
• Wear the device above your wrist bone. The device should
be snug but comfortable.
• Wait until the icon is solid before starting your activity.
• Warm up for 5 to 10 minutes and get a heart rate reading
before starting your activity.
NOTE:
In cold environments, warm up indoors.
• Rinse the device with fresh water after each workout.
Viewing the Heart Rate Widget
1
From the watch face, press
UP
or
DOWN
to view the heart
rate widget.
NOTE:
You may need to add the widget to your widget loop
(
Customizing the Widget Loop
, page 30
).
2
Press
START
to view your current heart rate in beats per
minute (bpm) and a graph of your heart rate for the last 4
hours.
3
Press
DOWN
to view your average resting heart rate values
for the last 7 days.
Broadcasting Heart Rate Data to Garmin
®
Devices
You can broadcast your heart rate data from your Forerunner
device and view it on paired Garmin devices.
NOTE:
Broadcasting heart rate data decreases battery life.
1
From the heart rate widget, hold .
2
Select
Options
>
Broadcast Heart Rate
.
The Forerunner device starts broadcasting your heart rate
data, and
appears.
NOTE:
You can view only the heart rate widget while
broadcasting heart rate data from the heart rate widget.
3
Pair your Forerunner device with your Garmin ANT+
compatible device.
NOTE:
The pairing instructions differ for each Garmin
compatible device. See your owner's manual.
TIP:
To stop broadcasting your heart rate data, press any
button, and select Yes.
Broadcasting Heart Rate Data During an Activity
You can set up your Forerunner device to broadcast your heart
rate data automatically when you begin an activity. For example,
you can broadcast your heart rate data to an Edge device while
cycling, or to a VIRB action camera during an activity.
NOTE:
Broadcasting heart rate data decreases battery life.
1
From the heart rate widget, hold .
2
Select
Options
>
Broadcast During Activity
.
3
Begin an activity (
Starting an Activity
, page 2
).
The Forerunner device starts broadcasting your heart rate
data in the background.
NOTE:
There is no indication that the device is broadcasting
your heart rate data during an activity.
4
Pair your Forerunner device with your Garmin ANT+
compatible device.
NOTE:
The pairing instructions differ for each Garmin
compatible device. See your owner's manual.
TIP:
To stop broadcasting your heart rate data, stop the
activity (
Stopping an Activity
, page 2
).
Setting an Abnormal Heart Rate Alert
CAUTION
This feature only alerts you when your heart rate exceeds or
drops below a certain number of beats per minute, as selected
by the user, after a period of inactivity. This feature does not
notify you of any potential heart condition and is not intended to
treat or diagnose any medical condition or disease. Always defer
to your health care provider for any heart-related issues.
You can set the heart rate threshold value.
1
From the heart rate widget, hold .
2
Select
Options
>
Abnormal Heart Rate Alerts
.
3
Select
High Alert
or
Low Alert
.
4
Set the heart rate threshold value.
Each time your heart rate exceeds or drops below the threshold
value, a message appears and the device vibrates.
Turning Off the Wrist-based Heart Rate Monitor
The default value for the Wrist Heart Rate setting is Auto. The
device automatically uses the wrist-based heart rate monitor
unless you pair an ANT+ heart rate monitor to the device.
NOTE:
Disabling the wrist-based heart rate monitor also
disables the wrist-based pulse oximeter sensor. You can
perform a manual reading from the pulse oximeter widget.
1
From the heart rate widget, hold .
2
Select
Options
>
Status
>
Off
.
Chest Heart Rate While Swimming
The HRM-Pro, HRM-Swim, and HRM-Tri heart rate accessories
record and store your heart rate data while you are swimming.
To view your heart rate data, you can add heart rate data fields
(
Customizing the Data Screens
, page 31
).
NOTE:
Chest heart rate data is not visible on compatible
Forerunner devices while the heart rate monitor is underwater.
You must start a timed activity on your paired Forerunner device
to view stored heart rate data later. During rest intervals when
out of the water, the heart rate accessory sends your heart rate
data to your Forerunner device. Your Forerunner device
12
Heart Rate Features
3.
Az
elmúlt 7 nap átlagos nyugalmi pulzusszámainak megtekintéséhez
nyomjuk meg a
DOWN
gombot.
Pulzusszám adatok sugárzása a Garmin készülékek felé
A Forerunner készülék képes elküldeni a mért pulzusszám adatokat egy má
-
sik párosított Garmin készülék számára.
MEGJEGYZÉS!
A pulzusszám adatok sugárzása csökkenti az akkumulátor
által biztosított működési időt.
1.
A pulzusszám widget megtekintése közben nyomjuk le hosszan a
Introduction
WARNING
See the
Important Safety and Product Information
guide in the
product box for product warnings and other important
information.
Always consult your physician before you begin or modify any
exercise program.
Keys
À
LIGHT
Hold to turn the device on.
Hold to view the controls menu.
Select to turn the backlight on and off.
Á
START
STOP
Select to start and stop the timer.
Select to choose an option or to acknowledge a message.
Â
BACK
Select to record a lap, rest, or transition during an activity.
Select to return to the previous screen.
Ã
DOWN Select to scroll through the widgets, data screens, options,
and settings.
Hold to manually change sports during an activity.
Ä
UP
Select to scroll through the widgets, data screens, options,
and settings.
Hold to view the menu.
GPS Status and Status Icons
The GPS status ring and icons temporarily overlay each data
screen. For outdoor activities, the status ring turns green when
GPS is ready. A flashing icon means the device is searching for
a signal. A solid icon means the signal was found or the sensor
is connected.
GPS
GPS status
Battery status
Smartphone connection status
Wi
‑
Fi
®
technology status
Heart rate status
Foot pod status
Running Dynamics Pod status
Speed and cadence sensor status
Power meter status
tempe
™
sensor status
VIRB
®
camera status
Going for a Run
The first fitness activity you record on your device can be a run,
ride, or any outdoor activity. You may need to charge the device
before starting the activity (
Charging the Device
, page 26
).
1
Select
START
, and select an activity.
2
Go outside, and wait while the device locates satellites.
3
Select
START
to start the timer.
4
Go for a run.
5
After you complete your run, select
STOP
to stop the timer.
6
Select an option:
•
Select
Resume
to restart the timer.
•
Select
Save
to save the run and reset the timer. You can
select the run to view a summary.
•
Select
Resume Later
to suspend the run and continue
recording later.
•
Select
Lap
to mark a lap.
•
Select
Discard
>
Yes
to delete the run.
Activities
Your device can be used for indoor, outdoor, athletic, and fitness
activities. When you start an activity, the device displays and
records sensor data. You can save activities and share them
with the Garmin Connect
™
community.
You can also add Connect IQ
™
activity apps to your device using
your Garmin Connect account (
Connect IQ Features
,
page 17
).
For more information about activity tracking and fitness metric
accuracy, go to
garmin.com/ataccuracy
.
Starting an Activity
When you start an activity, GPS turns on automatically (if
required). When you stop the activity, the device returns to
watch mode.
1
From the watch face, select
START
.
2
Select an activity.
3
If necessary, follow the on-screen instructions to enter
additional information.
4
If necessary, wait while the device connects to your ANT+
®
sensors.
5
If the activity requires GPS, go outside, and wait while the
device locates satellites.
6
Select
START
to start the timer.
NOTE:
The device does not record your activity data until
you start the timer.
Tips for Recording Activities
•
Charge the device before starting an activity (
Charging the
Device
, page 26
).
•
Select
to record laps.
•
Select
UP
or
DOWN
to view additional data pages.
Introduction
1
gombot.
2.
Válasszuk a
Beállítások
>
Pulzusszám leadása
pontot.
A készülék elkezdi a pulzusszám adatok sugárzását. A kijelzőn a
ikon
megjelenik.
NE FELEDJÜK!
A pulzusszám adatok sugárzása alatt csak a pulzus
-
szám widget érhető el.
3.
Párosítsuk a Forerunner készülékhez az ANT+ kompatibilis Garmin ké
-
szüléket.
MEGJEGYZÉS!
A párosítás menete a Garmin készülék típusától függően
eltérhet. Lásd az adott készülék használati útmutatójában.
TIPP!
A pulzusszám adatok sugárzásának leállításához nyomjuk meg
bármelyik gombot, és válasszuk az
Igen
t.
Pulzusszám adatok sugárzása tevékenység közben
Beállíthatjuk a készüléket, hogy tevékenység megkezdése esetén automati
-
kusan sugározza a pulzusszám adatokat. Például kerékpározás közben egy
Edge készülékre, illetve tevékenység közben VIRB akciókamerára sugároz
-
hatjuk pulzusszám adatainkat.
MEGJEGYZÉS!
A pulzusszám adatok sugárzása csökkenti az akkumulátor
által biztosított működési időt.
1.
A pulzusszám widget megtekintése közben nyomjuk le hosszan a
Introduction
WARNING
See the
Important Safety and Product Information
guide in the
product box for product warnings and other important
information.
Always consult your physician before you begin or modify any
exercise program.
Keys
À
LIGHT
Hold to turn the device on.
Hold to view the controls menu.
Select to turn the backlight on and off.
Á
START
STOP
Select to start and stop the timer.
Select to choose an option or to acknowledge a message.
Â
BACK
Select to record a lap, rest, or transition during an activity.
Select to return to the previous screen.
Ã
DOWN Select to scroll through the widgets, data screens, options,
and settings.
Hold to manually change sports during an activity.
Ä
UP
Select to scroll through the widgets, data screens, options,
and settings.
Hold to view the menu.
GPS Status and Status Icons
The GPS status ring and icons temporarily overlay each data
screen. For outdoor activities, the status ring turns green when
GPS is ready. A flashing icon means the device is searching for
a signal. A solid icon means the signal was found or the sensor
is connected.
GPS
GPS status
Battery status
Smartphone connection status
Wi
‑
Fi
®
technology status
Heart rate status
Foot pod status
Running Dynamics Pod status
Speed and cadence sensor status
Power meter status
tempe
™
sensor status
VIRB
®
camera status
Going for a Run
The first fitness activity you record on your device can be a run,
ride, or any outdoor activity. You may need to charge the device
before starting the activity (
Charging the Device
, page 26
).
1
Select
START
, and select an activity.
2
Go outside, and wait while the device locates satellites.
3
Select
START
to start the timer.
4
Go for a run.
5
After you complete your run, select
STOP
to stop the timer.
6
Select an option:
•
Select
Resume
to restart the timer.
•
Select
Save
to save the run and reset the timer. You can
select the run to view a summary.
•
Select
Resume Later
to suspend the run and continue
recording later.
•
Select
Lap
to mark a lap.
•
Select
Discard
>
Yes
to delete the run.
Activities
Your device can be used for indoor, outdoor, athletic, and fitness
activities. When you start an activity, the device displays and
records sensor data. You can save activities and share them
with the Garmin Connect
™
community.
You can also add Connect IQ
™
activity apps to your device using
your Garmin Connect account (
Connect IQ Features
,
page 17
).
For more information about activity tracking and fitness metric
accuracy, go to
garmin.com/ataccuracy
.
Starting an Activity
When you start an activity, GPS turns on automatically (if
required). When you stop the activity, the device returns to
watch mode.
1
From the watch face, select
START
.
2
Select an activity.
3
If necessary, follow the on-screen instructions to enter
additional information.
4
If necessary, wait while the device connects to your ANT+
®
sensors.
5
If the activity requires GPS, go outside, and wait while the
device locates satellites.
6
Select
START
to start the timer.
NOTE:
The device does not record your activity data until
you start the timer.
Tips for Recording Activities
•
Charge the device before starting an activity (
Charging the
Device
, page 26
).
•
Select
to record laps.
•
Select
UP
or
DOWN
to view additional data pages.
Introduction
1
gombot.
2.
Válasszuk a
Beállítások
>
Leadás tevékenység közben
pontot.
3.
Tevékenység indítása, 2. oldal
).
A Forerunner készülék a háttérben megkezdi a pulzusszám adatok sugár
-
zását.
MEGJEGYZÉS!
A készüléken semmi nem jelzi a pulzusszám adatok te
-
vékenység közben történő sugárzását.
4.
Párosítsuk a Forerunner készülékhez az ANT+ kompatibilis Garmin ké
-
szüléket.
Megjegyzés!
A párosítás menete a Garmin készülék típusától függően el
-
térhet. Lásd az adott készülék használati útmutatójában.
TIPP!
A pulzusszám adatok sugárzásának leállításához állítsuk le a tevé
-
kenységet (
Tevékenység leállítása, 2. oldal
).
Rendellenes pulzusszám figyelmeztetés bekapcsolása
Vigyázat!
Ez a funkció csak bizonyos, a felhasználó által megadott pulzusszám fölötti
vagy alatti értékek mérése esetén figyelmeztet egy adott inaktivitási idősza
-
kot követően. A funkció nem figyelmeztet semmiféle esetleges szívrendelle
-
nességről, és nem szolgál egészségügyi problémák, betegségek kezelésé
-
re. Szívbetegség esetén mindig forduljunk egészségügyi szolgáltatónkhoz!
Beállíthatjuk a pulzusszám küszöbértéket.
1.
A pulzusszám widget megtekintése közben nyomjuk le hosszan a
Introduction
WARNING
See the
Important Safety and Product Information
guide in the
product box for product warnings and other important
information.
Always consult your physician before you begin or modify any
exercise program.
Keys
À
LIGHT
Hold to turn the device on.
Hold to view the controls menu.
Select to turn the backlight on and off.
Á
START
STOP
Select to start and stop the timer.
Select to choose an option or to acknowledge a message.
Â
BACK
Select to record a lap, rest, or transition during an activity.
Select to return to the previous screen.
Ã
DOWN Select to scroll through the widgets, data screens, options,
and settings.
Hold to manually change sports during an activity.
Ä
UP
Select to scroll through the widgets, data screens, options,
and settings.
Hold to view the menu.
GPS Status and Status Icons
The GPS status ring and icons temporarily overlay each data
screen. For outdoor activities, the status ring turns green when
GPS is ready. A flashing icon means the device is searching for
a signal. A solid icon means the signal was found or the sensor
is connected.
GPS
GPS status
Battery status
Smartphone connection status
Wi
‑
Fi
®
technology status
Heart rate status
Foot pod status
Running Dynamics Pod status
Speed and cadence sensor status
Power meter status
tempe
™
sensor status
VIRB
®
camera status
The first fitness activity you record on your device can be a run,
ride, or any outdoor activity. You may need to charge the device
before starting the activity (
Charging the Device
, page 26
).
1
Select
START
, and select an activity.
2
Go outside, and wait while the device locates satellites.
3
Select
START
to start the timer.
4
Go for a run.
5
After you complete your run, select
STOP
to stop the timer.
6
Select an option:
•
Select
Resume
to restart the timer.
•
Select
Save
to save the run and reset the timer. You can
select the run to view a summary.
•
Select
Resume Later
to suspend the run and continue
recording later.
•
Select
Lap
to mark a lap.
•
Select
Discard
>
Yes
to delete the run.
Activities
Your device can be used for indoor, outdoor, athletic, and fitness
activities. When you start an activity, the device displays and
records sensor data. You can save activities and share them
with the Garmin Connect
™
community.
You can also add Connect IQ
™
activity apps to your device using
your Garmin Connect account (
Connect IQ Features
,
page 17
).
For more information about activity tracking and fitness metric
accuracy, go to
garmin.com/ataccuracy
.
Starting an Activity
When you start an activity, GPS turns on automatically (if
required). When you stop the activity, the device returns to
watch mode.
1
From the watch face, select
START
.
2
Select an activity.
3
If necessary, follow the on-screen instructions to enter
additional information.
4
If necessary, wait while the device connects to your ANT+
®
sensors.
5
If the activity requires GPS, go outside, and wait while the
device locates satellites.
6
Select
START
to start the timer.
NOTE:
The device does not record your activity data until
you start the timer.
Tips for Recording Activities
•
Charge the device before starting an activity (
Charging the
Device
, page 26
).
•
Select
to record laps.
•
Select
UP
or
DOWN
to view additional data pages.
Introduction
1
gombot.
2.
Válasszuk az
Opciók
>
Rendell. HR riasztó
pontot.
3.
Válasszunk a
Túlzott
vagy
Túl alacsony
pontok között.
4.
Adjuk meg a pulzusszám küszöbértékét.
Amikor a pulzusszámunk a megadott küszöbérték alá vagy fölé kerül, a ké
-
szülék egy üzenetet jelenít meg, és rezgést ad le.
Csuklóalapú pulzusszám mérés kikapcsolása
A Forerunner készüléken a csuklóalapú pulzusszám mérés alapbeállítás
szerint
Automatikus
módban működik. Amennyiben ANT+ pulzusmérőt nem
csatlakoztatunk a készülékhez, a készülék automatikusan a csuklón mért
pulzusszám adatokat használja fel.
MEGJEGYZÉS!
A csuklóalapú pulzusszám mérő kikapcsolásával a csukló
alapú pulzoximétert is kikapcsoljuk, azonban a pulzoximéter widget segítsé
-
gével manuális mérést végezhetünk.
1.
A pulzusszám widget megtekintése közben nyomjuk le hosszan a
Introduction
WARNING
See the
Important Safety and Product Information
guide in the
product box for product warnings and other important
information.
Always consult your physician before you begin or modify any
exercise program.
Keys
À
LIGHT
Hold to turn the device on.
Hold to view the controls menu.
Select to turn the backlight on and off.
Á
START
STOP
Select to start and stop the timer.
Select to choose an option or to acknowledge a message.
Â
BACK
Select to record a lap, rest, or transition during an activity.
Select to return to the previous screen.
Ã
DOWN Select to scroll through the widgets, data screens, options,
and settings.
Hold to manually change sports during an activity.
Ä
UP
Select to scroll through the widgets, data screens, options,
and settings.
Hold to view the menu.
GPS Status and Status Icons
The GPS status ring and icons temporarily overlay each data
screen. For outdoor activities, the status ring turns green when
GPS is ready. A flashing icon means the device is searching for
a signal. A solid icon means the signal was found or the sensor
GPS
GPS status
Battery status
Smartphone connection status
Wi
‑
Fi
®
technology status
Heart rate status
Foot pod status
Running Dynamics Pod status
Speed and cadence sensor status
Power meter status
tempe
™
sensor status
VIRB
®
camera status
Going for a Run
The first fitness activity you record on your device can be a run,
ride, or any outdoor activity. You may need to charge the device
before starting the activity (
Charging the Device
, page 26
).
1
Select
START
, and select an activity.
2
Go outside, and wait while the device locates satellites.
3
Select
START
to start the timer.
4
Go for a run.
5
After you complete your run, select
STOP
to stop the timer.
6
Select an option:
•
Select
Resume
to restart the timer.
•
Select
Save
to save the run and reset the timer. You can
select the run to view a summary.
•
Select
Resume Later
to suspend the run and continue
recording later.
•
Select
Lap
to mark a lap.
•
Select
Discard
>
Yes
to delete the run.
Activities
Your device can be used for indoor, outdoor, athletic, and fitness
activities. When you start an activity, the device displays and
records sensor data. You can save activities and share them
with the Garmin Connect
™
community.
You can also add Connect IQ
™
activity apps to your device using
your Garmin Connect account (
Connect IQ Features
,
page 17
).
For more information about activity tracking and fitness metric
accuracy, go to
garmin.com/ataccuracy
.
Starting an Activity
When you start an activity, GPS turns on automatically (if
required). When you stop the activity, the device returns to
watch mode.
1
From the watch face, select
START
.
2
Select an activity.
3
If necessary, follow the on-screen instructions to enter
additional information.
4
If necessary, wait while the device connects to your ANT+
®
sensors.
5
If the activity requires GPS, go outside, and wait while the
device locates satellites.
6
Select
START
to start the timer.
NOTE:
The device does not record your activity data until
you start the timer.
Tips for Recording Activities
•
Charge the device before starting an activity (
Charging the
Device
, page 26
).
•
Select
to record laps.
•
Select
UP
or
DOWN
to view additional data pages.
Introduction
1
gombot.
2.
Válasszuk az
Opciók
>
Állapot
>
Ki
pontot.
Mellkasi pulzusmérés úszás közben
A HRM-Pro™, HRM-Swim™ és HRM-Tri™ a mellkasi pulzusmérő kiegészí
-
tők úszás közben rögzítik és tárolják a pulzusszám adatokat. A pulzusszám
adatok megtekintéséhez pulzusszám adatmezőket kell hozzáadnunk (
képernyők testreszabása, 31. oldal
MEGJEGYZÉS!
A pulzusszám adatok mindaddig nem jelennek meg a kom
-
patibilis Forerunner készüléken, amíg a pulzusmérő a víz alatt van.
Ahhoz, hogy az úszást követően a párosított Forerunner készüléken meg
-
tekinthessük a tárolt pulzusszám adatokat, a tevékenységet a számlálóval
követve el kell indítanunk. A pihenő szakaszok során, amikor kijövünk, ki
-
emelkedünk a vízből, a pulzusmérő elküldi az adatokat a Forerunner készü
-
lék felé.
Amikor elmentjük a számlálóval kísért úszási tevékenység adatait, a
Forerunner készülék automatikusan letölti a tárolt pulzusszám adatokat.
Eközben a pulzusmérőnek a víz felett kell lennie, aktívan működnie kell, és