


20
Pulzoximéteres mérések lehívása
A pulzoximéteres mérést manuálisan a pulzoximéter widget megtekintésével
végezhetjük.A widget a legfrissebb vér oxigéntelítettségi százalékot, a leg
-
utóbbi 24 órában mért átlag méréseket, valamint a legutóbbi 24 órában mért
emelkedési grafikont mutatja.
MEGJEGYZÉS!
Amikor első alkalommal indítjuk el a pulzoximéter widgetet,
az emelkedés meghatározása érdekében műholdas jelre van szükség. Men
-
jünk ki szabadtérre, és várjunk, amíg a készülék műholdas kapcsolatot lé
-
tesít.
1.
Amikor ülünk vagy épp nem mozgunk, az
UP
vagy
DOWN
gombokkal
megtekinthetjük a pulzoximéter widgetet.
2.
Nyomjuk meg a
START
gombot a widget részletes adatainak megtekinté
-
séhez, és a pulzoximéteres mérés indításához.
3.
Maradjunk mozdulatlanok 30 másodpercig.
MEGJEGYZÉS!
Ha túl sokat mozgunk ahhoz, hogy az óra lemérhes
-
se az oxigéntelítettségi szintet, a százalék helyett egy üzenet jelenik
meg. Több perces inaktivitás után ismét megtekinthetjük a vérünk oxi
-
géntelítettségi szintjét. A legjobb eredmények érdekében a készüléket
viselő karunkat a véroxigén telítettség mérés alatt tartsuk a szívünkkel
egy szintben.
4.
A
DOWN
gombot megnyomva megtekinthetjük a legutóbbi hét nap
pulzoximéteres mérési eredményeket.
Pulzoximéteres alvásfigyelés bekapcsolása
Beállíthatjuk a készüléket, hogy alvás közben folyamatosan mérje a vér oxi
-
géntelítettségi százalékot.
MEGJEGYZÉS!
A szokatlan alvási testhelyzet alacsony alvási idejű SpO2
méréseket eredményezhet.
1.
A pulzoximéter widgetben nyomjuk meg hosszan a
Introduction
WARNING
See the
Important Safety and Product Information
guide in the
product box for product warnings and other important
information.
Always consult your physician before you begin or modify any
exercise program.
Keys
À
LIGHT
Hold to turn the device on.
Hold to view the controls menu.
Select to turn the backlight on and off.
Á
START
STOP
Select to start and stop the timer.
Select to choose an option or to acknowledge a message.
Â
BACK
Select to record a lap, rest, or transition during an activity.
Select to return to the previous screen.
Ã
DOWN Select to scroll through the widgets, data screens, options,
and settings.
Hold to manually change sports during an activity.
Ä
UP
Select to scroll through the widgets, data screens, options,
and settings.
Hold to view the menu.
GPS Status and Status Icons
The GPS status ring and icons temporarily overlay each data
screen. For outdoor activities, the status ring turns green when
GPS is ready. A flashing icon means the device is searching for
a signal. A solid icon means the signal was found or the sensor
is connected.
GPS
GPS status
Battery status
Smartphone connection status
Wi
‑
Fi
®
technology status
Heart rate status
Foot pod status
Running Dynamics Pod status
Speed and cadence sensor status
Power meter status
tempe
™
sensor status
VIRB
®
camera status
Going for a Run
The first fitness activity you record on your device can be a run,
ride, or any outdoor activity. You may need to charge the device
before starting the activity (
Charging the Device
, page 26
).
1
Select
START
, and select an activity.
2
Go outside, and wait while the device locates satellites.
3
Select
START
to start the timer.
4
Go for a run.
5
After you complete your run, select
STOP
to stop the timer.
6
Select an option:
•
Select
Resume
to restart the timer.
•
Select
Save
to save the run and reset the timer. You can
select the run to view a summary.
•
Select
Resume Later
to suspend the run and continue
recording later.
•
Select
Lap
to mark a lap.
•
Select
Discard
>
Yes
to delete the run.
Activities
Your device can be used for indoor, outdoor, athletic, and fitness
activities. When you start an activity, the device displays and
records sensor data. You can save activities and share them
with the Garmin Connect
™
community.
You can also add Connect IQ
™
activity apps to your device using
your Garmin Connect account (
Connect IQ Features
,
page 17
).
For more information about activity tracking and fitness metric
accuracy, go to
garmin.com/ataccuracy
.
Starting an Activity
When you start an activity, GPS turns on automatically (if
required). When you stop the activity, the device returns to
watch mode.
1
From the watch face, select
START
.
2
Select an activity.
3
If necessary, follow the on-screen instructions to enter
additional information.
4
If necessary, wait while the device connects to your ANT+
®
sensors.
5
If the activity requires GPS, go outside, and wait while the
device locates satellites.
6
Select
START
to start the timer.
NOTE:
The device does not record your activity data until
you start the timer.
Tips for Recording Activities
•
Charge the device before starting an activity (
Charging the
Device
, page 26
).
•
Select
to record laps.
•
Select
UP
or
DOWN
to view additional data pages.
Introduction
1
-t.
2.
Válasszuk az
Opciók
>
Pulzox.
mód
>
Alvás
pontot.
Egész napos akklimatizálás üzemmód bekapcsolása
A pulzoximéter widgetből nyomjuk meg hosszan a
Introduction
WARNING
See the
Important Safety and Product Information
guide in the
product box for product warnings and other important
information.
Always consult your physician before you begin or modify any
exercise program.
Keys
À
LIGHT
Hold to turn the device on.
Hold to view the controls menu.
Select to turn the backlight on and off.
Á
START
STOP
Select to start and stop the timer.
Select to choose an option or to acknowledge a message.
Â
BACK
Select to record a lap, rest, or transition during an activity.
Select to return to the previous screen.
Ã
DOWN Select to scroll through the widgets, data screens, options,
and settings.
Hold to manually change sports during an activity.
Ä
UP
Select to scroll through the widgets, data screens, options,
and settings.
Hold to view the menu.
GPS Status and Status Icons
The GPS status ring and icons temporarily overlay each data
screen. For outdoor activities, the status ring turns green when
GPS is ready. A flashing icon means the device is searching for
a signal. A solid icon means the signal was found or the sensor
is connected.
GPS
GPS status
Battery status
Smartphone connection status
Wi
‑
Fi
®
technology status
Heart rate status
Foot pod status
Running Dynamics Pod status
Speed and cadence sensor status
Power meter status
tempe
™
sensor status
VIRB
®
camera status
Going for a Run
The first fitness activity you record on your device can be a run,
ride, or any outdoor activity. You may need to charge the device
before starting the activity (
Charging the Device
, page 26
).
1
Select
START
, and select an activity.
2
Go outside, and wait while the device locates satellites.
3
Select
START
to start the timer.
4
Go for a run.
5
After you complete your run, select
STOP
to stop the timer.
6
Select an option:
•
Select
Resume
to restart the timer.
•
Select
Save
to save the run and reset the timer. You can
select the run to view a summary.
•
Select
Resume Later
to suspend the run and continue
recording later.
•
Select
Lap
to mark a lap.
Activities
Your device can be used for indoor, outdoor, athletic, and fitness
activities. When you start an activity, the device displays and
records sensor data. You can save activities and share them
with the Garmin Connect
™
community.
You can also add Connect IQ
™
activity apps to your device using
your Garmin Connect account (
Connect IQ Features
,
page 17
).
For more information about activity tracking and fitness metric
accuracy, go to
garmin.com/ataccuracy
.
Starting an Activity
When you start an activity, GPS turns on automatically (if
required). When you stop the activity, the device returns to
watch mode.
1
From the watch face, select
START
.
2
Select an activity.
3
If necessary, follow the on-screen instructions to enter
additional information.
4
If necessary, wait while the device connects to your ANT+
®
sensors.
5
If the activity requires GPS, go outside, and wait while the
device locates satellites.
6
Select
START
to start the timer.
NOTE:
The device does not record your activity data until
you start the timer.
Tips for Recording Activities
•
Charge the device before starting an activity (
Charging the
Device
, page 26
).
•
Select
to record laps.
•
Select
UP
or
DOWN
to view additional data pages.
Introduction
1
-t, majd válasszuk a
Opciók
>
Pulzox.
mód
>
Egésznapos
pontot.
A készülék nap közben automatikusan méri az oxigéntelítettségi szintet,
amennyiben nem vagyunk mozgásban.
MEGJEGYZÉS!
Az egész napos akklimatizálódás bekapcsolása gyor
-
sabban meríti az akkumulátor töltést.
Tippek hibás pulzoximéter adatok megjelenése esetén
Ha a pulzoximéter adatok hibásak vagy nem jelennek meg, az alábbi lé
-
péseket próbálhatjuk meg elvégezni.
• Maradjunk mozdulatlanok, amíg a készülék leméri a vér oxigéntelített
-
ségi szintünket.
• A készüléket a csuklócsont fölé helyezzük, és szorítsuk rá úgy, hogy
ne okozzon kényelmetlenséget.
• Tartsuk az órát viselő kezünket a szívünkkel egy szintben, amíg elvég
-
zi a vér oxigéntelítettség mérését.
• A készülékhez használjunk szilikon szíjat.
• Tisztítsuk és szárítsuk meg a karunkat, mielőtt felhelyeznénk a készü
-
léket.
• Ne viseljünk naptejen, krémet vagy rovarriasztó krémet a készülék
alatt.
• Ügyeljünk, hogy a készülék hátulján található optikai érzékelőt ne kar
-
coljuk meg.
• Öblítsük a készüléket friss vízzel minden edzés után.
Pulzusszám ingadozás és stressz szint
A pulzusszám ingadozás mérés végrehajtásához mellkasi pulzusmérőre van
szükség, melyet fel kell helyeznünk mellkasunkra, valamint párosítanunk kell
a Forerunner készülékkel (
Vezeték nélküli kapcsolattal működő mérő páro
A stressz szint egy három perces mérés eredménye, mely alatt végig álló,
mozdulatlan helyzetben kell maradnunk. Ez alatt a készülék a pulzusszám ki
-
téréseinek, szórásának mérésével meghatározza stresszességünk mértékét.
Edzés, alvás, táplálkozás, általános életviteli igénybevétel mind-mind befo
-
lyásolják a futó teljesítményét. A stressz szint egy 1 és 100 közötti szám, ahol
az 1 nagyon alacsony stresszt jelent, míg a 100 egy rendkívül stresszes ál
-
lapotot. Ismerve stressz szintünket, eldönthetjük, hogy szervezetünk készen
áll-e egy húzósabb edzésre vagy inkább válasszuk a jógát.
TIPP!
Garmin javaslata szerint a stressz szintet edzés előtt, lehetőleg min
-
den nap ugyanabban az időpontban, ugyanolyan körülmények között mérjük.
A korábbi mérési eredményeket a Garmin Connect fiókban tekinthetjük meg.
1.
Nyomjuk meg a
START
gombot, majd a
DOWN
gombot, majd válasszuk
a
HRV Stress
pontot, majd nyomjuk meg újra a
START
gombot.
2.
Kövessük a képernyőn megjelenő utasításokat.
Body Battery
A készülék elemzi a pulzusszám ingadozásunkat, stressz szintünket, al
-
vásunk minőségét és tevékenységi adatainkat, általános Body Battery
(Test Feltöltöttség) szintünk kiszámítása érdekében. Mint az autóknál az
üzemanyagszintjelző, testünk hátralévő energiatartalékait jeleníti meg. A
Body Battery szint 0 és 100 közötti értékben kerül megjelenítésére, ahol
0-25: alacsony energiatartalék, 26-50: közepes energiatartalék, 51-75: ma
-
gas enerigatartalék, 76-100: nagyon magas energiatartalék.
Ha a készüléket szinkronizáljuk Garmin Connect fiókunkkal, megtekinthet
-
jük legfrissebb Body Battery szintünket, hosszútávú tendenciáinkat, valamint
Tippek pontosabb Body Battery adatokért, 21. oldal
Body Battery widget megtekintése
A Body Battery widget aktuális Body Battery szintünket, valamint az útóbbi
néhány órai Body Battery szintünk grafikonját ábrázolja.
1.
Az
UP
vagy
DOWN
gombbal jelenítsük meg a Body Battery widgetet.
NE FELEDJÜK!
Lehetséges, hogy a widgetet hozzá kell adnunk a widget
sorhoz (
Widget sor beállítása, 30. oldal
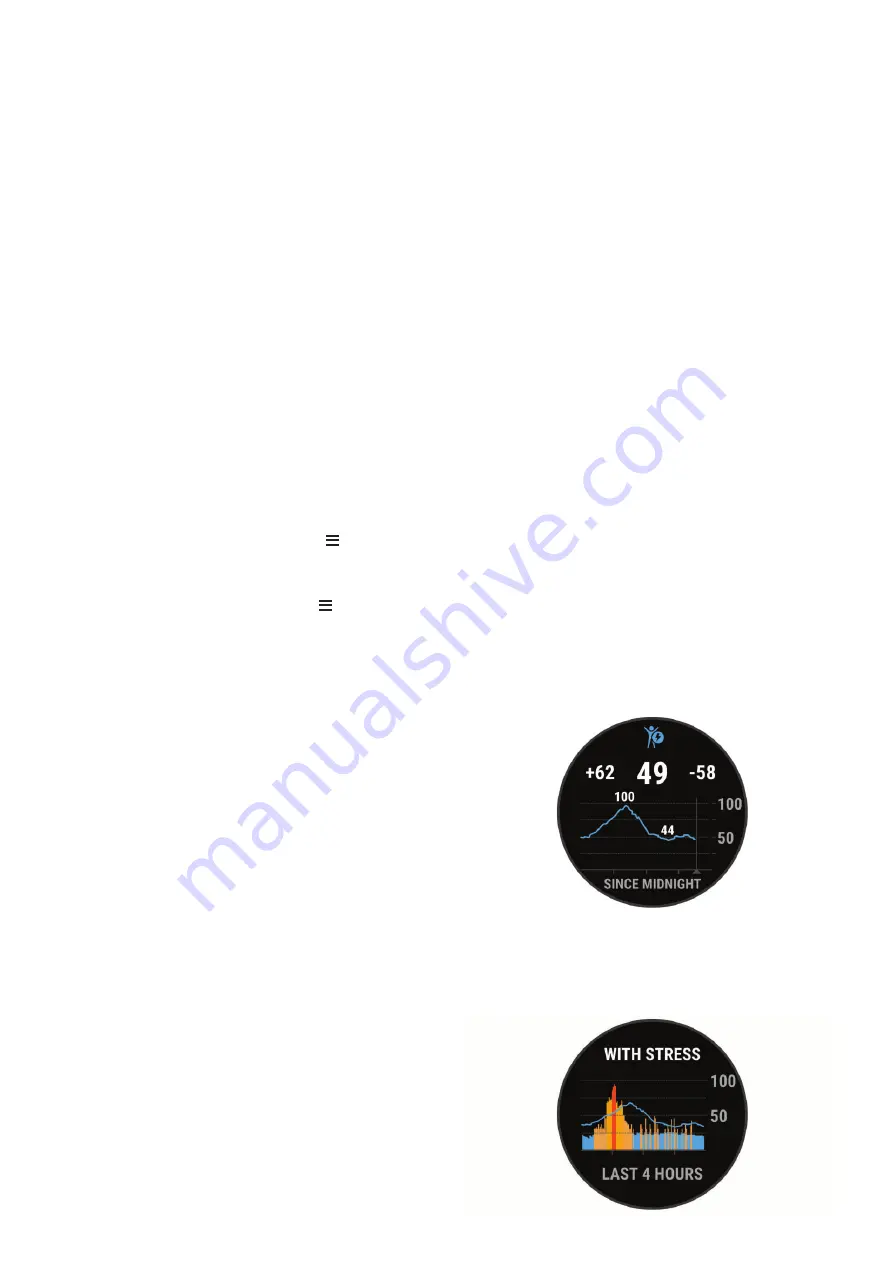
2.
A
START
gomb megnyomásával az éjféltől mért Body Battery adataink at
tekinthetjük meg.
Your most recent oxygen saturation reading.
The oxygen saturation percentage scale.
A graph of your elevation readings for the last 24 hours.
Getting Pulse Oximeter Readings
You can manually begin a pulse oximeter reading by viewing the
pulse oximeter widget. The widget displays your most recent
blood oxygen saturation percentage, a graph of your hourly
average readings for the last 24 hours, and a graph of your
elevation for the last 24 hours.
NOTE:
The first time you view the pulse oximeter widget, the
device must acquire satellite signals to determine your elevation.
You should go outside, and wait while the device locates
satellites.
1
While you are sitting or inactive, press
UP
or
DOWN
to view
the pulse oximeter widget.
2
Press
START
to view widget details and begin a pulse
oximeter reading.
3
Remain motionless for up to 30 seconds.
NOTE:
If you are too active for the watch to get a pulse
oximeter reading, a message appears instead of a
percentage. You can check again after several minutes of
inactivity. For best results, hold the arm wearing the device at
heart level while the device reads your blood oxygen
saturation.
4
Press
DOWN
to view a graph of your pulse oximeter
readings for the last seven days.
Turning On Pulse Oximeter Sleep Tracking
You can set your device to continuously measure your blood
oxygen saturation while you sleep.
NOTE:
Unusual sleep positions can cause abnormally low
sleep-time SpO2 readings.
1
From the pulse oximeter widget, hold .
2
Select
Options
>
Pulse Ox Mode
>
During Sleep
.
Turning On All-Day Acclimation Mode
1
From the pulse oximeter widget, hold .
2
Select
Options
>
Pulse Ox Mode
>
All Day
.
The device automatically analyzes your oxygen saturation
throughout the day, when you are not moving.
NOTE:
Turning on all-day acclimation mode decreases
battery life.
Tips for Erratic Pulse Oximeter Data
If the pulse oximeter data is erratic or does not appear, you can
try these tips.
• Remain motionless while the device reads your blood oxygen
saturation.
• Wear the device above your wrist bone. The device should
be snug but comfortable.
• Hold the arm wearing the device at heart level while the
device reads your blood oxygen saturation.
• Use a silicone band.
• Clean and dry your arm before putting on the device.
• Avoid wearing sunscreen, lotion, and insect repellent under
the device.
• Avoid scratching the optical sensor on the back of the device.
• Rinse the device with fresh water after each workout.
Viewing Your Heart Rate Variability Stress
Score
Before you can perform the heart rate variability (HRV) stress
test, you must put on a Garmin chest heart rate monitor and pair
it with your device (
Pairing Your Wireless Sensors
, page 29
).
Your HRV stress score is the result of a three-minute test
performed while standing still, where the Forerunner device
analyzes heart rate variability to determine your overall stress.
Training, sleep, nutrition, and general life stress all impact how
you perform. The stress score range is 1 to 100, where 1 is a
very low stress state, and 100 is a very high stress state.
Knowing your stress score can help you decide if your body is
ready for a tough training run or yoga.
TIP:
Garmin recommends that you measure your stress score
before you exercise, at approximately the same time, and under
the same conditions every day. You can view previous results
on your Garmin Connect account.
1
Select
2
Follow the onscreen instructions.
Body Battery
Your device analyzes your heart rate variability, stress level,
sleep quality, and activity data to determine your overall Body
Battery level. Like a gas gauge on a car, it indicates your
amount of available reserve energy. The Body Battery level
range is from 0 to 100, where 0 to 25 is low reserve energy, 26
to 50 is medium reserve energy, 51 to 75 is high reserve energy,
and 76 to 100 is very high reserve energy.
You can sync your device with your Garmin Connect account to
view your most up-to-date Body Battery level, long-term trends,
and additional details (
Tips for Improved Body Battery Data
,
page 21
).
Viewing the Body Battery Widget
The Body Battery widget displays your current Body Battery
level and a graph of your Body Battery level for the last several
hours.
1
Press
UP
or
DOWN
to view the Body Battery widget.
NOTE:
You may need to add the widget to your widget loop
(
Customizing the Widget Loop
, page 30
).
2
Press
START
to view a graph of your body battery level
since midnight.
3
Press
DOWN
to view a combined graph of your Body Battery
and stress levels.
Blue bars indicate periods of rest. Orange bars indicate
periods of stress. Gray bars indicate times when you were
too active to determine your stress level.
20
Heart Rate Features
3.
Ha a
DOWN
gombot nyomjuk meg, Body Battery és stressz-szintünk
kombinált grafikonját tekinthetjük meg.
A kék sávok pihenési időszakokat jelölnek, míg a narancssárgák stresz
-
szes időszakokat. A szürke sávok azt jelzik, hogy túl aktívak voltunk a
stressz-szint leméréséhez.
Your most recent oxygen saturation reading.
The oxygen saturation percentage scale.
A graph of your elevation readings for the last 24 hours.
Getting Pulse Oximeter Readings
You can manually begin a pulse oximeter reading by viewing the
pulse oximeter widget. The widget displays your most recent
blood oxygen saturation percentage, a graph of your hourly
average readings for the last 24 hours, and a graph of your
elevation for the last 24 hours.
NOTE:
The first time you view the pulse oximeter widget, the
device must acquire satellite signals to determine your elevation.
You should go outside, and wait while the device locates
satellites.
1
While you are sitting or inactive, press
UP
or
DOWN
to view
the pulse oximeter widget.
2
Press
START
to view widget details and begin a pulse
oximeter reading.
3
Remain motionless for up to 30 seconds.
NOTE:
If you are too active for the watch to get a pulse
oximeter reading, a message appears instead of a
percentage. You can check again after several minutes of
inactivity. For best results, hold the arm wearing the device at
heart level while the device reads your blood oxygen
saturation.
4
Press
DOWN
to view a graph of your pulse oximeter
readings for the last seven days.
Turning On Pulse Oximeter Sleep Tracking
You can set your device to continuously measure your blood
oxygen saturation while you sleep.
NOTE:
Unusual sleep positions can cause abnormally low
sleep-time SpO2 readings.
1
From the pulse oximeter widget, hold .
2
Select
Options
>
Pulse Ox Mode
>
During Sleep
.
Turning On All-Day Acclimation Mode
1
From the pulse oximeter widget, hold .
2
Select
Options
>
Pulse Ox Mode
>
All Day
.
The device automatically analyzes your oxygen saturation
throughout the day, when you are not moving.
NOTE:
Turning on all-day acclimation mode decreases
battery life.
Tips for Erratic Pulse Oximeter Data
If the pulse oximeter data is erratic or does not appear, you can
try these tips.
• Remain motionless while the device reads your blood oxygen
saturation.
• Wear the device above your wrist bone. The device should
be snug but comfortable.
• Hold the arm wearing the device at heart level while the
device reads your blood oxygen saturation.
• Use a silicone band.
• Clean and dry your arm before putting on the device.
• Avoid wearing sunscreen, lotion, and insect repellent under
the device.
• Avoid scratching the optical sensor on the back of the device.
• Rinse the device with fresh water after each workout.
Viewing Your Heart Rate Variability Stress
Score
Before you can perform the heart rate variability (HRV) stress
test, you must put on a Garmin chest heart rate monitor and pair
it with your device (
Pairing Your Wireless Sensors
, page 29
).
Your HRV stress score is the result of a three-minute test
performed while standing still, where the Forerunner device
analyzes heart rate variability to determine your overall stress.
Training, sleep, nutrition, and general life stress all impact how
you perform. The stress score range is 1 to 100, where 1 is a
very low stress state, and 100 is a very high stress state.
Knowing your stress score can help you decide if your body is
ready for a tough training run or yoga.
TIP:
Garmin recommends that you measure your stress score
before you exercise, at approximately the same time, and under
the same conditions every day. You can view previous results
on your Garmin Connect account.
1
Select
START
>
DOWN
>
HRV Stress
>
START
.
2
Follow the onscreen instructions.
Body Battery
Your device analyzes your heart rate variability, stress level,
sleep quality, and activity data to determine your overall Body
Battery level. Like a gas gauge on a car, it indicates your
amount of available reserve energy. The Body Battery level
range is from 0 to 100, where 0 to 25 is low reserve energy, 26
to 50 is medium reserve energy, 51 to 75 is high reserve energy,
and 76 to 100 is very high reserve energy.
You can sync your device with your Garmin Connect account to
view your most up-to-date Body Battery level, long-term trends,
and additional details (
Tips for Improved Body Battery Data
,
page 21
).
Viewing the Body Battery Widget
The Body Battery widget displays your current Body Battery
level and a graph of your Body Battery level for the last several
hours.
1
Press
UP
or
DOWN
to view the Body Battery widget.
NOTE:
You may need to add the widget to your widget loop
(
Customizing the Widget Loop
, page 30
).
2
Press
START
to view a graph of your body battery level
since midnight.
3
Press
DOWN
to view a combined graph of your Body Battery
and stress levels.
Blue bars indicate periods of rest. Orange bars indicate
periods of stress. Gray bars indicate times when you were
too active to determine your stress level.
20
Heart Rate Features


