


25
Ez a termék Spotify szoftvert alkalmaz, amelyet harmadik fél licensz sza
-
bályoz:
https://developer.spotify.com/legal/third-party-licenses
. Zenésítsünk
meg minden utat a Spotify-al. Hallgassuk szeretett előadóink legjobb dalait,
vagy hagyjuk, hogy a Spotify szórakoztasson.
Audio tartalom letöltése a Spotify-ról
Ehhez először csatlakoznunk kell egy Wi-Fi hálózathoz (
).
1.
Bármely képernyőn tartsuk lenyomva a
DOWN
gombot a zene vezérlő
megnyitásához.
2.
Tartsuk lenyomva a
Introduction
WARNING
See the
Important Safety and Product Information
guide in the
product box for product warnings and other important
information.
Always consult your physician before you begin or modify any
exercise program.
Keys
À
Hold to turn the device on.
Hold to view the controls menu.
Select to turn the backlight on and off.
Á
START
STOP
Select to start and stop the timer.
Select to choose an option or to acknowledge a message.
Â
BACK
Select to record a lap, rest, or transition during an activity.
Select to return to the previous screen.
DOWN Select to scroll through the widgets, data screens, options,
and settings.
Hold to manually change sports during an activity.
Ä
UP
Select to scroll through the widgets, data screens, options,
and settings.
Hold to view the menu.
GPS Status and Status Icons
The GPS status ring and icons temporarily overlay each data
screen. For outdoor activities, the status ring turns green when
GPS is ready. A flashing icon means the device is searching for
a signal. A solid icon means the signal was found or the sensor
is connected.
GPS
GPS status
Battery status
Smartphone connection status
Wi
‑
Fi
®
technology status
Heart rate status
Foot pod status
Running Dynamics Pod status
Speed and cadence sensor status
Power meter status
tempe
™
sensor status
VIRB
®
camera status
Going for a Run
The first fitness activity you record on your device can be a run,
ride, or any outdoor activity. You may need to charge the device
before starting the activity (
Charging the Device
, page 26
).
1
Select
START
, and select an activity.
2
Go outside, and wait while the device locates satellites.
3
Select
START
to start the timer.
4
Go for a run.
5
After you complete your run, select
STOP
to stop the timer.
6
Select an option:
•
Select
Resume
to restart the timer.
•
Select
Save
to save the run and reset the timer. You can
select the run to view a summary.
•
Select
Resume Later
to suspend the run and continue
recording later.
•
Select
Lap
to mark a lap.
•
Select
Discard
>
Yes
to delete the run.
Activities
Your device can be used for indoor, outdoor, athletic, and fitness
activities. When you start an activity, the device displays and
records sensor data. You can save activities and share them
with the Garmin Connect
™
community.
You can also add Connect IQ
™
activity apps to your device using
your Garmin Connect account (
Connect IQ Features
,
page 17
).
For more information about activity tracking and fitness metric
accuracy, go to
garmin.com/ataccuracy
.
Starting an Activity
When you start an activity, GPS turns on automatically (if
required). When you stop the activity, the device returns to
watch mode.
1
From the watch face, select
START
.
2
Select an activity.
3
If necessary, follow the on-screen instructions to enter
additional information.
4
If necessary, wait while the device connects to your ANT+
®
sensors.
5
If the activity requires GPS, go outside, and wait while the
device locates satellites.
6
Select
START
to start the timer.
NOTE:
The device does not record your activity data until
you start the timer.
Tips for Recording Activities
•
Charge the device before starting an activity (
Charging the
Device
, page 26
).
•
Select
to record laps.
•
Select
UP
or
DOWN
to view additional data pages.
Introduction
1
gombot.
3.
Válasszuk a
Zene szolgáltatók
>
Spotify
pontot.
4.
Válasszuk a
Zene és podcastok hozzáadása
pontot.
5.
Válasszuk lejátszási listát vagy egyéb fájlt, és töltsük le a készülékre.
MEGJEGYZÉS!
Az audio tartalmak letöltése fokozottan meríti a készü
-
lék akkumulátorát. Amennyiben a fennmaradt töltési szint nem elegendő,
csatlakoztassuk a készüléket egy külső energiaforráshoz.
A kiválasztott lejátszási listák és egyéb fájlok letöltésre kerülnek a készü
-
lékre.
Személyes audio tartalmak letöltése
Mielőtt saját zenéinket adhatnánk hozzá az eszközhöz, előbb telepítenünk
kell a Garmin Express alkalmazást a számítógépünkre (
).
A számítógépről feltölthetjük saját audio fájljainkat – pl. .mp3 és .m4a – az
eszközre.
1.
Csatlakoztassuk az eszközt a számítógépünkhöz egy USB kábellel.
2.
Számítógépünkön indítsuk el a Garmin Express alkalmazást, válasszuk ki
az eszközünket, majd lépjünk a
Zene
pontra.
TIPP!
Windows
®
operációs rendszerrel működő számítógépeknél kivá
-
laszthatjuk a
Changing Your Garmin Pay Passcode
You must know your current passcode to change it. Your
passcode cannot be recovered. If you forget your passcode, you
must delete your wallet, create a new one, and reenter your card
information.
You can change the passcode required to access your
Garmin Pay wallet on your fēnix 5/5S/5X Plus device.
1
From the fēnix 5/5S/5X Plus device page in the Garmin
Connect Mobile app, select
Garmin Pay
>
Reset Passcode
.
2
Follow the on-screen instructions.
The next time you pay using your fēnix 5/5S/5X Plus device, you
must enter the new passcode.
Music
NOTE:
This section is about three different music playback
options.
You can control music playback on your paired smartphone
using your fēnix 5/5S/5X Plus device.
On a fēnix, you can download audio content to your device from
your computer or from a third-party provider, so you can listen
when your smartphone is not nearby. To listen to audio content
stored on your device, you must connect headphones with
Bluetooth technology.
You can use the music controls to control music playback on
your smartphone or to play music stored on your device.
Connecting to a Third-Party Provider
Before you can download music or other audio files to your fēnix
from a supported third-party provider, you must connect to the
provider using the Garmin Connect Mobile app.
1
From the Garmin Connect Mobile app, select or .
2
Select
Garmin Devices
, and select your device.
3
Select
Music
.
4
Select an option:
• Select a third-party provider, and follow the on-screen
instructions.
• Select
Get Music Apps
, locate a provider, and follow the
on-screen instructions.
Downloading Audio Content from a Third-Party
Provider
Before you can download audio content from a third-party
provider, you must connect to a Wi
‑
Fi network (
Setting Up Wi
‑
Fi
Connectivity
, page 7
).
1
Hold
DOWN
from any screen to open the music controls.
2
Select >
Music Providers
.
3
Select a connected provider.
4
Select a playlist or other item to download to the device.
5
Select
BACK
until you are prompted to sync with the service,
and select
Yes
.
The selected playlists and other items are downloaded to the
device.
6
Connect the device to an external power source.
Downloading audio content can drain the battery.
Disconnecting from a Third-Party Provider
1
From the Garmin Connect Mobile app, select or .
2
Select
Garmin Devices
, and select your device.
3
Select
Music
.
4
Select an installed third-party provider, and follow the on-
screen instructions to disconnect the third-party provider from
your device.
Downloading Personal Audio Content
Before you can send your personal music to your device, you
must install the Garmin Express application on your computer
(
www.garmin.com/express
).
You can load your personal audio files, such as .mp3 and .aac
files, to a fēnix device from your computer.
1
Connect the device to your computer using the included USB
cable.
2
On your computer, open the Garmin Express application,
select your device, and select
Music
.
TIP:
For Windows
®
computers, you can select and browse
to the folder with your audio files. For Apple computers, the
Garmin Express application uses your iTunes
®
library.
3
In the
My Music
or
iTunes Library
list, select an audio file
category, such as songs or playlists.
4
Select the checkboxes for the audio files, and select
Send to
Device
.
5
If necessary, in the fēnix list, select a category, select the
checkboxes, and select
Remove From Device
to remove
audio files.
Listening to Downloaded Music
1
Hold
DOWN
from any screen to open the music controls.
2
Connect your headphones with Bluetooth technology
(
Connecting Headphones using Bluetooth Technology
,
page 10
).
3
Select , and select an option:
• To listen to music downloaded to the watch from your
computer, select
My Music
.
• To listen to music from your smartphone, select
Control
Music on Phone
.
• To listen to music from a third-party provider, select the
name of the provider.
4
Select the music you want to play.
TIP:
Select Play All Songs to start playing all the songs
downloaded to the device in shuffle mode.
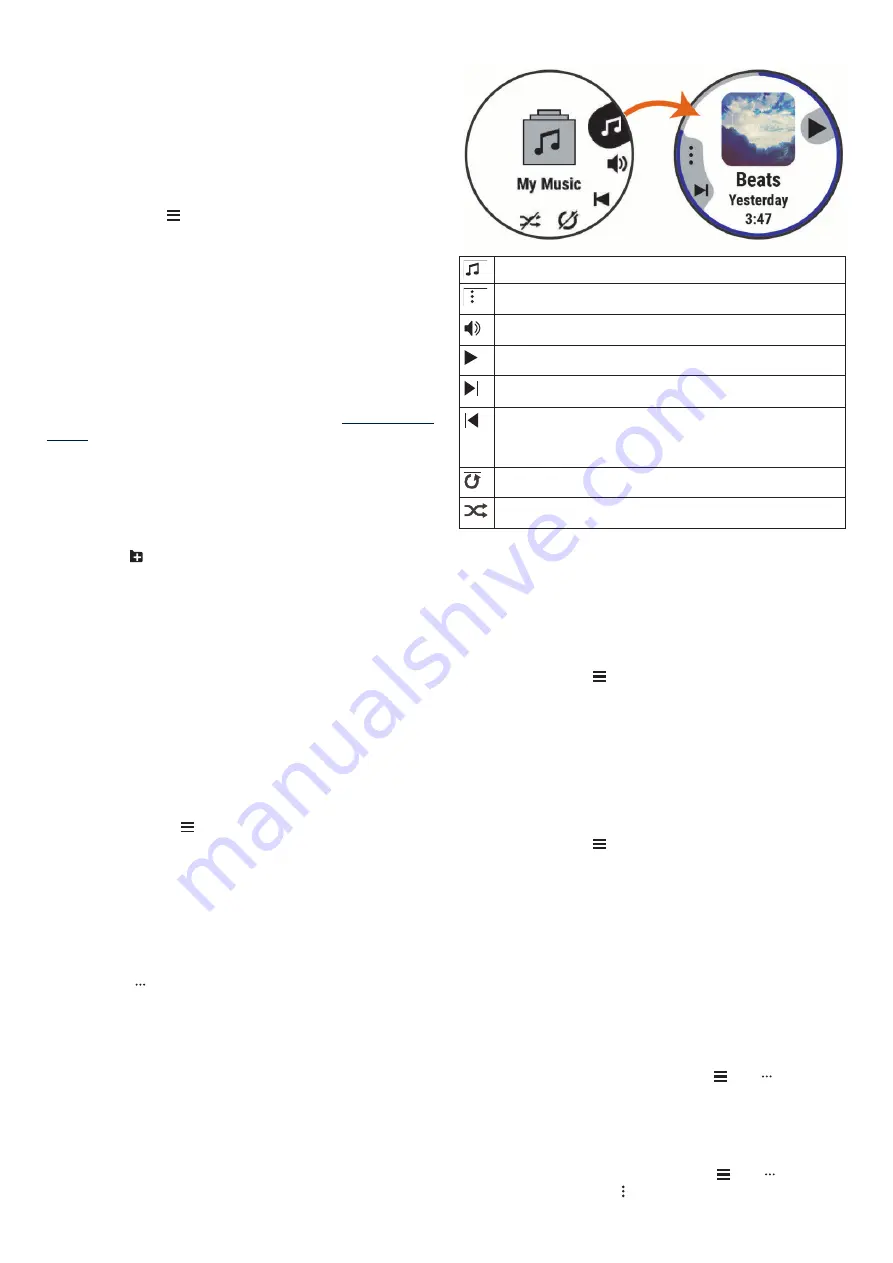
Music Playback Controls
Select to manage content from third-party providers.
Select to switch between playing audio from the device and
controlling music on a connected smartphone.
When playing audio from the device, select to browse the
available audio files and playlists in your library.
Select to adjust the volume.
Select to play and pause the current audio file.
Select to skip to the next audio file in the playlist.
Hold to fast forward through the current audio file.
Select to restart the current audio file.
Select twice to skip to the previous audio file in the playlist.
Hold to rewind through the current audio file.
Select to change the repeat mode.
Select to change the shuffle mode.
Music
9
pontot, és kikereshetjük a kívánt audio fájlokat a mappá
-
inkban. Az Apple számítógépek esetén a Garmin Express alkalmazás az
iTunes
®
könyvtárunkat használja.
3.
A
Saját zenék
vagy
iTunes Könyvtár
listából válasszuk ki az audio fájl
kategóriát, mint például dalok vagy lejátszási listák.
4.
Pipáljuk ki a letölteni kívánt audio fájlok melletti dobozokat, majd válasz
-
szuk a
Letöltés eszközre
pontot.
5.
Amennyiben szükséges, az eszközre letöltött fájlok listájában válasz
-
szunk kategóriát, pipáljuk ki az eltávolítani kívánt fájlok melletti dobozo
-
kat, majd válasszuk az
Eltávolítás az eszközről
pontot az audio fájlok
eltávolításához.
Letöltött zenék hallgatása
1.
Nyomjuk le hosszan a
DOWN
gombot a zene vezérlés elindításához.
2.
Párosítsuk az eszközt a Bluetooth technológiát használó fülhallgatóval
(
Fülhallgató csatlakoztatása Bluetooth technológiával,
).
3.
Nyomjuk le hosszan a
Introduction
WARNING
See the
Important Safety and Product Information
guide in the
product box for product warnings and other important
information.
Always consult your physician before you begin or modify any
exercise program.
Keys
À
LIGHT
Hold to turn the device on.
Hold to view the controls menu.
Select to turn the backlight on and off.
Á
START
STOP
Select to start and stop the timer.
Select to choose an option or to acknowledge a message.
Â
BACK
Select to record a lap, rest, or transition during an activity.
Select to return to the previous screen.
Ã
DOWN Select to scroll through the widgets, data screens, options,
and settings.
Hold to manually change sports during an activity.
Select to scroll through the widgets, data screens, options,
and settings.
Hold to view the menu.
GPS Status and Status Icons
The GPS status ring and icons temporarily overlay each data
screen. For outdoor activities, the status ring turns green when
GPS is ready. A flashing icon means the device is searching for
a signal. A solid icon means the signal was found or the sensor
is connected.
GPS
GPS status
Battery status
Smartphone connection status
Wi
‑
Fi
®
technology status
Heart rate status
Foot pod status
Running Dynamics Pod status
Speed and cadence sensor status
Power meter status
tempe
™
sensor status
VIRB
®
camera status
Going for a Run
The first fitness activity you record on your device can be a run,
ride, or any outdoor activity. You may need to charge the device
before starting the activity (
Charging the Device
, page 26
).
1
Select
START
, and select an activity.
2
Go outside, and wait while the device locates satellites.
3
Select
START
to start the timer.
4
Go for a run.
5
After you complete your run, select
STOP
to stop the timer.
6
Select an option:
•
Select
Resume
to restart the timer.
•
Select
Save
to save the run and reset the timer. You can
select the run to view a summary.
•
Select
Resume Later
to suspend the run and continue
recording later.
•
Select
Lap
to mark a lap.
•
Select
Discard
>
Yes
to delete the run.
Activities
Your device can be used for indoor, outdoor, athletic, and fitness
activities. When you start an activity, the device displays and
records sensor data. You can save activities and share them
with the Garmin Connect
™
community.
You can also add Connect IQ
™
activity apps to your device using
your Garmin Connect account (
Connect IQ Features
,
page 17
).
For more information about activity tracking and fitness metric
accuracy, go to
garmin.com/ataccuracy
.
Starting an Activity
When you start an activity, GPS turns on automatically (if
required). When you stop the activity, the device returns to
watch mode.
1
From the watch face, select
START
.
2
Select an activity.
3
If necessary, follow the on-screen instructions to enter
additional information.
4
If necessary, wait while the device connects to your ANT+
®
sensors.
5
If the activity requires GPS, go outside, and wait while the
device locates satellites.
6
Select
START
to start the timer.
NOTE:
The device does not record your activity data until
you start the timer.
Tips for Recording Activities
•
Charge the device before starting an activity (
Charging the
Device
, page 26
).
•
Select
to record laps.
•
Select
UP
or
DOWN
to view additional data pages.
Introduction
1
-t.
4.
Válasszuk a
Zeneszolgáltatók
pontot és válasszunk az alábbiak kö
-
zül:
•
Az órára a számítógépről letöltött zene hallgatásához válasszuk a
Saját
zene
Személyes audio tartalmak letöltése,
•
Az okostelefonon lévő zenék hallgatásához válasszuk a
Zenelejátszás
telefonról
pontot.
•
Külső szolgáltatótól származó zene hallgatásához válasszuk ki a szolgál
-
tató nevét.
5.
Nyomjuk le a
Introduction
WARNING
See the
Important Safety and Product Information
guide in the
product box for product warnings and other important
information.
Always consult your physician before you begin or modify any
exercise program.
Keys
À
Select to wake the device.
Hold to turn the device on and off.
Á
Select to scroll through the data screens, options, and
settings.
From the home screen, hold to view the device menu.
Â
Select to scroll through the data screens, options, and
settings.
From the home screen, select to view the widgets.
Ã
Select to start and stop the timer.
Select to choose an option or to acknowledge a message.
Ä
Select to mark a new lap.
Select to return to the previous screen.
Status Icons
A solid icon means the signal was found or the sensor is
connected.
GPS status
Bluetooth
®
status
Heart rate status
Power status
LiveTrack status
Speed and cadence status
Pairing Your Smartphone
To use the connected features of the Edge device, it must be
paired directly through the Garmin Connect
™
Mobile app,
instead of from the Bluetooth settings on your smartphone.
1
From the app store on your smartphone, install and open the
Garmin Connect Mobile app.
2
Hold to turn on the device.
The first time you turn on the device, you will select the
device language. The next screen prompts you to pair with
your smartphone.
TIP:
You can hold , and select
Phone
>
Status
>
Pair
Phone
to manually enter pairing mode.
3
Select an option to add your device to your Garmin Connect
account:
• If this is the first device you have paired with the Garmin
Connect Mobile app, follow the on-screen instructions.
• If you have already paired another device with the Garmin
Connect Mobile app, from the or menu, select
Garmin Devices
>
Add Device
, and follow the on-screen
instructions.
After you pair successfully, a message appears, and your device
syncs automatically with your smartphone.
Installing the Standard Mount
For the best GPS reception, position the bike mount so the front
of the device is oriented toward the sky. You can install the bike
mount on the stem or the handlebars.
1
Select a secure location to mount the device where it does
not interfere with the safe operation of your bike.
2
Place the rubber disk
À
on the back of the bike mount.
The rubber tabs align with the back of the bike mount so it
stays in place.
3
Place the bike mount on the bike stem.
4
Attach the bike mount securely using the two bands
Á
.
5
Align the tabs on the back of the device with the bike mount
notches
Â
.
6
Press down slightly and turn the device clockwise until it
locks into place.
Releasing the Edge
1
Turn the Edge clockwise to unlock the device.
2
Lift the Edge off the mount.
Charging the Device
NOTICE
To prevent corrosion, thoroughly dry the USB port, the weather
cap, and the surrounding area before charging or connecting to
a computer.
The device is powered by a built-in lithium-ion battery that you
can charge using a standard wall outlet or a USB port on your
computer.
NOTE:
The device will not charge when outside the approved
temperature range (
Edge Specifications
, page 10
).
1
Pull up the weather cap
À
from the USB port
Á
.
Introduction
1
-t a Zene lejátszási zevérlő megnyitásához.
Zenelejátszás vezérlő
TIP:
Spotify integration requires the Spotify application be
installed on your mobile phone. A compatible mobile digital
device and premium subscription is required, where available.
Go to
www.garmin.com/
.
This product incorporates Spotify software which is subject to
third party licenses found here:
https://developer.spotify.com
/legal/third-party-licenses
. Soundtrack every journey with
Spotify. Play songs and artists you love, or let Spotify entertain
you.
Downloading Audio Content from Spotify
Before you can download audio content from Spotify, you must
connect to a Wi
‑
Fi network (
Connecting to a Wi
‑
Fi Network
,
page 23
).
1
Hold
DOWN
from any screen to open the music controls.
2
Hold .
3
Select
Music Providers
>
Spotify
.
4
Select
Add music & podcasts
.
5
Select a playlist or other item to download to the device.
NOTE:
Downloading audio content can drain the battery. You
may need to connect the device to an external power source
if the remaining battery life is insufficient.
The selected playlists and other items are downloaded to the
device.
Downloading Personal Audio Content
Before you can send your personal music to your device, you
must install the Garmin Express application on your computer
(
www.garmin.com/express
).
You can load your personal audio files, such as .mp3 and .m4a
files, to a Forerunner 745 device from your computer. For more
information, go to
1
Connect the device to your computer using the included USB
cable.
2
On your computer, open the Garmin Express application,
select your device, and select
Music
.
TIP:
For Windows
®
computers, you can select and browse
to the folder with your audio files. For Apple
®
computers, the
Garmin Express application uses your iTunes
®
library.
3
In the
My Music
or
iTunes Library
list, select an audio file
category, such as songs or playlists.
4
Select the checkboxes for the audio files, and select
Send to
Device
.
5
If necessary, in the Forerunner 745 list, select a category,
select the checkboxes, and select
Remove From Device
to
remove audio files.
Listening to Music
1
Hold
DOWN
from any screen to open the music controls.
2
Connect your headphones with Bluetooth technology
(
Connecting Bluetooth Headphones
, page 25
).
3
Hold .
4
Select
Music Providers
, and select an option:
• To listen to music downloaded to the watch from your
computer, select
My Music
(
Downloading Personal Audio
Content
, page 25
).
• To control music playback on your smartphone, select
Control Phone
.
• To listen to music from a third-party provider, select the
name of the provider.
5
Select to open the music playback controls.
Music Playback Controls
Select to manage content from some third-party providers.
Select to browse the audio files and playlists for the selected
source.
Select to adjust the volume.
Select to play and pause the current audio file.
Select to skip to the next audio file in the playlist.
Hold to fast forward through the current audio file.
Select to restart the current audio file.
Select twice to skip to the previous audio file in the playlist.
Hold to rewind through the current audio file.
Select to change the repeat mode.
Select to change the shuffle mode.
Controlling Music Playback on a Connected
Smartphone
1
On your smartphone, start playing a song or playlist.
2
On your Forerunner 745 device, hold
DOWN
from any screen
to open the music controls.
3
Select
Music Providers
>
Control Phone
.
Changing the Audio Mode
You can change the music playback mode from stereo to mono.
1
Hold .
2
Select
Settings
>
Music
>
Audio
.
Select an option.
Connecting Bluetooth Headphones
To listen to music loaded onto your Forerunner 745 device, you
must connect headphones using Bluetooth technology.
1
Bring the headphones within 2 m (6.6 ft.) of your device.
2
Enable pairing mode on the headphones.
3
Hold .
4
Select
Settings
>
Music
>
Headphones
>
Add New
.
5
Select your headphones to complete the pairing process.
Garmin Pay
The Garmin Pay feature allows you to use your watch to pay for
purchases in participating stores using credit or debit cards from
a participating financial institution.
Setting Up Your Garmin Pay Wallet
You can add one or more participating credit or debit cards to
your Garmin Pay wallet. Go to
garmin.com/garminpay/banks
to
find participating financial institutions.
1
From the Garmin Connect app, select or .
2
Select
Garmin Pay
>
Get Started
.
3
Follow the on-screen instructions.
Adding a Card to Your Garmin Pay Wallet
You can add up to 10 credit or debit cards to your Garmin Pay
wallet.
1
From the Garmin Connect app, select or .
Garmin Pay
25
• Pair your Forerunner device with your smartphone using
Bluetooth technology.
• In the Garmin Connect app, from the settings menu, select
Connections
to update the list of connections for your
GroupTrack session.
• Make sure all of your connections pair to their smartphones
and start a LiveTrack session in the Garmin Connect app.
• Make sure all your connections are in range (40 km or
25 mi.).
• During a GroupTrack session, scroll to the map to view your
connections (
Adding a Map to an Activity
, page 30
).
Music
You can download audio content to your device from your
computer or from a third-party provider, so you can listen when
your smartphone is not nearby. To listen to audio content stored
on your device, you must connect headphones with Bluetooth
technology.
You can use the music controls to control music playback on
your smartphone or to play music stored on your device.
Connecting to a Third-Party Provider
Before you can download music or other audio files to your
compatible watch from a supported third-party provider, you
must connect to the provider using the Garmin Connect app.
1
From the Garmin Connect app, select or .
2
Select
Garmin Devices
, and select your device.
3
Select
Music
.
4
Select an option:
• To connect to an installed provider, select a provider, and
follow the on-screen instructions.
• To connect to a new provider, select
,
locate a provider, and follow the on-screen instructions.
Spotify
®
Spotify is a digital music service that gives you access to
millions of songs.
TIP:
Spotify integration requires the Spotify application be
installed on your mobile phone. A compatible mobile digital
device and premium subscription is required, where available.
Go to
www.garmin.com/
.
This product incorporates Spotify software which is subject to
third party licenses found here:
https://developer.spotify.com
/legal/third-party-licenses
. Soundtrack every journey with
Spotify. Play songs and artists you love, or let Spotify entertain
you.
Downloading Audio Content from Spotify
Before you can download audio content from Spotify, you must
connect to a Wi
‑
Fi network (
Connecting to a Wi
‑
Fi Network
,
page 21
).
1
Hold
DOWN
from any screen to open the music controls.
2
Hold
UP
.
3
Select
Music Providers
>
Spotify
.
4
Select
Add music & podcasts
.
5
Select a playlist or other item to download to the device.
NOTE:
Downloading audio content can drain the battery. You
may need to connect the device to an external power source
if the remaining battery life is insufficient.
The selected playlists and other items are downloaded to the
device.
Downloading Personal Audio Content
Before you can send your personal music to your device, you
must install the Garmin Express application on your computer
(
www.garmin.com/express
).
You can load your personal audio files, such as .mp3 and .aac
files, to a Forerunner device from your computer.
1
Connect the device to your computer using the included USB
cable.
2
On your computer, open the Garmin Express application,
select your device, and select
Music
.
TIP:
For Windows
®
computers, you can select and browse
to the folder with your audio files. For Apple
®
computers, the
Garmin Express application uses your iTunes
®
library.
3
In the
My Music
or
iTunes Library
list, select an audio file
category, such as songs or playlists.
4
Select the checkboxes for the audio files, and select
Send to
Device
.
5
If necessary, in the Forerunner list, select a category, select
the checkboxes, and select
Remove From Device
to remove
audio files.
Listening to Music
1
Hold
DOWN
from any screen to open the music controls.
2
Connect your headphones with Bluetooth technology
(
Connecting Headphones using Bluetooth Technology
,
page 23
).
3
Hold .
4
Select
Music Providers
, and select an option:
• To listen to music downloaded to the watch from your
computer, select
My Music
(
Downloading Personal Audio
Content
, page 22
).
• To listen to music from your smartphone, select
Control
Phone
.
• To listen to music from a third-party provider, select the
name of the provider.
5
Select to open the music playback controls.
Music Playback Controls
Select to manage content from some third-party providers.
Select to browse the audio files and playlists for the selected
source.
Select to adjust the volume.
Select to play and pause the current audio file.
Select to skip to the next audio file in the playlist.
Hold to fast forward through the current audio file.
Select to restart the current audio file.
Select twice to skip to the previous audio file in the playlist.
Hold to rewind through the current audio file.
Select to change the repeat mode.
Select to change the shuffle mode.
22
Music
Harmadik felektől származó tartalmak kezelése.
• Pair your Forerunner device with your smartphone using
Bluetooth technology.
• In the Garmin Connect app, from the settings menu, select
Connections
to update the list of connections for your
GroupTrack session.
• Make sure all of your connections pair to their smartphones
and start a LiveTrack session in the Garmin Connect app.
• Make sure all your connections are in range (40 km or
25 mi.).
• During a GroupTrack session, scroll to the map to view your
connections (
Adding a Map to an Activity
, page 30
).
Music
You can download audio content to your device from your
computer or from a third-party provider, so you can listen when
your smartphone is not nearby. To listen to audio content stored
on your device, you must connect headphones with Bluetooth
technology.
You can use the music controls to control music playback on
your smartphone or to play music stored on your device.
Connecting to a Third-Party Provider
Before you can download music or other audio files to your
compatible watch from a supported third-party provider, you
must connect to the provider using the Garmin Connect app.
1
From the Garmin Connect app, select or .
2
Select
Garmin Devices
, and select your device.
3
Select
Music
.
4
Select an option:
• To connect to an installed provider, select a provider, and
follow the on-screen instructions.
• To connect to a new provider, select
,
locate a provider, and follow the on-screen instructions.
Spotify
®
Spotify is a digital music service that gives you access to
millions of songs.
TIP:
Spotify integration requires the Spotify application be
installed on your mobile phone. A compatible mobile digital
device and premium subscription is required, where available.
Go to
www.garmin.com/
.
This product incorporates Spotify software which is subject to
third party licenses found here:
https://developer.spotify.com
/legal/third-party-licenses
. Soundtrack every journey with
Spotify. Play songs and artists you love, or let Spotify entertain
you.
Downloading Audio Content from Spotify
Before you can download audio content from Spotify, you must
connect to a Wi
‑
Fi network (
Connecting to a Wi
‑
Fi Network
,
page 21
).
1
Hold
DOWN
from any screen to open the music controls.
2
Hold
UP
.
3
Select
Music Providers
>
Spotify
.
4
Select
Add music & podcasts
.
5
Select a playlist or other item to download to the device.
NOTE:
Downloading audio content can drain the battery. You
may need to connect the device to an external power source
if the remaining battery life is insufficient.
The selected playlists and other items are downloaded to the
device.
Downloading Personal Audio Content
Before you can send your personal music to your device, you
must install the Garmin Express application on your computer
(
www.garmin.com/express
).
You can load your personal audio files, such as .mp3 and .aac
files, to a Forerunner device from your computer.
1
Connect the device to your computer using the included USB
cable.
2
On your computer, open the Garmin Express application,
select your device, and select
Music
.
TIP:
For Windows
®
computers, you can select and browse
to the folder with your audio files. For Apple
®
computers, the
Garmin Express application uses your iTunes
®
library.
3
In the
My Music
or
iTunes Library
list, select an audio file
category, such as songs or playlists.
4
Select the checkboxes for the audio files, and select
Send to
Device
.
5
If necessary, in the Forerunner list, select a category, select
the checkboxes, and select
Remove From Device
to remove
audio files.
Listening to Music
1
Hold
DOWN
from any screen to open the music controls.
2
Connect your headphones with Bluetooth technology
(
Connecting Headphones using Bluetooth Technology
,
page 23
).
3
Hold .
4
Select
Music Providers
, and select an option:
• To listen to music downloaded to the watch from your
computer, select
My Music
(
Downloading Personal Audio
Content
, page 22
).
• To listen to music from your smartphone, select
Control
Phone
.
• To listen to music from a third-party provider, select the
name of the provider.
5
Select to open the music playback controls.
Music Playback Controls
Select to manage content from some third-party providers.
Select to browse the audio files and playlists for the selected
source.
Select to adjust the volume.
Select to play and pause the current audio file.
Select to skip to the next audio file in the playlist.
Hold to fast forward through the current audio file.
Select to restart the current audio file.
Select twice to skip to the previous audio file in the playlist.
Hold to rewind through the current audio file.
Select to change the repeat mode.
Select to change the shuffle mode.
22
Music
Váltás eszközön vagy párosított okostelefonon található audio tartalmak le
-
játszása között.
Changing Your Garmin Pay Passcode
You must know your current passcode to change it. Your
passcode cannot be recovered. If you forget your passcode, you
must delete your wallet, create a new one, and reenter your card
information.
You can change the passcode required to access your
Garmin Pay wallet on your fēnix 5/5S/5X Plus device.
1
From the fēnix 5/5S/5X Plus device page in the Garmin
Connect Mobile app, select
Garmin Pay
>
Reset Passcode
.
2
Follow the on-screen instructions.
The next time you pay using your fēnix 5/5S/5X Plus device, you
must enter the new passcode.
Music
NOTE:
This section is about three different music playback
options.
You can control music playback on your paired smartphone
using your fēnix 5/5S/5X Plus device.
On a fēnix, you can download audio content to your device from
your computer or from a third-party provider, so you can listen
when your smartphone is not nearby. To listen to audio content
stored on your device, you must connect headphones with
Bluetooth technology.
You can use the music controls to control music playback on
your smartphone or to play music stored on your device.
Connecting to a Third-Party Provider
Before you can download music or other audio files to your fēnix
from a supported third-party provider, you must connect to the
provider using the Garmin Connect Mobile app.
1
From the Garmin Connect Mobile app, select or .
2
Select
Garmin Devices
, and select your device.
3
Select
Music
.
4
Select an option:
• Select a third-party provider, and follow the on-screen
• Select
Get Music Apps
, locate a provider, and follow the
on-screen instructions.
Downloading Audio Content from a Third-Party
Provider
Before you can download audio content from a third-party
provider, you must connect to a Wi
‑
Fi network (
Setting Up Wi
‑
Fi
Connectivity
, page 7
).
1
Hold
DOWN
from any screen to open the music controls.
2
Select >
Music Providers
.
3
Select a connected provider.
4
Select a playlist or other item to download to the device.
5
Select
BACK
until you are prompted to sync with the service,
and select
Yes
.
The selected playlists and other items are downloaded to the
device.
6
Connect the device to an external power source.
Downloading audio content can drain the battery.
Disconnecting from a Third-Party Provider
1
From the Garmin Connect Mobile app, select or .
2
Select
Garmin Devices
3
Select
Music
.
4
Select an installed third-party provider, and follow the on-
screen instructions to disconnect the third-party provider from
your device.
Downloading Personal Audio Content
Before you can send your personal music to your device, you
must install the Garmin Express application on your computer
(
www.garmin.com/express
).
You can load your personal audio files, such as .mp3 and .aac
files, to a fēnix device from your computer.
1
Connect the device to your computer using the included USB
cable.
2
On your computer, open the Garmin Express application,
select your device, and select
Music
.
TIP:
For Windows
®
computers, you can select and browse
to the folder with your audio files. For Apple computers, the
Garmin Express application uses your iTunes
®
library.
3
In the
My Music
or
iTunes Library
list, select an audio file
category, such as songs or playlists.
4
Select the checkboxes for the audio files, and select
Send to
Device
.
5
If necessary, in the fēnix list, select a category, select the
checkboxes, and select
Remove From Device
to remove
audio files.
Listening to Downloaded Music
1
Hold
DOWN
from any screen to open the music controls.
2
Connect your headphones with Bluetooth technology
(
Connecting Headphones using Bluetooth Technology
,
page 10
).
3
Select , and select an option:
• To listen to music downloaded to the watch from your
computer, select
My Music
.
• To listen to music from your smartphone, select
Control
Music on Phone
.
• To listen to music from a third-party provider, select the
name of the provider.
4
Select the music you want to play.
TIP:
Select Play All Songs to start playing all the songs
downloaded to the device in shuffle mode.
Music Playback Controls
Select to manage content from third-party providers.
Select to switch between playing audio from the device and
controlling music on a connected smartphone.
When playing audio from the device, select to browse the
available audio files and playlists in your library.
Select to adjust the volume.
Select to play and pause the current audio file.
Select to skip to the next audio file in the playlist.
Hold to fast forward through the current audio file.
Select to restart the current audio file.
Select twice to skip to the previous audio file in the playlist.
Hold to rewind through the current audio file.
Select to change the repeat mode.
Select to change the shuffle mode.
Music
9
Hangerő szabályozása.
Changing Your Garmin Pay Passcode
You must know your current passcode to change it. Your
passcode cannot be recovered. If you forget your passcode, you
must delete your wallet, create a new one, and reenter your card
information.
You can change the passcode required to access your
Garmin Pay wallet on your fēnix 5/5S/5X Plus device.
1
From the fēnix 5/5S/5X Plus device page in the Garmin
Connect Mobile app, select
Garmin Pay
>
Reset Passcode
.
2
Follow the on-screen instructions.
The next time you pay using your fēnix 5/5S/5X Plus device, you
must enter the new passcode.
Music
NOTE:
This section is about three different music playback
options.
You can control music playback on your paired smartphone
using your fēnix 5/5S/5X Plus device.
On a fēnix, you can download audio content to your device from
your computer or from a third-party provider, so you can listen
when your smartphone is not nearby. To listen to audio content
stored on your device, you must connect headphones with
Bluetooth technology.
You can use the music controls to control music playback on
your smartphone or to play music stored on your device.
Connecting to a Third-Party Provider
Before you can download music or other audio files to your fēnix
from a supported third-party provider, you must connect to the
provider using the Garmin Connect Mobile app.
1
From the Garmin Connect Mobile app, select or .
2
Select
Garmin Devices
, and select your device.
3
Select
Music
.
4
Select an option:
• Select a third-party provider, and follow the on-screen
instructions.
• Select
Get Music Apps
, locate a provider, and follow the
on-screen instructions.
Downloading Audio Content from a Third-Party
Provider
Before you can download audio content from a third-party
provider, you must connect to a Wi
‑
Fi network (
Setting Up Wi
‑
Fi
Connectivity
, page 7
).
1
Hold
DOWN
from any screen to open the music controls.
2
Select >
Music Providers
.
3
Select a connected provider.
4
Select a playlist or other item to download to the device.
5
Select
BACK
until you are prompted to sync with the service,
and select
Yes
.
The selected playlists and other items are downloaded to the
device.
6
Connect the device to an external power source.
Downloading audio content can drain the battery.
Disconnecting from a Third-Party Provider
1
From the Garmin Connect Mobile app, select or .
2
Select
Garmin Devices
3
Select
Music
.
4
Select an installed third-party provider, and follow the on-
screen instructions to disconnect the third-party provider from
your device.
Downloading Personal Audio Content
Before you can send your personal music to your device, you
must install the Garmin Express application on your computer
(
www.garmin.com/express
).
You can load your personal audio files, such as .mp3 and .aac
files, to a fēnix device from your computer.
1
Connect the device to your computer using the included USB
cable.
2
On your computer, open the Garmin Express application,
select your device, and select
Music
.
TIP:
For Windows
®
computers, you can select and browse
to the folder with your audio files. For Apple computers, the
Garmin Express application uses your iTunes
®
library.
3
In the
My Music
or
iTunes Library
list, select an audio file
category, such as songs or playlists.
4
Select the checkboxes for the audio files, and select
Send to
Device
.
5
If necessary, in the fēnix list, select a category, select the
checkboxes, and select
Remove From Device
to remove
audio files.
Listening to Downloaded Music
1
Hold
DOWN
from any screen to open the music controls.
2
Connect your headphones with Bluetooth technology
(
Connecting Headphones using Bluetooth Technology
,
page 10
).
3
Select , and select an option:
• To listen to music downloaded to the watch from your
computer, select
My Music
.
• To listen to music from your smartphone, select
Control
Music on Phone
.
• To listen to music from a third-party provider, select the
name of the provider.
4
Select the music you want to play.
TIP:
Select Play All Songs to start playing all the songs
downloaded to the device in shuffle mode.
Music Playback Controls
Select to manage content from third-party providers.
Select to switch between playing audio from the device and
controlling music on a connected smartphone.
When playing audio from the device, select to browse the
available audio files and playlists in your library.
Select to adjust the volume.
Select to play and pause the current audio file.
Select to skip to the next audio file in the playlist.
Hold to fast forward through the current audio file.
Select to restart the current audio file.
Select twice to skip to the previous audio file in the playlist.
Hold to rewind through the current audio file.
Select to change the repeat mode.
Select to change the shuffle mode.
Music
9
Jelenleg lejátszott audio fájl lejátszása vagy szüneteltetése.
Changing Your Garmin Pay Passcode
You must know your current passcode to change it. Your
passcode cannot be recovered. If you forget your passcode, you
must delete your wallet, create a new one, and reenter your card
information.
You can change the passcode required to access your
Garmin Pay wallet on your fēnix 5/5S/5X Plus device.
1
From the fēnix 5/5S/5X Plus device page in the Garmin
Connect Mobile app, select
Garmin Pay
>
Reset Passcode
.
2
Follow the on-screen instructions.
The next time you pay using your fēnix 5/5S/5X Plus device, you
must enter the new passcode.
Music
NOTE:
This section is about three different music playback
options.
You can control music playback on your paired smartphone
using your fēnix 5/5S/5X Plus device.
On a fēnix, you can download audio content to your device from
your computer or from a third-party provider, so you can listen
when your smartphone is not nearby. To listen to audio content
stored on your device, you must connect headphones with
Bluetooth technology.
You can use the music controls to control music playback on
your smartphone or to play music stored on your device.
Connecting to a Third-Party Provider
Before you can download music or other audio files to your fēnix
from a supported third-party provider, you must connect to the
provider using the Garmin Connect Mobile app.
1
From the Garmin Connect Mobile app, select or .
2
Select
Garmin Devices
, and select your device.
3
Select
Music
.
4
Select an option:
• Select a third-party provider, and follow the on-screen
instructions.
• Select
Get Music Apps
, locate a provider, and follow the
on-screen instructions.
Downloading Audio Content from a Third-Party
Before you can download audio content from a third-party
provider, you must connect to a Wi
‑
Fi network (
Setting Up Wi
‑
Fi
Connectivity
, page 7
).
1
Hold
DOWN
from any screen to open the music controls.
2
Select >
Music Providers
.
3
Select a connected provider.
4
Select a playlist or other item to download to the device.
5
Select
BACK
until you are prompted to sync with the service,
and select
Yes
.
The selected playlists and other items are downloaded to the
device.
6
Connect the device to an external power source.
Downloading audio content can drain the battery.
Disconnecting from a Third-Party Provider
1
From the Garmin Connect Mobile app, select or .
2
Select
Garmin Devices
, and select your device.
3
Select
Music
.
4
Select an installed third-party provider, and follow the on-
screen instructions to disconnect the third-party provider from
your device.
Downloading Personal Audio Content
Before you can send your personal music to your device, you
must install the Garmin Express application on your computer
(
www.garmin.com/express
).
You can load your personal audio files, such as .mp3 and .aac
files, to a fēnix device from your computer.
1
Connect the device to your computer using the included USB
cable.
2
On your computer, open the Garmin Express application,
select your device, and select
Music
.
TIP:
For Windows
®
computers, you can select and browse
to the folder with your audio files. For Apple computers, the
Garmin Express application uses your iTunes
®
library.
3
In the
My Music
or
iTunes Library
list, select an audio file
category, such as songs or playlists.
4
Select the checkboxes for the audio files, and select
Send to
Device
.
5
If necessary, in the fēnix list, select a category, select the
checkboxes, and select
Remove From Device
to remove
audio files.
Listening to Downloaded Music
1
Hold
DOWN
from any screen to open the music controls.
2
Connect your headphones with Bluetooth technology
(
Connecting Headphones using Bluetooth Technology
,
page 10
).
3
Select , and select an option:
• To listen to music downloaded to the watch from your
computer, select
My Music
.
• To listen to music from your smartphone, select
Control
Music on Phone
.
• To listen to music from a third-party provider, select the
name of the provider.
4
Select the music you want to play.
TIP:
Select Play All Songs to start playing all the songs
downloaded to the device in shuffle mode.
Music Playback Controls
Select to manage content from third-party providers.
Select to switch between playing audio from the device and
controlling music on a connected smartphone.
When playing audio from the device, select to browse the
available audio files and playlists in your library.
Select to adjust the volume.
Select to play and pause the current audio file.
Select to skip to the next audio file in the playlist.
Hold to fast forward through the current audio file.
Select to restart the current audio file.
Select twice to skip to the previous audio file in the playlist.
Hold to rewind through the current audio file.
Select to change the repeat mode.
Select to change the shuffle mode.
Music
9
Ugrás a következő audio fájlhoz a lejátszási listán.
Hosszan megnyomva a jelenleg lejátszott audio fájlban futtathatunk előre.
Changing Your Garmin Pay Passcode
You must know your current passcode to change it. Your
passcode cannot be recovered. If you forget your passcode, you
must delete your wallet, create a new one, and reenter your card
information.
You can change the passcode required to access your
Garmin Pay wallet on your fēnix 5/5S/5X Plus device.
1
From the fēnix 5/5S/5X Plus device page in the Garmin
Connect Mobile app, select
Garmin Pay
>
Reset Passcode
.
2
Follow the on-screen instructions.
The next time you pay using your fēnix 5/5S/5X Plus device, you
must enter the new passcode.
Music
NOTE:
This section is about three different music playback
options.
You can control music playback on your paired smartphone
using your fēnix 5/5S/5X Plus device.
On a fēnix, you can download audio content to your device from
your computer or from a third-party provider, so you can listen
when your smartphone is not nearby. To listen to audio content
stored on your device, you must connect headphones with
Bluetooth technology.
You can use the music controls to control music playback on
your smartphone or to play music stored on your device.
Connecting to a Third-Party Provider
Before you can download music or other audio files to your fēnix
from a supported third-party provider, you must connect to the
provider using the Garmin Connect Mobile app.
1
From the Garmin Connect Mobile app, select or .
2
Select
Garmin Devices
, and select your device.
3
Select
Music
.
4
Select an option:
• Select a third-party provider, and follow the on-screen
instructions.
• Select
Get Music Apps
, locate a provider, and follow the
on-screen instructions.
Downloading Audio Content from a Third-Party
Before you can download audio content from a third-party
provider, you must connect to a Wi
‑
Fi network (
Setting Up Wi
‑
Fi
Connectivity
, page 7
).
1
Hold
DOWN
from any screen to open the music controls.
2
Select >
Music Providers
.
3
Select a connected provider.
4
Select a playlist or other item to download to the device.
5
Select
BACK
until you are prompted to sync with the service,
and select
Yes
.
The selected playlists and other items are downloaded to the
device.
6
Connect the device to an external power source.
Downloading audio content can drain the battery.
Disconnecting from a Third-Party Provider
1
From the Garmin Connect Mobile app, select or .
2
Select
Garmin Devices
, and select your device.
3
Select
Music
.
4
Select an installed third-party provider, and follow the on-
screen instructions to disconnect the third-party provider from
your device.
Downloading Personal Audio Content
Before you can send your personal music to your device, you
must install the Garmin Express application on your computer
(
www.garmin.com/express
).
You can load your personal audio files, such as .mp3 and .aac
files, to a fēnix device from your computer.
1
Connect the device to your computer using the included USB
cable.
2
On your computer, open the Garmin Express application,
select your device, and select
Music
.
TIP:
For Windows
®
computers, you can select and browse
to the folder with your audio files. For Apple computers, the
Garmin Express application uses your iTunes
®
library.
3
In the
My Music
or
iTunes Library
list, select an audio file
category, such as songs or playlists.
4
Select the checkboxes for the audio files, and select
Send to
Device
.
5
If necessary, in the fēnix list, select a category, select the
checkboxes, and select
Remove From Device
to remove
audio files.
Listening to Downloaded Music
1
Hold
DOWN
from any screen to open the music controls.
2
Connect your headphones with Bluetooth technology
(
Connecting Headphones using Bluetooth Technology
,
page 10
).
3
Select , and select an option:
• To listen to music downloaded to the watch from your
computer, select
My Music
.
• To listen to music from your smartphone, select
Control
Music on Phone
.
• To listen to music from a third-party provider, select the
name of the provider.
4
Select the music you want to play.
TIP:
Select Play All Songs to start playing all the songs
downloaded to the device in shuffle mode.
Music Playback Controls
Select to manage content from third-party providers.
Select to switch between playing audio from the device and
controlling music on a connected smartphone.
When playing audio from the device, select to browse the
available audio files and playlists in your library.
Select to adjust the volume.
Select to play and pause the current audio file.
Select to skip to the next audio file in the playlist.
Hold to fast forward through the current audio file.
Select to restart the current audio file.
Select twice to skip to the previous audio file in the playlist.
Hold to rewind through the current audio file.
Select to change the repeat mode.
Select to change the shuffle mode.
Music
9
Jelenlegi audio fájl újraindítása.
Kétszer megnyomva visszaugorhatunk az előző audió fájlhoz a lejátszási
listán.
Hosszan lenyomva visszatekerhetünk a jelenleg lejátszott audio fájlban.
Changing Your Garmin Pay Passcode
You must know your current passcode to change it. Your
passcode cannot be recovered. If you forget your passcode, you
must delete your wallet, create a new one, and reenter your card
information.
You can change the passcode required to access your
Garmin Pay wallet on your fēnix 5/5S/5X Plus device.
1
From the fēnix 5/5S/5X Plus device page in the Garmin
Connect Mobile app, select
Garmin Pay
>
Reset Passcode
.
2
Follow the on-screen instructions.
The next time you pay using your fēnix 5/5S/5X Plus device, you
must enter the new passcode.
Music
NOTE:
This section is about three different music playback
options.
You can control music playback on your paired smartphone
using your fēnix 5/5S/5X Plus device.
On a fēnix, you can download audio content to your device from
your computer or from a third-party provider, so you can listen
when your smartphone is not nearby. To listen to audio content
stored on your device, you must connect headphones with
Bluetooth technology.
You can use the music controls to control music playback on
your smartphone or to play music stored on your device.
Connecting to a Third-Party Provider
Before you can download music or other audio files to your fēnix
from a supported third-party provider, you must connect to the
provider using the Garmin Connect Mobile app.
1
From the Garmin Connect Mobile app, select or .
2
Select
Garmin Devices
, and select your device.
3
Select
Music
.
Select an option:
• Select a third-party provider, and follow the on-screen
instructions.
• Select
Get Music Apps
, locate a provider, and follow the
on-screen instructions.
Downloading Audio Content from a Third-Party
Provider
Before you can download audio content from a third-party
provider, you must connect to a Wi
‑
Fi network (
Setting Up Wi
‑
Fi
Connectivity
, page 7
).
1
Hold
DOWN
from any screen to open the music controls.
2
Select >
Music Providers
.
3
Select a connected provider.
4
Select a playlist or other item to download to the device.
5
Select
BACK
until you are prompted to sync with the service,
and select
Yes
.
The selected playlists and other items are downloaded to the
device.
6
Connect the device to an external power source.
Downloading audio content can drain the battery.
Disconnecting from a Third-Party Provider
1
From the Garmin Connect Mobile app, select or .
2
Select
Garmin Devices
, and select your device.
3
Select
Music
.
4
Select an installed third-party provider, and follow the on-
screen instructions to disconnect the third-party provider from
your device.
Downloading Personal Audio Content
Before you can send your personal music to your device, you
must install the Garmin Express application on your computer
(
www.garmin.com/express
).
You can load your personal audio files, such as .mp3 and .aac
files, to a fēnix device from your computer.
1
Connect the device to your computer using the included USB
cable.
2
On your computer, open the Garmin Express application,
select your device, and select
Music
.
TIP:
For Windows
®
computers, you can select and browse
to the folder with your audio files. For Apple computers, the
Garmin Express application uses your iTunes
®
library.
3
In the
My Music
or
iTunes Library
list, select an audio file
category, such as songs or playlists.
4
Select the checkboxes for the audio files, and select
Send to
Device
.
5
If necessary, in the fēnix list, select a category, select the
checkboxes, and select
Remove From Device
to remove
audio files.
Listening to Downloaded Music
1
Hold
DOWN
from any screen to open the music controls.
2
Connect your headphones with Bluetooth technology
(
Connecting Headphones using Bluetooth Technology
,
page 10
).
3
Select , and select an option:
• To listen to music downloaded to the watch from your
computer, select
My Music
.
• To listen to music from your smartphone, select
Control
Music on Phone
.
• To listen to music from a third-party provider, select the
name of the provider.
4
Select the music you want to play.
TIP:
Select Play All Songs to start playing all the songs
downloaded to the device in shuffle mode.
Music Playback Controls
Select to manage content from third-party providers.
Select to switch between playing audio from the device and
controlling music on a connected smartphone.
When playing audio from the device, select to browse the
available audio files and playlists in your library.
Select to adjust the volume.
Select to play and pause the current audio file.
Select to skip to the next audio file in the playlist.
Hold to fast forward through the current audio file.
Select to restart the current audio file.
Select twice to skip to the previous audio file in the playlist.
Hold to rewind through the current audio file.
Select to change the repeat mode.
Select to change the shuffle mode.
Music
9
Ismétlő üzemmód be- és kikapcsolása.
Changing Your Garmin Pay Passcode
You must know your current passcode to change it. Your
passcode cannot be recovered. If you forget your passcode, you
must delete your wallet, create a new one, and reenter your card
information.
You can change the passcode required to access your
Garmin Pay wallet on your fēnix 5/5S/5X Plus device.
1
From the fēnix 5/5S/5X Plus device page in the Garmin
Connect Mobile app, select
Garmin Pay
>
Reset Passcode
.
2
Follow the on-screen instructions.
The next time you pay using your fēnix 5/5S/5X Plus device, you
must enter the new passcode.
Music
NOTE:
This section is about three different music playback
options.
You can control music playback on your paired smartphone
using your fēnix 5/5S/5X Plus device.
On a fēnix, you can download audio content to your device from
your computer or from a third-party provider, so you can listen
when your smartphone is not nearby. To listen to audio content
stored on your device, you must connect headphones with
Bluetooth technology.
You can use the music controls to control music playback on
your smartphone or to play music stored on your device.
Connecting to a Third-Party Provider
Before you can download music or other audio files to your fēnix
from a supported third-party provider, you must connect to the
provider using the Garmin Connect Mobile app.
1
From the Garmin Connect Mobile app, select or .
2
Select
Garmin Devices
, and select your device.
4
Select an option:
• Select a third-party provider, and follow the on-screen
instructions.
• Select
Get Music Apps
, locate a provider, and follow the
on-screen instructions.
Downloading Audio Content from a Third-Party
Provider
Before you can download audio content from a third-party
provider, you must connect to a Wi
‑
Fi network (
Setting Up Wi
‑
Fi
Connectivity
, page 7
).
1
Hold
DOWN
from any screen to open the music controls.
2
Select >
Music Providers
.
3
Select a connected provider.
4
Select a playlist or other item to download to the device.
5
Select
BACK
until you are prompted to sync with the service,
and select
Yes
.
The selected playlists and other items are downloaded to the
device.
6
Connect the device to an external power source.
Downloading audio content can drain the battery.
Disconnecting from a Third-Party Provider
1
From the Garmin Connect Mobile app, select or .
2
Select
Garmin Devices
, and select your device.
3
Select
Music
.
4
Select an installed third-party provider, and follow the on-
screen instructions to disconnect the third-party provider from
your device.
Downloading Personal Audio Content
Before you can send your personal music to your device, you
must install the Garmin Express application on your computer
(
www.garmin.com/express
).
You can load your personal audio files, such as .mp3 and .aac
files, to a fēnix device from your computer.
1
Connect the device to your computer using the included USB
cable.
2
On your computer, open the Garmin Express application,
select your device, and select
Music
.
TIP:
For Windows
®
computers, you can select and browse
to the folder with your audio files. For Apple computers, the
Garmin Express application uses your iTunes
®
library.
3
In the
My Music
or
iTunes Library
list, select an audio file
category, such as songs or playlists.
4
Select the checkboxes for the audio files, and select
Send to
Device
.
5
If necessary, in the fēnix list, select a category, select the
checkboxes, and select
Remove From Device
to remove
audio files.
Listening to Downloaded Music
1
Hold
DOWN
from any screen to open the music controls.
2
Connect your headphones with Bluetooth technology
(
Connecting Headphones using Bluetooth Technology
,
page 10
).
3
Select , and select an option:
• To listen to music downloaded to the watch from your
computer, select
My Music
.
• To listen to music from your smartphone, select
Control
Music on Phone
.
• To listen to music from a third-party provider, select the
name of the provider.
4
Select the music you want to play.
TIP:
Select Play All Songs to start playing all the songs
downloaded to the device in shuffle mode.
Music Playback Controls
Select to manage content from third-party providers.
Select to switch between playing audio from the device and
controlling music on a connected smartphone.
When playing audio from the device, select to browse the
available audio files and playlists in your library.
Select to adjust the volume.
Select to play and pause the current audio file.
Select to skip to the next audio file in the playlist.
Hold to fast forward through the current audio file.
Select to restart the current audio file.
Select twice to skip to the previous audio file in the playlist.
Hold to rewind through the current audio file.
Select to change the repeat mode.
Select to change the shuffle mode.
Music
9
Keverő üzemmód be- és kikapcsolása.
Zenelejátszás vezérlése csatlakoztatott okostelefonról
1.
Az okostelefonunkon indítsunk el egy zeneszámot vagy lejátszási listát.
2.
A Forerunner készüléken bármely képernyőről tartsuk lenyomva a
DOWN
gombot a zenevezérlő megjelenítéséhez.
3.
Válasszuk a
Zeneszolgáltatók
>
Vezérlés telefonról
pontot.
Lejátszási mód kiválasztása
Választhatunk sztereó és monó zenelejátszási mód között.
1.
Nyomjuk le hosszan a
Introduction
WARNING
See the
Important Safety and Product Information
guide in the
product box for product warnings and other important
information.
Always consult your physician before you begin or modify any
exercise program.
Keys
À
LIGHT
Hold to turn the device on.
Hold to view the controls menu.
Select to turn the backlight on and off.
Á
START
STOP
Select to start and stop the timer.
Select to choose an option or to acknowledge a message.
Â
BACK
Select to record a lap, rest, or transition during an activity.
Select to return to the previous screen.
Ã
DOWN Select to scroll through the widgets, data screens, options,
and settings.
Hold to manually change sports during an activity.
Ä
UP
Select to scroll through the widgets, data screens, options,
and settings.
Hold to view the menu.
GPS Status and Status Icons
The GPS status ring and icons temporarily overlay each data
screen. For outdoor activities, the status ring turns green when
GPS is ready. A flashing icon means the device is searching for
a signal. A solid icon means the signal was found or the sensor
is connected.
GPS
GPS status
Battery status
Smartphone connection status
Wi
‑
Fi
®
technology status
Heart rate status
Foot pod status
Running Dynamics Pod status
Speed and cadence sensor status
Power meter status
tempe
™
sensor status
VIRB
®
camera status
Going for a Run
The first fitness activity you record on your device can be a run,
ride, or any outdoor activity. You may need to charge the device
before starting the activity (
Charging the Device
, page 26
).
1
Select
START
, and select an activity.
2
Go outside, and wait while the device locates satellites.
3
Select
START
to start the timer.
4
Go for a run.
5
After you complete your run, select
STOP
to stop the timer.
6
Select an option:
•
Select
Resume
to restart the timer.
•
Select
Save
to save the run and reset the timer. You can
select the run to view a summary.
•
Select
Resume Later
to suspend the run and continue
recording later.
•
Select
Lap
to mark a lap.
•
Select
Discard
>
Yes
to delete the run.
Activities
Your device can be used for indoor, outdoor, athletic, and fitness
activities. When you start an activity, the device displays and
records sensor data. You can save activities and share them
with the Garmin Connect
™
community.
You can also add Connect IQ
™
activity apps to your device using
your Garmin Connect account (
Connect IQ Features
,
page 17
).
For more information about activity tracking and fitness metric
accuracy, go to
garmin.com/ataccuracy
.
Starting an Activity
When you start an activity, GPS turns on automatically (if
required). When you stop the activity, the device returns to
watch mode.
1
From the watch face, select
START
.
2
Select an activity.
3
If necessary, follow the on-screen instructions to enter
additional information.
4
If necessary, wait while the device connects to your ANT+
®
sensors.
5
If the activity requires GPS, go outside, and wait while the
device locates satellites.
6
Select
START
to start the timer.
NOTE:
The device does not record your activity data until
you start the timer.
Tips for Recording Activities
•
Charge the device before starting an activity (
Charging the
Device
, page 26
).
•
Select
to record laps.
•
Select
UP
or
DOWN
to view additional data pages.
Introduction
1
gombot.
2.
Válasszunk a
Beállítások
>
Zene
>
Audio
pontot.
3.
Válasszunk a lehetőségek közül.
Fülhallgató csatlakoztatása Bluetooth technológiával
Az eszközre letöltött zenék meghallgatásához Bluetooth technológiát hasz
-
náló fülhallgatót kell párosítanunk az eszközzel.
1.
Hozzuk az eszközt és a fülhallgatót 2 méteres távolságon belül egymás
-
hoz.
2.
A fülhallgatókon aktiváljuk a párosító módot.
3.
Nyomjuk le hosszan a
Introduction
WARNING
See the
Important Safety and Product Information
guide in the
product box for product warnings and other important
information.
Always consult your physician before you begin or modify any
exercise program.
Keys
À
LIGHT
Hold to turn the device on.
Hold to view the controls menu.
Select to turn the backlight on and off.
Á
START
STOP
Select to start and stop the timer.
Select to choose an option or to acknowledge a message.
Â
BACK
Select to record a lap, rest, or transition during an activity.
Select to return to the previous screen.
Ã
DOWN Select to scroll through the widgets, data screens, options,
and settings.
Hold to manually change sports during an activity.
Ä
UP
Select to scroll through the widgets, data screens, options,
and settings.
Hold to view the menu.
GPS Status and Status Icons
The GPS status ring and icons temporarily overlay each data
screen. For outdoor activities, the status ring turns green when
GPS is ready. A flashing icon means the device is searching for
a signal. A solid icon means the signal was found or the sensor
is connected.
GPS
GPS status
Battery status
Smartphone connection status
Wi
‑
Fi
®
technology status
Heart rate status
Foot pod status
Running Dynamics Pod status
Speed and cadence sensor status
Power meter status
tempe
™
sensor status
VIRB
®
camera status
Going for a Run
The first fitness activity you record on your device can be a run,
ride, or any outdoor activity. You may need to charge the device
before starting the activity (
Charging the Device
, page 26
).
1
Select
START
, and select an activity.
2
Go outside, and wait while the device locates satellites.
3
Select
START
to start the timer.
4
Go for a run.
5
After you complete your run, select
STOP
to stop the timer.
6
Select an option:
•
Select
Resume
to restart the timer.
•
Select
Save
to save the run and reset the timer. You can
select the run to view a summary.
•
Select
Resume Later
to suspend the run and continue
recording later.
•
Select
Lap
to mark a lap.
•
Select
Discard
>
Yes
to delete the run.
Activities
Your device can be used for indoor, outdoor, athletic, and fitness
activities. When you start an activity, the device displays and
records sensor data. You can save activities and share them
with the Garmin Connect
™
community.
You can also add Connect IQ
™
activity apps to your device using
your Garmin Connect account (
Connect IQ Features
,
page 17
).
For more information about activity tracking and fitness metric
accuracy, go to
garmin.com/ataccuracy
.
Starting an Activity
When you start an activity, GPS turns on automatically (if
required). When you stop the activity, the device returns to
watch mode.
1
From the watch face, select
START
.
2
Select an activity.
3
If necessary, follow the on-screen instructions to enter
additional information.
4
If necessary, wait while the device connects to your ANT+
®
sensors.
5
If the activity requires GPS, go outside, and wait while the
device locates satellites.
6
Select
START
to start the timer.
NOTE:
The device does not record your activity data until
you start the timer.
Tips for Recording Activities
•
Charge the device before starting an activity (
Charging the
Device
, page 26
).
•
Select
to record laps.
•
Select
UP
or
DOWN
to view additional data pages.
Introduction
1
-t.
4.
Válasszuk a
Beállítások
>
Zene
>
Fülhallgató
>
Új hozzáadása
pon
-
tot.
5.
Válasszuk ki a fülhallgatónkat a párosítás véglegesítéséhez.
Garmin Pay
A Garmin Pay funkció lehetővé teszi, hogy az órát a közreműködő áruházak
-
ban, üzletekben közreműködő pénzügyi intézménytől származó bankkártya
vagy hitelkártya használatával fizessünk.
GarminPay pénztárca beállítása
GarminPay pénztárcánkhoz egy vagy több közreműködő hitel- vagy bankkár
-
tyát adhatunk hozzá. A garmin.com/garminpay/banks oldalon megtalálhatjuk
a közreműködő pénzügyi intézmények listáját.
1.
A GarminConnect alkalmazásban válasszuk a
Introduction
WARNING
See the
Important Safety and Product Information
guide in the
product box for product warnings and other important
information.
Always consult your physician before you begin or modify any
exercise program.
Keys
À
LIGHT
Hold to turn the device on.
Hold to view the controls menu.
Select to turn the backlight on and off.
Á
START
STOP
Select to start and stop the timer.
Select to choose an option or to acknowledge a message.
Â
BACK
Select to record a lap, rest, or transition during an activity.
Select to return to the previous screen.
Ã
DOWN Select to scroll through the widgets, data screens, options,
and settings.
Hold to manually change sports during an activity.
Ä
UP
Select to scroll through the widgets, data screens, options,
and settings.
Hold to view the menu.
GPS Status and Status Icons
The GPS status ring and icons temporarily overlay each data
screen. For outdoor activities, the status ring turns green when
GPS is ready. A flashing icon means the device is searching for
a signal. A solid icon means the signal was found or the sensor
is connected.
GPS
GPS status
Battery status
Smartphone connection status
Wi
‑
Fi
®
technology status
Heart rate status
Foot pod status
Running Dynamics Pod status
Speed and cadence sensor status
Power meter status
tempe
™
sensor status
VIRB
®
camera status
Going for a Run
The first fitness activity you record on your device can be a run,
ride, or any outdoor activity. You may need to charge the device
before starting the activity (
Charging the Device
, page 26
).
1
Select
START
, and select an activity.
2
Go outside, and wait while the device locates satellites.
3
Select
START
to start the timer.
4
Go for a run.
5
After you complete your run, select
STOP
to stop the timer.
6
Select an option:
•
Select
Resume
to restart the timer.
•
Select
Save
to save the run and reset the timer. You can
select the run to view a summary.
•
Select
Resume Later
to suspend the run and continue
recording later.
•
Select
Lap
to mark a lap.
•
Select
Discard
>
Yes
to delete the run.
Activities
Your device can be used for indoor, outdoor, athletic, and fitness
activities. When you start an activity, the device displays and
records sensor data. You can save activities and share them
with the Garmin Connect
™
community.
You can also add Connect IQ
™
activity apps to your device using
your Garmin Connect account (
Connect IQ Features
,
page 17
).
For more information about activity tracking and fitness metric
accuracy, go to
garmin.com/ataccuracy
.
Starting an Activity
When you start an activity, GPS turns on automatically (if
required). When you stop the activity, the device returns to
watch mode.
1
From the watch face, select
START
.
2
Select an activity.
3
If necessary, follow the on-screen instructions to enter
additional information.
4
If necessary, wait while the device connects to your ANT+
®
sensors.
5
If the activity requires GPS, go outside, and wait while the
device locates satellites.
6
Select
START
to start the timer.
NOTE:
The device does not record your activity data until
you start the timer.
Tips for Recording Activities
•
Charge the device before starting an activity (
Charging the
Device
, page 26
).
•
Select
to record laps.
•
Select
UP
or
DOWN
to view additional data pages.
Introduction
1
vagy
Introduction
WARNING
See the
Important Safety and Product Information
guide in the
product box for product warnings and other important
information.
Always consult your physician before you begin or modify any
exercise program.
Keys
À
Select to wake the device.
Hold to turn the device on and off.
Á
Select to scroll through the data screens, options, and
settings.
From the home screen, hold to view the device menu.
Â
Select to scroll through the data screens, options, and
settings.
From the home screen, select to view the widgets.
Ã
Select to start and stop the timer.
Select to choose an option or to acknowledge a message.
Ä
Select to mark a new lap.
Select to return to the previous screen.
Status Icons
A solid icon means the signal was found or the sensor is
connected.
GPS status
Bluetooth
®
status
Heart rate status
Power status
LiveTrack status
Speed and cadence status
Pairing Your Smartphone
To use the connected features of the Edge device, it must be
paired directly through the Garmin Connect
™
Mobile app,
instead of from the Bluetooth settings on your smartphone.
1
From the app store on your smartphone, install and open the
Garmin Connect Mobile app.
2
Hold to turn on the device.
The first time you turn on the device, you will select the
device language. The next screen prompts you to pair with
your smartphone.
TIP:
You can hold , and select
Phone
>
Status
>
Pair
Phone
to manually enter pairing mode.
3
Select an option to add your device to your Garmin Connect
account:
• If this is the first device you have paired with the Garmin
Connect Mobile app, follow the on-screen instructions.
• If you have already paired another device with the Garmin
Connect Mobile app, from the or menu, select
Garmin Devices
>
Add Device
, and follow the on-screen
instructions.
After you pair successfully, a message appears, and your device
syncs automatically with your smartphone.
Installing the Standard Mount
For the best GPS reception, position the bike mount so the front
of the device is oriented toward the sky. You can install the bike
mount on the stem or the handlebars.
1
Select a secure location to mount the device where it does
not interfere with the safe operation of your bike.
2
Place the rubber disk
À
on the back of the bike mount.
The rubber tabs align with the back of the bike mount so it
stays in place.
3
Place the bike mount on the bike stem.
4
Attach the bike mount securely using the two bands
Á
.
5
Align the tabs on the back of the device with the bike mount
notches
Â
.
6
Press down slightly and turn the device clockwise until it
locks into place.
Releasing the Edge
1
Turn the Edge clockwise to unlock the device.
2
Lift the Edge off the mount.
Charging the Device
NOTICE
To prevent corrosion, thoroughly dry the USB port, the weather
cap, and the surrounding area before charging or connecting to
a computer.
The device is powered by a built-in lithium-ion battery that you
can charge using a standard wall outlet or a USB port on your
computer.
NOTE:
The device will not charge when outside the approved
temperature range (
Edge Specifications
, page 10
).
1
Pull up the weather cap
À
from the USB port
Á
.
Introduction
1
pontot.
2.
Válasszuk a
Garmin Pay
>
Pénztárca létrehozása
pontot.
3.
Kövessük a képernyőn megjelenő utasításokat.
Kártya hozzáadása a Garmin Pay pénztárcához
Maximum tíz kártyát adhatunk hozzá a Garmin Pay pénztárcánkhoz.
1.
A Garmin Connect alkalmazásban válasszuk a
Introduction
WARNING
See the
Important Safety and Product Information
guide in the
product box for product warnings and other important
information.
Always consult your physician before you begin or modify any
exercise program.
Keys
À
LIGHT
Hold to turn the device on.
Hold to view the controls menu.
Select to turn the backlight on and off.
Á
START
STOP
Select to start and stop the timer.
Select to choose an option or to acknowledge a message.
Â
BACK
Select to record a lap, rest, or transition during an activity.
Select to return to the previous screen.
Ã
DOWN Select to scroll through the widgets, data screens, options,
and settings.
Hold to manually change sports during an activity.
Ä
UP
Select to scroll through the widgets, data screens, options,
and settings.
Hold to view the menu.
GPS Status and Status Icons
The GPS status ring and icons temporarily overlay each data
screen. For outdoor activities, the status ring turns green when
GPS is ready. A flashing icon means the device is searching for
a signal. A solid icon means the signal was found or the sensor
is connected.
GPS
GPS status
Battery status
Smartphone connection status
Wi
‑
Fi
®
technology status
Heart rate status
Foot pod status
Running Dynamics Pod status
Speed and cadence sensor status
Power meter status
tempe
™
sensor status
VIRB
®
camera status
Going for a Run
The first fitness activity you record on your device can be a run,
ride, or any outdoor activity. You may need to charge the device
before starting the activity (
Charging the Device
, page 26
).
1
Select
START
, and select an activity.
2
Go outside, and wait while the device locates satellites.
3
Select
START
to start the timer.
4
Go for a run.
5
After you complete your run, select
STOP
to stop the timer.
6
Select an option:
•
Select
Resume
to restart the timer.
•
Select
Save
to save the run and reset the timer. You can
select the run to view a summary.
•
Select
Resume Later
to suspend the run and continue
recording later.
•
Select
Lap
to mark a lap.
•
Select
Discard
>
Yes
to delete the run.
Activities
Your device can be used for indoor, outdoor, athletic, and fitness
activities. When you start an activity, the device displays and
records sensor data. You can save activities and share them
with the Garmin Connect
™
community.
You can also add Connect IQ
™
activity apps to your device using
your Garmin Connect account (
Connect IQ Features
,
page 17
).
For more information about activity tracking and fitness metric
accuracy, go to
garmin.com/ataccuracy
.
Starting an Activity
When you start an activity, GPS turns on automatically (if
required). When you stop the activity, the device returns to
watch mode.
1
From the watch face, select
START
.
2
Select an activity.
3
If necessary, follow the on-screen instructions to enter
additional information.
4
If necessary, wait while the device connects to your ANT+
®
sensors.
5
If the activity requires GPS, go outside, and wait while the
device locates satellites.
6
Select
START
to start the timer.
NOTE:
The device does not record your activity data until
you start the timer.
Tips for Recording Activities
•
Charge the device before starting an activity (
Charging the
Device
, page 26
).
•
Select
to record laps.
•
Select
UP
or
DOWN
to view additional data pages.
Introduction
1
vagy
Introduction
WARNING
See the
Important Safety and Product Information
guide in the
product box for product warnings and other important
information.
Always consult your physician before you begin or modify any
exercise program.
Keys
À
Select to wake the device.
Hold to turn the device on and off.
Á
Select to scroll through the data screens, options, and
settings.
From the home screen, hold to view the device menu.
Â
Select to scroll through the data screens, options, and
settings.
From the home screen, select to view the widgets.
Ã
Select to start and stop the timer.
Select to choose an option or to acknowledge a message.
Ä
Select to mark a new lap.
Select to return to the previous screen.
Status Icons
A solid icon means the signal was found or the sensor is
connected.
GPS status
Bluetooth
®
status
Heart rate status
Power status
LiveTrack status
Speed and cadence status
Pairing Your Smartphone
To use the connected features of the Edge device, it must be
paired directly through the Garmin Connect
™
Mobile app,
instead of from the Bluetooth settings on your smartphone.
1
From the app store on your smartphone, install and open the
Garmin Connect Mobile app.
2
Hold to turn on the device.
The first time you turn on the device, you will select the
device language. The next screen prompts you to pair with
your smartphone.
TIP:
You can hold , and select
Phone
>
Status
>
Pair
Phone
to manually enter pairing mode.
3
Select an option to add your device to your Garmin Connect
account:
• If this is the first device you have paired with the Garmin
Connect Mobile app, follow the on-screen instructions.
• If you have already paired another device with the Garmin
Connect Mobile app, from the or menu, select
Garmin Devices
>
Add Device
, and follow the on-screen
instructions.
After you pair successfully, a message appears, and your device
syncs automatically with your smartphone.
Installing the Standard Mount
For the best GPS reception, position the bike mount so the front
of the device is oriented toward the sky. You can install the bike
mount on the stem or the handlebars.
1
Select a secure location to mount the device where it does
not interfere with the safe operation of your bike.
2
Place the rubber disk
À
on the back of the bike mount.
The rubber tabs align with the back of the bike mount so it
stays in place.
3
Place the bike mount on the bike stem.
4
Attach the bike mount securely using the two bands
Á
.
5
Align the tabs on the back of the device with the bike mount
notches
Â
.
6
Press down slightly and turn the device clockwise until it
locks into place.
Releasing the Edge
1
Turn the Edge clockwise to unlock the device.
2
Lift the Edge off the mount.
Charging the Device
NOTICE
To prevent corrosion, thoroughly dry the USB port, the weather
cap, and the surrounding area before charging or connecting to
a computer.
The device is powered by a built-in lithium-ion battery that you
can charge using a standard wall outlet or a USB port on your
computer.
NOTE:
The device will not charge when outside the approved
temperature range (
Edge Specifications
, page 10
).
1
Pull up the weather cap
À
from the USB port
Á
.
Introduction
1
pontot.
2.
Válasszuk a
Garmin Pay
>
2
Select
Garmin Pay
> >
Add Card
.
3
Follow the on-screen instructions.
After the card is added, you can select the card on your watch
when you make a payment.
Managing Your Garmin Pay Cards
You can temporarily suspend or delete a card.
NOTE:
In some countries, participating financial institutions may
restrict the Garmin Pay features.
1
From the Garmin Connect app, select or .
2
Select
Garmin Pay
.
3
Select a card.
4
Select an option:
• To temporarily suspend or unsuspend the card, select
Suspend Card
.
The card must be active to make purchases using your
Forerunner device.
• To delete the card, select .
Paying for a Purchase Using Your Watch
Before you can use your watch to pay for purchases, you must
set up at least one payment card.
You can use your watch to pay for purchases in a participating
store.
1
Hold
LIGHT
.
2
Select
Wallet
.
3
Enter your four-digit passcode.
NOTE:
If you enter your passcode incorrectly three times,
your wallet locks, and you must reset your passcode in the
Garmin Connect app.
Your most recently used payment card appears.
4
If you have added multiple cards to your Garmin Pay wallet,
select
DOWN
to change to another card (optional).
5
Within 60 seconds, hold your watch near the payment reader,
with the watch facing the reader.
The watch vibrates and displays a check mark when it is
finished communicating with the reader.
6
If necessary, follow the instructions on the card reader to
complete the transaction.
TIP:
After you successfully enter your passcode, you can make
payments without a passcode for 24 hours while you continue to
wear your watch. If you remove the watch from your wrist or
disable heart rate monitoring, you must enter the passcode
again before making a payment.
Changing Your Garmin Pay Passcode
You must know your current passcode to change it. If you forget
your passcode, you must reset the Garmin Pay feature for your
Forerunner device, create a new passcode, and reenter your
card information.
1
From the Forerunner device page in the Garmin Connect
app, select
Garmin Pay
>
Change Passcode
.
2
Follow the on-screen instructions.
The next time you pay using your Forerunner device, you must
enter the new passcode.
History
History includes time, distance, calories, average pace or speed,
lap data, and optional sensor information.
NOTE:
When the device memory is full, your oldest data is
overwritten.
Using History
History contains previous activities you have saved on your
device.
The device has a history widget for quick access to your activity
data (
Widgets
, page 22
).
1
From the watch face, hold .
2
Select
History
>
Activities
.
3
Select an activity.
4
Select an option:
• To view additional information about the activity, select
All
Stats
.
• To view the impact of the activity on your aerobic and
anaerobic fitness, select
Training Effect
(
About Training
Effect
, page 16
).
• To view your time in each heart rate zone, select
Heart
Rate
(
Viewing Your Time in Each Heart Rate Zone
,
page 26
).
• To select a lap and view additional information about each
lap, select
Laps
.
• To select an exercise set and view additional information
about each set, select
Sets
.
• To view the activity on a map, select
Map
.
• To view an elevation plot for the activity, select
Elevation
Plot
.
• To delete the selected activity, select
Delete
.
Multisport History
Your device stores the overall multisport summary of the activity,
including overall distance, time, calories, and optional accessory
data. Your device also separates the activity data for each sport
segment and transition so you can compare similar training
activities and track how quickly you move through the
transitions. Transition history includes distance, time, average
speed, and calories.
Viewing Your Time in Each Heart Rate Zone
Viewing your time in each heart rate zone can help you adjust
your training intensity.
1
From the watch face, hold .
2
Select
History
>
Activities
.
3
Select an activity.
4
Select
Heart Rate
.
Viewing Data Totals
You can view the accumulated distance and time data saved to
your device.
1
From the watch face, hold .
2
Select
History
>
Totals
.
3
If necessary, select an activity.
4
Select an option to view weekly or monthly totals.
Using the Odometer
The odometer automatically records the total distance traveled,
elevation gained, and time in activities.
26
History
>
Kártya hozzáadása
pontot.


