


27
Napló törlése
1.
Az óra számlapon nyomjuk meg hosszan a
Introduction
WARNING
See the
Important Safety and Product Information
guide in the
product box for product warnings and other important
information.
Always consult your physician before you begin or modify any
exercise program.
Keys
À
LIGHT
Hold to turn the device on.
Hold to view the controls menu.
Select to turn the backlight on and off.
Á
START
STOP
Select to start and stop the timer.
Select to choose an option or to acknowledge a message.
Â
BACK
Select to record a lap, rest, or transition during an activity.
Select to return to the previous screen.
Ã
DOWN Select to scroll through the widgets, data screens, options,
and settings.
Hold to manually change sports during an activity.
Ä
UP
Select to scroll through the widgets, data screens, options,
and settings.
Hold to view the menu.
GPS Status and Status Icons
The GPS status ring and icons temporarily overlay each data
screen. For outdoor activities, the status ring turns green when
GPS is ready. A flashing icon means the device is searching for
a signal. A solid icon means the signal was found or the sensor
is connected.
GPS
GPS status
Battery status
Smartphone connection status
Wi
‑
Fi
®
technology status
Heart rate status
Foot pod status
Running Dynamics Pod status
Speed and cadence sensor status
Power meter status
tempe
™
sensor status
VIRB
®
camera status
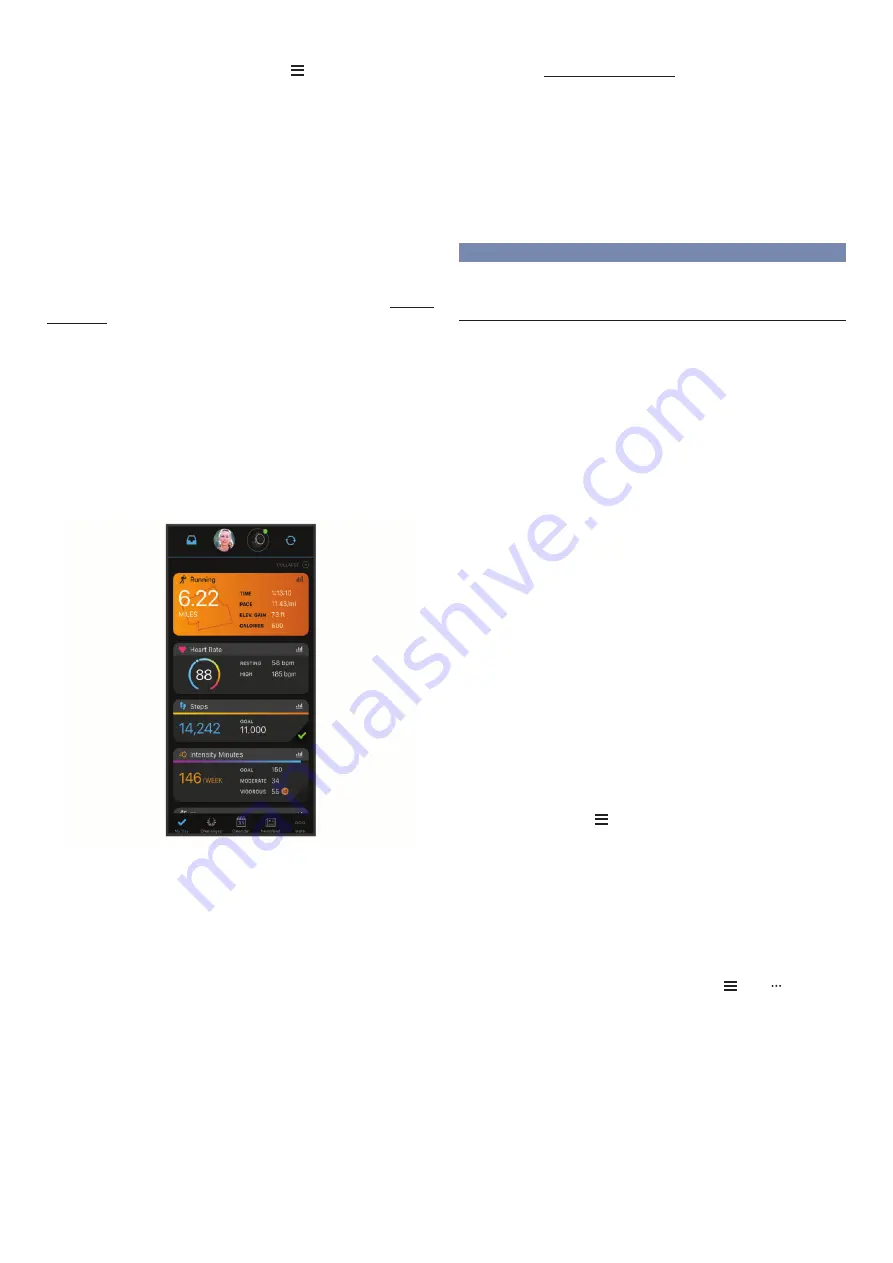
Going for a Run
The first fitness activity you record on your device can be a run,
ride, or any outdoor activity. You may need to charge the device
before starting the activity (
Charging the Device
, page 26
).
1
Select
START
, and select an activity.
2
Go outside, and wait while the device locates satellites.
3
Select
START
to start the timer.
4
Go for a run.
5
After you complete your run, select
STOP
to stop the timer.
6
Select an option:
•
Select
Resume
to restart the timer.
•
Select
Save
to save the run and reset the timer. You can
select the run to view a summary.
•
Select
Resume Later
to suspend the run and continue
recording later.
•
Select
Lap
to mark a lap.
•
Select
Discard
>
Yes
to delete the run.
Activities
Your device can be used for indoor, outdoor, athletic, and fitness
activities. When you start an activity, the device displays and
records sensor data. You can save activities and share them
with the Garmin Connect
™
community.
You can also add Connect IQ
™
activity apps to your device using
your Garmin Connect account (
Connect IQ Features
,
page 17
).
For more information about activity tracking and fitness metric
accuracy, go to
garmin.com/ataccuracy
.
Starting an Activity
When you start an activity, GPS turns on automatically (if
required). When you stop the activity, the device returns to
watch mode.
1
From the watch face, select
START
.
2
Select an activity.
3
If necessary, follow the on-screen instructions to enter
additional information.
4
If necessary, wait while the device connects to your ANT+
®
sensors.
5
If the activity requires GPS, go outside, and wait while the
device locates satellites.
6
Select
START
to start the timer.
NOTE:
The device does not record your activity data until
you start the timer.
Tips for Recording Activities
•
Charge the device before starting an activity (
Charging the
Device
, page 26
).
•
Select
to record laps.
•
Select
UP
or
DOWN
to view additional data pages.
Introduction
1
gombot, majd válasszuk
az
Napló
>
Opciók
-at.
2.
Válasszunk az alábbi lehetőségek közül:
• Az
Összes tevékenység törlése
ponttal az összes tevékenységet töröl
-
jük a naplóból.
• A
Összesítések visszaállítása
ponttal a távolság és idő összesítéseket
nullázzuk.
NE FELEDJÜK!
Az utóbbival mentett tevékenységet nem törlünk.
Garmin Connect
A Garmin Connect internetes közösségi oldalon könnyedén tárolhatjuk és
elemezhetjük az edzés adatait, sőt, ezeket meg is oszhatjuk másokkal. Le
-
gyen szó bármely sportágról, futásról, gyaloglásról, úszásról, kerékpározás
-
ról, túrázásról, triatlonozásról, a Garmin Connect oldalon könnyedén rögzít
-
hetjük mozgásban gazdag életvitelünk fontosabb eseményeit. A connect.
garmin.com honlapra fel lépve ingyenesen hozhatunk létre fiókot.
Tevékenységek tárolása:
A tevékenység végén a napló adatait mentsük
el, majd töltsük fel a Garmin Connect honlapra, ahol addig tárolhatjuk
ezeket, ameddig csak akarjuk.
Adatok kielemzése:
Számos adat felhasználásával, pl. idő, távolság,
pulzusszám, elégetett kalória, lépésszám, magasság, tempó és sebes
-
ség grafikonok alapján részletesen elemezhetjük tevékenységünket.
Felülnézetből, térképen tekinthetjük meg a tevékenység során bejárt
utat, a tempó, sebesség változásait grafikonos szemléltető ábrák mutat
-
ják be. Egyedi jelentéseket is összeállíthatunk.
MEGJEGYZÉS!
Egyes adatok csak külön megvásárolható kiegészítő,
pl. pulzusmérő használata esetén érhetők el.
1
From the watch face, hold .
2
Select
History
>
Totals
>
Odometer
.
3
Select
UP
or
DOWN
to view odometer totals.
Deleting History
1
From the watch face, hold .
2
Select
History
>
Options
.
3
Select an option:
• Select
Delete All Activities
to delete all activities from the
history.
• Select
Reset Totals
to reset all distance and time totals.
NOTE:
This does not delete any saved activities.
Garmin Connect
You can connect with your friends on Garmin Connect. Garmin
Connect gives you the tools to track, analyze, share, and
encourage each other. Record the events of your active lifestyle
including runs, walks, rides, swims, hikes, triathlons, and more.
To sign up for a free account, go to
connect.garmin.com
.
Store your activities
: After you complete and save an activity
with your device, you can upload that activity to your Garmin
Connect account and keep it as long as you want.
Analyze your data
: You can view more detailed information
about your activity, including time, distance, elevation, heart
rate, calories burned, cadence, running dynamics, an
overhead map view, pace and speed charts, and
customizable reports.
NOTE:
Some data requires an optional accessory such as a
heart rate monitor.
Plan your training
: You can choose a fitness goal and load one
of the day-by-day training plans.
Track your progress
: You can track your daily steps, join a
friendly competition with your connections, and meet your
goals.
Share your activities
: You can connect with friends to follow
each other's activities or post links to your activities on your
favorite social networking sites.
Manage your settings
: You can customize your device and
user settings on your Garmin Connect account.
Access the Connect IQ store
: You can download apps, watch
faces, data fields, and widgets.
Using Garmin Connect on Your Computer
The Garmin Express application connects your device to your
Garmin Connect account using a computer. You can use the
Garmin Express application to upload your activity data to your
Garmin Connect account and to send data, such as workouts or
training plans, from the Garmin Connect website to your device.
You can also install device software updates and manage your
Connect IQ apps.
1
Connect the device to your computer using the USB cable.
2
Go to
www.garmin.com/express
.
3
Download and install the Garmin Express application.
4
Open the Garmin Express application, and select
Add
Device
.
5
Follow the on-screen instructions.
Data Management
NOTE:
The device is not compatible with Windows 95, 98, Me,
Windows NT
®
, and Mac
®
OS 10.3 and earlier.
Deleting Files
NOTICE
If you do not know the purpose of a file, do not delete it. Your
device memory contains important system files that should not
be deleted.
1
Open the
Garmin
drive or volume.
2
If necessary, open a folder or volume.
3
Select a file.
4
Press the
Delete
key on your keyboard.
NOTE:
Mac operating systems provide limited support for
MTP file transfer mode. You must open the Garmin drive on
a Windows operating system. You should use the Garmin
Express application to remove music files from your device.
Navigation
You can use the GPS navigation features on your device to view
your path on a map, save locations, and find your way home.
Courses
You can send a course from your Garmin Connect account to
your device. After it is saved to your device, you can navigate
the course on your device.
You can follow a saved course simply because it is a good
route. For example, you can save and follow a bike friendly
commute to work.
You can also follow a saved course, trying to match or exceed
previously set performance goals. For example, if the original
course was completed in 30 minutes, you can race against a
Virtual Partner trying to complete the course in under 30
minutes.
Following a Course on Your Device
1
From the watch face, select
START
.
2
Select an activity.
3
Hold .
Select
Navigation
>
Courses
.
5
Select a course.
6
Select
Do Course
.
Navigation information appears.
7
Select
START
Creating a Course on Garmin Connect
Before you can create a course on the Garmin Connect app,
you must have a Garmin Connect account (
Garmin Connect
,
page 27
).
1
From the Garmin Connect app, select or .
2
Select
Training
>
Courses
>
Create Course
.
3
Select a course type.
4
Follow the on-screen instructions.
5
Select
Done
.
Navigation
27
Edzés megtervezése:
Edzési célt tűzhetünk ki, valamint napi bontású
edzési terveket tölthetünk le.
Fejlődés nyomon követése:
Nyomon követhetjük a napi lépésszámot,
ismerőseinkkel baráti versenyeket rendezhetünk, valamint célokat tűz
-
hetünk ki.
Tevékenységek megosztása:
Kapcsolódhatunk barátainkhoz egymás
tevékenységének nyomon követéséhez, vagy kedvenc közösségi olda
-
lainkon keresztül linket is küldhetünk az edzésekről.
Beállítások kezelése:
A készüléket a Garmin Connect fiókon keresztül
is beállíthatjuk, illetve ezen keresztül a felhasználói beállításokat is mó
-
dosíthatjuk.
Hozzáférés a Connect IQ tárhoz:
Alkalmazásokat, óra számlapokat, adat
-
mezőket és widgeteket tölthetünk le.
Garmin Connect használata a számítógépen
A Garmin Express alkalmazás egy számítógép segítségével csatlakoztat
-
ja a készüléket a Garmin Connect fiókunkhoz. A Garmin Express alkalma
-
zással feltölthetjük tevékenységünk adatait a Garmin Connect fiókunkba, il
-
letve adatokat küldhetünk (például edzések vagy edzéstervek) a Garmin
Connect weboldalról az eszközünkre. A készülékre szoftverfrissítéseket is
letölthetünk és a Connect IQ alkalmazásainkat is kezelhetjük.
1.
Csatlakoztassuk az USB-kábellel a készüléket a számítógépünk höz.
2.
Lépjünk fel a www.garmin.com/express oldalra.
3.
Töltsük le és telepítsük a Garmin Express alkalmazást.
4.
Lépjünk be a Garmin Express alkalmazásba és válasszuk a
Készülék
hozzáadása
pontot.
5.
Kövessük a képernyőn megjelenő utasításokat.
Adatkezelés
MEGJEGYZÉS
! A készülék nem kompatibilis a Windows
®
95 / 98 / Me / NT /
XP verziókkal, valamint a Mac
®
OS 10.3-as és korábbi verziókkal.
Fájlok törlése
Figyelem!
A készülék memóriája fontos rendszerfájlokat tartalmaz, melyeket nem sza
-
bad letörölnünk. Amennyiben nem ismerjük egy adott fájl rendeltetését, NE
töröljük azt.
1.
Nyissuk meg a
Garmin
meghajtót, kötetet.
2.
Amennyiben szükséges, nyissuk meg a mappát, kötetet.
3.
Válasszuk ki a kívánt fájlt.
4.
Nyomjuk le számítógépünk billentyűzetén a
Delete
gombot.
MEGJEGYZÉS!
A Mac operációs rendszerek korlátozott támoga
-
tást nyújtanak az mtp fájl áthelyezés módhoz. A Garmin meghajtót
windows operációs rendszeren kell megnyitnunk. amennyiben zene
-
fájlokat szeretnénk törölni a készülékről, használjuk a Garmin Express
alkalmazást.
Navigáció
A GPS-alapú navigáció funkciók lehetővé teszik, hogy a térképen megtekint
-
sük a bejárt utat, elmentsünk kedvenc vagy egyéb okból kiemelt helyeket, il
-
letve a készülék irányításával hazataláljunk.
Pályák
A Garmin Connect fiókból letölthetünk egy pályát a készülékre. Miután ez a
készülék memóriájában eltárolásra került, a készüléken navigálhatunk a pá
-
lya mentén.
A pályák révén egy korábban elmentett, számunkra tetszetős pályát újra le
-
tekerhetünk, pl. egy kerékpáros útvonalat, amely munkahelyünkre visz be.
Ezenfelül egy már megtett útvonal mentén próbálhatjuk megismételni vagy
felülmúlni korábbi teljesítményünket. Például ha az útvonalat korábban 30
perc alatt tettük meg, a virtuális edzőpartnerrel versenyre kelve megpróbál
-
hatjuk azt 30 percen belül megtenni.
Pálya követése a készüléken
1.
Az óra számlapon nyomjuk le a
START
gombot.
2.
Válasszunk tevékenységet.
3.
Nyomjuk le hosszan a
Introduction
WARNING
See the
Important Safety and Product Information
guide in the
product box for product warnings and other important
information.
Always consult your physician before you begin or modify any
exercise program.
Keys
À
LIGHT
Hold to turn the device on.
Hold to view the controls menu.
Select to turn the backlight on and off.
Á
START
STOP
Select to start and stop the timer.
Select to choose an option or to acknowledge a message.
Â
BACK
Select to record a lap, rest, or transition during an activity.
Select to return to the previous screen.
Ã
DOWN Select to scroll through the widgets, data screens, options,
and settings.
Hold to manually change sports during an activity.
Ä
UP
Select to scroll through the widgets, data screens, options,
and settings.
Hold to view the menu.
GPS Status and Status Icons
The GPS status ring and icons temporarily overlay each data
screen. For outdoor activities, the status ring turns green when
GPS is ready. A flashing icon means the device is searching for
a signal. A solid icon means the signal was found or the sensor
is connected.
GPS
GPS status
Battery status
Smartphone connection status
Wi
‑
Fi
®
technology status
Heart rate status
Foot pod status
Running Dynamics Pod status
Speed and cadence sensor status
tempe
™
sensor status
VIRB
®
camera status
Going for a Run
The first fitness activity you record on your device can be a run,
ride, or any outdoor activity. You may need to charge the device
before starting the activity (
Charging the Device
, page 26
).
1
Select
START
, and select an activity.
2
Go outside, and wait while the device locates satellites.
3
Select
START
to start the timer.
4
Go for a run.
5
After you complete your run, select
STOP
to stop the timer.
6
Select an option:
•
Select
Resume
to restart the timer.
•
Select
Save
to save the run and reset the timer. You can
select the run to view a summary.
•
Select
Resume Later
to suspend the run and continue
recording later.
•
Select
Lap
to mark a lap.
•
Select
Discard
>
Yes
to delete the run.
Activities
Your device can be used for indoor, outdoor, athletic, and fitness
activities. When you start an activity, the device displays and
records sensor data. You can save activities and share them
with the Garmin Connect
™
community.
You can also add Connect IQ
™
activity apps to your device using
your Garmin Connect account (
Connect IQ Features
,
page 17
).
For more information about activity tracking and fitness metric
accuracy, go to
garmin.com/ataccuracy
.
Starting an Activity
When you start an activity, GPS turns on automatically (if
required). When you stop the activity, the device returns to
watch mode.
1
From the watch face, select
START
.
2
Select an activity.
3
If necessary, follow the on-screen instructions to enter
additional information.
4
If necessary, wait while the device connects to your ANT+
®
sensors.
5
If the activity requires GPS, go outside, and wait while the
device locates satellites.
6
Select
START
to start the timer.
NOTE:
The device does not record your activity data until
you start the timer.
Tips for Recording Activities
•
Charge the device before starting an activity (
Charging the
Device
, page 26
).
•
Select
to record laps.
•
Select
UP
or
DOWN
to view additional data pages.
Introduction
1
-t, majd válasszuk a
Navigálás
>
Pályák
pon
-
tot.
4.
Válasszunk egy pályát.
5.
Válasszuk a
Pálya követése
pontot.
M
egjelenik a navigálási információ.
6.
Nyomjuk meg a
START
gombot a navigálás indításához.
Pá
lya létrehozása a Garmin Connect fiókban
A funkció eléréséhez rendelkeznünk kell Garmin Connect fiókkal (
1.
A Garmin Connect alkalmazásában válasszuk a
Introduction
WARNING
See the
Important Safety and Product Information
guide in the
product box for product warnings and other important
information.
Always consult your physician before you begin or modify any
exercise program.
Keys
À
LIGHT
Hold to turn the device on.
Hold to view the controls menu.
Select to turn the backlight on and off.
Á
START
STOP
Select to start and stop the timer.
Select to choose an option or to acknowledge a message.
Â
BACK
Select to record a lap, rest, or transition during an activity.
Select to return to the previous screen.
Ã
DOWN Select to scroll through the widgets, data screens, options,
and settings.
Hold to manually change sports during an activity.
Ä
UP
Select to scroll through the widgets, data screens, options,
and settings.
Hold to view the menu.
GPS Status and Status Icons
The GPS status ring and icons temporarily overlay each data
screen. For outdoor activities, the status ring turns green when
GPS is ready. A flashing icon means the device is searching for
a signal. A solid icon means the signal was found or the sensor
is connected.
GPS
GPS status
Battery status
Smartphone connection status
Wi
‑
Fi
®
technology status
Heart rate status
Foot pod status
Running Dynamics Pod status
Speed and cadence sensor status
Power meter status
tempe
™
sensor status
VIRB
®
camera status
Going for a Run
The first fitness activity you record on your device can be a run,
ride, or any outdoor activity. You may need to charge the device
before starting the activity (
Charging the Device
, page 26
).
1
Select
START
, and select an activity.
2
Go outside, and wait while the device locates satellites.
3
Select
START
to start the timer.
4
Go for a run.
5
After you complete your run, select
STOP
to stop the timer.
6
Select an option:
•
Select
Resume
to restart the timer.
•
Select
Save
to save the run and reset the timer. You can
select the run to view a summary.
•
Select
Resume Later
to suspend the run and continue
recording later.
•
Select
Lap
to mark a lap.
•
Select
Discard
>
Yes
to delete the run.
Activities
Your device can be used for indoor, outdoor, athletic, and fitness
activities. When you start an activity, the device displays and
records sensor data. You can save activities and share them
with the Garmin Connect
™
community.
You can also add Connect IQ
™
activity apps to your device using
your Garmin Connect account (
Connect IQ Features
,
page 17
).
For more information about activity tracking and fitness metric
accuracy, go to
garmin.com/ataccuracy
.
Starting an Activity
When you start an activity, GPS turns on automatically (if
required). When you stop the activity, the device returns to
watch mode.
1
From the watch face, select
START
.
2
Select an activity.
3
If necessary, follow the on-screen instructions to enter
additional information.
4
If necessary, wait while the device connects to your ANT+
®
sensors.
5
If the activity requires GPS, go outside, and wait while the
device locates satellites.
6
Select
START
to start the timer.
NOTE:
The device does not record your activity data until
you start the timer.
Tips for Recording Activities
•
Charge the device before starting an activity (
Charging the
Device
, page 26
).
•
Select
to record laps.
•
Select
UP
or
DOWN
to view additional data pages.
Introduction
1
vagy
Introduction
WARNING
See the
Important Safety and Product Information
product box for product warnings and other important
information.
Always consult your physician before you begin or modify any
exercise program.
Keys
À
Select to wake the device.
Hold to turn the device on and off.
Á
Select to scroll through the data screens, options, and
settings.
From the home screen, hold to view the device menu.
Â
Select to scroll through the data screens, options, and
settings.
From the home screen, select to view the widgets.
Ã
Select to start and stop the timer.
Select to choose an option or to acknowledge a message.
Ä
Select to mark a new lap.
Select to return to the previous screen.
Status Icons
A solid icon means the signal was found or the sensor is
connected.
GPS status
Bluetooth
®
status
Heart rate status
Power status
LiveTrack status
Speed and cadence status
Pairing Your Smartphone
To use the connected features of the Edge device, it must be
paired directly through the Garmin Connect
™
Mobile app,
instead of from the Bluetooth settings on your smartphone.
1
From the app store on your smartphone, install and open the
Garmin Connect Mobile app.
2
Hold to turn on the device.
The first time you turn on the device, you will select the
device language. The next screen prompts you to pair with
your smartphone.
TIP:
You can hold , and select
Phone
>
Status
>
Pair
Phone
to manually enter pairing mode.
3
Select an option to add your device to your Garmin Connect
account:
• If this is the first device you have paired with the Garmin
Connect Mobile app, follow the on-screen instructions.
• If you have already paired another device with the Garmin
Connect Mobile app, from the or menu, select
Garmin Devices
>
Add Device
, and follow the on-screen
instructions.
After you pair successfully, a message appears, and your device
syncs automatically with your smartphone.
Installing the Standard Mount
For the best GPS reception, position the bike mount so the front
of the device is oriented toward the sky. You can install the bike
mount on the stem or the handlebars.
1
Select a secure location to mount the device where it does
not interfere with the safe operation of your bike.
2
Place the rubber disk
À
on the back of the bike mount.
The rubber tabs align with the back of the bike mount so it
stays in place.
3
Place the bike mount on the bike stem.
4
Attach the bike mount securely using the two bands
Á
.
5
Align the tabs on the back of the device with the bike mount
notches
Â
.
6
Press down slightly and turn the device clockwise until it
locks into place.
Releasing the Edge
1
Turn the Edge clockwise to unlock the device.
2
Lift the Edge off the mount.
Charging the Device
NOTICE
To prevent corrosion, thoroughly dry the USB port, the weather
cap, and the surrounding area before charging or connecting to
a computer.
The device is powered by a built-in lithium-ion battery that you
can charge using a standard wall outlet or a USB port on your
computer.
NOTE:
The device will not charge when outside the approved
temperature range (
Edge Specifications
, page 10
).
1
Pull up the weather cap
À
from the USB port
Á
.
Introduction
1
pontot.
2.
Válasszuk az
Edzés
>
Pályák
>
Pálya létrehozása
pontot.
3.
Válasszunk pályatípust.
4.
Kövessük a képernyőn megjelenő utasításokat.
5.
Válasszuk a
Kész
t.
MEGJEGYZÉS!
A létrehozott pályát letölthetjük a készülékünkre (
).


