


28
Pálya letöltése a készülékre
A Garmin Connect fiókban létrehozott pályákat letölthetjük a készülékre (
lya létrehozása a Garmin Connect fiókban, 27. oldal
).
1.
A Garmin Connect alkalmazásában válasszuk a
Introduction
WARNING
See the
Important Safety and Product Information
guide in the
product box for product warnings and other important
information.
Always consult your physician before you begin or modify any
exercise program.
Keys
À
LIGHT
Hold to turn the device on.
Hold to view the controls menu.
Select to turn the backlight on and off.
Á
START
STOP
Select to start and stop the timer.
Select to choose an option or to acknowledge a message.
Â
BACK
Select to record a lap, rest, or transition during an activity.
Select to return to the previous screen.
Ã
DOWN Select to scroll through the widgets, data screens, options,
and settings.
Hold to manually change sports during an activity.
UP
Select to scroll through the widgets, data screens, options,
and settings.
Hold to view the menu.
GPS Status and Status Icons
The GPS status ring and icons temporarily overlay each data
screen. For outdoor activities, the status ring turns green when
GPS is ready. A flashing icon means the device is searching for
a signal. A solid icon means the signal was found or the sensor
is connected.
GPS
GPS status
Battery status
Smartphone connection status
Wi
‑
Fi
®
technology status
Heart rate status
Foot pod status
Running Dynamics Pod status
Speed and cadence sensor status
Power meter status
tempe
™
sensor status
VIRB
®
camera status
Going for a Run
The first fitness activity you record on your device can be a run,
ride, or any outdoor activity. You may need to charge the device
before starting the activity (
Charging the Device
, page 26
).
1
Select
START
, and select an activity.
2
Go outside, and wait while the device locates satellites.
3
Select
START
to start the timer.
4
Go for a run.
5
After you complete your run, select
STOP
to stop the timer.
6
Select an option:
•
Select
Resume
to restart the timer.
•
Select
Save
to save the run and reset the timer. You can
select the run to view a summary.
•
Select
Resume Later
to suspend the run and continue
recording later.
•
Select
Lap
to mark a lap.
•
Select
Discard
>
Yes
to delete the run.
Activities
Your device can be used for indoor, outdoor, athletic, and fitness
activities. When you start an activity, the device displays and
records sensor data. You can save activities and share them
with the Garmin Connect
™
community.
You can also add Connect IQ
™
activity apps to your device using
your Garmin Connect account (
Connect IQ Features
,
page 17
).
For more information about activity tracking and fitness metric
accuracy, go to
garmin.com/ataccuracy
.
Starting an Activity
When you start an activity, GPS turns on automatically (if
required). When you stop the activity, the device returns to
watch mode.
1
From the watch face, select
START
.
2
Select an activity.
3
If necessary, follow the on-screen instructions to enter
additional information.
4
If necessary, wait while the device connects to your ANT+
®
sensors.
5
If the activity requires GPS, go outside, and wait while the
device locates satellites.
6
Select
START
to start the timer.
NOTE:
The device does not record your activity data until
you start the timer.
Tips for Recording Activities
•
Charge the device before starting an activity (
Charging the
Device
, page 26
).
•
Select
to record laps.
•
Select
UP
or
DOWN
to view additional data pages.
Introduction
1
vagy
Introduction
WARNING
See the
Important Safety and Product Information
product box for product warnings and other important
information.
Always consult your physician before you begin or modify any
exercise program.
Keys
À
Select to wake the device.
Hold to turn the device on and off.
Á
Select to scroll through the data screens, options, and
settings.
From the home screen, hold to view the device menu.
Â
Select to scroll through the data screens, options, and
settings.
From the home screen, select to view the widgets.
Ã
Select to start and stop the timer.
Select to choose an option or to acknowledge a message.
Ä
Select to mark a new lap.
Select to return to the previous screen.
Status Icons
A solid icon means the signal was found or the sensor is
connected.
GPS status
Bluetooth
®
status
Heart rate status
Power status
LiveTrack status
Speed and cadence status
Pairing Your Smartphone
To use the connected features of the Edge device, it must be
paired directly through the Garmin Connect
™
Mobile app,
instead of from the Bluetooth settings on your smartphone.
1
From the app store on your smartphone, install and open the
Garmin Connect Mobile app.
2
Hold to turn on the device.
The first time you turn on the device, you will select the
device language. The next screen prompts you to pair with
your smartphone.
TIP:
You can hold , and select
Phone
Phone
to manually enter pairing mode.
3
Select an option to add your device to your Garmin Connect
account:
• If this is the first device you have paired with the Garmin
Connect Mobile app, follow the on-screen instructions.
• If you have already paired another device with the Garmin
Connect Mobile app, from the or menu, select
Garmin Devices
>
Add Device
, and follow the on-screen
instructions.
After you pair successfully, a message appears, and your device
syncs automatically with your smartphone.
Installing the Standard Mount
For the best GPS reception, position the bike mount so the front
of the device is oriented toward the sky. You can install the bike
mount on the stem or the handlebars.
1
Select a secure location to mount the device where it does
not interfere with the safe operation of your bike.
2
Place the rubber disk
À
on the back of the bike mount.
The rubber tabs align with the back of the bike mount so it
stays in place.
3
Place the bike mount on the bike stem.
4
Attach the bike mount securely using the two bands
Á
.
5
Align the tabs on the back of the device with the bike mount
notches
Â
.
6
Press down slightly and turn the device clockwise until it
locks into place.
Releasing the Edge
1
Turn the Edge clockwise to unlock the device.
2
Lift the Edge off the mount.
Charging the Device
NOTICE
To prevent corrosion, thoroughly dry the USB port, the weather
cap, and the surrounding area before charging or connecting to
a computer.
The device is powered by a built-in lithium-ion battery that you
can charge using a standard wall outlet or a USB port on your
computer.
NOTE:
The device will not charge when outside the approved
Edge Specifications
, page 10
).
À
from the USB port
Á
.
Introduction
1
pontot.
2.
Válasszuk az
Edzés
>
Pályák
pontot.
3.
Válasszuk ki a kívánt pályát.
4.
Válasszuk a
2
Select
Garmin Pay
> >
Add Card
.
3
Follow the on-screen instructions.
After the card is added, you can select the card on your watch
when you make a payment.
Managing Your Garmin Pay Cards
You can temporarily suspend or delete a card.
NOTE:
In some countries, participating financial institutions may
restrict the Garmin Pay features.
1
From the Garmin Connect app, select or .
2
Select
Garmin Pay
.
3
Select a card.
4
Select an option:
• To temporarily suspend or unsuspend the card, select
Suspend Card
.
The card must be active to make purchases using your
Forerunner device.
• To delete the card, select .
Paying for a Purchase Using Your Watch
Before you can use your watch to pay for purchases, you must
set up at least one payment card.
You can use your watch to pay for purchases in a participating
store.
1
Hold
LIGHT
.
2
Select
Wallet
.
3
Enter your four-digit passcode.
NOTE:
If you enter your passcode incorrectly three times,
your wallet locks, and you must reset your passcode in the
Garmin Connect app.
Your most recently used payment card appears.
4
If you have added multiple cards to your Garmin Pay wallet,
select
DOWN
to change to another card (optional).
5
Within 60 seconds, hold your watch near the payment reader,
with the watch facing the reader.
The watch vibrates and displays a check mark when it is
finished communicating with the reader.
6
If necessary, follow the instructions on the card reader to
complete the transaction.
TIP:
After you successfully enter your passcode, you can make
payments without a passcode for 24 hours while you continue to
wear your watch. If you remove the watch from your wrist or
disable heart rate monitoring, you must enter the passcode
again before making a payment.
Changing Your Garmin Pay Passcode
You must know your current passcode to change it. If you forget
your passcode, you must reset the Garmin Pay feature for your
Forerunner device, create a new passcode, and reenter your
card information.
1
From the Forerunner device page in the Garmin Connect
app, select
Garmin Pay
>
Change Passcode
.
2
Follow the on-screen instructions.
The next time you pay using your Forerunner device, you must
enter the new passcode.
History
History includes time, distance, calories, average pace or speed,
lap data, and optional sensor information.
NOTE:
When the device memory is full, your oldest data is
overwritten.
Using History
History contains previous activities you have saved on your
device.
The device has a history widget for quick access to your activity
data (
Widgets
, page 22
).
1
From the watch face, hold .
2
Select
History
>
Activities
.
3
Select an activity.
4
Select an option:
• To view additional information about the activity, select
All
Stats
.
• To view the impact of the activity on your aerobic and
anaerobic fitness, select
Training Effect
(
About Training
Effect
, page 16
).
• To view your time in each heart rate zone, select
Heart
Rate
(
Viewing Your Time in Each Heart Rate Zone
,
page 26
).
• To select a lap and view additional information about each
lap, select
Laps
.
• To select an exercise set and view additional information
about each set, select
Sets
.
• To view the activity on a map, select
Map
.
• To view an elevation plot for the activity, select
Elevation
Plot
.
• To delete the selected activity, select
Delete
.
Multisport History
Your device stores the overall multisport summary of the activity,
including overall distance, time, calories, and optional accessory
data. Your device also separates the activity data for each sport
segment and transition so you can compare similar training
activities and track how quickly you move through the
transitions. Transition history includes distance, time, average
speed, and calories.
Viewing Your Time in Each Heart Rate Zone
Viewing your time in each heart rate zone can help you adjust
your training intensity.
1
From the watch face, hold .
2
Select
History
>
Activities
.
3
Select an activity.
4
Select
Heart Rate
.
Viewing Data Totals
You can view the accumulated distance and time data saved to
your device.
1
From the watch face, hold .
2
Select
History
>
Totals
.
3
If necessary, select an activity.
4
Select an option to view weekly or monthly totals.
Using the Odometer
The odometer automatically records the total distance traveled,
elevation gained, and time in activities.
26
History
>
Letöltés
a készülékre
pontot.
5.
Válasszuk ki a kompatibilis készülékünket.
6.
Kövessük a képernyőn megjelenő utasításokat.
Pálya részletes adatainak megtekintése
Pálya navigálása előtt megtekinthetjük a részletes adatait.
1.
Az óra számlapon nyomjuk meg a
START
gombot.
2.
Válasszunk egy tevékenységet.
3.
Nyomjuk le hosszan a
Introduction
WARNING
See the
Important Safety and Product Information
guide in the
product box for product warnings and other important
information.
Always consult your physician before you begin or modify any
exercise program.
Keys
À
LIGHT
Hold to turn the device on.
Hold to view the controls menu.
Select to turn the backlight on and off.
Á
START
STOP
Select to start and stop the timer.
Select to choose an option or to acknowledge a message.
Â
BACK
Select to record a lap, rest, or transition during an activity.
Select to return to the previous screen.
Ã
DOWN Select to scroll through the widgets, data screens, options,
and settings.
Hold to manually change sports during an activity.
Ä
UP
Select to scroll through the widgets, data screens, options,
and settings.
Hold to view the menu.
GPS Status and Status Icons
The GPS status ring and icons temporarily overlay each data
screen. For outdoor activities, the status ring turns green when
GPS is ready. A flashing icon means the device is searching for
a signal. A solid icon means the signal was found or the sensor
is connected.
GPS
GPS status
Battery status
Smartphone connection status
Wi
‑
Fi
®
technology status
Heart rate status
Foot pod status
Running Dynamics Pod status
Speed and cadence sensor status
Power meter status
tempe
™
sensor status
VIRB
®
camera status
Going for a Run
The first fitness activity you record on your device can be a run,
ride, or any outdoor activity. You may need to charge the device
before starting the activity (
Charging the Device
, page 26
).
2
Go outside, and wait while the device locates satellites.
3
Select
START
to start the timer.
4
Go for a run.
5
After you complete your run, select
STOP
to stop the timer.
6
Select an option:
•
Select
Resume
to restart the timer.
•
Select
Save
to save the run and reset the timer. You can
select the run to view a summary.
•
Select
Resume Later
to suspend the run and continue
recording later.
•
Select
Lap
to mark a lap.
•
Select
Discard
>
Yes
to delete the run.
Activities
Your device can be used for indoor, outdoor, athletic, and fitness
activities. When you start an activity, the device displays and
records sensor data. You can save activities and share them
with the Garmin Connect
™
community.
You can also add Connect IQ
™
activity apps to your device using
your Garmin Connect account (
Connect IQ Features
,
page 17
).
For more information about activity tracking and fitness metric
accuracy, go to
garmin.com/ataccuracy
.
Starting an Activity
When you start an activity, GPS turns on automatically (if
required). When you stop the activity, the device returns to
watch mode.
1
From the watch face, select
START
.
2
Select an activity.
3
If necessary, follow the on-screen instructions to enter
additional information.
4
If necessary, wait while the device connects to your ANT+
®
sensors.
5
If the activity requires GPS, go outside, and wait while the
device locates satellites.
6
Select
START
to start the timer.
NOTE:
The device does not record your activity data until
you start the timer.
Tips for Recording Activities
•
Charge the device before starting an activity (
Charging the
Device
, page 26
).
•
Select
to record laps.
•
Select
UP
or
DOWN
to view additional data pages.
Introduction
1
gombot.
4.
Válasszuk a
Navigálás
>
Pályák
pontot.
5.
Nyomjuk meg a
START
gombot a pálya kiválasztásához.
6.
Válasszunk az alábbiak közül:
• A navigálás indításához válasszuk a
Pálya indítása
pontot.
• Egyedi tempókövető létrehozásához válasszuk a
PacePro
pontot.
• A pálya megtekintéséhez a térképen és a térképen való nagyításhoz és
pásztázáshoz válasszuk a
Térkép
pontot.
• A pálya fordított irányban történő indításához válasszuk a
Pálya indítá-
sa fordítva
pontot.
• A pálya magasság grafikonjának megtekintéséhez válasszuk a
Magas-
ság grafikon
pontot.
• A pálya nevének megváltoztatásához válasszuk a
Név
pontot.
• A pályán található lesiklások megtekintéséhez válasszuk az
Emelkedők
megtekintése
pontot.
• A pálya törléséhez válasszuk a
Törlés
pontot.
Aktuális pozíciónk mentése
Elmenthetjük aktuális pozíciónkat, így későbbi bármikor visszanavigálhatunk
ide.
1.
Nyomjuk le hosszan a
LIGHT
gombot.
2.
Válasszuk a
Pozíció mentése
pontot.
MEGJEGYZÉS!
Előfordulhat, hogy ezt hozzá kell adnunk a vezérlő me
-
Vezérlő menü beállítása, 23. oldal
)
3.
Kövessük a képernyőn megjelenő utasításokat.
Mentett hely szerkesztése
A mentett helyet törölhetjük vagy módosíthatjuk nevét, magasságát, pozíci
-
óját.
1.
Az óra számlapon nyomjuk le a
START
gombot.
2.
Válasszunk egy tevékenységet.
MEGJEGYZÉS!
Ez a lehetőség nem minden tevékenységnél elérhető.
3.
Nyomjuk le a
Introduction
WARNING
See the
Important Safety and Product Information
guide in the
product box for product warnings and other important
information.
Always consult your physician before you begin or modify any
exercise program.
Keys
LIGHT
Hold to view the controls menu.
Select to turn the backlight on and off.
Á
START
STOP
Select to start and stop the timer.
Select to choose an option or to acknowledge a message.
Â
BACK
Select to record a lap, rest, or transition during an activity.
Select to return to the previous screen.
Ã
DOWN Select to scroll through the widgets, data screens, options,
and settings.
Hold to manually change sports during an activity.
Ä
UP
Select to scroll through the widgets, data screens, options,
and settings.
Hold to view the menu.
GPS Status and Status Icons
The GPS status ring and icons temporarily overlay each data
screen. For outdoor activities, the status ring turns green when
GPS is ready. A flashing icon means the device is searching for
a signal. A solid icon means the signal was found or the sensor
is connected.
GPS
GPS status
Battery status
Smartphone connection status
Wi
‑
Fi
®
technology status
Heart rate status
Foot pod status
Running Dynamics Pod status
Speed and cadence sensor status
Power meter status
tempe
™
sensor status
VIRB
®
camera status
Going for a Run
The first fitness activity you record on your device can be a run,
ride, or any outdoor activity. You may need to charge the device
before starting the activity (
Charging the Device
, page 26
).
1
Select
START
, and select an activity.
2
Go outside, and wait while the device locates satellites.
3
Select
START
to start the timer.
4
Go for a run.
5
After you complete your run, select
STOP
to stop the timer.
6
Select an option:
•
Select
Resume
to restart the timer.
•
Select
Save
to save the run and reset the timer. You can
select the run to view a summary.
•
Select
Resume Later
to suspend the run and continue
recording later.
•
Select
Lap
to mark a lap.
•
Select
Discard
>
Yes
to delete the run.
Activities
Your device can be used for indoor, outdoor, athletic, and fitness
activities. When you start an activity, the device displays and
records sensor data. You can save activities and share them
with the Garmin Connect
™
community.
You can also add Connect IQ
™
activity apps to your device using
your Garmin Connect account (
Connect IQ Features
,
page 17
).
For more information about activity tracking and fitness metric
accuracy, go to
garmin.com/ataccuracy
.
Starting an Activity
When you start an activity, GPS turns on automatically (if
required). When you stop the activity, the device returns to
watch mode.
1
From the watch face, select
START
.
2
Select an activity.
3
If necessary, follow the on-screen instructions to enter
additional information.
4
If necessary, wait while the device connects to your ANT+
®
sensors.
5
If the activity requires GPS, go outside, and wait while the
device locates satellites.
6
Select
START
to start the timer.
NOTE:
The device does not record your activity data until
you start the timer.
Tips for Recording Activities
•
Charge the device before starting an activity (
Charging the
Device
, page 26
).
•
Select
to record laps.
•
Select
UP
or
DOWN
to view additional data pages.
Introduction
1
gombot.
4.
Válasszuk a
Navigáció
>
Mentett helyek
pontot.
5.
Válasszuk ki a kívánt mentett helyet.
6.
Végezzük el a kívánt módosítást.
Mentett helyek törlése
Egyszerre törölhetjük az összes mentett helyünnket.
1.
Az óra számlapon nyomjuk meg a
START
gombot.
2.
Válasszuk ki a kívánt tevékenységet.
MEGJEGYZÉS!
Ez a funkció nem minden tevékenység esetén érhető
el.
3.
Nyomjuk le hosszan a
Introduction
WARNING
See the
Important Safety and Product Information
guide in the
product box for product warnings and other important
information.
Always consult your physician before you begin or modify any
exercise program.
Keys
À
LIGHT
Hold to turn the device on.
Hold to view the controls menu.
Select to turn the backlight on and off.
Á
START
STOP
Select to start and stop the timer.
Select to choose an option or to acknowledge a message.
Â
BACK
Select to record a lap, rest, or transition during an activity.
Select to return to the previous screen.
Ã
DOWN Select to scroll through the widgets, data screens, options,
and settings.
Hold to manually change sports during an activity.
Ä
UP
Select to scroll through the widgets, data screens, options,
and settings.
Hold to view the menu.
GPS Status and Status Icons
The GPS status ring and icons temporarily overlay each data
screen. For outdoor activities, the status ring turns green when
GPS is ready. A flashing icon means the device is searching for
a signal. A solid icon means the signal was found or the sensor
is connected.
GPS
GPS status
Battery status
Smartphone connection status
Wi
‑
Fi
®
technology status
Heart rate status
Foot pod status
Running Dynamics Pod status
Speed and cadence sensor status
Power meter status
tempe
™
sensor status
VIRB
®
camera status
Going for a Run
The first fitness activity you record on your device can be a run,
ride, or any outdoor activity. You may need to charge the device
before starting the activity (
Charging the Device
, page 26
).
1
Select
START
, and select an activity.
2
Go outside, and wait while the device locates satellites.
3
Select
START
to start the timer.
4
Go for a run.
5
After you complete your run, select
STOP
to stop the timer.
6
Select an option:
•
Select
Resume
to restart the timer.
•
Select
Save
to save the run and reset the timer. You can
select the run to view a summary.
•
Select
Resume Later
to suspend the run and continue
recording later.
•
Select
Lap
to mark a lap.
•
Select
Discard
>
Yes
to delete the run.
Activities
Your device can be used for indoor, outdoor, athletic, and fitness
activities. When you start an activity, the device displays and
records sensor data. You can save activities and share them
with the Garmin Connect
™
community.
You can also add Connect IQ
™
activity apps to your device using
your Garmin Connect account (
Connect IQ Features
,
page 17
).
For more information about activity tracking and fitness metric
accuracy, go to
garmin.com/ataccuracy
.
Starting an Activity
When you start an activity, GPS turns on automatically (if
required). When you stop the activity, the device returns to
watch mode.
1
From the watch face, select
START
.
2
Select an activity.
3
If necessary, follow the on-screen instructions to enter
additional information.
4
If necessary, wait while the device connects to your ANT+
®
sensors.
5
If the activity requires GPS, go outside, and wait while the
device locates satellites.
6
Select
START
to start the timer.
NOTE:
The device does not record your activity data until
you start the timer.
Tips for Recording Activities
•
Charge the device before starting an activity (
Charging the
Device
, page 26
).
•
Select
to record laps.
•
Select
UP
or
DOWN
to view additional data pages.
Introduction
1
gombot.
4.
Válasszuk a
Navigáció
>
Mentett helyek
>
Összes törlése
pontot.
Navigáció a kiindulási pontba tevékenység során
Lehetőségünk van visszanavigálni a túra kiindulási pontjához a bejárt út
mentén (a rögzített nyomvonal alapján) vagy egy egyenes vonal mentén. Ki
-
zárólag GPS alapú pozíciómeghatározást igénylő tevékenység esetén érhe
-
tő el a funkció.
1.
Tevékenység alatt nyomjuk le a
STOP
gombot, majd válasszuk a
Vissza
a kiindulási helyre
pontot.
2.
Válasszunk az alábbi lehetőségek közül:
• A
TracBack
pontot választva a bejárt út mentén navigál vissza a ké
-
szülék a kiindulási helyhez.
• Amennyiben nincs térképi adatbázis feltöltve, vagy egyenes navigáci
-
ót használunk, az
Egyenes vonal
opciót választva a készülék egye
-
nes vonal mentén vezet vissza a kiindulási pontba.
NOTE:
You can send this course to your device (
Sending a
Course to Your Device
, page 28
).
Sending a Course to Your Device
You can send a course you created using the Garmin Connect
app to your device (
Creating a Course on Garmin Connect
,
page 27
).
1
From the Garmin Connect app, select or .
2
Select
Training
>
Courses
.
3
Select a course.
4
Select >
Send to Device
.
5
Select your compatible device.
6
Follow the on-screen instructions.
Viewing Course Details
You can view course details before you navigate a course.
1
From the watch face, select
START
.
2
Select an activity.
3
Hold .
4
Select
Navigation
>
Courses
.
5
Press
START
to select a course.
6
Select an option:
• To begin navigation, select
Do Course
.
• To create a custom pace band, select
PacePro
.
• To view the course on the map and pan or zoom the map,
select
Map
.
• To begin the course in reverse, select
Reverse
.
• To view an elevation plot of the course, select
Elevation
Plot
.
• To change the course name, select
Name
.
• To view a list of ascents in the course, select
View
Climbs
.
• To delete the course, select
Delete
.
Saving Your Location
You can save your current location to navigate back to it later.
1
Hold
LIGHT
.
2
Select
Save Location
.
NOTE:
You may need to add this item to the controls menu
(
Customizing the Controls Menu
, page 23
).
3
Follow the on-screen instructions.
Editing Your Saved Locations
You can delete a saved location or edit its name, elevation, and
position information.
1
From the watch face, select
START
.
2
Select an activity.
NOTE:
This feature is not available for all activities.
3
Hold .
4
Select
Navigation
>
Saved Locations
.
5
Select a saved location.
6
Select an option to edit the location.
Deleting All Saved Locations
You can delete all of your saved locations at once.
1
From the watch face, select
START
.
2
Select an activity.
NOTE:
This feature is not available for all activities.
3
Hold .
4
Select
Navigation
>
Saved Locations
>
Delete All
.
Navigating to Your Starting Point During an
Activity
You can navigate back to the starting point of your current
activity in a straight line or along the path you traveled. This
feature is available only for activities that use GPS.
1
During an activity, press
STOP
.
2
Select
Back to Start
, and select an option:
• To navigate back to the starting point of your activity along
the path you traveled, select
TracBack
.
• To navigate back to the starting point of your activity in a
straight line, select
Straight Line
.
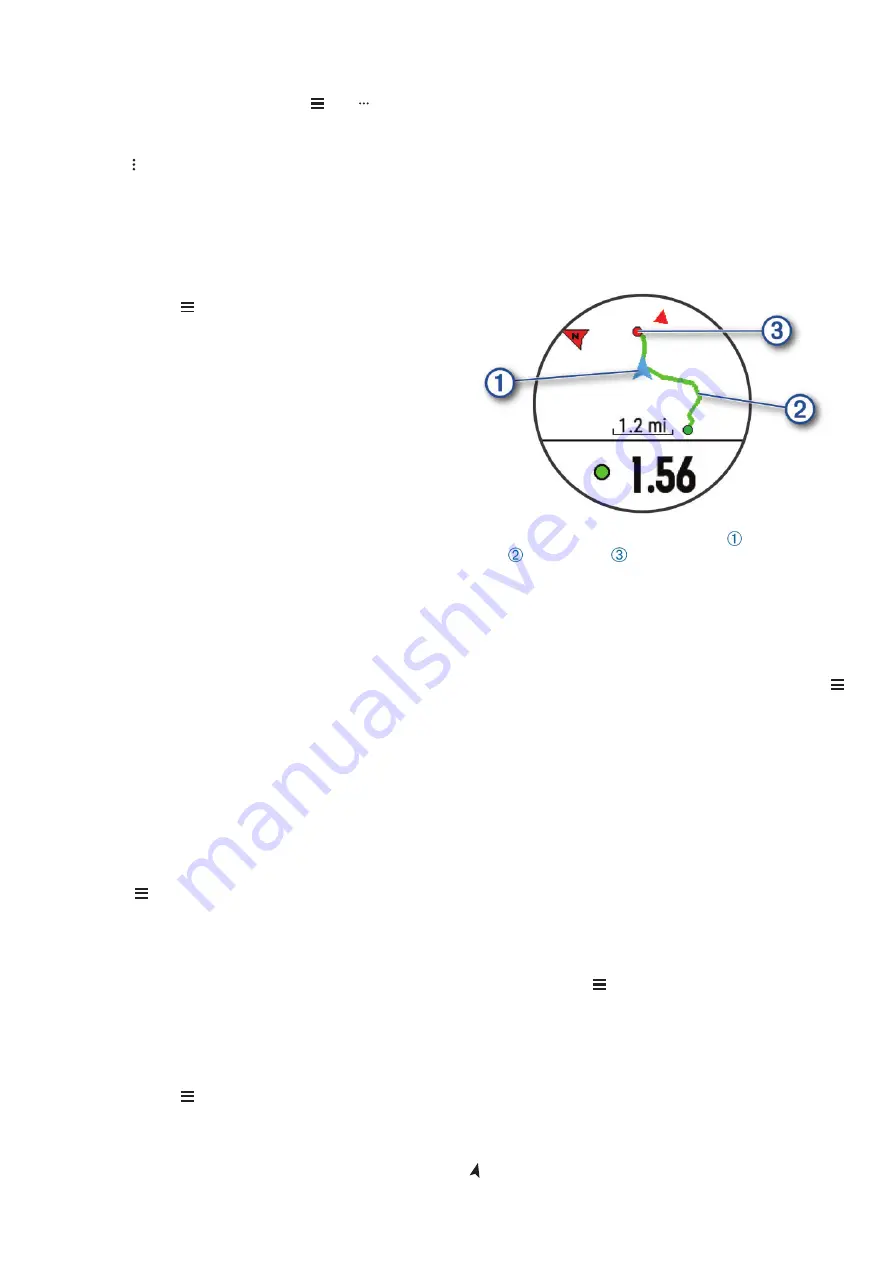
Your current location , the track to follow , and your
destination appear on the map.
Navigating to the Starting Point of Your Last
Saved Activity
You can navigate back to the starting point of your last saved
activity in a straight line or along the path you traveled. This
feature is available only for activities that use GPS.
1
Select
START
.
2
Hold .
3
Select
Navigation
>
Activities
.
4
Select your last saved activity.
5
Select
Back to Start
.
6
Select an option:
• To navigate back to the starting point of your activity along
the path you traveled, select
TracBack
.
• To navigate back to the starting point of your activity in a
straight line, select
Straight Line
.
7
Select
DOWN
to view the compass (optional).
The arrow points toward your starting point.
Navigating to a Saved Location
Before you can navigate to a saved location, your device must
locate satellites.
1
From the watch face, select
START
.
2
Select an activity.
NOTE:
This feature is not available for all activities.
3
Hold .
4
Select
Navigation
>
Saved Locations
.
5
Select a location, and select
Go To
.
6
Move forward.
The compass arrow points toward the saved location.
TIP:
For more accurate navigation, orient the top of the
screen toward the direction in which you are moving.
7
Select
START
to start the activity timer.
Map
represents your location on the map. Location names and
symbols appear on the map. When you are navigating to a
destination, your route is marked with a line on the map.
28
Navigation
A térképen megjelenik az aktuális tartózkodóhelyünk , az útvonal, amelyet
követünk , és az úti célunk
.
Navigáció legutóbb mentett tevékenység
kezdőpontjához
Lehetőségünk van visszanavigálni a legutóbb mentett tevékenység kezdő
-
pontjához a bejárt út mentén (a rögzített nyomvonal alapján) vagy egy egye
-
nes vonal mentén. Kizárólag GPS alapú pozíciómeghatározást igénylő tevé
-
kenység esetén érhető el a funkció.
1.
Nyomjuk meg a
START
gombot, ezt követően nyomjuk le hosszan a
Introduction
WARNING
See the
Important Safety and Product Information
guide in the
product box for product warnings and other important
information.
Always consult your physician before you begin or modify any
exercise program.
Keys
À
LIGHT
Hold to turn the device on.
Hold to view the controls menu.
Select to turn the backlight on and off.
Á
START
STOP
Select to start and stop the timer.
Select to choose an option or to acknowledge a message.
Â
BACK
Select to record a lap, rest, or transition during an activity.
Select to return to the previous screen.
Ã
DOWN Select to scroll through the widgets, data screens, options,
and settings.
Hold to manually change sports during an activity.
Ä
UP
Select to scroll through the widgets, data screens, options,
and settings.
Hold to view the menu.
GPS Status and Status Icons
The GPS status ring and icons temporarily overlay each data
screen. For outdoor activities, the status ring turns green when
GPS is ready. A flashing icon means the device is searching for
a signal. A solid icon means the signal was found or the sensor
is connected.
GPS
GPS status
Battery status
Smartphone connection status
Wi
‑
Fi
®
technology status
Heart rate status
Foot pod status
Running Dynamics Pod status
Speed and cadence sensor status
Power meter status
tempe
™
sensor status
VIRB
®
camera status
Going for a Run
The first fitness activity you record on your device can be a run,
ride, or any outdoor activity. You may need to charge the device
before starting the activity (
Charging the Device
, page 26
).
1
Select
START
, and select an activity.
2
Go outside, and wait while the device locates satellites.
3
Select
START
to start the timer.
4
Go for a run.
5
After you complete your run, select
STOP
to stop the timer.
6
Select an option:
•
Select
Resume
to restart the timer.
•
Select
Save
to save the run and reset the timer. You can
select the run to view a summary.
•
Select
Resume Later
to suspend the run and continue
recording later.
•
Select
Lap
to mark a lap.
•
Select
Discard
>
Yes
to delete the run.
Activities
Your device can be used for indoor, outdoor, athletic, and fitness
activities. When you start an activity, the device displays and
records sensor data. You can save activities and share them
with the Garmin Connect
™
community.
You can also add Connect IQ
™
activity apps to your device using
your Garmin Connect account (
Connect IQ Features
,
page 17
).
For more information about activity tracking and fitness metric
accuracy, go to
garmin.com/ataccuracy
.
Starting an Activity
When you start an activity, GPS turns on automatically (if
required). When you stop the activity, the device returns to
watch mode.
1
From the watch face, select
START
.
2
Select an activity.
3
If necessary, follow the on-screen instructions to enter
additional information.
4
If necessary, wait while the device connects to your ANT+
®
sensors.
5
If the activity requires GPS, go outside, and wait while the
device locates satellites.
6
Select
START
to start the timer.
NOTE:
The device does not record your activity data until
you start the timer.
Tips for Recording Activities
•
Charge the device before starting an activity (
Charging the
Device
, page 26
).
•
Select
to record laps.
•
Select
UP
or
DOWN
to view additional data pages.
Introduction
1
gombot, majd válasszuk a
Navigáció
>
Tevékenységek
pontot.
2.
Válasszuk ki a legutóbb mentett tevékenységet.
3.
Válasszuk a
Vissza a kiindulási helyre
pontot.
4.
Válasszunk az alábbi lehetőségek közül:
• A
TracBack
pontot választva a bejárt út mentén navigál vissza a készü
-
lék a kiindulási helyhez.
• Az
Egyenes vonal
opciót választva egy egyenes vonal mentén jutunk
vissza a kiindulási helyhez.
5.
A
DOWN
gomb megnyomásával megjeleníthetjük az iránytűt (nem köte
-
lező).
A nyíl a kiindulási pontunk felé mutat.
Navigáció mentett helyhez
A funkcióhoz a készüléknek műholdas kapcsolatot kell létesítenie.
1.
Az óra számlapon nyomjuk meg a
START
gombot.
2.
Válasszuk ki a kívánt tevékenységet.
3.
Nyomjuk le hosszan a
Introduction
WARNING
See the
Important Safety and Product Information
guide in the
product box for product warnings and other important
information.
Always consult your physician before you begin or modify any
exercise program.
Keys
À
LIGHT
Hold to turn the device on.
Hold to view the controls menu.
Select to turn the backlight on and off.
Á
START
STOP
Select to start and stop the timer.
Select to choose an option or to acknowledge a message.
Â
BACK
Select to record a lap, rest, or transition during an activity.
Select to return to the previous screen.
Ã
DOWN Select to scroll through the widgets, data screens, options,
and settings.
Hold to manually change sports during an activity.
Ä
UP
Select to scroll through the widgets, data screens, options,
and settings.
Hold to view the menu.
GPS Status and Status Icons
The GPS status ring and icons temporarily overlay each data
screen. For outdoor activities, the status ring turns green when
GPS is ready. A flashing icon means the device is searching for
a signal. A solid icon means the signal was found or the sensor
is connected.
GPS
GPS status
Battery status
Smartphone connection status
Wi
‑
Fi
®
technology status
Heart rate status
Foot pod status
Running Dynamics Pod status
Speed and cadence sensor status
Power meter status
tempe
™
sensor status
VIRB
®
camera status
Going for a Run
The first fitness activity you record on your device can be a run,
ride, or any outdoor activity. You may need to charge the device
before starting the activity (
Charging the Device
, page 26
).
1
Select
START
, and select an activity.
2
Go outside, and wait while the device locates satellites.
3
Select
START
to start the timer.
4
Go for a run.
5
After you complete your run, select
STOP
to stop the timer.
6
Select an option:
•
Select
Resume
to restart the timer.
•
Select
Save
to save the run and reset the timer. You can
select the run to view a summary.
•
Select
Resume Later
to suspend the run and continue
recording later.
•
Select
Lap
to mark a lap.
•
Select
Discard
>
Yes
to delete the run.
Activities
Your device can be used for indoor, outdoor, athletic, and fitness
activities. When you start an activity, the device displays and
records sensor data. You can save activities and share them
with the Garmin Connect
™
community.
You can also add Connect IQ
™
activity apps to your device using
your Garmin Connect account (
Connect IQ Features
,
page 17
).
For more information about activity tracking and fitness metric
accuracy, go to
garmin.com/ataccuracy
.
Starting an Activity
When you start an activity, GPS turns on automatically (if
required). When you stop the activity, the device returns to
watch mode.
1
From the watch face, select
START
.
2
Select an activity.
3
If necessary, follow the on-screen instructions to enter
additional information.
4
If necessary, wait while the device connects to your ANT+
®
sensors.
5
If the activity requires GPS, go outside, and wait while the
device locates satellites.
6
Select
START
to start the timer.
NOTE:
The device does not record your activity data until
you start the timer.
Tips for Recording Activities
•
Charge the device before starting an activity (
Charging the
Device
, page 26
).
•
Select
to record laps.
•
Select
UP
or
DOWN
to view additional data pages.
Introduction
1
gombot.
4.
Válasszuk a
Navigáció
>
Mentett helyek
pontot.
5.
Válasszuk ki a kívánt helyet, és válasszuk az
Indulás ide
pontot.
6.
Induljunk el előre.
Az iránytű a mentett hely irányába mutat.
TIPP!
Pontosabb információkért a képernyő felső részét irányítsuk a me
-
netirányunk felé.
7.
Nyomjuk meg a
START
gombot a tevékenység időzítő indításához.
Térkép
A
jel mutatja aktuális pozíciónkat a térképen. A térképen a helyek megne
-
vezései, valamint a hozzájuk tartozó szimbólumok jelennek meg. Amikor cél
felé navigálunk, a követendő útvonalat egy vonal jelzi a térképen.


