


35
Visszaszámláló időzítő
1.
Bármely képernyőről nyomjuk le hosszan a
LIGHT
gombot.
2.
Válasszuk az
Időzítőt
.
NE FELEDJÜK!
Előfordulhat, hogy ez hozzá kell adnunk a vezérlő menü
-
Vezérlő menü beállítása, 23. oldal
3.
Adjuk meg az időt.
4.
Amennyiben szükséges, válasszunk az alábbiak közül:
•
a
2
Select
Garmin Pay
> >
Add Card
.
3
Follow the on-screen instructions.
After the card is added, you can select the card on your watch
when you make a payment.
Managing Your Garmin Pay Cards
You can temporarily suspend or delete a card.
NOTE:
In some countries, participating financial institutions may
restrict the Garmin Pay features.
1
From the Garmin Connect app, select or .
2
Select
Garmin Pay
.
3
Select a card.
4
Select an option:
• To temporarily suspend or unsuspend the card, select
Suspend Card
.
The card must be active to make purchases using your
Forerunner device.
• To delete the card, select .
Paying for a Purchase Using Your Watch
Before you can use your watch to pay for purchases, you must
set up at least one payment card.
You can use your watch to pay for purchases in a participating
store.
1
Hold
LIGHT
.
2
Select
Wallet
.
3
Enter your four-digit passcode.
NOTE:
If you enter your passcode incorrectly three times,
your wallet locks, and you must reset your passcode in the
Garmin Connect app.
Your most recently used payment card appears.
4
If you have added multiple cards to your Garmin Pay wallet,
select
DOWN
to change to another card (optional).
5
Within 60 seconds, hold your watch near the payment reader,
with the watch facing the reader.
The watch vibrates and displays a check mark when it is
finished communicating with the reader.
6
If necessary, follow the instructions on the card reader to
complete the transaction.
TIP:
After you successfully enter your passcode, you can make
payments without a passcode for 24 hours while you continue to
wear your watch. If you remove the watch from your wrist or
disable heart rate monitoring, you must enter the passcode
again before making a payment.
Changing Your Garmin Pay Passcode
You must know your current passcode to change it. If you forget
your passcode, you must reset the Garmin Pay feature for your
Forerunner device, create a new passcode, and reenter your
card information.
1
From the Forerunner device page in the Garmin Connect
app, select
Garmin Pay
>
Change Passcode
.
2
Follow the on-screen instructions.
The next time you pay using your Forerunner device, you must
enter the new passcode.
History
History includes time, distance, calories, average pace or speed,
lap data, and optional sensor information.
NOTE:
When the device memory is full, your oldest data is
overwritten.
Using History
History contains previous activities you have saved on your
device.
The device has a history widget for quick access to your activity
data (
Widgets
, page 22
).
1
From the watch face, hold .
2
Select
History
>
Activities
.
3
Select an activity.
4
Select an option:
• To view additional information about the activity, select
All
Stats
.
• To view the impact of the activity on your aerobic and
anaerobic fitness, select
Training Effect
(
About Training
Effect
, page 16
).
• To view your time in each heart rate zone, select
Heart
Rate
(
Viewing Your Time in Each Heart Rate Zone
,
page 26
).
• To select a lap and view additional information about each
lap, select
Laps
.
• To select an exercise set and view additional information
about each set, select
Sets
.
• To view the activity on a map, select
Map
.
• To view an elevation plot for the activity, select
Elevation
Plot
.
• To delete the selected activity, select
Delete
.
Multisport History
Your device stores the overall multisport summary of the activity,
including overall distance, time, calories, and optional accessory
data. Your device also separates the activity data for each sport
segment and transition so you can compare similar training
activities and track how quickly you move through the
transitions. Transition history includes distance, time, average
speed, and calories.
Viewing Your Time in Each Heart Rate Zone
Viewing your time in each heart rate zone can help you adjust
your training intensity.
1
From the watch face, hold .
2
Select
History
>
Activities
.
3
Select an activity.
4
Select
Heart Rate
.
Viewing Data Totals
You can view the accumulated distance and time data saved to
your device.
1
From the watch face, hold .
2
Select
History
>
Totals
.
If necessary, select an activity.
4
Select an option to view weekly or monthly totals.
Using the Odometer
The odometer automatically records the total distance traveled,
elevation gained, and time in activities.
26
History
>
Időzítő
mentése ponttal elmenthetjük a visszaszámláló időzítőt.
•
a
2
Select
Garmin Pay
> >
Add Card
.
3
Follow the on-screen instructions.
After the card is added, you can select the card on your watch
when you make a payment.
Managing Your Garmin Pay Cards
You can temporarily suspend or delete a card.
NOTE:
In some countries, participating financial institutions may
restrict the Garmin Pay features.
1
From the Garmin Connect app, select or .
2
Select
Garmin Pay
.
3
Select a card.
4
Select an option:
• To temporarily suspend or unsuspend the card, select
Suspend Card
.
The card must be active to make purchases using your
Forerunner device.
• To delete the card, select .
Paying for a Purchase Using Your Watch
Before you can use your watch to pay for purchases, you must
set up at least one payment card.
You can use your watch to pay for purchases in a participating
store.
1
Hold
LIGHT
.
2
Select
Wallet
.
3
Enter your four-digit passcode.
NOTE:
If you enter your passcode incorrectly three times,
your wallet locks, and you must reset your passcode in the
Garmin Connect app.
Your most recently used payment card appears.
4
If you have added multiple cards to your Garmin Pay wallet,
select
DOWN
to change to another card (optional).
5
Within 60 seconds, hold your watch near the payment reader,
with the watch facing the reader.
The watch vibrates and displays a check mark when it is
finished communicating with the reader.
6
If necessary, follow the instructions on the card reader to
complete the transaction.
TIP:
After you successfully enter your passcode, you can make
payments without a passcode for 24 hours while you continue to
wear your watch. If you remove the watch from your wrist or
disable heart rate monitoring, you must enter the passcode
again before making a payment.
Changing Your Garmin Pay Passcode
You must know your current passcode to change it. If you forget
your passcode, you must reset the Garmin Pay feature for your
Forerunner device, create a new passcode, and reenter your
card information.
1
From the Forerunner device page in the Garmin Connect
app, select
Garmin Pay
>
Change Passcode
.
2
Follow the on-screen instructions.
The next time you pay using your Forerunner device, you must
enter the new passcode.
History
History includes time, distance, calories, average pace or speed,
lap data, and optional sensor information.
NOTE:
When the device memory is full, your oldest data is
overwritten.
Using History
History contains previous activities you have saved on your
device.
The device has a history widget for quick access to your activity
data (
Widgets
, page 22
).
1
From the watch face, hold .
2
Select
History
>
Activities
.
3
Select an activity.
4
Select an option:
• To view additional information about the activity, select
All
Stats
.
• To view the impact of the activity on your aerobic and
anaerobic fitness, select
Training Effect
(
About Training
Effect
, page 16
).
• To view your time in each heart rate zone, select
Heart
Rate
(
Viewing Your Time in Each Heart Rate Zone
,
page 26
).
• To select a lap and view additional information about each
lap, select
Laps
.
• To select an exercise set and view additional information
about each set, select
Sets
.
• To view the activity on a map, select
Map
.
• To view an elevation plot for the activity, select
Elevation
Plot
.
• To delete the selected activity, select
Delete
.
Multisport History
Your device stores the overall multisport summary of the activity,
including overall distance, time, calories, and optional accessory
data. Your device also separates the activity data for each sport
segment and transition so you can compare similar training
activities and track how quickly you move through the
transitions. Transition history includes distance, time, average
Viewing Your Time in Each Heart Rate Zone
Viewing your time in each heart rate zone can help you adjust
your training intensity.
1
From the watch face, hold .
2
Select
History
>
Activities
.
3
Select an activity.
4
Select
Heart Rate
.
Viewing Data Totals
You can view the accumulated distance and time data saved to
your device.
1
From the watch face, hold .
>
Totals
.
3
If necessary, select an activity.
4
Select an option to view weekly or monthly totals.
Using the Odometer
The odometer automatically records the total distance traveled,
elevation gained, and time in activities.
26
History
>
Újraindítás
>
Be
ponttal a visszaszámlálást követően az időzítő
automatikusan újraindul.
•
A
2
Select
Garmin Pay
> >
Add Card
.
3
Follow the on-screen instructions.
After the card is added, you can select the card on your watch
when you make a payment.
Managing Your Garmin Pay Cards
You can temporarily suspend or delete a card.
NOTE:
In some countries, participating financial institutions may
restrict the Garmin Pay features.
1
From the Garmin Connect app, select or .
2
Select
Garmin Pay
.
3
Select a card.
4
Select an option:
• To temporarily suspend or unsuspend the card, select
Suspend Card
.
The card must be active to make purchases using your
Forerunner device.
• To delete the card, select .
Paying for a Purchase Using Your Watch
Before you can use your watch to pay for purchases, you must
set up at least one payment card.
You can use your watch to pay for purchases in a participating
store.
1
Hold
LIGHT
.
2
Select
Wallet
.
3
Enter your four-digit passcode.
NOTE:
If you enter your passcode incorrectly three times,
your wallet locks, and you must reset your passcode in the
Garmin Connect app.
Your most recently used payment card appears.
4
If you have added multiple cards to your Garmin Pay wallet,
select
DOWN
to change to another card (optional).
5
Within 60 seconds, hold your watch near the payment reader,
with the watch facing the reader.
The watch vibrates and displays a check mark when it is
finished communicating with the reader.
6
If necessary, follow the instructions on the card reader to
complete the transaction.
TIP:
After you successfully enter your passcode, you can make
payments without a passcode for 24 hours while you continue to
wear your watch. If you remove the watch from your wrist or
disable heart rate monitoring, you must enter the passcode
again before making a payment.
Changing Your Garmin Pay Passcode
You must know your current passcode to change it. If you forget
your passcode, you must reset the Garmin Pay feature for your
Forerunner device, create a new passcode, and reenter your
card information.
1
From the Forerunner device page in the Garmin Connect
app, select
Garmin Pay
>
Change Passcode
.
2
Follow the on-screen instructions.
The next time you pay using your Forerunner device, you must
enter the new passcode.
History
History includes time, distance, calories, average pace or speed,
lap data, and optional sensor information.
NOTE:
When the device memory is full, your oldest data is
overwritten.
Using History
History contains previous activities you have saved on your
device.
The device has a history widget for quick access to your activity
data (
Widgets
, page 22
).
1
2
Select
History
>
Activities
.
3
Select an activity.
4
Select an option:
• To view additional information about the activity, select
All
Stats
.
• To view the impact of the activity on your aerobic and
anaerobic fitness, select
Training Effect
(
About Training
Effect
, page 16
).
• To view your time in each heart rate zone, select
Heart
Rate
(
Viewing Your Time in Each Heart Rate Zone
,
page 26
).
• To select a lap and view additional information about each
lap, select
Laps
.
• To select an exercise set and view additional information
about each set, select
Sets
.
• To view the activity on a map, select
Map
.
• To view an elevation plot for the activity, select
Elevation
Plot
.
• To delete the selected activity, select
Delete
.
Multisport History
Your device stores the overall multisport summary of the activity,
including overall distance, time, calories, and optional accessory
data. Your device also separates the activity data for each sport
segment and transition so you can compare similar training
activities and track how quickly you move through the
transitions. Transition history includes distance, time, average
speed, and calories.
Viewing Your Time in Each Heart Rate Zone
Viewing your time in each heart rate zone can help you adjust
your training intensity.
1
From the watch face, hold .
2
Select
History
>
Activities
.
3
Select an activity.
4
Select
Heart Rate
.
Viewing Data Totals
You can view the accumulated distance and time data saved to
your device.
1
From the watch face, hold .
2
Select
History
>
Totals
.
3
If necessary, select an activity.
4
Select an option to view weekly or monthly totals.
Using the Odometer
The odometer automatically records the total distance traveled,
elevation gained, and time in activities.
26
History
>
Hangok
pontot kiválasztva megadhatjuk az értesítés típusát.
5.
Válasszuk a
3
Select an alarm.
4
Select
Delete
.
Starting the Countdown Timer
1
From any screen, hold
LIGHT
.
2
Select
Timers
.
You may need to add this item to the controls menu
, page 23
).
3
Enter the time.
4
If necessary, select an option:
• Select >
Save Timer
to save the countdown timer.
• Select >
Restart
>
On
to automatically restart the timer
after it expires.
• Select >
Sounds
, and select a type of notification.
5
Select .
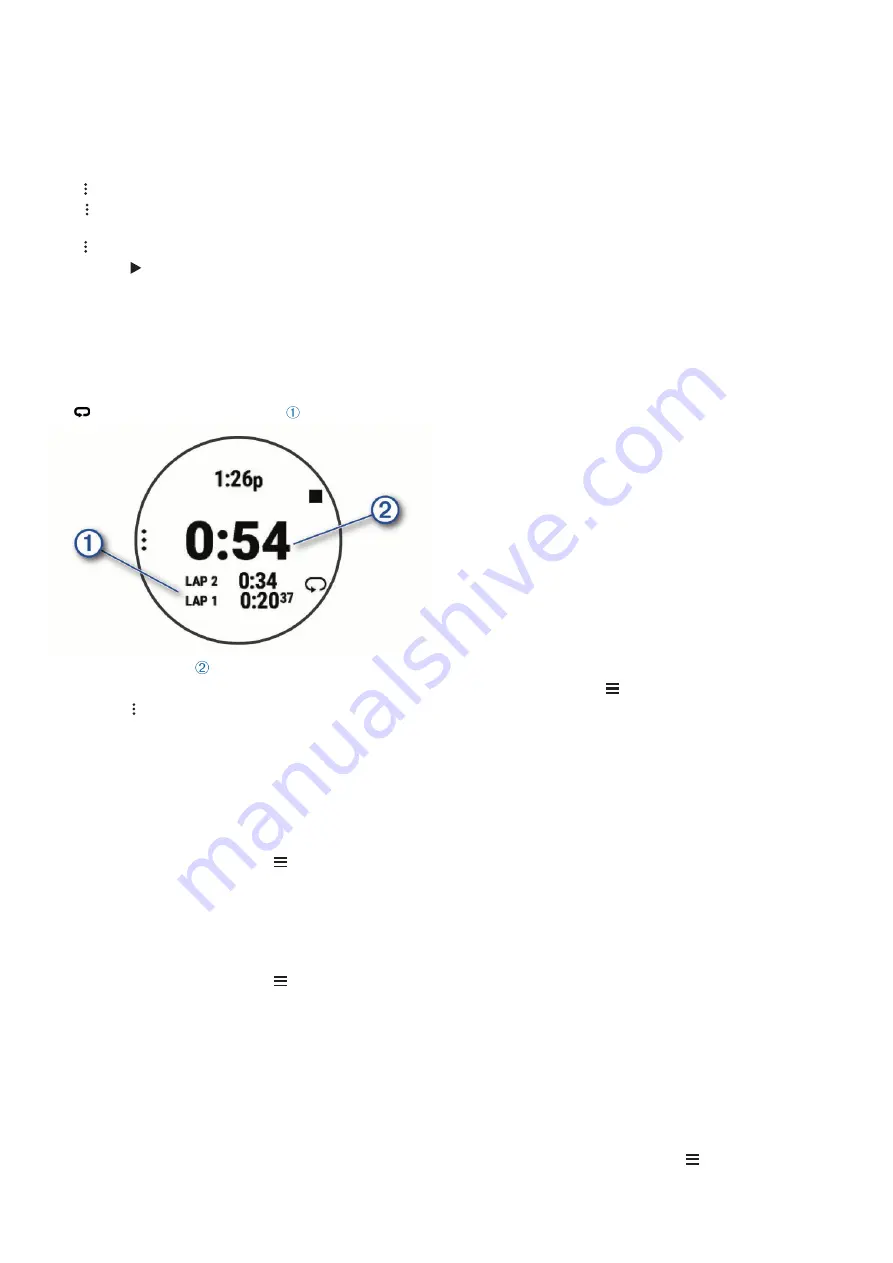
Using the Stopwatch
1
From any screen, hold
LIGHT
.
2
Select
Stopwatch
.
NOTE:
You may need to add this item to the controls menu
, page 23
).
3
Select
START
to start the timer.
4
Select
to restart the lap timer .
The total stopwatch time continues running.
5
Select
START
to stop both timers.
6
Select .
7
Save the recorded time as an activity in your history
(optional).
Syncing the Time with GPS
Each time you turn on the device and acquire satellites, the
device automatically detects your time zones and the current
time of day. You can also manually sync the time with GPS
when you change time zones, and to update for daylight saving
time.
1
From the watch face, hold .
2
Select
Settings
>
System
>
Time
>
Sync With GPS
.
3
Wait while the device locates satellites (
Acquiring Satellite
Signals
, page 38
).
Setting the Time Manually
1
From the watch face, hold .
2
Select
Settings
>
System
>
Time
>
Set Time
>
Manual
.
3
Select
Time
, and enter the time of day.
The VIRB remote function allows you to control your VIRB
action camera using your device. Go to
www.garmin.com/VIRB
to purchase a VIRB action camera.
Controlling a VIRB Action Camera
Before you can use the VIRB remote function, you must enable
the remote setting on your VIRB camera. See the
VIRB Series
Owner's Manual
for more information. You must also set the
VIRB widget to be shown in the widget loop (
Customizing the
Widget Loop
, page 30
).
1
Turn on your VIRB camera.
2
On your Forerunner watch, select
UP
or
DOWN
to view the
VIRB widget.
3
If necessary, select
START
to pair your Forerunner watch
with your VIRB camera.
4
Wait while your watch connects to your camera.
5
Select an option:
• To record video, select
Start Recording
.
The video counter appears on the Forerunner screen.
• To take a photo while recording video, select
DOWN
.
• To stop recording video, select
STOP
.
• To take a photo, select
Take Photo
.
• To take multiple photos in burst mode, select
Take Burst
.
• To send the camera to sleep mode, select
Sleep Camera
.
• To wake the camera from sleep mode, select
Wake
Camera
.
• To change video and photo settings, select
Settings
.
Controlling a VIRB Action Camera During an Activity
Before you can use the VIRB remote function, you must enable
the remote setting on your VIRB camera. See the
VIRB Series
Owner's Manual
for more information. You must also set the
VIRB widget to be shown in the widget loop (
Customizing the
Widget Loop
, page 30
).
1
Turn on your VIRB camera.
2
On your Forerunner watch, select
VIRB widget.
3
If necessary, select
START
to pair your Forerunner watch
with your VIRB camera.
4
Wait while your watch connects to your camera.
When the camera is connected, a VIRB data screen is
automatically added to the activity apps.
5
During an activity, select
UP
or
DOWN
to view the VIRB data
screen.
6
Hold .
7
Select
VIRB Remote
.
8
Select an option:
• To control the camera using the activity timer, select
Settings
>
Recording Mode
>
Timer Start/Stop
.
NOTE:
Video recording automatically starts and stops
when you start and stop an activity.
• To control the camera using the menu options, select
Settings
>
Recording Mode
>
Manual
.
• To manually record video, select
Start Recording
.
The video counter appears on the Forerunner screen.
• To take a photo while recording video, select
DOWN
.
• To manually stop recording video, select
STOP
.
• To take multiple photos in burst mode, select
Take Burst
.
• To send the camera to sleep mode, select
Sleep Camera
.
• To wake the camera from sleep mode, select
Wake
Camera
.
Device Information
Viewing Device Information
You can view device information, such as the unit ID, software
version, regulatory information, and license agreement.
1
From the watch face, hold .
Device Information
35
pontot.
Stopper használata
1.
Bármely képernyőről nyomjuk le hosszan a
LIGHT
gombot.
2.
Válasszuk a
Stopper
t.
NE FELEDJÜK!
Előfordulhat, hogy ez hozzá kell adnunk a vezérlő menü
-
Vezérlő menü beállítása, 23. oldal
3.
A
START
gombbal indítsuk a számlálót.
4.
A
gombbal indítsuk újra a kör számlálót
.
3
Select an alarm.
4
Select
Delete
.
Starting the Countdown Timer
1
From any screen, hold
LIGHT
.
2
Select
Timers
.
NOTE:
You may need to add this item to the controls menu
(
Customizing the Controls Menu
, page 23
).
3
Enter the time.
4
If necessary, select an option:
• Select >
Save Timer
to save the countdown timer.
• Select >
Restart
>
On
to automatically restart the timer
after it expires.
• Select >
Sounds
, and select a type of notification.
5
Select .
Using the Stopwatch
1
From any screen, hold
LIGHT
.
2
Select
Stopwatch
.
NOTE:
You may need to add this item to the controls menu
(
Customizing the Controls Menu
, page 23
).
3
Select
4
Select
to restart the lap timer .
The total stopwatch time continues running.
5
Select
START
to stop both timers.
6
Select .
7
Save the recorded time as an activity in your history
(optional).
Syncing the Time with GPS
Each time you turn on the device and acquire satellites, the
device automatically detects your time zones and the current
time of day. You can also manually sync the time with GPS
when you change time zones, and to update for daylight saving
time.
1
From the watch face, hold .
2
Select
Settings
>
System
>
Time
>
Sync With GPS
.
3
Wait while the device locates satellites (
Acquiring Satellite
Signals
, page 38
).
Setting the Time Manually
1
From the watch face, hold .
2
Select
>
System
>
Time
>
Set Time
>
Manual
.
3
Select
Time
, and enter the time of day.
VIRB Remote
The VIRB remote function allows you to control your VIRB
action camera using your device. Go to
www.garmin.com/VIRB
to purchase a VIRB action camera.
Controlling a VIRB Action Camera
Before you can use the VIRB remote function, you must enable
the remote setting on your VIRB camera. See the
VIRB Series
Owner's Manual
for more information. You must also set the
VIRB widget to be shown in the widget loop (
Customizing the
Widget Loop
, page 30
).
1
Turn on your VIRB camera.
2
On your Forerunner watch, select
UP
or
DOWN
to view the
VIRB widget.
3
If necessary, select
START
to pair your Forerunner watch
with your VIRB camera.
4
Wait while your watch connects to your camera.
5
Select an option:
• To record video, select
Start Recording
.
The video counter appears on the Forerunner screen.
• To take a photo while recording video, select
DOWN
.
• To stop recording video, select
STOP
.
• To take a photo, select
Take Photo
.
• To take multiple photos in burst mode, select
Take Burst
.
• To send the camera to sleep mode, select
Sleep Camera
.
• To wake the camera from sleep mode, select
Wake
Camera
.
• To change video and photo settings, select
Settings
.
Controlling a VIRB Action Camera During an Activity
Before you can use the VIRB remote function, you must enable
the remote setting on your VIRB camera. See the
VIRB Series
Owner's Manual
for more information. You must also set the
VIRB widget to be shown in the widget loop (
Customizing the
1
Turn on your VIRB camera.
2
On your Forerunner watch, select
UP
or
DOWN
to view the
VIRB widget.
3
If necessary, select
START
to pair your Forerunner watch
with your VIRB camera.
4
Wait while your watch connects to your camera.
When the camera is connected, a VIRB data screen is
automatically added to the activity apps.
5
During an activity, select
UP
or
DOWN
to view the VIRB data
screen.
6
Hold .
7
Select
VIRB Remote
.
8
Select an option:
• To control the camera using the activity timer, select
Settings
>
Recording Mode
>
Timer Start/Stop
.
NOTE:
Video recording automatically starts and stops
when you start and stop an activity.
• To control the camera using the menu options, select
Settings
>
Recording Mode
>
Manual
.
• To manually record video, select
Start Recording
.
The video counter appears on the Forerunner screen.
• To take a photo while recording video, select
DOWN
.
• To manually stop recording video, select
STOP
.
• To take multiple photos in burst mode, select
Take Burst
.
• To send the camera to sleep mode, select
Sleep Camera
.
• To wake the camera from sleep mode, select
Wake
Camera
.
Device Information
Viewing Device Information
You can view device information, such as the unit ID, software
version, regulatory information, and license agreement.
1
From the watch face, hold .
Device Information
35
Az összesített stopperidő tovább fut.
5.
A
START
gomb lenyomásával mindkét számlálót leállítjuk.
6.
Válasszuk a
2
Select
Garmin Pay
> >
Add Card
.
3
Follow the on-screen instructions.
After the card is added, you can select the card on your watch
when you make a payment.
Managing Your Garmin Pay Cards
You can temporarily suspend or delete a card.
NOTE:
In some countries, participating financial institutions may
restrict the Garmin Pay features.
1
From the Garmin Connect app, select or .
2
Select
Garmin Pay
.
3
Select a card.
4
Select an option:
• To temporarily suspend or unsuspend the card, select
Suspend Card
.
The card must be active to make purchases using your
Forerunner device.
• To delete the card, select .
Paying for a Purchase Using Your Watch
Before you can use your watch to pay for purchases, you must
set up at least one payment card.
You can use your watch to pay for purchases in a participating
store.
1
Hold
LIGHT
.
2
Select
Wallet
.
3
Enter your four-digit passcode.
NOTE:
If you enter your passcode incorrectly three times,
your wallet locks, and you must reset your passcode in the
Garmin Connect app.
Your most recently used payment card appears.
4
If you have added multiple cards to your Garmin Pay wallet,
select
DOWN
to change to another card (optional).
5
Within 60 seconds, hold your watch near the payment reader,
with the watch facing the reader.
The watch vibrates and displays a check mark when it is
finished communicating with the reader.
6
If necessary, follow the instructions on the card reader to
complete the transaction.
TIP:
After you successfully enter your passcode, you can make
payments without a passcode for 24 hours while you continue to
wear your watch. If you remove the watch from your wrist or
disable heart rate monitoring, you must enter the passcode
again before making a payment.
Changing Your Garmin Pay Passcode
You must know your current passcode to change it. If you forget
your passcode, you must reset the Garmin Pay feature for your
Forerunner device, create a new passcode, and reenter your
card information.
1
From the Forerunner device page in the Garmin Connect
app, select
Garmin Pay
>
Change Passcode
.
2
Follow the on-screen instructions.
The next time you pay using your Forerunner device, you must
enter the new passcode.
History
History includes time, distance, calories, average pace or speed,
lap data, and optional sensor information.
NOTE:
When the device memory is full, your oldest data is
overwritten.
Using History
History contains previous activities you have saved on your
device.
The device has a history widget for quick access to your activity
data (
Widgets
, page 22
).
1
From the watch face, hold .
2
Select
History
>
Activities
.
3
Select an activity.
4
Select an option:
• To view additional information about the activity, select
All
Stats
.
• To view the impact of the activity on your aerobic and
anaerobic fitness, select
Training Effect
(
About Training
Effect
, page 16
).
• To view your time in each heart rate zone, select
Heart
Rate
(
Viewing Your Time in Each Heart Rate Zone
,
page 26
).
• To select a lap and view additional information about each
lap, select
Laps
.
• To select an exercise set and view additional information
about each set, select
Sets
.
• To view the activity on a map, select
Map
.
• To view an elevation plot for the activity, select
Elevation
Plot
.
• To delete the selected activity, select
Delete
.
Multisport History
Your device stores the overall multisport summary of the activity,
including overall distance, time, calories, and optional accessory
data. Your device also separates the activity data for each sport
segment and transition so you can compare similar training
activities and track how quickly you move through the
transitions. Transition history includes distance, time, average
speed, and calories.
Viewing Your Time in Each Heart Rate Zone
Viewing your time in each heart rate zone can help you adjust
your training intensity.
1
From the watch face, hold .
2
Select
History
>
Activities
.
3
Select an activity.
4
Select
Heart Rate
.
Viewing Data Totals
You can view the accumulated distance and time data saved to
your device.
1
From the watch face, hold .
2
Select
History
>
Totals
.
3
If necessary, select an activity.
4
Select an option to view weekly or monthly totals.
Using the Odometer
The odometer automatically records the total distance traveled,
elevation gained, and time in activities.
26
History
pontot.
7.
Mentsük a rögzített időt a naplóban tevékenységként (nem kötelező).
A pontos idő szinkronizálása a GPS-vétellel
Amikor bekapcsoljuk a készüléket, a készülék műholdas kapcsolatot létesít
és egyúttal meghatározza a pontos időt, valamint hogy melyik időzónában
tartózkodunk. Amikor másik időzónába kerülünk, vagy a nyári időszámítást
kívánjuk frissíteni, manuálisan is kezdeményezhetjük az idő GPS-jelekkel
történő szinkronizálását.
1.
Az óra számlapon nyomjuk le hosszan a
Introduction
WARNING
See the
Important Safety and Product Information
guide in the
product box for product warnings and other important
information.
Always consult your physician before you begin or modify any
exercise program.
Keys
À
LIGHT
Hold to turn the device on.
Hold to view the controls menu.
Select to turn the backlight on and off.
Á
START
STOP
Select to start and stop the timer.
Select to choose an option or to acknowledge a message.
Â
BACK
Select to record a lap, rest, or transition during an activity.
Select to return to the previous screen.
Ã
DOWN Select to scroll through the widgets, data screens, options,
and settings.
Hold to manually change sports during an activity.
Ä
UP
Select to scroll through the widgets, data screens, options,
and settings.
Hold to view the menu.
GPS Status and Status Icons
The GPS status ring and icons temporarily overlay each data
screen. For outdoor activities, the status ring turns green when
GPS is ready. A flashing icon means the device is searching for
a signal. A solid icon means the signal was found or the sensor
is connected.
GPS
GPS status
Battery status
Smartphone connection status
Wi
‑
Fi
®
technology status
Heart rate status
Foot pod status
Running Dynamics Pod status
Speed and cadence sensor status
Power meter status
VIRB
®
camera status
Going for a Run
The first fitness activity you record on your device can be a run,
ride, or any outdoor activity. You may need to charge the device
before starting the activity (
Charging the Device
, page 26
).
1
Select
START
, and select an activity.
2
Go outside, and wait while the device locates satellites.
3
Select
START
to start the timer.
4
Go for a run.
5
After you complete your run, select
STOP
to stop the timer.
6
Select an option:
•
Select
Resume
to restart the timer.
•
Select
Save
to save the run and reset the timer. You can
select the run to view a summary.
•
Select
Resume Later
to suspend the run and continue
recording later.
•
Select
Lap
to mark a lap.
•
Select
Discard
>
Yes
to delete the run.
Activities
Your device can be used for indoor, outdoor, athletic, and fitness
activities. When you start an activity, the device displays and
records sensor data. You can save activities and share them
with the Garmin Connect
™
community.
You can also add Connect IQ
™
activity apps to your device using
your Garmin Connect account (
Connect IQ Features
,
page 17
).
For more information about activity tracking and fitness metric
accuracy, go to
garmin.com/ataccuracy
.
Starting an Activity
When you start an activity, GPS turns on automatically (if
required). When you stop the activity, the device returns to
watch mode.
1
From the watch face, select
START
.
2
Select an activity.
3
If necessary, follow the on-screen instructions to enter
additional information.
4
If necessary, wait while the device connects to your ANT+
®
sensors.
5
If the activity requires GPS, go outside, and wait while the
device locates satellites.
6
Select
START
to start the timer.
NOTE:
The device does not record your activity data until
you start the timer.
Tips for Recording Activities
•
Charge the device before starting an activity (
Charging the
Device
, page 26
).
•
Select
to record laps.
•
Select
UP
or
DOWN
to view additional data pages.
Introduction
1
gombot.
2.
Válasszuk az
Beállítások
>
Rendszer
>
Óra
>
Szinkronizálás GPS-
szel
t.
3.
Várjunk, amíg a készülék műholdas kapcsolatot létesít (
).
Idő kézi beállítása
1.
Az óra számlapon nyomjuk le hosszan a
Introduction
WARNING
See the
Important Safety and Product Information
guide in the
product box for product warnings and other important
information.
Always consult your physician before you begin or modify any
exercise program.
Keys
À
LIGHT
Hold to turn the device on.
Hold to view the controls menu.
Select to turn the backlight on and off.
Á
START
STOP
Select to start and stop the timer.
Select to choose an option or to acknowledge a message.
Â
BACK
Select to record a lap, rest, or transition during an activity.
Select to return to the previous screen.
Ã
DOWN Select to scroll through the widgets, data screens, options,
and settings.
Hold to manually change sports during an activity.
Ä
UP
Select to scroll through the widgets, data screens, options,
and settings.
Hold to view the menu.
GPS Status and Status Icons
The GPS status ring and icons temporarily overlay each data
screen. For outdoor activities, the status ring turns green when
GPS is ready. A flashing icon means the device is searching for
a signal. A solid icon means the signal was found or the sensor
is connected.
GPS
GPS status
Battery status
Smartphone connection status
Wi
‑
Fi
®
technology status
Heart rate status
Foot pod status
Running Dynamics Pod status
Speed and cadence sensor status
Power meter status
tempe
™
sensor status
VIRB
®
camera status
Going for a Run
The first fitness activity you record on your device can be a run,
ride, or any outdoor activity. You may need to charge the device
before starting the activity (
Charging the Device
, page 26
).
1
Select
START
, and select an activity.
2
Go outside, and wait while the device locates satellites.
3
Select
START
to start the timer.
4
Go for a run.
5
After you complete your run, select
STOP
to stop the timer.
6
Select an option:
•
Select
Resume
to restart the timer.
•
Select
Save
to save the run and reset the timer. You can
select the run to view a summary.
•
Select
Resume Later
to suspend the run and continue
recording later.
•
Select
Lap
to mark a lap.
•
Select
Discard
>
Yes
to delete the run.
Activities
Your device can be used for indoor, outdoor, athletic, and fitness
activities. When you start an activity, the device displays and
records sensor data. You can save activities and share them
with the Garmin Connect
™
community.
You can also add Connect IQ
™
activity apps to your device using
your Garmin Connect account (
Connect IQ Features
,
page 17
).
For more information about activity tracking and fitness metric
accuracy, go to
garmin.com/ataccuracy
.
Starting an Activity
When you start an activity, GPS turns on automatically (if
required). When you stop the activity, the device returns to
watch mode.
1
From the watch face, select
START
.
2
Select an activity.
3
If necessary, follow the on-screen instructions to enter
additional information.
4
If necessary, wait while the device connects to your ANT+
®
sensors.
5
If the activity requires GPS, go outside, and wait while the
device locates satellites.
6
Select
START
to start the timer.
NOTE:
The device does not record your activity data until
you start the timer.
Tips for Recording Activities
•
Charge the device before starting an activity (
Charging the
Device
, page 26
).
•
Select
to record laps.
•
Select
UP
or
DOWN
to view additional data pages.
Introduction
1
gombot.
2.
Válasszuk a
Beállítások
>
Rendszer
>
Idő
>
Idő beállítása
>
Kézi
pontot.
3.
Válasszuk az
Idő
menüpontot, majd adjuk meg a pontos időt.
VIRB távvezérlő funkció
A VIRB távvezérlő funkcióval a VIRB akciókamerán távolról is elindíthatjuk, illet
-
ve leállíthatjuk a felvételt. VIRB kamera beszerzésével kapcsolatosan lépjünk fel
a www.garmin.com/VIRB oldalra.
A VIRB akciókamera vezérlése
A funkció használatához először a VIRB kamerán kell engedélyeznünk a táv
-
vezérlési funkciót (lásd a VIRB kamera útmutatójában). Ezenfelül a widget
sorban láthatóvá kell tennünk a VIRB widgetet (
).
1.
Kapcsoljuk be a VIRB kamerát.
2.
A készüléken az óra képernyőt megjelenítve az
UP
és
DOWN
gombokkal
lépjünk a VIRB widgetre.
3.
Amennyiben szükséges, nyomjuk meg a
START
gombot a Forerunner
készüléks és a VIRB kamera párosításához.
4.
Várjunk, amíg a készülék csatlakozik a VIRB kamerához.
5.
Válasszunk az alábbiak közül:
• Videófelvétel indításához a készüléken nyomjuk meg a
Felvétel indí-
tás
gombot. A felvételi időt mutató számláló megjelenik a készülék kijel
-
zőjén.
• Videófelvétel készítése közben állókép (fotó) készítéséhez nyomjuk
meg a
DOWN
gombot.
• A felvétel leállításához nyomjuk meg a
STOP
gombot.
• Állókép készítéséhez (nem videófelvétel készítése közben) válasszuk a
Fotó készítés
t.
• Sorozatfotó készítéséhez válasszuk a
Sorozatfotó
opciót.
• A kamerát alvó módba állíthatjuk a
Kamera alvás
lehetőséggel.
• A
Kamera ébresztés
lehetőséggel a kamerát kivehetjük alvó módból.
• A fotó és videó beállítások módosításához válasszuk a
Beállítások
pon
-
tot.
A VIRB akciókamera vezérlése tevékenység alatt
A funkció használatához először a VIRB kamerán kell engedélyeznünk a táv
-
vezérlési funkciót (lásd a VIRB kamera útmutatójában). Ezenfelül a widget
sorban láthatóvá kell tennünk a VIRB widgetet (
.
1.
Kapcsoljuk be a VIRB kamerát.
2.
A készüléken az óra számlapot megjelenítve az
UP
vagy
DOWN
gombok
-
kal lépjünk a VIRB widgetre.
3.
Amennyiben szükséges, nyomjuk meg a
START
gombot a Forerunner
készüléks és a VIRB kamera párosításához.
4.
Várjunk, amíg a készülék csatlakozik a VIRB kamerához.
Amikor a kamera megfelelően csatlakozott, a tevékenység alkalmazások
automatikusan kibővülnek a VIRB adatképernyővel.
5.
A tevékenység alatt az
UP
vagy
DOWN
gombokkal váltsunk a VIRB adat
-
képernyőre.
6.
Nyomjuk meg hosszan a
Introduction
WARNING
See the
Important Safety and Product Information
guide in the
product box for product warnings and other important
information.
Always consult your physician before you begin or modify any
exercise program.
Keys
À
LIGHT
Hold to turn the device on.
Hold to view the controls menu.
Select to turn the backlight on and off.
Á
START
STOP
Select to start and stop the timer.
Select to choose an option or to acknowledge a message.
Â
BACK
Select to record a lap, rest, or transition during an activity.
Select to return to the previous screen.
Ã
DOWN Select to scroll through the widgets, data screens, options,
and settings.
Hold to manually change sports during an activity.
Ä
UP
Select to scroll through the widgets, data screens, options,
and settings.
Hold to view the menu.
GPS Status and Status Icons
The GPS status ring and icons temporarily overlay each data
screen. For outdoor activities, the status ring turns green when
GPS is ready. A flashing icon means the device is searching for
a signal. A solid icon means the signal was found or the sensor
is connected.
GPS
GPS status
Battery status
Smartphone connection status
Wi
‑
Fi
®
technology status
Heart rate status
Foot pod status
Running Dynamics Pod status
Speed and cadence sensor status
Power meter status
tempe
™
sensor status
VIRB
®
camera status
Going for a Run
The first fitness activity you record on your device can be a run,
ride, or any outdoor activity. You may need to charge the device
before starting the activity (
Charging the Device
, page 26
).
1
Select
START
, and select an activity.
2
Go outside, and wait while the device locates satellites.
3
Select
START
to start the timer.
4
Go for a run.
5
After you complete your run, select
STOP
to stop the timer.
6
Select an option:
•
Select
Resume
to restart the timer.
•
Select
Save
to save the run and reset the timer. You can
select the run to view a summary.
•
Select
Resume Later
to suspend the run and continue
recording later.
•
Select
Lap
to mark a lap.
•
Select
Discard
>
Yes
to delete the run.
Activities
Your device can be used for indoor, outdoor, athletic, and fitness
activities. When you start an activity, the device displays and
records sensor data. You can save activities and share them
with the Garmin Connect
™
community.
You can also add Connect IQ
™
activity apps to your device using
your Garmin Connect account (
Connect IQ Features
,
page 17
).
For more information about activity tracking and fitness metric
accuracy, go to
garmin.com/ataccuracy
.
Starting an Activity
When you start an activity, GPS turns on automatically (if
required). When you stop the activity, the device returns to
watch mode.
1
From the watch face, select
START
.
2
Select an activity.
3
If necessary, follow the on-screen instructions to enter
additional information.
4
If necessary, wait while the device connects to your ANT+
®
sensors.
5
If the activity requires GPS, go outside, and wait while the
device locates satellites.
6
Select
START
to start the timer.
NOTE:
The device does not record your activity data until
you start the timer.
Tips for Recording Activities
•
Charge the device before starting an activity (
Charging the
Device
, page 26
).
•
Select
to record laps.
•
Select
UP
or
DOWN
to view additional data pages.
Introduction
1
-
t.
7.
Válasszuk a
VIRB távvezérlés
t.
8.
Válasszunk az alábbiak közül:
• Amennyiben a felvételt a számláló indításával kívánjuk indítani, és a
számláló leállításával leállítani, válasszuk a
Beállítások
>
Felvételi
mód
>
Számláló indítás/leállítás
t.
MEGJEGYZÉS!
A felvétel a számláló indításával és leállításával együtt
automatikusan elindul és leáll.
• A
Beállítások
>
Felvételi mód
>
Kézi
opciót választva a kamerát a
menü opciókkal vezérelhetjük.
• A videó manuális indításához válasszuk a
Felvétel indítás
t.
A felvételi időt mutató számláló megjelenik a készülék kijelzőjén.
• Videófelvétel készítése közben állókép (fotó) készítéséhez nyomjuk
meg a
DOWN
gombot.
• A felvétel manuális leállításához nyomjuk meg a
STOP
gombot.
• Állókép készítéséhez (nem videófelvétel készítése közben) válasszuk a
Fotó készítés
t.
• Sorozatfotó készítéséhez válasszuk a
Sorozatfotó
opciót.
• A kamerát alvó módba állíthatjuk a
Kamera alvás
lehetőséggel.
• A
Kamera ébresztés
lehetőséggel a kamerát kivehetjük alvó módból.
Készülék információk
Készülékinformációk megtekintése
Megtekinthetjük a készülékadatokat, pl. a készülék sorozatszámát, a vonat
-
kozó jogi tudnivalókat, és a felhasználói szerződést.
1.
Az óra számlapon nyomjuk le hosszan a
Introduction
WARNING
See the
Important Safety and Product Information
guide in the
product box for product warnings and other important
information.
Always consult your physician before you begin or modify any
exercise program.
Keys
À
LIGHT
Hold to turn the device on.
Hold to view the controls menu.
Select to turn the backlight on and off.
Á
START
STOP
Select to start and stop the timer.
Select to choose an option or to acknowledge a message.
Â
BACK
Select to record a lap, rest, or transition during an activity.
Select to return to the previous screen.
Ã
DOWN Select to scroll through the widgets, data screens, options,
and settings.
Hold to manually change sports during an activity.
Ä
UP
Select to scroll through the widgets, data screens, options,
and settings.
Hold to view the menu.
GPS Status and Status Icons
The GPS status ring and icons temporarily overlay each data
screen. For outdoor activities, the status ring turns green when
GPS is ready. A flashing icon means the device is searching for
a signal. A solid icon means the signal was found or the sensor
is connected.
GPS
GPS status
Battery status
Smartphone connection status
Wi
‑
Fi
®
technology status
Heart rate status
Foot pod status
Running Dynamics Pod status
Speed and cadence sensor status
Power meter status
tempe
™
sensor status
VIRB
®
camera status
Going for a Run
The first fitness activity you record on your device can be a run,
ride, or any outdoor activity. You may need to charge the device
before starting the activity (
Charging the Device
, page 26
).
1
Select
START
, and select an activity.
2
Go outside, and wait while the device locates satellites.
3
Select
START
to start the timer.
4
Go for a run.
5
After you complete your run, select
STOP
to stop the timer.
6
Select an option:
•
Select
Resume
to restart the timer.
•
Select
Save
to save the run and reset the timer. You can
select the run to view a summary.
•
Select
Resume Later
to suspend the run and continue
recording later.
•
Select
Lap
to mark a lap.
•
Select
Discard
>
Yes
to delete the run.
Activities
Your device can be used for indoor, outdoor, athletic, and fitness
activities. When you start an activity, the device displays and
records sensor data. You can save activities and share them
with the Garmin Connect
™
community.
You can also add Connect IQ
™
activity apps to your device using
your Garmin Connect account (
Connect IQ Features
,
page 17
).
For more information about activity tracking and fitness metric
accuracy, go to
garmin.com/ataccuracy
.
Starting an Activity
When you start an activity, GPS turns on automatically (if
required). When you stop the activity, the device returns to
watch mode.
1
From the watch face, select
START
.
2
Select an activity.
3
If necessary, follow the on-screen instructions to enter
additional information.
4
If necessary, wait while the device connects to your ANT+
®
sensors.
5
If the activity requires GPS, go outside, and wait while the
device locates satellites.
6
Select
START
to start the timer.
NOTE:
The device does not record your activity data until
you start the timer.
Tips for Recording Activities
•
Charge the device before starting an activity (
Charging the
Device
, page 26
).
•
Select
to record laps.
•
Select
UP
or
DOWN
to view additional data pages.
Introduction
1
gombot.
2.
Válasszuk a
Beállítások
>
Rendszer
>
Névjegy
pontot.


