8
A készülék megjeleníti a személyre szabott tempókövetőnket.
TIPP!
A
DOWN
gomb megnyomásával, és a
Szakaszok megtekintése
pont kiválasztásával megtekinthetjük a verseny szakaszait.
8.
A terv indításához nyomjuk meg a
START
gombot.
9.
Amennyiben szükséges, válasszuk az
Igen
t a pálya navigáció indításá
-
hoz.
10
. A
START
gomb megnyomásával indítsuk a tevékenység időzítőt.
PacePro terv indítása
1.
Az óra számlapon nyomjuk meg a
START
gombot.
2.
Válasszunk egy kültéri futás tevékenységet.
3.
Nyomjuk le hosszan a
Introduction
WARNING
See the
Important Safety and Product Information
guide in the
product box for product warnings and other important
information.
Always consult your physician before you begin or modify any
exercise program.
Keys
À
LIGHT
Hold to turn the device on.
Hold to view the controls menu.
Select to turn the backlight on and off.
Á
START
STOP
Select to start and stop the timer.
Select to choose an option or to acknowledge a message.
Â
BACK
Select to record a lap, rest, or transition during an activity.
Select to return to the previous screen.
Ã
DOWN Select to scroll through the widgets, data screens, options,
and settings.
Hold to manually change sports during an activity.
Ä
UP
Select to scroll through the widgets, data screens, options,
and settings.
Hold to view the menu.
GPS Status and Status Icons
The GPS status ring and icons temporarily overlay each data
screen. For outdoor activities, the status ring turns green when
GPS is ready. A flashing icon means the device is searching for
a signal. A solid icon means the signal was found or the sensor
is connected.
GPS
GPS status
Battery status
Smartphone connection status
Wi
‑
Fi
®
technology status
Heart rate status
Foot pod status
Running Dynamics Pod status
Speed and cadence sensor status
Power meter status
tempe
™
sensor status
VIRB
®
camera status
Going for a Run
The first fitness activity you record on your device can be a run,
ride, or any outdoor activity. You may need to charge the device
before starting the activity (
Charging the Device
, page 26
).
1
Select
START
, and select an activity.
2
Go outside, and wait while the device locates satellites.
3
Select
START
to start the timer.
4
Go for a run.
5
After you complete your run, select
STOP
to stop the timer.
6
Select an option:
•
Select
Resume
to restart the timer.
•
Select
Save
to save the run and reset the timer. You can
select the run to view a summary.
•
Select
Resume Later
to suspend the run and continue
recording later.
•
Select
Lap
to mark a lap.
•
Select
Discard
>
Yes
to delete the run.
Activities
Your device can be used for indoor, outdoor, athletic, and fitness
activities. When you start an activity, the device displays and
records sensor data. You can save activities and share them
with the Garmin Connect
™
community.
You can also add Connect IQ
™
activity apps to your device using
your Garmin Connect account (
Connect IQ Features
,
page 17
).
For more information about activity tracking and fitness metric
accuracy, go to
garmin.com/ataccuracy
.
Starting an Activity
When you start an activity, GPS turns on automatically (if
required). When you stop the activity, the device returns to
watch mode.
1
From the watch face, select
START
.
2
Select an activity.
3
If necessary, follow the on-screen instructions to enter
additional information.
4
If necessary, wait while the device connects to your ANT+
®
sensors.
5
If the activity requires GPS, go outside, and wait while the
device locates satellites.
6
Select
START
to start the timer.
NOTE:
The device does not record your activity data until
you start the timer.
Tips for Recording Activities
•
Charge the device before starting an activity (
Charging the
Device
, page 26
).
•
Select
to record laps.
•
Select
UP
or
DOWN
to view additional data pages.
Introduction
1
gombot.
4.
Válasszuk az
Edzés
>
PacePro
tervek pontot.
5.
Válasszuk ki a kívánt tervet.
TIPP!
A szakaszok előnézetben történő megtekintéséhez nyomjuk meg a
DOWN
gombot, majd válasszuk a
Szakaszok megtekintése
pontot.
6.
A terv indításához nyomjuk meg a
START
gombot.
7.
Amennyiben szükséges, válasszuk az
Igen
-t a pálya navigáció indításá
-
hoz.
8.
A
START
gomb megnyomásával indítsuk a tevékenység időzítőt.
• Select
Goal Time
, and enter your target time.
The device displays your custom pace band.
TIP:
You can press
DOWN
and select
View Splits
to preview
the splits.
8
Select
START
to start the plan.
9
If necessary, select
Yes
to enable course navigation.
10
Select
START
to start the activity timer.
Starting a PacePro Plan
1
From the watch face, select
START
.
2
Select an outdoor running activity.
3
Hold .
4
Select
Training
>
PacePro Plans
.
5
Select a plan.
TIP:
You can select
DOWN
>
View Splits
to preview the
splits.
6
Select
START
to start the plan.
7
If necessary, select
Yes
to enable course navigation.
8
Select
START
to start the activity timer.
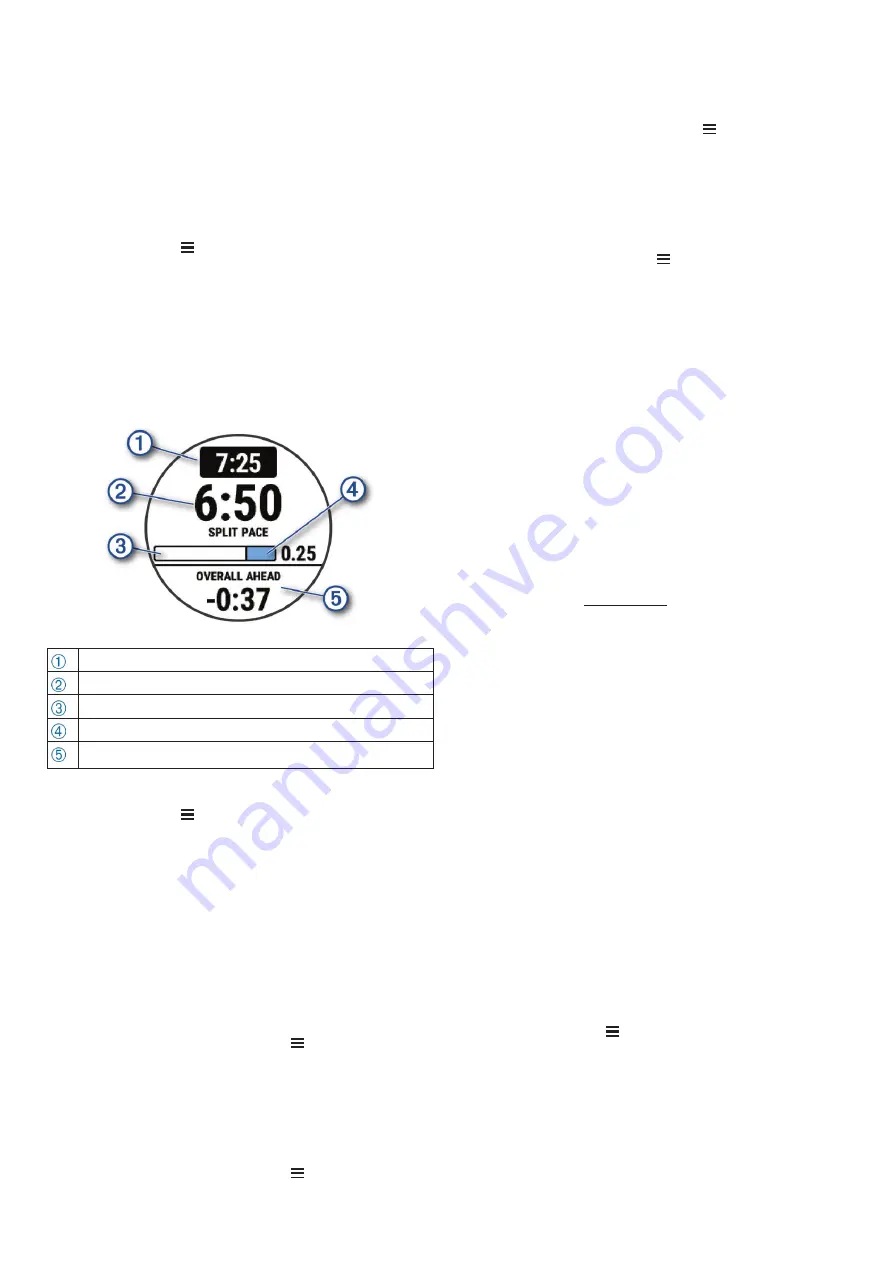
Target split pace
Current split pace
Completion progress for the split
Distance remaining in the split
Overall time ahead of or behind your target time
Stopping a PacePro Plan
1
Hold .
2
Select
Stop PacePro
>
Yes
.
The device stops the PacePro plan. The activity timer
continues running.
Personal Records
When you complete an activity, the device displays any new
personal records you achieved during that activity. Personal
records include your fastest time over several typical race
distances and longest run, ride, or swim.
NOTE:
For cycling, personal records also include most ascent
and best power (power meter required).
Viewing Your Personal Records
1
From the watch face, hold .
2
Select
History
>
Records
.
3
Select a sport.
4
Select a record.
5
Select
View Record
.
Restoring a Personal Record
You can set each personal record back to the one previously
recorded.
1
From the watch face, hold .
2
Select
History
>
Records
.
3
Select a sport.
4
Select a record to restore.
5
Select
Previous
>
Yes
.
NOTE:
This does not delete any saved activities.
Clearing a Personal Record
1
From the watch face, hold .
2
Select
History
>
Records
.
3
Select a sport.
4
Select a record to delete.
5
Select
Clear Record
>
Yes
.
NOTE:
This does not delete any saved activities.
Clearing All Personal Records
1
From the watch face, hold .
2
Select
History
>
Records
.
3
Select a sport.
4
Select
Clear All Records
>
Yes
.
The records are deleted for that sport only.
NOTE:
This does not delete any saved activities.
Segments
You can send running or cycling segments from your Garmin
Connect account to your device. After a segment is saved to
your device, you can race a segment, trying to match or exceed
your personal record or other participants who have raced the
segment.
NOTE:
When you download a course from your Garmin
Connect account, you can download all of the available
segments in the course.
Strava
™
Segments
You can download Strava segments to your Forerunner device.
Follow Strava segments to compare your performance with your
past rides, friends, and pros who have ridden the same
segment.
To sign up for a Strava membership, go to the segments widget
in your Garmin Connect account. For more information, go to
www.strava.com
.
The information in this manual applies to both Garmin Connect
segments and Strava segments.
Racing a Segment
Segments are virtual race courses. You can race a segment,
and compare your performance to past activities, others'
performance, connections in your Garmin Connect account, or
other members of the running or cycling communities. You can
upload your activity data to your Garmin Connect account to
view your segment position.
NOTE:
If your Garmin Connect account and Strava account are
linked, your activity is automatically sent to your Strava account
so you can review the segment position.
1
Select
START
.
2
Select an activity.
3
Go for a run or ride.
When you approach a segment, a message appears, and
you can race the segment.
4
Start racing the segment.
A message appears when the segment is complete.
Viewing Segment Details
1
Select
START
.
2
Select an activity.
3
Hold .
8
Training
Szakasz céltempó
Aktuális szakasztempó
Szakasz megtett része
Szakasz hátralevő része
Célidőnél hosszabb vagy rövidebb összesített idő
PacePro terv leállítása
1.
Nyomjuk le hosszan a
Introduction
WARNING
See the
Important Safety and Product Information
guide in the
product box for product warnings and other important
information.
Always consult your physician before you begin or modify any
exercise program.
Keys
À
LIGHT
Hold to turn the device on.
Hold to view the controls menu.
Select to turn the backlight on and off.
Á
START
STOP
Select to start and stop the timer.
Select to choose an option or to acknowledge a message.
Â
BACK
Select to record a lap, rest, or transition during an activity.
Select to return to the previous screen.
Ã
DOWN Select to scroll through the widgets, data screens, options,
and settings.
Hold to manually change sports during an activity.
Ä
UP
Select to scroll through the widgets, data screens, options,
and settings.
Hold to view the menu.
GPS Status and Status Icons
The GPS status ring and icons temporarily overlay each data
screen. For outdoor activities, the status ring turns green when
GPS is ready. A flashing icon means the device is searching for
a signal. A solid icon means the signal was found or the sensor
is connected.
GPS
GPS status
Battery status
Smartphone connection status
Wi
‑
Fi
®
technology status
Heart rate status
Foot pod status
Running Dynamics Pod status
Speed and cadence sensor status
Power meter status
tempe
™
sensor status
VIRB
®
camera status
Going for a Run
The first fitness activity you record on your device can be a run,
ride, or any outdoor activity. You may need to charge the device
before starting the activity (
Charging the Device
, page 26
).
1
Select
START
, and select an activity.
2
Go outside, and wait while the device locates satellites.
3
Select
START
to start the timer.
4
Go for a run.
5
After you complete your run, select
STOP
to stop the timer.
6
Select an option:
•
Select
Resume
to restart the timer.
•
Select
Save
to save the run and reset the timer. You can
select the run to view a summary.
•
Select
Resume Later
to suspend the run and continue
recording later.
•
Select
Lap
to mark a lap.
•
Select
Discard
>
Yes
to delete the run.
Activities
Your device can be used for indoor, outdoor, athletic, and fitness
activities. When you start an activity, the device displays and
records sensor data. You can save activities and share them
with the Garmin Connect
™
community.
You can also add Connect IQ
™
activity apps to your device using
your Garmin Connect account (
Connect IQ Features
,
page 17
).
For more information about activity tracking and fitness metric
accuracy, go to
garmin.com/ataccuracy
.
Starting an Activity
When you start an activity, GPS turns on automatically (if
required). When you stop the activity, the device returns to
watch mode.
1
From the watch face, select
START
.
2
Select an activity.
3
If necessary, follow the on-screen instructions to enter
additional information.
4
If necessary, wait while the device connects to your ANT+
®
sensors.
5
If the activity requires GPS, go outside, and wait while the
device locates satellites.
6
Select
START
to start the timer.
NOTE:
The device does not record your activity data until
you start the timer.
Tips for Recording Activities
•
Charge the device before starting an activity (
Charging the
Device
, page 26
).
•
Select
to record laps.
•
Select
UP
or
DOWN
to view additional data pages.
Introduction
1
gombot.
2.
Válasszuk a
PacePro leállítása
>
Igen
pontot.
A készülék leállítja a PacePro tervet, azonban a tevékenység időzítő to
-
vábbra is fut.
Személyes rekordok
A tevékenység végén a készülék kijelzi a tevékenység során elért esetleges
személyes rekordokat. Ez jelentheti adott versenytáv megtételéhez szüksé
-
ges legrövidebb időt, vagy a legnagyobb lefutott, letekert, leúszott távot.
MEGJEGYZÉS!
Kerékpáros profil esetén a személyes rekord tartalmazza a
legnagyobb emelkedést és a legjobb teljesítményt is (teljesítménymérő szük
-
séges).
Személyes rekordok megtekintése
1.
Az óra számlapon nyomjuk meg hosszan a
Introduction
WARNING
See the
Important Safety and Product Information
guide in the
product box for product warnings and other important
information.
Always consult your physician before you begin or modify any
exercise program.
Keys
À
LIGHT
Hold to turn the device on.
Hold to view the controls menu.
Select to turn the backlight on and off.
Á
START
STOP
Select to start and stop the timer.
Select to choose an option or to acknowledge a message.
Â
BACK
Select to record a lap, rest, or transition during an activity.
Select to return to the previous screen.
Ã
DOWN Select to scroll through the widgets, data screens, options,
and settings.
Hold to manually change sports during an activity.
Ä
UP
Select to scroll through the widgets, data screens, options,
and settings.
Hold to view the menu.
GPS Status and Status Icons
The GPS status ring and icons temporarily overlay each data
screen. For outdoor activities, the status ring turns green when
GPS is ready. A flashing icon means the device is searching for
a signal. A solid icon means the signal was found or the sensor
is connected.
GPS
GPS status
Battery status
Smartphone connection status
Wi
‑
Fi
®
technology status
Heart rate status
Foot pod status
Running Dynamics Pod status
Speed and cadence sensor status
Power meter status
tempe
™
sensor status
VIRB
®
camera status
Going for a Run
The first fitness activity you record on your device can be a run,
ride, or any outdoor activity. You may need to charge the device
before starting the activity (
Charging the Device
, page 26
).
1
Select
START
, and select an activity.
2
Go outside, and wait while the device locates satellites.
3
Select
START
to start the timer.
4
Go for a run.
5
After you complete your run, select
STOP
to stop the timer.
6
Select an option:
•
Select
Resume
to restart the timer.
•
Select
Save
to save the run and reset the timer. You can
select the run to view a summary.
•
Select
Resume Later
to suspend the run and continue
recording later.
•
Select
Lap
to mark a lap.
•
Select
Discard
>
Yes
to delete the run.
Activities
Your device can be used for indoor, outdoor, athletic, and fitness
activities. When you start an activity, the device displays and
records sensor data. You can save activities and share them
with the Garmin Connect
™
community.
You can also add Connect IQ
™
activity apps to your device using
your Garmin Connect account (
Connect IQ Features
,
page 17
).
For more information about activity tracking and fitness metric
accuracy, go to
garmin.com/ataccuracy
.
Starting an Activity
When you start an activity, GPS turns on automatically (if
required). When you stop the activity, the device returns to
watch mode.
1
From the watch face, select
START
.
2
Select an activity.
3
If necessary, follow the on-screen instructions to enter
additional information.
4
If necessary, wait while the device connects to your ANT+
®
sensors.
5
If the activity requires GPS, go outside, and wait while the
device locates satellites.
6
Select
START
to start the timer.
NOTE:
The device does not record your activity data until
you start the timer.
Tips for Recording Activities
•
Charge the device before starting an activity (
Charging the
Device
, page 26
).
•
Select
to record laps.
•
Select
UP
or
DOWN
to view additional data pages.
Introduction
1
gombot, majd válasszuk
az
Előzmények
>
Rekordok
at.
2.
Válasszunk egy sportágat.
3.
Válasszuk ki a rekordot.
4.
Válasszuk a
Rekord megtekintése
-t.
Személyes rekord visszaállítása
Az aktuális rekordot visszaállíthatjuk egy korábbi rekordra.
1.
Az óra számlapon nyomjuk meg hosszan a
Introduction
WARNING
See the
Important Safety and Product Information
guide in the
product box for product warnings and other important
information.
Always consult your physician before you begin or modify any
exercise program.
Keys
À
LIGHT
Hold to turn the device on.
Hold to view the controls menu.
Select to turn the backlight on and off.
Á
START
STOP
Select to start and stop the timer.
Select to choose an option or to acknowledge a message.
Â
BACK
Select to record a lap, rest, or transition during an activity.
Select to return to the previous screen.
Ã
DOWN Select to scroll through the widgets, data screens, options,
and settings.
Hold to manually change sports during an activity.
Ä
UP
Select to scroll through the widgets, data screens, options,
and settings.
Hold to view the menu.
GPS Status and Status Icons
The GPS status ring and icons temporarily overlay each data
screen. For outdoor activities, the status ring turns green when
GPS is ready. A flashing icon means the device is searching for
a signal. A solid icon means the signal was found or the sensor
is connected.
GPS
GPS status
Battery status
Smartphone connection status
Wi
‑
Fi
®
technology status
Heart rate status
Foot pod status
Running Dynamics Pod status
Speed and cadence sensor status
Power meter status
tempe
™
sensor status
VIRB
®
camera status
Going for a Run
The first fitness activity you record on your device can be a run,
ride, or any outdoor activity. You may need to charge the device
before starting the activity (
Charging the Device
, page 26
).
1
Select
START
, and select an activity.
2
Go outside, and wait while the device locates satellites.
3
Select
START
to start the timer.
4
Go for a run.
5
After you complete your run, select
STOP
to stop the timer.
6
Select an option:
•
Select
Resume
to restart the timer.
•
Select
Save
to save the run and reset the timer. You can
select the run to view a summary.
•
Select
Resume Later
to suspend the run and continue
recording later.
•
Select
Lap
to mark a lap.
•
Select
Discard
>
Yes
to delete the run.
Activities
Your device can be used for indoor, outdoor, athletic, and fitness
activities. When you start an activity, the device displays and
records sensor data. You can save activities and share them
with the Garmin Connect
™
community.
You can also add Connect IQ
™
activity apps to your device using
your Garmin Connect account (
Connect IQ Features
,
page 17
).
For more information about activity tracking and fitness metric
accuracy, go to
garmin.com/ataccuracy
.
Starting an Activity
When you start an activity, GPS turns on automatically (if
required). When you stop the activity, the device returns to
watch mode.
1
From the watch face, select
START
.
2
Select an activity.
3
If necessary, follow the on-screen instructions to enter
additional information.
4
If necessary, wait while the device connects to your ANT+
®
sensors.
5
If the activity requires GPS, go outside, and wait while the
device locates satellites.
6
Select
START
to start the timer.
NOTE:
The device does not record your activity data until
you start the timer.
Tips for Recording Activities
•
Charge the device before starting an activity (
Charging the
Device
, page 26
).
•
Select
to record laps.
•
Select
UP
or
DOWN
to view additional data pages.
Introduction
1
gombot, majd válasszuk
az
Előzmények
>
Rekordok
at.
2.
Válasszunk egy sportágat.
3.
Válasszuk ki a visszaállítani kívánt rekordot.
4.
Válasszuk az
Előző
>
Igen
-t.
NE FELEDJÜK!
A mentett tevékenységek ezzel nem törlődnek.
Személyes rekordok törlése
1.
Az óra számlapon nyomjuk meg hosszan a
Introduction
WARNING
See the
Important Safety and Product Information
guide in the
product box for product warnings and other important
information.
Always consult your physician before you begin or modify any
exercise program.
Keys
À
LIGHT
Hold to turn the device on.
Hold to view the controls menu.
Select to turn the backlight on and off.
Á
START
STOP
Select to start and stop the timer.
Select to choose an option or to acknowledge a message.
Â
BACK
Select to record a lap, rest, or transition during an activity.
Select to return to the previous screen.
Ã
DOWN Select to scroll through the widgets, data screens, options,
and settings.
Hold to manually change sports during an activity.
Ä
UP
Select to scroll through the widgets, data screens, options,
and settings.
Hold to view the menu.
GPS Status and Status Icons
The GPS status ring and icons temporarily overlay each data
screen. For outdoor activities, the status ring turns green when
GPS is ready. A flashing icon means the device is searching for
a signal. A solid icon means the signal was found or the sensor
is connected.
GPS
GPS status
Battery status
Smartphone connection status
Wi
‑
Fi
®
technology status
Heart rate status
Foot pod status
Running Dynamics Pod status
Speed and cadence sensor status
Power meter status
tempe
™
sensor status
VIRB
®
camera status
Going for a Run
The first fitness activity you record on your device can be a run,
ride, or any outdoor activity. You may need to charge the device
before starting the activity (
Charging the Device
, page 26
).
1
Select
START
, and select an activity.
2
Go outside, and wait while the device locates satellites.
3
Select
START
to start the timer.
4
Go for a run.
5
After you complete your run, select
STOP
to stop the timer.
6
Select an option:
•
Select
Resume
to restart the timer.
•
Select
Save
to save the run and reset the timer. You can
select the run to view a summary.
•
Select
Resume Later
to suspend the run and continue
recording later.
•
Select
Lap
to mark a lap.
•
Select
Discard
>
Yes
to delete the run.
Activities
Your device can be used for indoor, outdoor, athletic, and fitness
activities. When you start an activity, the device displays and
records sensor data. You can save activities and share them
with the Garmin Connect
™
community.
You can also add Connect IQ
™
activity apps to your device using
your Garmin Connect account (
Connect IQ Features
,
page 17
).
For more information about activity tracking and fitness metric
accuracy, go to
garmin.com/ataccuracy
.
Starting an Activity
When you start an activity, GPS turns on automatically (if
required). When you stop the activity, the device returns to
watch mode.
1
From the watch face, select
START
.
2
Select an activity.
3
If necessary, follow the on-screen instructions to enter
additional information.
4
If necessary, wait while the device connects to your ANT+
®
sensors.
5
If the activity requires GPS, go outside, and wait while the
device locates satellites.
6
Select
START
to start the timer.
NOTE:
The device does not record your activity data until
you start the timer.
Tips for Recording Activities
•
Charge the device before starting an activity (
Charging the
Device
, page 26
).
•
Select
to record laps.
•
Select
UP
or
DOWN
to view additional data pages.
Introduction
1
gombot, majd válasszuk
az
Előzmények
>
Rekordok
at.
2.
Válasszunk egy sportágat.
3.
Válasszuk ki a törölni kívánt rekordot.
4.
Válasszuk a
Rekord törlése
>
Igen
pontot.
NE FELEDJÜK!
A mentett tevékenységek ezzel nem törlődnek.
Összes személyes rekord törlése
1.
Az óra számlapon nyomjuk meg a
Introduction
WARNING
See the
Important Safety and Product Information
guide in the
product box for product warnings and other important
information.
Always consult your physician before you begin or modify any
exercise program.
Keys
À
LIGHT
Hold to turn the device on.
Hold to view the controls menu.
Select to turn the backlight on and off.
Á
START
STOP
Select to start and stop the timer.
Select to choose an option or to acknowledge a message.
Â
BACK
Select to record a lap, rest, or transition during an activity.
Select to return to the previous screen.
Ã
DOWN Select to scroll through the widgets, data screens, options,
and settings.
Hold to manually change sports during an activity.
Ä
UP
Select to scroll through the widgets, data screens, options,
and settings.
Hold to view the menu.
GPS Status and Status Icons
The GPS status ring and icons temporarily overlay each data
screen. For outdoor activities, the status ring turns green when
GPS is ready. A flashing icon means the device is searching for
a signal. A solid icon means the signal was found or the sensor
is connected.
GPS
GPS status
Battery status
Smartphone connection status
Wi
‑
Fi
®
technology status
Heart rate status
Foot pod status
Running Dynamics Pod status
Speed and cadence sensor status
Power meter status
tempe
™
sensor status
VIRB
®
camera status
Going for a Run
The first fitness activity you record on your device can be a run,
ride, or any outdoor activity. You may need to charge the device
before starting the activity (
Charging the Device
, page 26
).
1
Select
START
, and select an activity.
2
Go outside, and wait while the device locates satellites.
3
Select
START
to start the timer.
4
Go for a run.
5
After you complete your run, select
STOP
to stop the timer.
6
Select an option:
•
Select
Resume
to restart the timer.
•
Select
Save
to save the run and reset the timer. You can
select the run to view a summary.
•
Select
Resume Later
to suspend the run and continue
recording later.
•
Select
Lap
to mark a lap.
•
Select
Discard
>
Yes
to delete the run.
Activities
Your device can be used for indoor, outdoor, athletic, and fitness
activities. When you start an activity, the device displays and
records sensor data. You can save activities and share them
with the Garmin Connect
™
community.
You can also add Connect IQ
™
activity apps to your device using
your Garmin Connect account (
Connect IQ Features
,
page 17
).
For more information about activity tracking and fitness metric
accuracy, go to
garmin.com/ataccuracy
.
Starting an Activity
When you start an activity, GPS turns on automatically (if
required). When you stop the activity, the device returns to
watch mode.
1
From the watch face, select
START
.
2
Select an activity.
3
If necessary, follow the on-screen instructions to enter
additional information.
4
If necessary, wait while the device connects to your ANT+
®
sensors.
5
If the activity requires GPS, go outside, and wait while the
device locates satellites.
6
Select
START
to start the timer.
NOTE:
The device does not record your activity data until
you start the timer.
Tips for Recording Activities
•
Charge the device before starting an activity (
Charging the
Device
, page 26
).
•
Select
to record laps.
•
Select
UP
or
DOWN
to view additional data pages.
Introduction
1
gombot, majd válasszuk az
Előz-
mények
>
Rekordok
at.
2.
Válasszunk egy sportágat.
3.
Válasszuk a
Összes rekord törlése
>
Igen
pontot.
NE FELEDJÜK!
A mentett tevékenységek ezzel nem törlődnek.
Szegmensek
A Garmin Connect fiókról futó vagy kerékpáros szegmenseket tölthetünk le
a készülékre. Miután egy szegmens letöltésre került a készüléken, verse
-
nyezhetünk a szegmens mentén, megpróbálhatunk egy személyes rekord
-
dal vagy egy ugyanezen szegmenssel küzdő sporttárssal felvenni a versenyt
vagy éppen túlszárnyalni annak teljesítményét.
NE FELEDJÜK!
Amikor egy pályát töltünk le a Garmin Connect fiókból a ké
-
szülékre, a pályát alkotó összes szegmens letöltésre kerül.
Strava™ szegmensek
Strava szegmenseket is letölthetünk a Forerunner készülékre. A Strava szeg
-
mensek követésével korábbi túráink teljesítményével, barátok teljesítményé
-
vel, valamint ugyanezen szegmenseket végrehajtó profik teljesítményével
mérhetjük össze aktuális teljesítményünket.
Strava tagnak a Garmin Connect oldal szegmens widgetében jelentkezhe
-
tünk (részletesen lásd a www.strava.com oldalon).
Az útmutatóban szereplő alábbi leírás mind a Garmin Connect, mind a Strava
szegmensekre egyformán érvényes.
Verseny egy szegmens ellen
A szegmens egy virtuális versenypálya. Egy szegmens mentén versenyezve
korábbi edzésekkel, más kerékpárosok teljesítményével, a Garmin Connect
fiókon belüli ismerőseink vagy a futó és kerékpáros közösség más tagjai
-
nak teljesítményével vethetjük össze saját aktuális teljesítményünket. A tevé
-
kenység adatait a Garmin Connect oldalra feltöltve megtekinthetjük a szeg
-
mens pozícióját.
MEGJEGYZÉS!
Amennyiben Strava fiókunk és Garmin Connect fiókunk
kapcsolódnak egymáshoz, a tevékenység adatai automatikusan elküldés
-
re kerülnek a Strava fiók felé, így meg tudjuk tekinteni a szegmens pozí
-
ciót.
1.
A
START
gombbal indítsuk a számlálót.
2.
Válasszunk egy tevékenységet.
3.
Kezdjük meg a futást vagy a kerékpározást.
Amikor egy szegmenshez közeledünk, üzenet figyelmeztet. Ezután meg
-
kezdhetjük a szegmens mentén történő versenyt.
4.
Kezdjünk el versenyezni a szegmens mentén.
Egy üzenet jelzi, amikor a szegmens befejeződött.
Szegmens adatok megjelenítése
1.
Nyomjuk meg a
START
gombot.
2.
Válasszunk egy tevékenységet.
3.
Nyomjuk meg hosszan a
Introduction
WARNING
See the
Important Safety and Product Information
guide in the
product box for product warnings and other important
information.
Always consult your physician before you begin or modify any
exercise program.
Keys
À
LIGHT
Hold to turn the device on.
Hold to view the controls menu.
Select to turn the backlight on and off.
Á
START
STOP
Select to start and stop the timer.
Select to choose an option or to acknowledge a message.
Â
BACK
Select to record a lap, rest, or transition during an activity.
Select to return to the previous screen.
Ã
DOWN Select to scroll through the widgets, data screens, options,
and settings.
Hold to manually change sports during an activity.
Ä
UP
Select to scroll through the widgets, data screens, options,
and settings.
Hold to view the menu.
GPS Status and Status Icons
The GPS status ring and icons temporarily overlay each data
screen. For outdoor activities, the status ring turns green when
GPS is ready. A flashing icon means the device is searching for
a signal. A solid icon means the signal was found or the sensor
is connected.
GPS
GPS status
Battery status
Smartphone connection status
Wi
‑
Fi
®
technology status
Heart rate status
Foot pod status
Running Dynamics Pod status
Speed and cadence sensor status
Power meter status
tempe
™
sensor status
VIRB
®
camera status
Going for a Run
The first fitness activity you record on your device can be a run,
ride, or any outdoor activity. You may need to charge the device
before starting the activity (
Charging the Device
, page 26
).
1
Select
START
, and select an activity.
2
Go outside, and wait while the device locates satellites.
3
Select
START
to start the timer.
4
Go for a run.
5
After you complete your run, select
STOP
to stop the timer.
6
Select an option:
•
Select
Resume
to restart the timer.
•
Select
Save
to save the run and reset the timer. You can
select the run to view a summary.
•
Select
Resume Later
to suspend the run and continue
recording later.
•
Select
Lap
to mark a lap.
•
Select
Discard
>
Yes
to delete the run.
Activities
Your device can be used for indoor, outdoor, athletic, and fitness
activities. When you start an activity, the device displays and
records sensor data. You can save activities and share them
with the Garmin Connect
™
community.
You can also add Connect IQ
™
activity apps to your device using
your Garmin Connect account (
Connect IQ Features
,
page 17
).
For more information about activity tracking and fitness metric
accuracy, go to
garmin.com/ataccuracy
.
Starting an Activity
When you start an activity, GPS turns on automatically (if
required). When you stop the activity, the device returns to
watch mode.
1
From the watch face, select
START
.
2
Select an activity.
3
If necessary, follow the on-screen instructions to enter
additional information.
4
If necessary, wait while the device connects to your ANT+
®
sensors.
5
If the activity requires GPS, go outside, and wait while the
device locates satellites.
6
Select
START
to start the timer.
NOTE:
The device does not record your activity data until
you start the timer.
Tips for Recording Activities
•
Charge the device before starting an activity (
Charging the
Device
, page 26
).
•
Select
to record laps.
•
Select
UP
or
DOWN
to view additional data pages.
Introduction
1
gombot.