


14
Mellkasi pulzusmérő felvétele
A pulzusmérőt helyezzük közvetlenül bőrünkre, mellünk alá. A pánt elég szo
-
rosan fogja a mérőt ahhoz, hogy az edzés során az a helyén maradjon.
1.
Válasszuk ki a megfelelő pánt toldót.
2.
Vegyük fel úgy a mérőt, hogy a Garmin logó olvasható legyen.
A kampó , és a hurok (bújtató) jobb oldalunkon csatlakozzon.
• Put on the heart rate monitor backward to easily adjust the
slider on the strap extender.
• Put on the heart rate monitor forward to easily adjust the
slider on the heart rate monitor.
Putting On the Heart Rate Monitor
You should wear the heart rate monitor directly on your skin, just
below your sternum.
1
Select a strap extender for the best fit.
2
Wear the heart rate monitor with the Garmin logo facing right-
side up.
The hook and loop connection should be on your right
side.
3
Wrap the heart rate monitor around your chest, and connect
the strap hook to the loop.
NOTE:
Make sure the care tag does not fold over.
4
Tighten the heart rate monitor so it is snug around your
chest, but not restrictive.
After you put on the heart rate monitor, it is active, storing, and
sending data.
Tips for Using the HRM-Swim Accessory
• Adjust the tightness of the heart rate monitor and strap
extender if the heart rate monitor slides down your chest
when pushing off the pool wall.
• Stand up between intervals so that the heart rate monitor is
out of the water to see your heart rate data.
Running Dynamics
You can use your compatible Forerunner device paired with the
HRM-Pro accessory or other running dynamics accessory to
provide real-time feedback about your running form.
The running dynamics accessory has an accelerometer that
measures torso movement in order to calculate six running
metrics.
Cadence
: Cadence is the number of steps per minute. It
displays the total steps (right and left combined).
Vertical oscillation
: Vertical oscillation is your bounce while
running. It displays the vertical motion of your torso,
measured in centimeters.
Ground contact time
: Ground contact time is the amount of
time in each step that you spend on the ground while
running. It is measured in milliseconds.
NOTE:
Ground contact time and balance are not available
while walking.
Ground contact time balance
: Ground contact time balance
displays the left/right balance of your ground contact time
while running. It displays a percentage. For example, 53.2
with an arrow pointing left or right.
Stride length
: Stride length is the length of your stride from one
footfall to the next. It is measured in meters.
Vertical ratio
: Vertical ratio is the ratio of vertical oscillation to
stride length. It displays a percentage. A lower number
typically indicates better running form.
Training with Running Dynamics
Before you can view running dynamics, you must put on an
HRM-Pro, HRM-Run
™
, or HRM-Tri accessory, or the Running
Dynamics Pod, and pair it with your device (
Pairing Your
Wireless Sensors
, page 29
).
1
Select
START
, and select a running activity.
2
Select
START
.
4
Scroll to the running dynamics screens to view your metrics.
5
If necessary, hold
UP
to edit how the running dynamics data
appears.
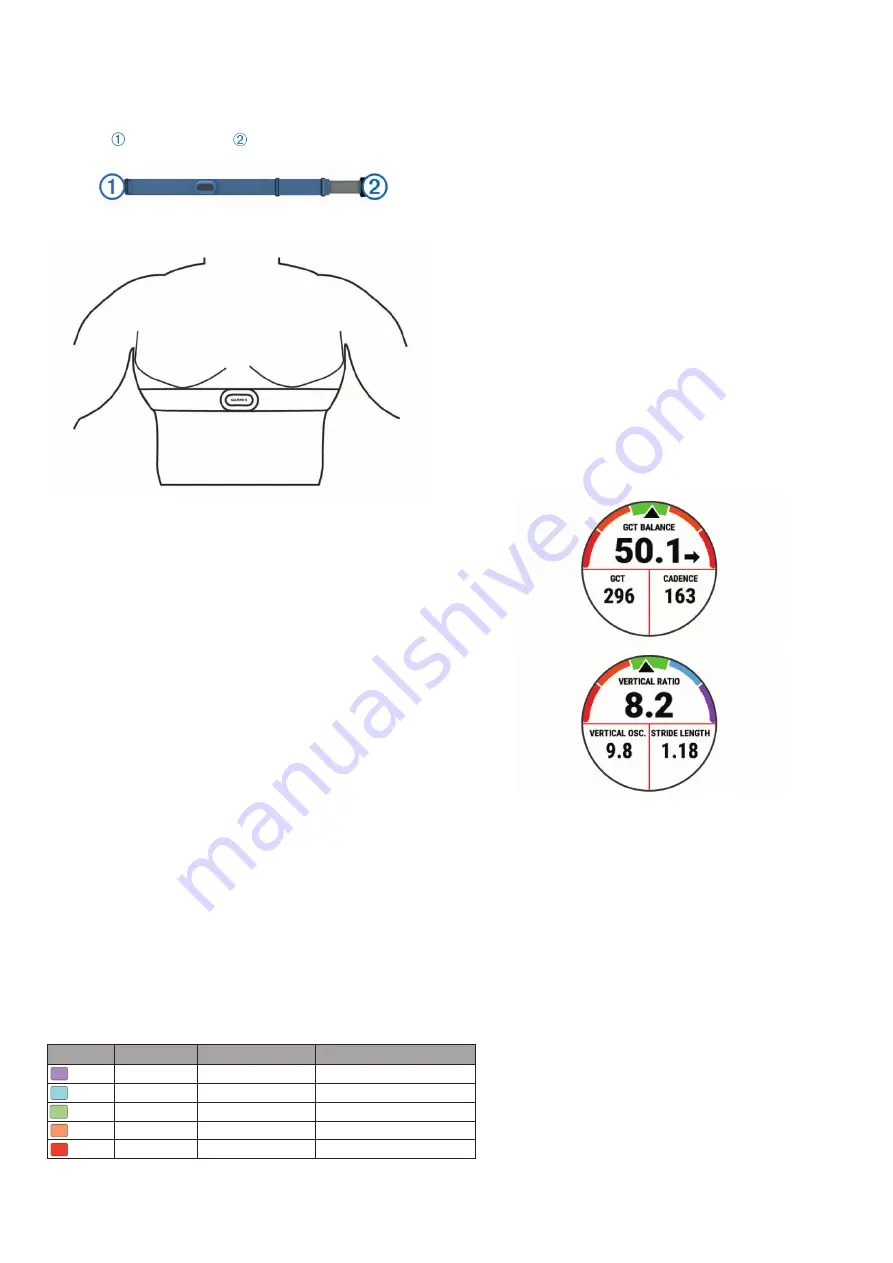
Color Gauges and Running Dynamics Data
The running dynamics screens display a color gauge for the primary metric. You can display cadence, vertical oscillation, ground
contact time, ground contact time balance, or vertical ratio as the primary metric. The color gauge shows you how your running
dynamics data compare to those of other runners. The color zones are based on percentiles.
Garmin has researched many runners of all different levels. The data values in the red or orange zones are typical for less
experienced or slower runners. The data values in the green, blue, or purple zones are typical for more experienced or faster
runners. More experienced runners tend to exhibit shorter ground contact times, lower vertical oscillation, lower vertical ratio, and
higher cadence than less experienced runners. However, taller runners typically have slightly slower cadences, longer strides, and
slightly higher vertical oscillation. Vertical ratio is your vertical oscillation divided by stride length. It is not correlated with height.
Go to
www.garmin.com/performance-data/running/
for more information on running dynamics. For additional theories and
interpretations of running dynamics data, you can search reputable running publications and websites.
Color Zone Percentile in Zone Cadence Range Ground Contact Time Range
Purple >95
>183 spm
<218 ms
Blue
70–95
174–183 spm
218–248 ms
14
Heart Rate Features
3.
A pántot fűzzük át mellkasunk körül, majd a kampót bújtassuk át a hurkon.
automatically downloads stored heart rate data when you save
your timed swim activity. Your heart rate accessory must be out
of the water, active, and within range of the device (3 m) while
data downloads. Your heart rate data can be reviewed in the
device history and on your Garmin Connect account.
If both wrist-based heart rate and chest heart rate data are
available, your device uses the chest heart rate data.
HRM-Pro Accessory
The device can record heart rate during your swim (
Chest Heart
Rate While Swimming
, page 12
).
Putting On the Heart Rate Monitor
You should wear the heart rate monitor directly on your skin, just
below your sternum. It should be snug enough to stay in place
during your activity.
1
If necessary, attach the strap extender to the heart rate
monitor.
2
Wet the electrodes on the back of the heart rate monitor to
create a strong connection between your chest and the
transmitter.
3
Wear the heart rate monitor with the Garmin logo facing right-
side up.
The loop and hook connection should be on your right
side.
4
Wrap the heart rate monitor around your chest, and connect
the strap hook to the loop.
NOTE:
Make sure the care tag does not fold over.
After you put on the heart rate monitor, it is active and sending
data.
Heart Rate Storage for Timed Activities
You can start a timed activity on your paired Forerunner device,
and the heart rate monitor records your heart rate data even if
you move away from your device. For example, you can record
heart rate data during fitness activities or team sports where
watches cannot be worn.
Your heart rate monitor automatically sends your stored heart
rate data to your Forerunner device when you save your activity.
Your heart rate monitor must be active and within range (3 m) of
the device while data is uploaded.
Accessing Stored Heart Rate Data
If you save a timed activity before you upload the stored heart
rate data, you can download the data from the HRM-Pro
accessory.
NOTE:
Your HRM-Pro accessory stores up to 18 hours of
activity history. When the heart rate monitor memory is full, your
oldest data is overwritten.
1
Put on the heart rate monitor.
2
From your Garmin device, select the History menu.
3
Select the timed activity you saved while you were wearing
the heart rate monitor
4
Select
Download HR
.
Pool Swimming
NOTICE
Hand wash the heart rate monitor after exposure to chlorine or
other pool chemicals. Prolonged exposure to these substances
can damage the heart rate monitor.
The HRM-Pro accessory is designed primarily for open water
swimming, but it can be used occasionally for pool swimming.
The heart rate monitor should be worn under a swim suit or
triathlon top during pool swimming. Otherwise, it may slide down
your chest when pushing off the pool wall.
Caring for the Heart Rate Monitor
NOTICE
A buildup of sweat and salt on the strap can decrease the ability
of the heart rate monitor to report accurate data.
• Rinse the heart rate monitor after every use.
• Hand wash the heart rate monitor after every seven uses or
one pool swim, using a tiny amount of mild detergent, such
as dishwashing liquid.
NOTE:
Using too much detergent may damage the heart rate
monitor.
• Do not put the heart rate monitor in a washing machine or
dryer.
• When drying the heart rate monitor, hang it up or lay it flat.
Tips for Erratic Heart Rate Data
If the heart rate data is erratic or does not appear, you can try
these tips.
• Reapply water to the electrodes and contact patches (if
applicable).
• Tighten the strap on your chest.
• Warm up for 5 to 10 minutes.
• Follow the care instructions (
Caring for the Heart Rate
Monitor
, page 13
).
• Wear a cotton shirt or thoroughly wet both sides of the strap.
Synthetic fabrics that rub or flap against the heart rate
monitor can create static electricity that interferes with heart
rate signals.
• Move away from sources that can interfere with your heart
rate monitor.
Sources of interference may include strong electromagnetic
fields, some 2.4 GHz wireless sensors, high-voltage power
lines, electric motors, ovens, microwave ovens, 2.4 GHz
cordless phones, and wireless LAN access points.
HRM-Swim Accessory
The device can record heart rate during your swim (
Chest Heart
Rate While Swimming
, page 12
).
Sizing the Heart Rate Monitor
Before your first swim, take some time sizing the heart rate
monitor. It should be tight enough to stay in place when pushing
off the pool wall.
• Select a strap extender, and attach it to the elastic end of the
heart rate monitor.
The heart rate monitor comes with three extender straps to fit
different chest sizes.
TIP:
The medium strap extender works for most shirt sizes
(from medium to extra-large).
Heart Rate Features
13
MEGJEGYZÉS!
Ügyeljünk, hogy a mosócímke ne gyűrődjön a pánt alá.
4.
Ellenőrizzük, hogy a mérő szorosan illeszkedjen mellkasunkon, azonban
fontos, hogy ne legyen zavaró, ne korlátozzon a szabad mozgásban.
Amint felvesszük a mérőt, az azonnal bekapcsolódik, és elkezdi küldeni az
adatokat.
Tippek a HRM-Swim kiegészítő használatához
• Amennyiben a medence falától történő elrugaszkodás során a mérő le
-
csúszik mellkasunkon, a pántot és a toldót húzzuk szorosabbra.
• Ahhoz, hogy láthatussuk a mérési adatokat, az egyes szakaszok között
fel kell állnunk és mellkasunkkal (a mérővel) ki kell emelkedünk a vízből.
Futás dinamika
A készüléket egy HRM-Pro™ vagy egyéb futás dinamikai kiegészítővel páro
-
sítva valós idejű visszajelzést kaphatunk futási erőnléti állapotunkról.
A futás dinamika kiegészítőbe egy gyorsulásmérő került beépítésre, amely
a felsőtest mozgásainak mérésével a következő hat futási adat kiszámítá
-
sát teszi lehetővé.
Lépésszám:
A lépésszám a percenként megtett lépések száma. Az összesí
-
tett (bal és jobb oldali együttesen) lépésszám jelenik meg.
Függőleges oszcilláció:
A futás alatti szökkenéseket, felugrásokat jelenti.
Felsőtestünk függőleges mozgását mutatja ki, az egyes lépésekre vetítve,
centiméterben kifejezve.
Talaj érintési idő:
Az a milli sze kun dumban kifejezett időtartam, amíg egy-
egy lépés során lábunkat a talajon tartjuk.
NE FELEDJÜK!
Séta közben a talaj érintési idő adat nem áll rendelke
-
zésre.
Talaj érintési idő eloszlás:
A talaj érintési idő bal és jobb lábunk közötti
megoszlását mutatja (futás során). Egy százalékértéket jelenít meg. Például
53,2%-ot egy balra vagy jobbra mutató nyíllal kiegészítve.
Lépéshossz:
Az egyik majd a másik lábbal megtett lépés közötti távolságot
mutatja méterben kifejezve.
Függőleges arány:
A függőleges arány a függőleges oszcilláció és a lépés
-
hossz aránya. Százalékérték jelenik meg. Alacsonyabb érték előnyösebb fu
-
tási mozgást jelent.
Edzés a futás dinamika alapján
Először fel kell helyeznünk a futási dinamika kiegészítőt – pl. a HRM-Pro,
HRM-Tri vagy HRM-Run kiegészítőt –, ezt párosítanunk kell a készülékkel
Vezeték nélküli kapcsolattal működő mérő párosítása, 29. oldal
), és csak ez
-
után tekinthetjük meg a futás dinamikai adatokat.
1.
Nyomjuk meg a
START
gombot, majd válasszunk egy futási tevékenysé
-
get.
2.
Nyomjuk meg a
START
gombot.
3.
Indítsuk el a futást.
4.
Lefelé léptetve megtekinthetjük a futás dinamikai adatokat.
• Put on the heart rate monitor backward to easily adjust the
slider on the strap extender.
• Put on the heart rate monitor forward to easily adjust the
slider on the heart rate monitor.
Putting On the Heart Rate Monitor
You should wear the heart rate monitor directly on your skin, just
below your sternum.
1
Select a strap extender for the best fit.
2
Wear the heart rate monitor with the Garmin logo facing right-
side up.
The hook and loop connection should be on your right
side.
3
Wrap the heart rate monitor around your chest, and connect
the strap hook to the loop.
NOTE:
Make sure the care tag does not fold over.
4
Tighten the heart rate monitor so it is snug around your
chest, but not restrictive.
After you put on the heart rate monitor, it is active, storing, and
sending data.
Tips for Using the HRM-Swim Accessory
• Adjust the tightness of the heart rate monitor and strap
extender if the heart rate monitor slides down your chest
when pushing off the pool wall.
• Stand up between intervals so that the heart rate monitor is
out of the water to see your heart rate data.
Running Dynamics
You can use your compatible Forerunner device paired with the
HRM-Pro accessory or other running dynamics accessory to
provide real-time feedback about your running form.
The running dynamics accessory has an accelerometer that
measures torso movement in order to calculate six running
metrics.
Cadence
: Cadence is the number of steps per minute. It
displays the total steps (right and left combined).
Vertical oscillation
: Vertical oscillation is your bounce while
running. It displays the vertical motion of your torso,
measured in centimeters.
Ground contact time
: Ground contact time is the amount of
time in each step that you spend on the ground while
running. It is measured in milliseconds.
NOTE:
Ground contact time and balance are not available
while walking.
Ground contact time balance
: Ground contact time balance
displays the left/right balance of your ground contact time
while running. It displays a percentage. For example, 53.2
with an arrow pointing left or right.
Stride length
: Stride length is the length of your stride from one
footfall to the next. It is measured in meters.
Vertical ratio
: Vertical ratio is the ratio of vertical oscillation to
stride length. It displays a percentage. A lower number
typically indicates better running form.
Training with Running Dynamics
Before you can view running dynamics, you must put on an
HRM-Pro, HRM-Run
™
, or HRM-Tri accessory, or the Running
Dynamics Pod, and pair it with your device (
Wireless Sensors
, page 29
).
1
Select
START
, and select a running activity.
2
Select
START
.
3
Go for a run.
4
Scroll to the running dynamics screens to view your metrics.
5
If necessary, hold
UP
to edit how the running dynamics data
appears.
Color Gauges and Running Dynamics Data
The running dynamics screens display a color gauge for the primary metric. You can display cadence, vertical oscillation, ground
contact time, ground contact time balance, or vertical ratio as the primary metric. The color gauge shows you how your running
dynamics data compare to those of other runners. The color zones are based on percentiles.
Garmin has researched many runners of all different levels. The data values in the red or orange zones are typical for less
experienced or slower runners. The data values in the green, blue, or purple zones are typical for more experienced or faster
runners. More experienced runners tend to exhibit shorter ground contact times, lower vertical oscillation, lower vertical ratio, and
higher cadence than less experienced runners. However, taller runners typically have slightly slower cadences, longer strides, and
slightly higher vertical oscillation. Vertical ratio is your vertical oscillation divided by stride length. It is not correlated with height.
Go to
www.garmin.com/performance-data/running/
for more information on running dynamics. For additional theories and
interpretations of running dynamics data, you can search reputable running publications and websites.
Color Zone Percentile in Zone Cadence Range Ground Contact Time Range
Purple >95
>183 spm
<218 ms
Blue
70–95
174–183 spm
218–248 ms
14
Heart Rate Features
5.
Amennyiben szükséges, az
UP
gombot hosszan lenyomva módosíthatjuk
a futás dinamikai adatok megjelenését.
Színskála és futás dinamikai adatok
A futás dinamika képernyő mutatja az elsődleges adathoz tartozó színjelzést. Elsődleges adatként szerepelhet a lépésszám, a függőleges oszcilláció, a
talaj érintési idő, a talaj érintéső idő eloszlás és a függőleges arány. A színskála egy összehasonító értékelés, amely futás dinamikai adatainkat más fu
-
tókéval veti össze százalékos alapon. A zónák százalék alapúak.
A Garmin számos, különböző felkészültségi szintű futó bevonásával egy felmérést készített, ez alapján került összeállításra a színskála. A piros és
naracs tartományok kevésbé rutinos, lassabb futók értékeit fogják át. A zöld, kék vagy lila tartományok tapasztaltabb, gyorsabb futók értékeit jelképezik.
A magasabb futóknál jellegzetesebb a kisebb talaj érintési idő és függőleges kilengés, függőleges arány, valamint a nagyobb lépésütem, azonban pl. a
magasabb futóknál jellegzetesebb a kicsivel kisebb lépésütem és a kicsivel nagyobb függőleges kilengés, nagyobb lépéshossz. A függőleges arány a
függőleges kilengés és a lépéshossz hányadosa. Magassággal nem függ össze. A futási dinamikáról a www.garmin.com/performance-data/running/ ol
-
dalon bővebben tájékoztatást találunk, valamint egyéb magyarázatok, elméletek érhetők el a témáról szóló elismert tanulmányokban, cikkekben, hon
-
lapokon.
Színkód
Zóna százalék
Lépésütem tartomány
Talaj érintési idő tartomány
Bíbor
> 95
> 183 l./perc
< 218 ms
Kék
70-95
174-183 l./perc
218-248 ms
Zöld
30-69
164-173 l./perc
248-277 ms
Narancs
5-29
153-163 l./perc
278-308 ms
Piros
< 5
< 153 l./perc
> 308 ms


