Power Connection
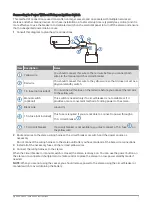
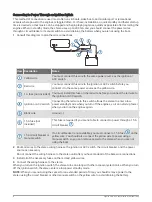
When connecting the stereo to power, you must connect the yellow, red, and black wires to the power source.
The yellow and red wires have different functions, and the method you use to connect them to power depends
on how you plan to use the stereo on your vessel.
Yellow wire
• This wire provides power to the stereo.
• This wire should be connected through a 15 A circuit breaker, if one is available on the vessel.
NOTICE
If a 15 A circuit breaker is not available on the vessel, you must connect this wire to power through a 15 A
fuse (not included).
• This wire provides power to the stereo at all times, and it will drain the battery even when the stereo is not
in use. You should install a manual switch on this wire if a 15 A circuit breaker is not available on the
vessel, or if you cannot toggle the breaker to remove power to the stereo when storing the vessel.
• If it is necessary to extend this wire, use 14 AWG (2.08 mm
2
) wire. For extensions longer than 1 m (3 ft.),
use 12 AWG (3.31 mm
²
) wire.
Red wire
• This wire can be connected to the same power source as the yellow wire through the ignition or through a
manual switch. This enables you to turn the stereo on and off automatically when you turn the vessel on
and off, or when you activate the switch.
• Using this wire to turn the stereo on and off behaves in the same way as using the power button on the
stereo to turn it on and off. It is not necessary to connect this wire to a switch if you plan to toggle the
power using the power button on the stereo or using a connected chartplotter or remote control. This wire
must be connected to turn the stereo on.
• When you turn off the stereo using this switch or the power button, it enters a standby mode that allows
the stereo to start up again faster than if you switch the power off using the yellow wire. When it is in
standby mode, the stereo uses up to 200 mA, and you must turn off power to the stereo on the yellow wire
thorough the circuit breaker or manual switch when you are not using the vessel to avoid draining the
battery.
•
NOTICE
You must connect this wire to power through a 1 A fuse (not included), whether or not you connect it to
the ignition or manual switch.
• If it is necessary to extend this wire, use 22 AWG (0.33 mm
2
) wire.
Black wire
• This is the ground wire, and you must connect it to the negative terminal of the power source or to a
common ground.
• If it is necessary to extend this wire, use 14 AWG (2.08 mm
2
) wire. For extensions longer than 1 m (3 ft.),
use 12 AWG (3.31 mm
²
) wire.
6
Apollo SRX400 Installation Instructions


