background image

Garmin G1000 NXi Cockpit Reference Guide for the da62

190-02622-00 Rev. A 

147

annunciations & alerts

Flight

Instruments

EIS

Nav/Com/

XPDR/Audio

Flight


Management

Hazar

d

Avoidance

AFCS

Additional

Featur

es

Annun/Alerts

Appendix

Index

Flight

Instruments

EIS

Nav/Com/

XP

d

R/

a

udio

Flight


Management

Hazar

d

avoidance

a

FCS

a

dditional

Featur

es

a

bnormal

o

per
ation

a

nnun/

a

lerts

a

ppendix

Index

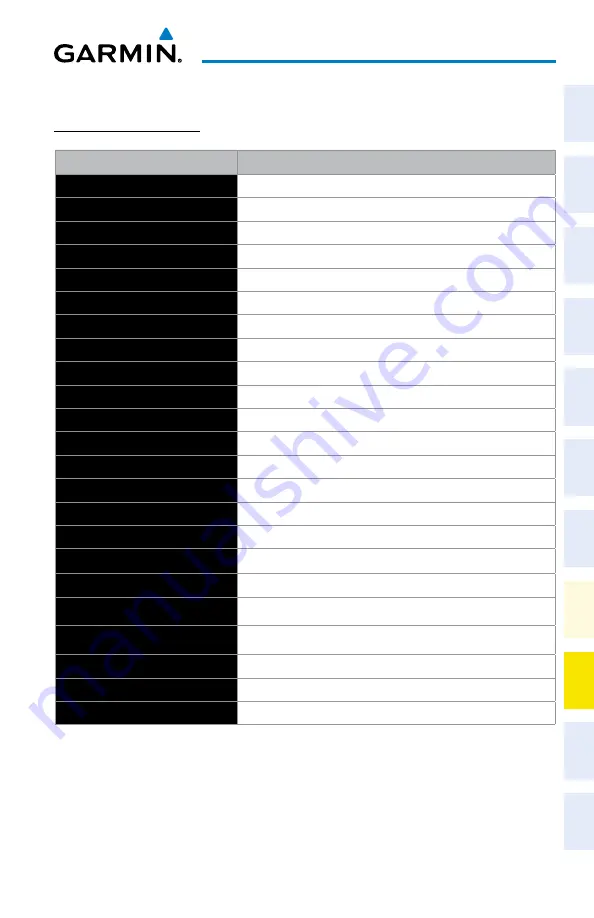
CaS MESSaGES

WaRNING MESSaGES

annunciation Window Text ‘alerts’ Window Message

FWD DOOR

Left or right baggage door is not closed.

L ALTN AMPS

Left engine alternator output is >70 amps.

L DOOR OPEN

Front, left door is not closed.

L ENG FIRE

Left engine fire detected.

L FUEL PRESS

Left engine fuel pressure is low.

L ENG TEMP

Left engine coolant temp is >100 deg C.

L FUEL TEMP

Left fuel temp is greater than 60 deg C.

L GBOX TEMP

Left engine gearbox temp is >120 deg C.

L OIL TEMP

Left engine oil temp is greater than 139 deg C.

L OIL PRES

Left engine oil pressure is less than 0.9 bar.

L STARTER

Left engine starter is engaged.

R ALTN AMPS

Right engine alternator output is >70 amps.

R DOOR OPEN

Front, right door is not closed.

R ENG FIRE

Right engine fire detected.

R ENG TEMP

Right engine coolant temp is >100 deg C.

R FUEL PRESS

Right engine fuel pressure is low.

R FUEL TEMP

Right fuel temp is greater than 60 deg C.

R GBOX TEMP

Right engine gearbox temp is >120 deg C.

R OIL PRES

Right engine oil pressure is less than 0.9 bar.

R OIL TEMP

Right engine oil temp is greater than 139 deg C.

R STARTER

Right engine starter is engaged.

REAR DOOR

Rear door is not closed.

USP ACTIVE*

USP has engaged autopilot due to slow airspeed.

* Optional (Garmin AFCS equipped aircraft with ESP

 only)

Summary of Contents for G1000 NXi

Page 1: ...Cockpit Reference Guide Diamond DA62 System Software Version 2056 10 or later...

Page 2: ......

Page 3: ...NTS Engine Indication System EIS NAV COM TRANSPONDER AUDIO PANEL FLIGHT MANAGEMENT SYSTEM HAZARD AVOIDANCE AUTOMATIC FLIGHT CONTROL SYSTEM ADDITIONAL FEATURES ABNORMAL OPERATIONS ANNUNCIATIONS ALERTS...

Page 4: ......

Page 5: ...wed for personal use provided that such electronic or printed copy of this manual or revision must contain the complete text of this copyright notice and provided further that any unauthorized commerc...

Page 6: ...tations or exclusions may not apply to you AC U KWIKanditsrelatedorganizations hereaftercollectively AC U KWIKOrganizations expressly disclaim all warranties with respect to the AC U KWIK information...

Page 7: ...information to accurately depict all of the traffic within range of the aircraft Due to lack of equipment poor signal reception and or inaccurate information from aircraft or ground stations traffic m...

Page 8: ...following geographic areas due to variations in the earth s magnetic field North of 72 North latitude at all longitudes South of 70 South latitude at all longitudes North of 65 North latitude between...

Page 9: ...from a lightning detection system display as the sole basis for hazardous weather avoidance Range limitations and interference may cause the system to display inaccurate or incomplete information Ref...

Page 10: ...e most current system and aviation databases Depictions of equipment may differ slightly from the actual equipment NOTE Do not rely solely upon data link services to provideTemporary Flight Restric ti...

Page 11: ...ion Database coding specific to each procedure NOTE The FAA has asked Garmin to remind pilots who fly with Garmin database dependent avionics of the following It is the pilot s responsibility to remai...

Page 12: ...0 76D as aType B Electronic Flight Bag EFB for FliteCharts and ChartView The accuracy of the charts is subject to the chart data provider Own ship position on airport surface charts cannot be guarante...

Page 13: ...NOTE Interference from GPS repeaters operating inside nearby hangars can cause an intermittent loss of attitude and heading displays while the aircraft is on the ground Moving the aircraft more than...

Page 14: ...Garmin G1000 NXi Cockpit Reference Guide for the DA62 190 02622 00 Rev A Warnings Cautions Notes Blank Page...

Page 15: ...in and or its third party providers You acknowledge that the Software is the property of Garmin and or its third party providers and is protected under the United States of America copyright laws and...

Page 16: ...Garmin G1000 NXi Cockpit Reference Guide for the DA62 190 02622 00 Rev A Software License Agreement Blank Page...

Page 17: ...NXi Cockpit Reference Guide for the DA62 190 02622 00 Rev A 13 Record of Revisions Record of Revisions Part Number Revision Date Page Range Description 190 02622 00 A 09 06 2019 All Production Release...

Page 18: ...Garmin G1000 NXi Cockpit Reference Guide for the DA62 190 02622 00 Rev A 14 Record of Revisions Blank Page...

Page 19: ...TIC VISION TECHNOLOGY SVT 5 SVT Operation 5 Field of View 6 PFD ANNUNCIATIONS AND ALERTING FUNCTIONS 6 ENGINE INDICATION SYSTEM EIS EIS DISPLAY 7 ENGINE PAGE 8 Fuel Calculations 10 AUDIO PANEL AND CNS...

Page 20: ...Map Items 24 WAYPOINTS 25 Airports 25 Non Airport Waypoints 26 Nearest Airspace 30 Smart Airspace 30 DIRECT TO NAVIGATION 31 FLIGHT PLANNING 33 Flight Plan Views 33 Creating a Flight Plan 33 Flight P...

Page 21: ...3 Additional Stormscope Displays 84 Stormscope Abnormal Operations 85 AIRBORNE COLOR WEATHER RADAR 86 Basic Antenna Tilt and Range Setup 86 Weather Radar Operation 89 Ground Mapping and Interpretation...

Page 22: ...ng the System with Garmin Connext 117 Disable Enable Iridium Transceiver 117 Contacts 117 Telephone Communication 118 Text Messaging SMS 121 CONNEXT SETUP OPTIONAL 126 SIRIUSXM RADIO OPTIONAL 127 Acti...

Page 23: ...topilot Servos 142 GDL 69A SXM TROUBLESHOOTING 143 GDL 69A SXM Radio 143 ANNUNCIATIONS AND ALERTS SYSTEM ANNUNCIATIONS 145 CAS MESSAGES 147 Warning Messages 147 Caution Messages 148 Advisory Messages...

Page 24: ...Updating Databases Using an Supplemental Data SD card 176 Update Databases Using the Wireless Transceiver 177 Database Deletion Feature 182 Magnetic Field Variation Database Update 182 MAP SYMBOLS 183...

Page 25: ...e for the selected vspeed bug 4 Turn the large FMS Knob to highlight the ON OFF field 5 Turn the small FMS Knob clockwise to ON or counterclockwise to OFF 6 To remove the window press the CLR Key or t...

Page 26: ...aying altitude in meters 1 Press the PFD Opt Softkey to display the second level softkeys 2 Press the ALT Units Softkey 3 Press the Meters Softkey to turn on metric altitude readouts 4 Press the Back...

Page 27: ...ition Alert Level 8 If desired turn the small FMS Knob to set the BARO Transition Alert Flight Level On or Off 9 Turn the large FMS Knob to highlight the Flight Level field 10 Use the FMS Knob to chan...

Page 28: ...aring pointer and information window press either Bearing 1 or Bearing 2 Softkey again Displaying the DME Information Window 1 Press the PFD Opt Softkey 2 Press the DME Softkey to display the DME Info...

Page 29: ...n 1 Headwind tailwind and crosswind arrows with numeric speed components Option 2 Wind direction arrow and speed Option 3 Wind direction arrow with headwind tailwind and crosswind components 4 To remo...

Page 30: ...Airport Signs 1 Press the PFD Opt Softkey 2 Press the SVT Softkey 3 Press the APT Sign Softkey Display of airport signs will cycle on or off with the APT Sign Softkey FIELD OF VIEW Configuring field...

Page 31: ...v Com XPDR Audio Flight Management Hazard Avoidance AFCS Additional Features Annun Alerts Appendix Index Flight Instruments EIS Nav Com XPDR Audio Flight Management Hazard Avoidance AFCS Additional Fe...

Page 32: ...ate coolant temperature for each engine 7 Fuel Temperature Indicator Displays fuel temperature range pointers labeled L and R indicate the fuel temperature in each tank 8 Fuel Quantity Indicator Displ...

Page 33: ...sius C 2 Oil Pressure Indicator Displays engine oil pressure ranges in bar 3 Tachometer Displays propeller speeds in revolutions per minute rpm 4 Engine Load Indicator Displays current engine loads as...

Page 34: ...beled L and R indicate the fuel temperature in each tank Displays current fuel flow for each engine in gallons per hour GPH 10 Fuel Calculator Gallons Remain Displays current fuel remaining gal as set...

Page 35: ...ress the ENT Key to load the COM frequency into the COM Standby Frequency Field 4 Press the Frequency Transfer Key to transfer the frequency to the COM Active Frequency Field Auto tuning a COM frequen...

Page 36: ...ges 1 From any page the NAV frequency can be auto tuned activate the cursor by pressing the FMS Knob or the appropriate softkey 2 Turn the FMS Knob to place the cursor on the desired NAV identifier or...

Page 37: ...ceiver pairing 1 Press the ADF DME or DME Softkey to display the ADF DME Tuning Window 2 Turn the small FMS Knob to select the DME tuning mode 3 Press the ENT Key to complete the selection MODE S TRAN...

Page 38: ...e selection cursor if not already activated 3 Turn the large FMS Knob to scroll down to the Flight ID 4 Turn the small FMS Knob to enter the desired Flight ID 5 Press the ENT Key to complete Flight ID...

Page 39: ...nnunciator in Blue Select Mode to select the audio source to adjust The cursor will time out after a few seconds and the position of the cursor will al ways default back to the PILOT ICS Key Pressing...

Page 40: ...UE WHITE selects the wired audio source BLUE selects the Bluetooth audio source The BLUE source assignment will persist through Bluetooth audio connection disrup tions NOTE The Bluetooth audio can onl...

Page 41: ...nstruments EIS Nav Com XPDR Audio Flight Management Hazard Avoidance AFCS Additional Features Abnormal Operation Annun Alerts Appendix Index 5 Turn CRSR Control Knob to select the COM NAV radios and e...

Page 42: ...io Flight Instruments EIS Nav Com XPDR Audio Flight Management Hazard Avoidance AFCS Additional Features Annun Alerts Appendix Index Flight Instruments EIS Nav Com XPDR Audio Flight Management Hazard...

Page 43: ...efault setting USING MAP DISPLAYS MAP ORIENTATION Changing the Navigation Map orientation 1 With the Map Navigation Map Page displayed press the MENU Key The cursor flashes on the Map Settings option...

Page 44: ...option The flashing cursor highlights the Auto Zoom display selection Field 7 Select MFD PFD or All using the small FMS Knob 8 Press the ENT Key to accept the selected option The flashing cursor highl...

Page 45: ...ation Map Page displayed 2 Use the FMS Knob to highlight the Measure Bearing Distance Field 3 Press the ENT Key A Measure Pointer is displayed on the map at the aircraft s present position 4 Move the...

Page 46: ...Map Page displayed The cursor flashes on the Map Settings option 2 Press the ENT Key The Map Settings Menu is displayed 3 Turn the small FMS Knob to select the Map group 4 Press the ENT Key 5 Use the...

Page 47: ...l Softkey with the Map Navigation Map Page displayed The current declutter level is shown With each softkey press another level of map information is removed Or 1 Press the MENU Key with the Map Navig...

Page 48: ...hlight the Low ALT Airways or High ALT Airways range field 5 To change the range setting turn the small FMS Knob to display the range list 6 Select the desired range using the small FMS Knob 7 Press t...

Page 49: ...he flashing cursor press the FMS Knob Viewing a destination airport From the WPT Airport Information Page Info 1 Softkey press the MENU Key Select View Destination Airport The Destination Airport is d...

Page 50: ...the small FMS Knob to select the desired runway 3 Press the FMS Knob to remove the flashing cursor Selecting nearest airport surface and minimum runway length matching criteria 1 Use the FMS Knob to...

Page 51: ...the flashing cursor Creating User Waypoints Creating user waypoints from the WPT User WPT Information Page 1 Press the New Softkey or press the MENU Key and select Create New User Waypoint 2 Enter a u...

Page 52: ...al and the distance into the Reference Waypoints Window using the FMS Knobs Or Select LAT LON using the small FMS Knob press the ENT Key and enter the latitude and longitude into the Information Windo...

Page 53: ...move the flashing cursor Or 1 With the WPT User WPT Information Page displayed press the FMS Knob to activate the cursor The cursor is placed in the User Waypoint Box 2 Use the FMS Knobs to enter the...

Page 54: ...4 Turn the small FMS Knob clockwise to turn the airspace alert On or counterclockwise to turn the alert Off 5 Press the FMS Knob to remove the flashing cursor Changing the altitude buffer distance se...

Page 55: ...l FMS Knob to begin entering a facility name or city If duplicate entries exist for the entered facility or city name additional entries can be viewed by turning the small FMS Knob during the selectio...

Page 56: ...Key again to activate the direct to Selecting a manual direct to course 1 Press the Key The Direct To Window is displayed with the active flight plan waypoint as the default selection or a blank waypo...

Page 57: ...ce 4 Press the Wide Softkey to display the wide view or press the Narrow Softkey to display the narrow view 5 Press the Back Softkey to return to the top level active flight plan softkeys CREATING A F...

Page 58: ...runway a Highlight the field below the Origin header to enter the origin airport identifier using the FMS Knob b Use the FMS Knob or the waypoint submenu to enter the identifier facility or city name...

Page 59: ...Key 2 Press the FMS Knob on the MFD to activate the cursor 3 Select the point in the flight plan to add the new waypoint 4 Push the Joystick on the MFD to activate the panning function on the FPL Acti...

Page 60: ...age 2 Turn the small FMS Knob clockwise one click to display the FPL Flight Plan Catalog Page 3 Press the FMS Knob to activate the cursor and turn the FMS Knob to highlight the flight plan to be edite...

Page 61: ...oad Airway menu item is available only when a valid airway entry waypoint has been chosen the waypoint ahead of the cursor position 5 Turn the FMS Knob to select the desired airway from the list and p...

Page 62: ...ey The Remove airway name from flight plan window is displayed 4 With OK highlighted press the ENT Key To cancel the request press the CLR Key or highlight Cancel and press the ENT Key 5 Press the FMS...

Page 63: ...ng track offset distance 1 Press the FPL Key to display the FPL Active Flight Plan Page MFD or the Flight Plan Window PFD 2 Press the FMS Knob to activate the cursor not required on the PFD and turn t...

Page 64: ...to display the FPL Active Flight Plan Page MFD or the Flight Plan Window PFD 2 Press the MENU Key highlight Parallel Track and press the ENT Key The Parallel Track Window is displayed with the Directi...

Page 65: ...ghlight Hold At Present Position and press the ENT Key The Hold at Window appears with the course field highlighted 3 If desired use the FMS Knobs to edit the entry course and press the ENT Key 4 Use...

Page 66: ...Active Flight Plan Window PFD 2 Press the FMS Knob to activate the cursor not required on the PFD and turn the large FMS Knob to highlight the HOLD waypoint 3 Press the CLR Key A Remove Holding Patte...

Page 67: ...g flight plan 1 Press the FPL Key 2 Turn the small FMS Knob to display the FPL Flight Plan Catalog Page 3 Press the FMS Knob to activate the cursor 4 Turn the FMS Knob to highlight the pending flight...

Page 68: ...ht plan 1 Press the FPL Key 2 Turn the small FMS Knob to display the FPL Flight Plan Catalog Page 3 Press the FMS Knob to activate the cursor 4 Turn the FMS Knob to highlight the desired pending fligh...

Page 69: ...the selected flight plan and see the list of available flight plans on the SD card If overwriting the existing flight plan is not desired select Cancel using the FMS Knob press the ENT Key select ano...

Page 70: ...is displayed 4 With OK highlighted press the ENT Key To cancel the request press the CLR Key or highlight Cancel and press the ENT Key Deleting the Active Flight Plan Deleting the active flight plan...

Page 71: ...the FMS Knob to activate the cursor and turn the FMS Knob to highlight the desired flight plan 3 Open the Activate stored flight plan window Press the Activate Softkey Or Press the ENT Key An Activate...

Page 72: ...d press the ENT Key 4 With OK highlighted press the ENT Key to delete the flight plan To cancel the request press the CLR Key or highlight Cancel and press the ENT Key Deleting all stored flight plans...

Page 73: ...displayed b Turn the large FMS Knob to highlight the Edit c Press the ENT Key Or a Press the MENU Key b Select Edit Flight Plan and press the ENT Key 4 Turn the large FMS Knob to highlight the comment...

Page 74: ...FCS Additional Features Abnormal Operation Annun Alerts Appendix Index CONSTRAINTS Altitude Constraints Active Flight Plan Waypoint Altitude Constraints Altitude Constraint Examples Cross AT or ABOVE...

Page 75: ...esignating or modifying an altitude constraint 1 Press the FPL Key on the MFD to display the FPL Active Flight Plan Page 2 Press the FMS Knob and turn to highlight the desired waypoint altitude constr...

Page 76: ...the FPL Key to display the FPL Active Flight Plan Page on the MFD 2 Press the VNV Prof Softkey or press the MENU Key highlight Select VNV Profile Window and press the ENT Key The cursor is now located...

Page 77: ...Map Page 2 Press the MENU Key 3 Turn the FMS Knob to highlight Hide VSD and press the ENT Key VERTICAL NAVIGATION DIRECT TO Activating a vertical navigation direct to 1 Press the FPL Key for the MFD...

Page 78: ...sen procedure 7 Press the Info 1 Softkey or the Info 2 Softkey to return to the WPT Airport Information Page DEPARTURES Loading a departure into the active flight plan using the PROC Key 1 Press the P...

Page 79: ...elect Edit Flight Plan and press the ENT Key The FPL Stored Flight Plan Page is displayed 3 Press the LD DP Softkey or press the MENU Key select Load Departure and press the ENT Key The PROC Departure...

Page 80: ...u Window and turn the FMS Knob to highlight Remove Departure b Press the ENT Key The Remove procedure name from flight plan window is displayed 6 With OK highlighted press the ENT Key To cancel the re...

Page 81: ...FMS Knob to highlight Load Arrival 6 Press the ENT Key to load the arrival procedure into the active flight plan Loading an arrival procedure into a stored flight plan 1 Select a stored flight plan fr...

Page 82: ...plan window is displayed 6 With OK highlighted press the ENT Key To cancel the request press the CLR Key or highlight Cancel and press the ENT Key 7 Press the FMS Knob to remove the flashing cursor A...

Page 83: ...rn the small FMS Knob to select the altitude and press the ENT Key b If TEMP COMP was selected the cursor moves to the temperature field Turn the small FMS Knob to select the temperature and press the...

Page 84: ...the ENT Key Loading an approach procedure into a stored flight plan 1 Select a stored flight plan from the FPL Flight Plan Catalog Page 2 Press the Edit Softkey or press the MENU Key select Edit Fligh...

Page 85: ...ss the ENT Key When selecting a NAVAID exclusive approach the popup message is displayed NOT APPROVED FOR GPS GPS guidance is for monitoring only Load approach With Yes highlighted press the ENT Key R...

Page 86: ...b to highlight Remove Approach b Press the ENT Key The Remove procedure name from flight plan window is displayed 6 With OK highlighted press the ENT Key To cancel the request press the CLR Key or hig...

Page 87: ...n the large FMS Knob to highlight Select Approach Press the ENT Key 3 Use the FMS Knob and the ENT Key to select the desired approach and transition 4 Use the FMS Knob to place the flashing cursor in...

Page 88: ...rsor may now be positioned in any field within the input data box 2 Turn the FMS Knobs to move the cursor onto the Departure Time Field and enter the desired value Press the ENT Key The statistics are...

Page 89: ...lity or city name and press the ENT Key Or a Turn the small FMS Knob counter clockwise to display a list of flight plan waypoints the FPL list is populated only when navigating a flight plan b Turn th...

Page 90: ...ghlighted 4 Press the MENU Key 5 With Set WPT to Present Position highlighted press the ENT Key 6 Press the ENT Key to accept the waypoint entry 7 Use the FMS Knob to enter an arrival time and press t...

Page 91: ...ng SiriusXM s customer service the coded ID s unique to the installed data link receiver The Data Radio ID must be provided to activate the weather service A separate Audio Radio ID if present enables...

Page 92: ...nformation about the airframe may be required After an account has been established Garmin provides an access code that must be entered on the system and successfully transmitted to the Garmin Connext...

Page 93: ...ays the correct information for the Airframe Tail Number Airframe Serial Number and Iridium Serial Number 12 When finished push the FMS Knob to remove the Connext Registration Window WEATHER PRODUCT A...

Page 94: ...XM Weather Product Product Symbol Expiration Time Minutes Winds Aloft 90 County Warnings 60 Cyclone Hurricane Warnings 60 Icing Potential CIP and SLD 90 Pilot Weather Report PIREPs 90 Air Report AIREP...

Page 95: ...l Expiration Time Minutes Connext Radar 30 IR Satellite 60 Connext Lightning 30 SIGMETs 60 AIRMETs 60 Meteorological Aerodrome Report METARs 90 Winds Aloft 90 Pilot Weather Reports PIREPs 90 Temporary...

Page 96: ...gend and press the ENT Key 3 Turn the FMS Knob to scroll through the legends if more are available than fit in the window 4 To remove the Weather Legends Window press the Legend Softkey the ENT or the...

Page 97: ...lect the Map Navigation Map Page 2 Press the MENU Key 3 With Map Settings highlighted press the ENT Key 4 Turn the small FMS Knob to select the Weather Group and press the ENT Key 5 Turn the large FMS...

Page 98: ...s Turn the small FMS Knob to select the desired flight plan look ahead distance option or choose Remaining FPL to request weather data for the remainder of the flight plan then press the ENT Key Waypo...

Page 99: ...T Page WEATHER PRODUCT OVERVIEW NEXRAD SiriusXM WARNING Do not use the indicated data link weather product age to determine the age of the weather information shown by the data link weather product Du...

Page 100: ...Turn the FMS Knob to select the Weather Group and press the ENT Key 5 Turn the large FMS Knob to highlight the NEXRAD Animation On Off field 6 Turn the small FMS Knob to highlight On or Off and press...

Page 101: ...press the ENT Key 5 Turn the small FMS Knob to select the Weather Group then press the ENT Key 6 Turn the large FMS Knob to highlight the NEXRAD Data Region field 7 Turn the small FMS Knob to highligh...

Page 102: ...ress the Datalink Softkey 4 When finished press the Back Softkey Cell Movement SiriusXM Displaying Cell Movement information on the Map Weather Data Link XM Page 1 Select the Map Weather Data Link XM...

Page 103: ...the Weather Data Link Page Or 1 Select the Weather Information Page a Turn the large FMS Knob to select the Waypoint Page Group b Press the WX Softkey to select the Weather Information Page 2 Press t...

Page 104: ...SiriusXM Displaying Freezing Level information 1 Select the Map Weather Data Link XM Page 2 Press the More WX Softkey 3 Press the FRZ LVL Softkey Winds Aloft Displaying the Winds Aloft weather produc...

Page 105: ...t the Map Weather Data Link XM Page 2 Press the More WX Softkey 3 Press the County Softkey Cyclone SiriusXM Displaying cyclone hurricane track information 1 Select the Map Weather Data Link XM Page 2...

Page 106: ...rsion 6 Use the FMS Knob or the ENT Key to scroll through the PIREP or AIREP text 7 Press the FMS Knob or the CLR Key to return to the Map Weather Data Link XM Page TFRS Displaying TFR Data 1 Select t...

Page 107: ...Disable FIS B Weather and press the ENT Key STORMSCOPE LIGHTNING DETECTION SYSTEM WARNING Do not rely on information from the lightning detection system display as the sole basis for hazardous weathe...

Page 108: ...ghted in cyan to indicate the mode to be selected 3 Press the ENT Key to select the highlighted mode and remove the menu To remove the menu without changing modes press the MENU Key or the CLR Key or...

Page 109: ...Key 2 With Map Settings highlighted press the ENT Key 3 Turn the FMS Knob to highlight the select the Weather group and press the ENT Key 4 Turn the large FMS Knob to highlight the Stormscope maximum...

Page 110: ...ance of precipitation returns For ranges of up to 80 NM this ground clutter should appear on the outer portion of the radar display At ranges greater than 80 NM the displayed ground clutter will move...

Page 111: ...e resulting change will displace the center of the beam 1000 feet vertically at a range of 10 nautical miles Applying the 1 10 1000 rule to various distances provides the flight crew with the ability...

Page 112: ...available for deviations Tilt angle set to show minimal ground clutter Descent To 10 000 FT Tilt to Minimize Clutter Altitude Compensated Tilt On 60 120 NM Range setting is dependent upon ground spee...

Page 113: ...nless all display panesdisplayingweatherradararesettoStandbyMode andaredisplaying STANDBY in the center of each weather radar display CAUTION In Standby mode the antenna is parked at the center line I...

Page 114: ...6 Turn the Joystick to adjust the range 7 Press the FMS Knob to remove the cursor 8 To select a new area to be vertically scanned select the Horizon Softkey to return to the Horizontal Scan view and...

Page 115: ...return to the calibrated gain setting Calibrated is displayed in the Gain field Sector Scan Enabling disabling Sector Scanning 1 While in horizontal scan mode select the BRG Softkey to display the Be...

Page 116: ...e the HSI Map on the PFD 2 On the PFD press the Map HSI Softkey 3 Press the WX Radar Softkey to enable disable the airborne weather radar HSI Map overlay 4 Press the RDR Opt Softkey 5 Press the Featur...

Page 117: ...on Map Page 1 With the weather radar overlay enabled push the Joystick twice The bearing and tilt legend is displayed in the lower left corner of the map 2 Move the Joystick up to adjust the antenna t...

Page 118: ...e of information for maintaining separation from terrain and obstacles Garmin obtains terrain and obstacle data from third party sources and cannot independently verify the accuracy of the information...

Page 119: ...n Map Page with the changed settings Terrain Page Displaying the terrain page 1 Turn the large FMS Knob to select the Map Page Group 2 Turn the small FMS Knob to select the Map Terrain Proximity Page...

Page 120: ...hted press the ENT Key 4 Turn the small FMS Knob to select the VSD Group and press the ENT Key 5 Turn the large FMS Knob or press the ENT Key to scroll through product selections TRK Mode BNDRY Enable...

Page 121: ...the ENT Key 4 Turn the small FMS Knob to select the Traffic Group and press the ENT Key 5 Turn the large FMS Knob or press the ENT Key to scroll through product selections Traffic Turns the display o...

Page 122: ...rently off and press the ENT Key Switching between TIS modes 1 Select the Map Traffic Map Page 2 Press the Standby or Operate Softkey to switch between modes The mode is displayed in the upper right c...

Page 123: ...ion Points in the direction of the aircraft track Proximity Advisory without directional information Other Non Threat traffic with directional information Points in the direction of the intruder aircr...

Page 124: ...ATION Changing traffic system modes on the Map Traffic Map Page 1 Turn the large FMS Knob to select the Map Page Group 2 Turn the small FMS Knob to select the Map Traffic Map Page 3 Press the Operate...

Page 125: ...NU Key 2 Turn the small FMS Knob to select one of the following see softkey description in the previous step 2 Above Normal Below Unrestricted 3 Select the ENT Softkey Traffic Map Page Display Range T...

Page 126: ...Traffic Advisories only Traffic Symbols Selects the maximum range at which traffic symbols are shown Traffic Labels Selects the maximum range at which traffic labels relative altitude vertical trend...

Page 127: ...reat traffic with directional information Points in the direction of the intruder aircraft track Other Non Threat traffic without directional information Traffic located on the ground with directional...

Page 128: ...tkey Or a Press the MENU Key b Turn the small FMS Knob to highlight Test Mode c Press the ENT Key Changing the altitude range 1 On the Map Traffic Map Page select the ALT Mode Softkey 2 Select one of...

Page 129: ...tive Displays the motion vector relative to own aircraft Off Disables the display of the motion vector Or 1 Select the Map Traffic Map Page 2 Press the MENU Key 3 Turn the small FMS Knob to highlight...

Page 130: ...S Additional Features Abnormal Operation Annun Alerts Appendix Index Changing the display range on the Map Traffic Map Page 1 Select the Map Traffic Map Page 2 Turn the Joystick 3 The following range...

Page 131: ...ons regarding the engagement are indicated on the PFD Autopilot Engagement with Flight Director Off Upon engagement the autopilot will be set to hold the current attitude of the airplane if the flight...

Page 132: ...ld default PIT CWS Button Roll Hold default ROL Pitch Hold default PIT GO AROUND Button Takeoff on ground Go Around in air TO GA Takeoff on ground Go Around in air TO GA ALT Key Roll Hold default ROL...

Page 133: ...al Speed Maintains the current aircraft vertical speed may be used to climb descend to the Selected Altitude VS Key VS nnnn fpm Flight Level Change Maintains the current aircraft airspeed while the ai...

Page 134: ...epath Captures and tracks the SBAS glidepath on approach GP LOC Approach Mode ILS Arm Capture Track Captures and tracks the LOC navigation source APR Key LOC Glideslope Captures and tracks the ILS gli...

Page 135: ...through navigation sources if necessary 3 Press the NAV Softkey Glidepath Mode GP Selecting Glidepath Mode 1 Ensure a GPS approach is loaded into the active flight plan The active waypoint must be pa...

Page 136: ...cy is tuned 2 Ensure that LOC is the selected navigation source use the CDI Softkey to cycle through navigation sources if necessary 3 Press the APR Key Or 1 Ensure that GPS is the selected navigation...

Page 137: ...al charts and NOTAMs for verification of displayed aeronautical information Displayed aeronautical data may not incorporate the latest NOTAM information WARNING Do not rely on the displayed minimum sa...

Page 138: ...3 Turn the large FMS Knob to move to the Preferred Charts Source option 4 Turn the small FMS Knob to choose between the available options FliteCharts or ChartView FLITECHARTS Selecting terminal proced...

Page 139: ...ey 3 Turn the large FMS Knob to move to the Color Scheme Option 4 Turn the small FMS Knob to choose between Day Auto and Night Options 5 If Auto Mode is selected turn the large FMS Knob to select the...

Page 140: ...complete the chart selection Selecting full screen On or Off 1 While viewing a terminal chart press the MENU Key to display the Page Menu Options 2 Turn the large FMS Knob to highlight the Full Screen...

Page 141: ...already selected 3 Press the FMS Knob to activate the cursor 4 Use the large FMS Knob to view GSR 1 5 Note the GSR 1 Serial Number This number will be needed when contacting Garmin Connext to establis...

Page 142: ...on the MFD 9 Press the Symbols Softkey to display the at symbol the period and other special characters 10 Press the ENT Key The Save Button is highlighted 11 Press the ENT Key The new contact entry...

Page 143: ...azard Avoidance AFCS Additional Features Abnormal Operation Annun Alerts Appendix Index Internal Phone External Phone Description Phone is Idle Phone is ringing Phone has a dial tone off hook or conne...

Page 144: ...erts 3 Press the ENT Key The voice and pop up alert will not be displayed now when an incoming call is received Making a call 1 With the Aux Satellite Phone Page displayed press the Phone Key if not a...

Page 145: ...e displayed press the MENU Key on the MFD to display the Page Menu 2 Turn either FMS Knob to place the cursor on Disable New Message Popups or Enable New Message Popups 3 Press the ENT Key The pop up...

Page 146: ...Phone Softkey to send to the phone number saved for the contact The cursor is placed in the To Field Confirm the contact you wish to send a message to by pressing the ENT Key 4 Enter the desired messa...

Page 147: ...il address Entry can be accomplished through the alphanumeric keys on the MFD Controller or combination of the FMS Knob on the controller and softkeys on the MFD The FMS Knob is used to enter letters...

Page 148: ...ange Softkey then press the Inbox Softkey and the Outbox Softkey to only display the Draft messages Or 1 If the Draft messages are not already displayed press the MENU Key to display the Page Menu 2 T...

Page 149: ...the Aux Text Messaging Page select the desired message box 2 Press the FMS Knob to activate the cursor 3 Turn either FMS Knob to select the desired message 4 Press the View Softkey Or Press the ENT K...

Page 150: ...to place the cursor on Delete Selected Message c Press the ENT Key 4 With cursor highlighting Yes press the ENT Key The message is now deleted CONNEXT SETUP OPTIONAL Viewing the Aux Connext Setup Pag...

Page 151: ...Remove Softkey A confirmation screen is displayed 4 If necessary turn the large FMS Knob to select Yes 5 Press the ENT Key to remove the device from the list of paired devices SIRIUSXM RADIO OPTIONAL...

Page 152: ...Radio Page where audio entertainment is controlled Selecting a channel from the Channels List 1 While on the Aux XM Radio Page press the Channel Softkey 2 Press the CH Softkey to go up through the li...

Page 153: ...uttons are pressed ELECTRONIC CHECKLISTS Accessing and navigating checklists 1 From any page on the MFD except the EIS Pages press the Checklist Softkey or turn the large FMS Knob to select the Checkl...

Page 154: ...ms have been checked Checklist Finished is displayed in green text at the bottom left of the checklist window If all items in the checklist have not be checked Checklist Not Finished will be displayed...

Page 155: ...lding either the Control Wheel Steering CWS Switch or Autopilot Disconnect AP DISC Switch Upon releasing the CWS or AP DISC Switch ESP force will again be applied provided aircraft attitude and or air...

Page 156: ...shown at the top of the System Setup Page in the box labeled Crew Profile From here crew profiles may be created selected renamed or deleted Crew profiles may also be exported from the system to an SD...

Page 157: ...p to 16 characters long and press the ENT Key 8 With Rename highlighted press the ENT Key 9 To cancel the process use the large FMS Knob to select Cancel and press the ENT Key Deleting a profile 1 Sel...

Page 158: ...port Aux System Setup Page Exporting a profile to an SD card 1 Insert the SD card for storing the Crew Profile into the top card slot on the MFD 2 Turn the FMS Knob to select the Aux System Setup 1 or...

Page 159: ...original timer value once the message is displayed When power is cycled messages are retained until deleted and message timer countdown is restarted Entering a scheduler message 1 Select the Aux Utili...

Page 160: ...ursor to enter the next message Deleting a scheduler message 1 Select the Aux Utility Page 2 Press the FMS Knob momentarily to activate the flashing cursor 3 Turn the large FMS Knob to highlight the M...

Page 161: ...display by the IAU are flagged as invalid on the remaining display The system reverts to backup paths for the AHRS ADC Engine Airframe Unit and Transponder as required The change to backup paths is c...

Page 162: ...cator Wind Data Ground Speed Distances in the Bearing Information Windows GPS bearing pointers These items should be verified when operating in Dead Reckoning Mode as they become increasingly inaccura...

Page 163: ...tude red chevrons pointing toward the hori zon warn of extreme pitch The chevrons are displayed on the Attitude Indicator starting at 50 above and 30 below the horizon line Pitch Attitude Warnings Nos...

Page 164: ...e PFD References Nearest Airports Flight Plan Messages Procedures Minimum Descent Altitude Decision Height readout Vertical Deviation Glideslope and Glide path Indicators Altimeter Barometric Setting...

Page 165: ...calculate a GPS position the system automatically reverts to Dead Reckoning DR Mode In DR Mode the system uses its last known position combined with continuously updated airspeed and heading data when...

Page 166: ...he location of circuit breakers as well as specifics that may supplement or amplify this procedure Mitigating suspected autopilot failure or trim failure 1 Firmly grasp the control stick 2 Press and h...

Page 167: ...select the Aux System Status Page Some quick troubleshooting steps listed below can be performed to find the possible cause of a failure Ensure the installed Datalink Receiver or Iridium Transceiver h...

Page 168: ...tion Annun Alerts Appendix Index Abnormal Operation Message Message Location Description ACTIVATION REQUIRED Aux XM Information Page MFD SiriusXM subscription is not activated DETECTING ACTIVATION Aux...

Page 169: ...o initialize All windows should be operational within one minute of initalization If any window continues to remain flagged the system should be serviced by a Garmin authorized repair facility Viewing...

Page 170: ...l operation AHRS operation may be degraded if GPS signals are not present see POH Display system is not receiving airspeed input from the air data computer Display system is not receiving vertical spe...

Page 171: ...emp is 100 deg C L FUEL TEMP Left fuel temp is greater than 60 deg C L GBOX TEMP Left engine gearbox temp is 120 deg C L OIL TEMP Left engine oil temp is greater than 139 deg C L OIL PRES Left engine...

Page 172: ...eft auxiliary fuel tank is empty L COOL LVL Left engine coolant level is low L ECU A FAIL Left engine ECU A has failed L ECU B FAIL Left engine ECU B has failed L FUEL LOW Left engine main tank fuel q...

Page 173: ...is inoperative R AUXPUMP ON Right fuel transfer from aux to main in progress R GLOW ON Right engine glow plug active Optional VOICE ALERTS Voice Alert Alert Trigger Minimums Minimums Issued when the...

Page 174: ...t receiving backup GPS information The system should be serviced AHRS1 GPS AHRS1 operating exclusively in no GPS mode The 1 AHRS is operating exclusively in no GPS mode The system should be serviced A...

Page 175: ...1 external push to talk switch is stuck in the enable or pressed position Press the PTT Switch again to cycle its operation If the problem persists the system should be serviced COM2 PTT COM2 push to...

Page 176: ...DB MISMATCH Terrain database mismatch The PFD and MFD have different terrain database versions or types installed Check the Aux System Status Page to determine versions or regions Also check the Aux S...

Page 177: ...69 has failed A failure has been detected in the GDL 69A SXM The receiver is unavailable The system system should be serviced GDL69 MANIFEST GDL software mismatch communication halted The GDL 69A SXM...

Page 178: ...y The system should be serviced GIA1 MANIFEST GIA1 software mismatch communication halted The GIA1 has incorrect software installed The system should be serviced GIA2 CONFIG GIA2 audio config error Co...

Page 179: ...ICE GRA1 needs service Return unit for repair The GRA self test has detected a problem in the unit The system should be serviced GRA1 TEMP GRA1 over temperature The system has detected an over tempera...

Page 180: ...ismatch has been detected where only one is SBAS capable HW MISMATCH GIA hardware mismatch GIA2 communication halted A GIA mismatch has been detected where only one is SBAS capable INSIDE ARSPC Inside...

Page 181: ...If problem persists delete databases and reload with a new card MFD1 DB ERR MFD1 obstacle database missing The obstacle database is present on another LRU but is missing on the specified LRU MFD1 DB...

Page 182: ...nfig error Config service req d The PFD configuration settings do not match backup configuration memory The system should be serviced PFD1 COOLING PFD1 has poor cooling Reducing power usage The PFD is...

Page 183: ...o the correct NAV receiver Set the CDI to the correct NAV receiver SLCT NON MAG Select alternate NAV ANGLE display units The system notifies the pilot to set the Nav Angle units on the Avionics Settin...

Page 184: ...es of the aircraft heading at a range of 80 to 320 nm XPDR1 ADS B 1090 Datalinik ADS B 1090 receiver has failed A failure has been detected in the 1090 receiver XPDR1 ADS B NO TX Transponder ADS B out...

Page 185: ...iguration memory The system should be serviced XPDR1 SRVC XPDR1 needs service Return unit for repair The transponder should be serviced when possible XTALK ERROR A flight display crosstalk error has o...

Page 186: ...the SD card contains user waypoints The quantity of stored user waypoints has exceeded system capacity therefore not all the user waypoints on the SD card have been imported Any flight plan user waypo...

Page 187: ...o receive the weather product from the FIS B data broadcast Aux ADS B Status Page Messages for FIS B Weather CONNEXT WEATHER MESSAGES Weather Request Status Message Description Auto requests inhibited...

Page 188: ...in Aviation Product Support through the phone number listed on its website www flygarmin com Connext Server Temp Inop The Garmin Connext Weather data server is temporarily out of service but is expect...

Page 189: ...dditional failure annunciations Radar Modes on the Map Weather Radar Page Radar Feature Status Description STAB INOP The radar is not receiving pitch and roll information The antenna stabilization fea...

Page 190: ...Reduced Required Obstacle Clearance Warning ROC TERRAIN WARNING OBSTACLE Warning Ob stacle Obstacle Imminent Obstacle ImpactWarning IOI TERRAIN WARNING OBSTACLE Warning Ob stacle Obstacle Reduced Req...

Page 191: ...udio fault TER FAIL TERRAIN FAIL Terrain System Failure MFD Terrain or Obstacle database unavailable or invalid and Terrain SVT operating with PFD Terrain or Obstacle databases None TERRAIN DATABASE F...

Page 192: ...affic data from a data link OPERATING UNAVAILABLE TIS is operating but the traffic service is currently unavailable or is out of reception range STANDBY STANDBY TIS is in Standby Mode UNIT FAILED TRFC...

Page 193: ...RFC RMVD Traffic is removed because it is too old for coasting 12 to 60 seconds since last message Traffic may exist within the selected display range but it is not displayed TRFC FAIL Traffic data ha...

Page 194: ...unciation Description TA OFF SCALE A Traffic Advisory is outside the selected display range Annunciation is removed when traffic comes within the selected display range TA X X XX System cannot determi...

Page 195: ...Operating in Surface Mode ADS B SURF None ABS B Traffic Off ADS B OFF ADS B TRFC OFF ADS B Traffic Not Available ADS B N A NO TRK HDG ADS B Failed ADS B FAIL FAILED See following table for additional...

Page 196: ...er of Map Traffic Map Page Traffic Status Annunciations ADS B Status Page Item Status Message Description Traffic Application Status Airborne AIRB Surface SURF Airborne Alerts CSA On Traffic applicati...

Page 197: ...inutes since the last uplink from a ground station occurred If no uplink has been received or the status is invalid dashes appear instead of a number of minutes Aux ADS B Status Page Messages for ADS...

Page 198: ...rts Flight Instruments EIS Nav Com XPDR Audio Flight Management Hazard Avoidance AFCS Additional Features Annun Alerts Appendix Index Flight Instruments EIS Nav Com XPDR Audio Flight Management Hazard...

Page 199: ...ted in the bottom SD slot of the MFD NOTE When loading database updates the DB Mismatch message will be displayed until database synchronization is complete followed by turning system power off then o...

Page 200: ...k and program the new databases onto an existing Supplemental Data Card Equipment required to perform the update is as follows Windows compatible PC computer SD Card Reader SanDisk SDDR 93 SanDisk SDD...

Page 201: ...to exit d Remove and apply power to the system e Press the ENT Key or the right most softkey on MFD display to acknowledge the startup screen f Turn the large FMS Knob and select Aux g Turn the small...

Page 202: ...if new databases have been detected for download on Garmin Pilot WIFI a valid Bluetooth connection If there are no database updates required the system will not provide a WiFi signal NOTE If the mobi...

Page 203: ...of the Aux Connext Setup Page 12 The database update window will appear Database update progress may be monitored on the mobile device 13 When the transfer is complete the database update window will...

Page 204: ...atabases have been detected for download on Garmin Pilot via a valid Bluetooth connection If there are no database updates required the system will not provide a WIFI signal NOTE If the mobile device...

Page 205: ...databases have been successfully transferred from the mobile device and appear in the Standby Column remove and reapply power to the system 16 Press the ENT Key or the right most softkey on MFD displ...

Page 206: ...bases are not properly loading or functioning and an attempt has been made to load the databases using a new SD card or multimedia card it may be necessary to delete the data bases from the system Del...

Page 207: ...e Update Prompt Loading the magnetic field variation database update With OK highlighted press the ENT Key on the MFD A progress monitor is displayed When the upload is complete the system is ready fo...

Page 208: ...ppendix Index LAND SYMBOLS The following items are configured on the land menu Land Symbols Symbol Default Range nm Maximum Range nm User Waypoint 25 1000 Highways and Roads Interstate Highway Freeway...

Page 209: ...enu Aviation Symbols Symbol Default Range nm Maximum Range nm Large Airport Longest Runway 8100 ft 100 1000 Medium Airport 8100 ft Longest Runway 5000 ft or Longest Runway 5000 ft with control tower 5...

Page 210: ...ult Range nm Maximum Range nm Class B Airspace Altitude Label ceiling floor Class C Airspace Altitude Label ceiling floor Class D Airspace Altitude Label ceiling Class B Terminal Manoeuvring Area and...

Page 211: ...FLIGHT PLAN LEG SYMBOLS Flight Plan Leg Type Symbol Active Course Leg Active Heading Leg Active Roll Steering Path Course Leg in the current flight segment Course Leg not in the current flight segment...

Page 212: ...bstacle Location 1000 AGL 1000 AGL 1000 AGL 1000 AGL Red obstacle is above or within 100 ft below the aircraft altitude Yellow obstacle is between 100 ft and 1000 ft below the aircraft altitude White...

Page 213: ...nce AFCS Additional Features Annun Alerts Appendix Index Flight Instruments EIS Nav Com XPDR Audio Flight Management Hazard Avoidance AFCS Additional Features Abnormal Operation Annun Alerts Appendix...

Page 214: ...ight Instruments EIS Nav Com XPDR Audio Flight Management Hazard Avoidance AFCS Additional Features Annun Alerts Appendix Index Flight Instruments EIS Nav Com XPDR Audio Flight Management Hazard Avoid...

Page 215: ...ar Modes Annunciations 165 Weather Radar Operation Additional Weather Radar Dis plays 93 Adjusting Antenna Tilt Angle 90 Adjusting Gain 91 Altitude Compensated Tilt ACT Angle Adjustment 90 Ground Mapp...

Page 216: ...Tops SiriusXM 77 County Warnings SiriusXM 81 Data Link Lightning SiriusXM Garmin Connext 78 Echo Tops SirisuXM 77 Freezing Level SiriusXM 80 Icing CIP SLD SiriusXM 81 Infrared Satellite Garmin Con nex...

Page 217: ...ng and Exporting Flight Plans 42 Intercom 14 Inverting a Flight Plan 46 L Land Symbols 184 Localizer Approach Mode 112 M Manual Squelch 16 Map Airways 23 187 Declutter 23 Orientation 19 Range 20 Symbo...

Page 218: ...8 9 TAS 150 Temperature Compensated Mini mums 63 Terrain 152 Terrain Displays 94 Relative Terrain Symbology Relative Obstacle Symbols 188 Terrain SVT Potential Impact Area with Annunciations 189 Wind...

Page 219: ......

Page 220: ...02 U S A Garmin Europe Ltd Liberty House Hounsdown Business Park Southampton Hampshire SO40 9LR U K Garmin Corporation No 68 Zhangshu 2nd Road Xizhi District New Taipei City Taiwan Contact Garmin Prod...

Reviews: