2
GDR E530/E560
The metal disc remains attached to the windshield.
6
Using your finger, press firmly on the disc for 30
seconds.
This helps to ensure the disc adhesive has proper
contact with the windshield.
7
Wait
24 hours
before installing the GDR device.
It takes 24 hours for the adhesive to bond properly
to the windshield.
Installing and Setting Up the GDR device
CAUTION:
Before installing the GDR device, you must
install the mount and allow the adhesive to bond to
the windshield for
24 hours
. Failure to allow adequate
bonding time may cause the mount to detach from
the windshield, which could result in damage to the
product or mount.
1
Place the camera and mount onto the metal disc.
2
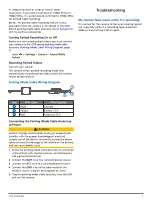
Plug the vehicle power cable into the USB port on
the device.
3
Route the power cable to your vehicle’s power outlet.
The included vehicle power cable is designed to
be routed out of sight. It is long enough to route
around the windshield in most vehicles, and you
can hide the thin cable along or behind the trim or
headliner.
4
Plug the other end of the vehicle power cable into a
power outlet in your vehicle.
5
If necessary, turn on the vehicle ignition switch to
provide power to the power outlet in your vehicle.
The device turns on.
6
Follow the on-screen instructions to complete the
initial device setup.
The camera view appears.
7
Adjust the position of the camera to capture the
desired field of view.
Setting the Camera Placement
You can mount the device in the left, center, or right
of your windshield. For the best performance, you
should set the Camera Placement option to indicate the
location of your device in the vehicle.
1
Select
Settings
>
Driver Assistance
>
Camera
Placement
.
2
Select
Horizontal Placement
, and select the
horizontal placement of your camera.
3
Select
Vehicle Height
.
4
Select an option:
• If you are driving a large vehicle, like a full size van
or truck, select
Tall
.
• If you are driving a car, select
Normal
.
Turning On the Device Manually
NOTE:
When the device is connected to an ignition-
switched power outlet, it turns on automatically when
you turn on the vehicle.
Select .
The device turns on.
Turning Off the Device Manually
NOTE:
When the device is connected to an ignition-
switched power outlet, it turns off automatically when
you turn off the vehicle.
Hold for 3 seconds.
The device turns off.
NOTE:
The battery of your GDR serves as an
emergency source of power when the power is
accidentally cut off. Please make sure the device is
connected to power outlet when in use and during
software update.
GDR device Recording
NOTICE
Some jurisdictions regulate or prohibit the use of
this device. It is your responsibility to know and
comply with applicable laws and rights to privacy in
jurisdictions where you plan to use this device.
Before you can record videos, you must install a
memory card
(Installing the Memory Card, page 1)
By default, the device immediately starts recording
video when it turns on. It continues recording,
overwriting the oldest, non- saved video until it turns
off.
Saving a Video Recording
By default, the device uses a sensor to detect a possible
incident and saves video footage automatically before,
during, and after the detected event. You can also save
video files manually at any time.
Hold .
The device saves the video footage before, during,
and after you select .
The memory card has limited storage. After you save
a video recording, you should transfer the recording
to your computer or other external storage location
for permanent storage
.


