background image

GHP 12 Installation Instructions


3

GHP 12 Package Contents and tools 

needed

The GHP 12 autopilot system consists of multiple components. 

Familiarize yourself with all of the components before beginning 

installation. You must know how the components operate together in 

order to correctly plan the installation on your boat.
As you familiarize yourself with the GHP 12 components, confirm 

that your package includes the items listed below. All the components, 

except the drive unit and (optional) Shadow Drive, are included in the 

GHP 12 core box. The drive unit is sold separately (

page 9

). If any parts 

are missing, contact your Garmin dealer immediately.
Record the serial number of each component in the space provided.

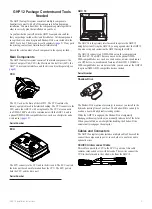
Main Components

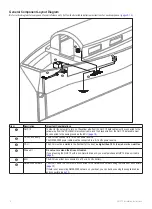
The GHP 12 autopilot system consists of four main components: the 

Course Computer Unit (CCU), the Electronic Control Unit (ECU), the 

GHC

 10 user control interface, and the drive unit (sold separately, see 

page 9

).

CCu

The CCU acts as the brain of the GHP 12. The CCU contains the 

sensory equipment used to determine heading. The CCU connects to the 

ECU and to the GHC 10 with a single cable. The CCU also connects 

to a NMEA 2000

®

 network to communicate with the GHC 10, and to 

optional NMEA 2000-compatible devices, such as a chartplotter and a 

wind sensor (

page 12

).

Serial number 

ECu

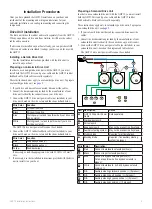
The ECU connects to the CCU and to the drive unit. The ECU controls 

the drive unit based on information from the CCU. The ECU powers 

both the CCU and the drive unit.

Serial number 

GHC 10

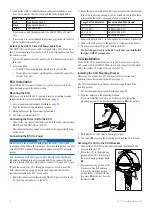
The GHC 10 is the primary interface used to operate the GHP 12 

autopilot system. Using the GHC 10, you engage and steer the GHP 12. 

You also set up and customize the GHP 12 using the GHC 10.
The GHC 10 connects to a NMEA 2000 network to communicate 

with the CCU. The GHC 10 also connects with optional NMEA 

2000-compatible devices, such as a wind sensor, a water-speed sensor, 

or a GPS device, to use advanced features of the GHP 12. If NMEA 

2000-compatible devices are not available, you can connect the GHC 10 

to optional NMEA 0183-compatible devices instead.

Serial number 

Shadow Drive

The Shadow Drive (optional accessory) is a sensor you install in the 

hydraulic steering lines of your boat. The Shadow Drive can only be 

used on a boat with a hydraulic steering system.
While the GHP 12 is engaged, the Shadow Drive temporarily 

disengages the autopilot when you manually take control of the helm. 

When you establish a new straight line heading, the Shadow Drive 

automatically reengages the autopilot

Cables and Connectors

The GHP 12 autopilot system includes multiple cables. These cables 

connect the components to power, to each other, to an alarm, and to 

optional devices.

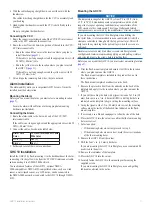
CCu/ECu Interconnect Cable

This cable connects the CCU to the ECU. A portion of this cable 

contains color-coded wires with bare ends. These wires connect the 

CCU to the alarm and to the yellow wire from the GHC 10. 

Summary of Contents for GHP 12 Autopilot System

Page 1: ...n each component Contacting Garmin Product Support Go to www garmin com support and click Contact Support for in country support information In the USA call 913 397 8200 or 800 800 1020 In the UK call...

Page 2: ...rations 14 Connecting an Optional NMEA 0183 compatible Device to the GHC 10 14 Shadow Drive Installation 14 Connecting the Shadow Drive to the Hydraulics 14 Connecting the Shadow Drive 14 Configuring...

Page 3: ...to the drive unit The ECU controls the drive unit based on information from the CCU The ECU powers both the CCU and the drive unit Serial Number GHC 10 The GHC 10 is the primary interface used to oper...

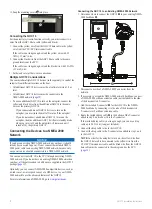
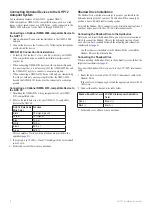
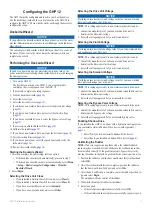
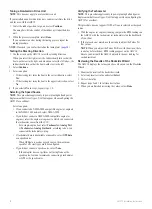
Page 4: ...e NMEA 2000 network Either connect the CCU and the GHC 10 to an existing NMEA 2000 network using the included T connectors and drop cables use all of the included NMEA 2000 cables and connectors to bu...

Page 5: ...n the location you want to mount the CCU then there is magnetic interference Choose another location and test again The CCU can be mounted below the waterline if it is not in a location where it will...

Page 6: ...fitting at the helm and the Shadow Drive Do not install the Shadow Drive directly to a hydraulic T connector in the hydraulic line Install a length of hose between a T connector and the Shadow Drive...

Page 7: ...ctors page 12 If there is not an existing NMEA 2000 network on your boat you can build one using the supplied cables and connectors page 13 Drive unit The drive unit must be installed by an experience...

Page 8: ...Vdc battery The ECU can connect to a 12 24 Vdc power source The NMEA 2000 power cable must be connected to a 9 16 Vdc power source CCU The CCU must be installed in the front half of the boat no highe...

Page 9: ...he GHP 12 rudder feedback cable not included to your drive unit based on the wire colors and functions defined below Wire Color Function Red Feedback positive Black Feedback negative Yellow Feedback w...

Page 10: ...power cable to a terminal block or other source connect it through a 40 A fuse If you plan to route the ECU through a breaker or a switch near the helm consider using an appropriately sized relay and...

Page 11: ...8 F from 15 C to 70 C Extended exposure to temperatures outside of this range in storage or operating conditions may cause failure of the LCD screen or other components This type of failure and relate...

Page 12: ...d to power Do not connect the included NMEA 2000 power cable to an existing NMEA 2000 network because only one power source should be connected to a NMEA 2000 network You can connect the GHC 10 to the...

Page 13: ...CU Building a Basic NMEA 2000 Network for the GHC 10 and the CCU Notice You must connect the included NMEA 2000 power cable to the boat ignition switch or through another in line switch The GHC 10 wil...

Page 14: ...lor Function Black CCU signal ground Yellow CCU signal Blue Tx A White Tx B Brown Rx A Green Rx B Three examples of various wiring situations are provided in the appendix page 21 3 If necessary use 22...

Page 15: ...rrect drive unit voltage value for your non Garmin drive unit can damage your drive unit NOTE This setting applies only to non Garmin other drive units 1 Consult the manufacturer of your non Garmin dr...

Page 16: ...select the engine or engines to which you connected the tachometer sensor from the CCU For a single engine boat select Tachometer Analog Port or Tachometer Analog Starboard according to how you conne...

Page 17: ...is only applicable to power boats and appears only when GPS is selected as the speed source and Planing Hull is selected as the vessel type 1 Note the speed over ground reading from the instrument on...

Page 18: ...he boat using the autopilot the boat should approach and settle on the desired heading with minimal overshoot and oscillation 3 Select an option If the boat turns too quickly or too sluggishly adjust...

Page 19: ...2 On the GHC 10 select Menu Setup DealerAutopilot Configuration Autopilot Tuning Rudder Rate Limiter 3 Select Continue Autopilot takes control of the rudder 4 Use the arrows on the GHC 10 to adjust t...

Page 20: ...e GHP 12 Use the advanced tuning procedures only if you would like to make slight adjustments to the performance of the drive unit Tuning the Speed on a non Garmin Drive Unit This setting does not app...

Page 21: ...ields for 30 seconds If the power usage field fluctuates then your error tolerance is set too low If the power usage field stays at 0 but the rudder error field shows and unacceptable degree of error...

Page 22: ...one receiving Rx line the NMEA 2000 bus and the NMEA 0183 device must be connected to a common ground Example Three of Three Only One Transmitting Wire If your NMEA 0183 compatible device has only one...

Page 23: ...inum alloy waterproof to IEC 529 IPX7 standards GHC 10 power usage 2 5 W max NMEA 2000 input voltage 9 16 Vdc NMEA 2000 LEN 6 300 mA NMEA 2000 PGN Information CCU Type PGN Description Receive 059392 I...

Page 24: ...ct Information 128259 Water Speed 129025 Position Rapid Update 129026 COG SOG Rapid Update 129283 Cross Track Error 129284 Navigation Data 129540 GNSS Sats in View 130306 Wind Data The GHP 12 and the...

Page 25: ...the arrows to adjust the value Speed Source Setup power boat only Max Speed Allows you to adjust the maximum speed of your boat If the value does not match the value on the GHC 10 use the arrows to ad...

Page 26: ...been set If this value is too high the autopilot will overcompensate for cross track error If this value is too low the autopilot will allow a large long term cross track error Steering System Setup...

Page 27: ...ng System Setup Rudder Sensor Setup Calibrate Rudder Sensor Initiates a procedure which establishes the maximum range of movement of the rudder and calibrates the rudder sensor If an error appears dur...

Page 28: ...iated Would you like to continue The autopilot has detected that the user has attempted to initiate a gybe Sounds alarm GHC10 prompts for user input Selecting Gybe initiates the gybe and selecting Can...

Page 29: ...P 12 Installation Instructions 29 Mounting Templates Use the following mounting templates during the mounting process ECU Mounting Template CCU Mounting Template Up when installing on a vertical surfa...

Page 30: ...30 GHP 12 Installation Instructions This page is intentionally left blank...

Page 31: ...Connect the drive unit to the ECU Mount the CCU page 10 in a location free of magnetic interference Use a handheld compass to test for magnetic interference in the area Mount the CCU in the bracket s...

Page 32: ...bligation to notify any person or organization of such changes or improvements Visit the Garmin Web site www garmin com for current updates and supplemental information concerning the use and operatio...

Reviews: