Page 2-2
GMA 340 Installation Manual
Rev. L
190-00149-01
2.3.4
Installation Approval Considerations for Pressurized Aircraft
Antenna and cable installations on pressurized cabin aircraft require FAA approved installation design and
engineering substantiation data whenever such installations incorporate alteration (penetration) of the cabin
pressure vessel by connector holes and/or mounting arrangements.
For needed engineering support pertaining to the design and approval of such pressurized aircraft antenna
installations, it is recommended that the installer proceed according to any of the following listed alternatives:
1. Obtain approved antenna installation design data from the aircraft manufacturer.
2. Obtain an FAA approved Supplemental Type Certificate (STC) pertaining to and valid for the subject
antenna installation.
3. Contact the FAA Aircraft Certification Office in the appropriate Region and request identification of FAA
Designated Engineering Representatives (DERs) who are authorized to prepare and approve the required
antenna installation engineering data.
4. Obtain FAA Advisory Circular AC-183C and select (and contact) a DER from the roster of individuals
identified there under.
Contact an aviation industry organization such as the Aircraft Electronics Association and request their assistance.
2.4
GMA 340 INSTALLATION
NOTE
Avoid installing the unit near heat sources. If this is not possible, insure that
additional cooling is provided. Allow adequate space for installation of cables
and connectors. The installer will supply and fabricate all of the cables. All
wiring must be in accordance with FAA AC 43.13-2A.
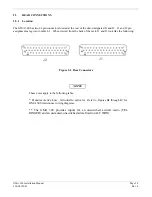
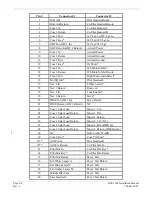
1. Assemble the connector/rack kit according to table 2-1 and figures B4 through B7. Install the rack
assembly according to the dimensions given in figures B1 and B3. Mounting brackets are not supplied
due to the wide range of mounting configurations available. Suitable mounting brackets may be
fabricated from sheet metal or angle stock. To insure a sturdy mount, rear support for the unit should be
provided.
2. Slide the unit into the rack until the jack screw makes contact with the receptacle located in the back
plate.
3. Insert a 3/32” Allen wrench into the jackscrew access hole on the faceplate.
4. Turn the Allen wrench clockwise until the unit is secured in the rack. Continue turning until tight, but do
not over-tighten.
5. To remove the unit from the rack, turn the Allen wrench counterclockwise until it disengages from the
rack.


