Post-Installation Configuration & Checkout
GNS 480 (CNX80) Installation Manual560-0982-01 Rev A
3-33
1059) may be required in series with the VHF Com antenna coax at the rear of the com unit.
ELT’s may re-radiate harmonics of the VHF Com signal into the GPS band. A 1575.42 MHz
notch filter on the ELT will solve this.
NOTE
Older VHF Com transmitters may emit higher levels of harmonic interference causing
greater problems and may be more difficult to deal with.
3.3.2.2 VHF Nav Checkout
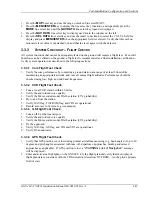
Press the
CDI
bezel key to select VOR CDI mode (indicated by a green VOR in the left portion of the
GNS 480 CDI display). To the right of the VOR indication is the current setting of the OBS. Verify that
the OBS decodes properly from 0 to 360 degrees (the value displayed on the GNS 480 should be within
±
2
°
of the OBS). Check the operation of remote VOR flip-flop switch (if installed).
Check the VOR reception with ground equipment, operating VOT or VOR, and verify audio and Morse
code ID functions (if possible). Tune a Localizer frequency and verify the CDI needle and NAV flag, and
VDI needle and GS flag operation.
NOTE
Some VOR test equipment may not be compatible with the digital signal processing of
the VHF Nav receiver and will give erroneous results. Examples of equipment known to
function properly are: IFR Nav 750 and Collins 479S-6.
3.3.2.3 VHF Com Checkout
3.3.2.3.1 Antenna Check
If desired, the antenna VSWR can be checked using an inline wattmeter in the antenna coax using
frequencies near both ends of the band. The VSWR should be < 2:1, and is not to exceed 3:1. A VSWR of
2:1 will cause a drop in output power of approximately 12%, and 3:1 causes approximately a 26% drop.
3.3.2.3.2 Receiver / Transmitter Operation
Press the
COM
bezel key to allow control of the VHF com transceiver. Tune the unit to a local
frequency and verify the receiver output produces a clear and understandable audio output. Verify the
transmitter functions properly by contacting another station and getting a report of reliable
communications. Check the operation of remote com flip/flop switch (if installed). If necessary, adjust
the RF Squelch and Mic Gain values as describe in 3.2.1.5.
3.3.2.3.3 Sidetone Level Adjustment
The sidetone volume was preset at the factory to a typical audio level. The level can be adjusted as
follows:
1.
Press the
COM
bezel key to allow control of the VHF com transceiver.
2.
Press the
MENU/ENTER
key to display the com menu, and press the
AUDIO
line select key to
display the volume adjustment window.
3.
Rotate the large, outer knob to select the
Sidtone
item.
4.
Rotate the
PWR/VOL
knob or the small, inner knob to adjust the sidetone level. The sidetone level
is displayed as a horizontal bar, showing the level from zero to 100%. The sidetone level can be
adjusted during transmit.
5.
Press the
MENU/ENTER
key when done.
Summary of Contents for GNS 480
Page 1: ...GNS 480 CNX80 Color GPS Nav Com Installation Manual September 2004 560 0982 01 Rev A...
Page 10: ...Table of Contents viii 560 0982 01 Rev A GNS 480 CNX80 Installation Manual NOTES...
Page 30: ...General Information 1 20 560 0982 01 Rev A GNS 480 CNX80 Installation Manual NOTES...
Page 126: ...Periodic Maintenance 6 2 560 0982 01 Rev A GNS 480 CNX80 Installation Manual NOTES...
Page 150: ...Appendix D Interconnect Diagrams D 2 560 0982 01 Rev A GNS 480 CNX80 Installation Manual NOTES...
Page 185: ......
Page 186: ......


