500W Series Installation Manual
Page 3-7
190-00357-02
Rev. D
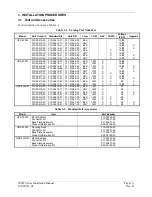
Table 3-4. Pin Contact Part Numbers
78 pin conn
(P5001/5050)
44 pin
conn
(P5006)
25 pin connector (P5002)
Shield ground
connector
Connector
Type
High Density Pin
Contact
Standard Density Socket Contact
.1-inch Pitch Card-Edge
Wire Gauge
22-24 AWG
18 AWG
20-24 AWG
20-24 AWG
Garmin P/N
336-00021-00
336-00023-00 336-00022-00
336-00029-00
Military P/N
M39029/58-360
N/A
M39029/63-368
N/A
AMP 204370-2 N/A
205090-1 583853-4
Positronic M39029/58-360 FC6018D
M39029/63-368
N/A
ITT Cannon
030-2042-000
See Note 2
031-1007-042
N/A
NOTES
1.
Non-Garmin part numbers shown are not maintained by Garmin and consequently are subject
to change without notice.
2.
Alternate contacts for 18 AWG wire: As an alternative to the Positronic contacts listed (and
provided in the installation kit), the installer may use contacts made by ITT Cannon under P/N
031-1007-001. These contacts require the use of a different crimp tool positioner than shown
in the table, with the part numbers as follows: Daniels P/N K250, Astro P/N 616245, or ITT
Cannon P/N 980-0005-722.
3.
For the card-edge connector pin contacts, use AMP part number 90272-1 or equivalent
crimping tool.
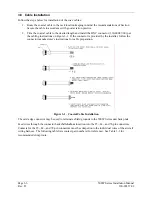
To prevent a possible short across the pins in the wiring harness, Teflon shrink tubing P/N 312-00005-05,
provided in Connector Kit 011-00351-00 (P5002) covers the oversized power and ground pin contacts
P/N 336-00023-00 (pins 11, 12, 21, 22) that protrude from the back of the connector shell. Before
crimping the pins onto the wire:
1.
Cut the tubing (312-00005-05) into 4 equal lengths.
2.
Slide a short piece of the tubing over the wire.
3.
Strip the wire and crimp the pin (336-00023-00) onto the wire.
4.
Insert the pin into the connector shell.
5.
Slide the tubing over the exposed portion of the pin and shrink using a heat gun.
Summary of Contents for GNS 530W
Page 2: ...500W Series Installation Manual 190 00357 02 Rev D...
Page 130: ...Page 7 4 500W Series Installation Manual Rev D 190 00357 02 This Page Intentionally Left Blank...
Page 132: ...Page 8 2 500W Series Installation Manual Rev D 190 00357 02 This Page Intentionally Left Blank...
Page 134: ...Page A 2 500W Series Installation Manual Rev D 190 00357 02 This Page Intentionally Left Blank...
Page 136: ...Page B 2 500W Series Installation Manual Rev D 190 00357 02 This Page Intentionally Left Blank...
Page 137: ...500W Series Installation Manual Page C 1 190 00357 02 Rev D Appendix C RESERVED...
Page 138: ...Page C 2 500W Series Installation Manual Rev D 190 00357 02 This Page Intentionally Left Blank...
Page 148: ...Page E 6 500W Series Installation Manual Rev D 190 00357 02 This Page Intentionally Left Blank...
Page 150: ...Page F 2 500W Series Installation Manual Rev D 190 00357 02 This Page Intentionally Left Blank...
Page 160: ...Page G 6 500W Series Installation Manual Rev D 190 00357 02 This Page Intentionally Left Blank...
Page 162: ...Page H 2 500W Series Installation Manual Rev D 190 00357 02 This Page Intentionally Left Blank...
Page 188: ...Page H 28 500W Series Installation Manual Rev D 190 00357 02 Figure H 16 GTX 330 Interconnect...
Page 194: ...Page H 34 500W Series Installation Manual Rev D 190 00357 02 Figure H 20 RMI OBI Interconnect...
Page 198: ...Page H 38 500W Series Installation Manual Rev D 190 00357 02 Figure H 24 TAWS Interconnect...
Page 211: ...500W Series Installation Manual Page H 51 190 00357 02 Rev D Figure H 33 Switches Interconnect...
Page 215: ......
Page 216: ......

