


minutes. If the recipient replies quickly, you can receive the
reply before the next scheduled listen interval.
Sounds Settings
Select
Settings
>
Sounds
.
Mute All
: Mutes all device tones.
Volume
: Sets the device volume level.
Message Received
: Sets the tone that sounds when you
receive a message.
Message Sent
: Sets the tone that sounds when the you send a
message.
Critical Alert
: Sets the tone that sounds when the device
announces a critical alert.
Power Off
: Sets the tone that sounds when you turn off the
device.
Time Settings
Select
Settings
>
Time
.
Time Format
: Sets the device to show time in a 12-hour or 24-
hour format.
Zone
: Sets the time zone for the device.
Daylight Saving
: Sets the device to use daylight saving time.
Units Settings
NOTE:
You should not change the position-coordinate format or
the map datum coordinate system unless you are using a map
or chart that specifies a different position format.
Select
Settings
>
Units
.
Coordinates
: Sets the format used for geographical position
coordinates.
Datum
: Sets the coordinate system used by the map.
Measures
: Sets the unit of measure for distance.
Temperature
: Sets the temperature units to Fahrenheit (°F) or
Celsius (°C).
Pressure
: Sets the pressure units.
Bearing
: Sets the north reference used on the compass to true
or magnetic north.
External Power Settings
Select
Settings
>
External Power
.
Auto On
: Automatically turns on the device when it is connected
to external power.
Auto Off
: Automatically turns off the device when it is
disconnected from external power.
Changing the Device Language
1
Select
Settings
>
Language
.
2
Select a language.
Adding Owner Information
You can add owner information that appears when you turn on
the device.
1
Select
Settings
>
Owner Info
.
2
Select , enter your information, and select
Done
.
3
Select
Display Info at Startup
.
Device Information
Support and Updates
Go to
for easy access to these services for
inReach devices.
• Product registration
• Product manuals
• Firmware updates
• Map downloads and updates
• Data uploads and syncing your device with your account
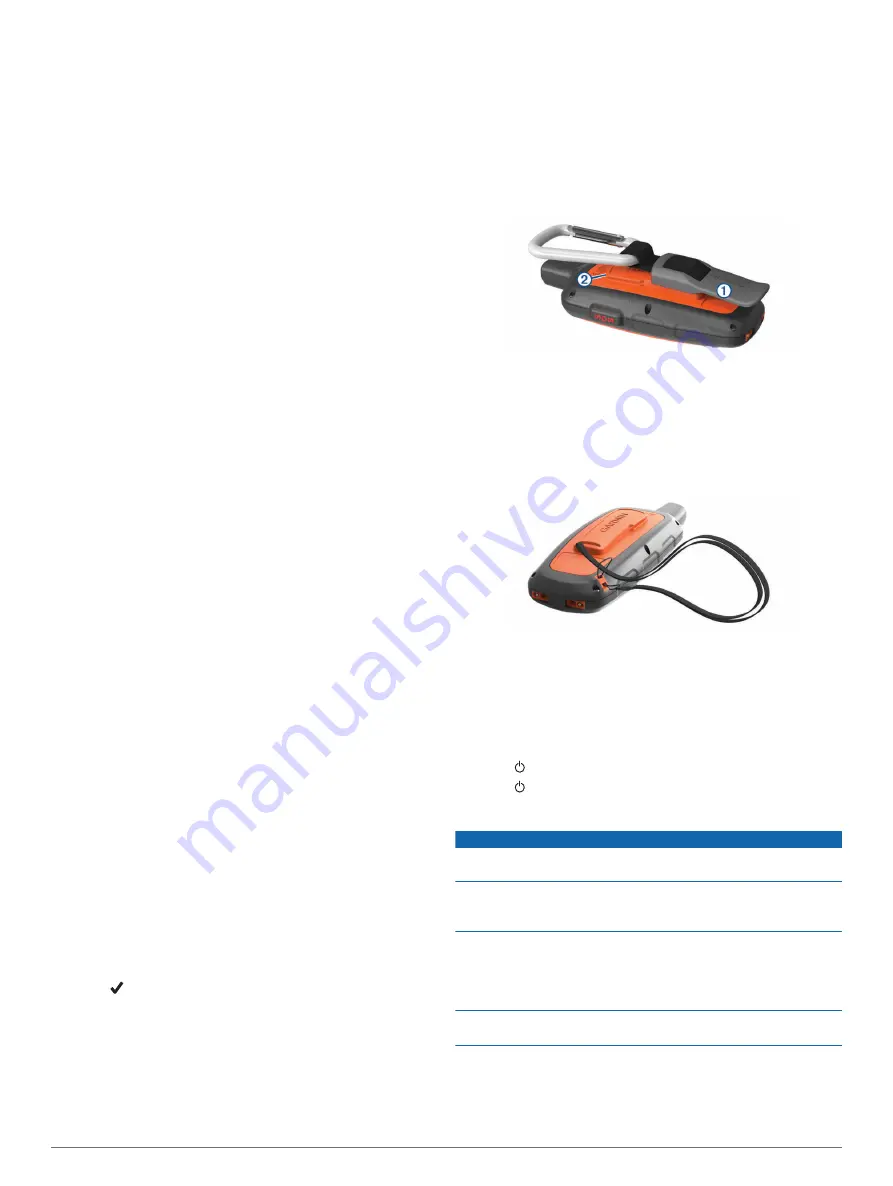
Attaching the Carabiner Clip
1
Position the carabiner clip
À
in the slots on the mounting
spine
Á
of the device.
2
Slide the carabiner clip up until it locks in place.
Removing the Carabiner Clip
Lift up on the bottom of the carabiner clip, and slide the
carabiner clip off the mounting spine.
Attaching a Lanyard
1
Insert the loop of the lanyard through the slot in the device.
2
Thread the other end of the lanyard through the loop, and pull
it tight.
3
If necessary, attach the lanyard to your clothing or backpack
to tether it during an activity.
Locking and Unlocking the Keys
You can lock the keys to prevent inadvertent key presses.
1
Select >
Lock Screen
.
2
Select >
Unlock
to unlock the keys.
Device Care
NOTICE
Avoid chemical cleaners, solvents, and insect repellents that can
damage plastic components and finishes.
Do not store the device where prolonged exposure to extreme
temperatures can occur, because it can cause permanent
damage.
The device is water resistant to IEC Standard 60529 IPX7. It can
withstand accidental immersion in 1 meter of water for 30
minutes. Prolonged submersion can cause damage to the
device. After submersion, be certain to wipe dry and air dry the
device before using or charging.
Thoroughly rinse the device with fresh water after exposure to
chlorinated or salt water environments.
Device Information
7
Summary of Contents for INREACH SE+
Page 1: ...INREACHSE INREACHEXPLORER Owner sManual...
Page 4: ......


