background image

include popular travel destinations such as gas stations, 

restaurants, hotels, and entertainment venues.

Creating and Following a Course on Your 

Device

1

From the watch face, select   > 

Navigate

 > 

Courses

 > 

Create New

.

2

Enter a name for the course, and select  .

3

Select 

Add Location

.

4

Select an option.

5

If necessary, repeat steps 3 and 4.

6

Select 

Done

 > 

Do Course

.

Navigation information appears.

7

Select   to begin navigation.

Creating a Round-Trip Course

The device can create a round-trip course based on a specified 

distance and direction of navigation.

1

From the watch face, select  .

2

Select 

Run

 or 

Bike

.

3

Hold 

UP

.

4

Select 

Navigation

 > 

Round-Trip Course

.

5

Enter the total distance for the course.

6

Select a direction heading.
The device creates up to three courses. You can select 

DOWN to view the courses.

7

Select   to select a course.

8

Select an option:
• To begin navigation, select 

Go

.

• To view the course on the map and pan or zoom the map, 

select 

Map

.

• To view a list of turns in the course, select 

Turn By Turn

.

• To view an elevation plot of the course, select 

Elevation 

Plot

.

Marking and Starting Navigation to a Man 

Overboard Location

You can save a man overboard (MOB) location, and 

automatically start navigation back to it.

TIP: 

You can customize the hold function of the keys to access 

the MOB function (

Customizing the Hot Keys

, page 29

).

From the watch face, select   > 

Navigate

 > 

Last MOB

.

Navigation information appears.

Navigating with Sight 'N Go

You can point the device at an object in the distance, such as a 

water tower, lock in the direction, and then navigate to the 

object.

1

From the watch face, select   > 

Navigate

 > 

Sight 'N Go

.

2

Point the top of the watch at an object, and select  .
Navigation information appears.

3

Select   to begin navigation.

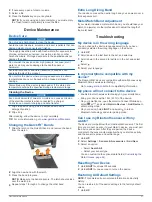
Navigating to Your Starting Point During an 

Activity

You can navigate back to the starting point of your current 

activity in a straight line or along the path you traveled. This 

feature is available only for activities that use GPS.

1

During an activity, select   > 

Back to Start

.

2

Select an option:

• To navigate back to the starting point of your activity along 

the path you traveled, select 

TracBack

.

• If you do not have a supported map or are using direct 

routing, select 

Route

 to navigate back to the starting point 

of your activity in a straight line.

• If you are not using direct routing, select 

Route

 to 

navigate back to the starting point of your activity using 

turn-by-turn directions.

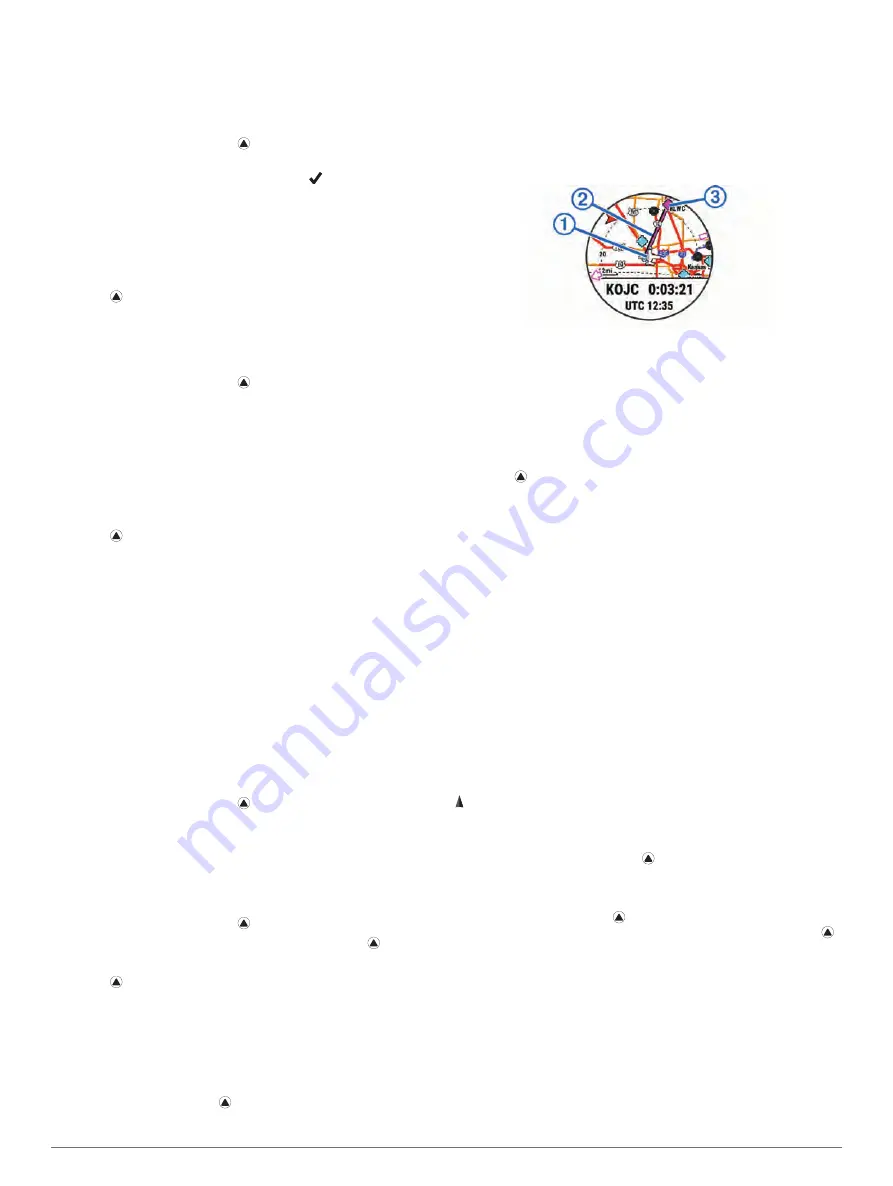
Your current location 

À

, the track to follow 

Á

, and your 

destination 

Â

 appear on the map.

Navigating to the Starting Point of Your Last 

Saved Activity

You can navigate back to the starting point of your last saved 

activity in a straight line or along the path you traveled. This 

feature is available only for activities that use GPS.

1

Select   > 

Navigate

 > 

Back to Start

 > 

Route

.

Turn-by-turn directions help you navigate to the starting point 

of your last saved activity if you have a supported map or are 

using direct routing. A line appears on the map from your 

current location to the starting point of the last saved activity 

if you are not using direct routing.

NOTE: 

You can start the timer to prevent the device from 

timing out to watch mode.

2

Select 

DOWN

 to view the compass (optional).

The arrow points toward your starting point.

Stopping Navigation

1

During an activity, hold 

UP

.

2

Select 

Stop Navigation

.

Map

Your Descent Mk1 watch can display several types of Garmin 

map data. To purchase map data and view compatibility 

information, go to 

garmin.com/maps

.

 represents your location on the map. When you are navigating 

to a destination, your route is marked with a line on the map.

Viewing the Map

1

From the watch face, select   > 

Map

.

2

Hold 

UP

, and select an option:

• To pan or zoom the map, select 

Pan/Zoom

.

TIP: 

You can select   to toggle between panning up and 

down, panning left and right, or zooming. You can hold 

to select the point indicated by the crosshairs.

• To see nearby points of interest and waypoints, select 

Around Me

.

Saving or Navigating to a Location on the Map

You can select any location on the map. You can save the 

location or start navigating to it.

1

From the map, hold 

UP

.

2

Select 

Pan/Zoom

.

Controls and crosshairs appear on the map.

Navigation

19

Summary of Contents for IPH-A3095

Page 1: ...DESCENT MK1 Owner sManual...

Page 2: ...out the express permission of Garmin American Heart Association is a registered trademark of American Heart Association Inc Android is a trademark of Google Inc Apple and Mac are trademarks of Apple I...

Page 3: ...Monitor 8 Tips for Erratic Heart Rate Data 8 Caring for the Heart Rate Monitor 8 Running Dynamics 9 Training with Running Dynamics 9 Color Gauges and Running Dynamics Data 9 Ground Contact Time Balanc...

Page 4: ...GroupTrack Session 22 Tips for GroupTrack Sessions 22 Wi Fi Connected Features 22 Setting Up Wi Fi Connectivity 22 Connect IQ Features 23 Downloading Connect IQ Features 23 Downloading Connect IQ Feat...

Page 5: ...efault Settings 31 Acquiring Satellite Signals 32 Improving GPS Satellite Reception 32 The temperature reading is not accurate 32 Maximizing the Battery Life 32 Activity Tracking 32 My daily step coun...

Page 6: ......

Page 7: ...widget From any screen hold DOWN to return to the watch face If you are recording an activity select BACK to return to the activity data pages Charging the Device NOTICE To prevent corrosion thorough...

Page 8: ...isplay in dive and post dive Single Gas Allows you to dive with a single gas blend Multi Gas Allows you to configure multiple gas blends and switch gases during your dive This mode supports one bottom...

Page 9: ...et heading 3 Select and select an option To reset the heading select Reset Heading To change the heading to the reciprocal heading select Set to Recip The compass indicates the reciprocal heading with...

Page 10: ...2 Select a decompression plan 3 If necessary select View to view the decompression plan then select BACK 4 Select Apply to use the decompression plan settings Editing a Decompression Plan 1 Select Pl...

Page 11: ...device such as a speed or cadence sensor Outdoor Activities The Descent device comes preloaded with apps for outdoor activities such as running and open water swimming GPS is turned on for outdoor act...

Page 12: ...ly Butterfly Mixed More than one stroke type in an interval Drill Used with drill logging Training with the Drill Log page 6 Tips for Swimming Activities Before starting a pool swimming activity follo...

Page 13: ...es are removed from the list as you pass them Keeping Score 1 From the hole information screen select Scorecard The scorecard appears when you are on the green 2 Select UP or DOWN to scroll through th...

Page 14: ...vice NOTE The pairing instructions differ for each Garmin compatible device See your owner s manual TIP To stop broadcasting your heart rate data select any key and select Yes Turning Off the Wrist He...

Page 15: ...t a running dynamics data screen NOTE The running dynamics screens are not available for all activities 8 Go for a run Starting an Activity page 4 9 Select UP or DOWN to open a running dynamics screen...

Page 16: ...are fully recovered and ready for the next hard workout Training load Training load is the sum of your excess post exercise oxygen consumption EPOC over the last 7 days EPOC is an estimate of how muc...

Page 17: ...ed Poor VO2 max data and analysis is provided with permission from The Cooper Institute For more information see the appendix VO2 Max Standard Ratings page 36 and go to www CooperInstitute org Getting...

Page 18: ...nd the type of activity Repeated high intensity intervals of 10 to 120 seconds have a highly beneficial impact on your anaerobic capability and result in an improved anaerobic Training Effect It is im...

Page 19: ...update your heart rate zones based on your lactate threshold heart rate For each additional lactate threshold estimate the device prompts you to accept or decline the estimate Getting Your FTP Estimat...

Page 20: ...as a percentage of your lactate threshold heart rate 8 Select a zone and enter a value for each zone 9 Select Add Sport Heart Rate and select a sport profile to add separate heart rate zones optional...

Page 21: ...ur weekly intensity minutes goal by participating in at least 10 consecutive minutes of moderate to vigorous intensity activities The device adds the amount of moderate activity minutes with the amoun...

Page 22: ...e number of repetitions select Repeat To add an open ended warm up to your workout select Warm Up On To add an open ended cool down to your workout select Cool Down On Starting an Interval Workout 1 F...

Page 23: ...ou are during the activity NOTE This feature is not available for all activities 1 From the watch face select 2 Select an activity 3 Hold UP 4 Select Training Race an Activity 5 Select an option Selec...

Page 24: ...t a saved location 3 Select an option to edit the location Deleting All Saved Locations You can delete all of your saved locations at once From the watch face select Navigate Saved Locations Delete Al...

Page 25: ...elect Back to Start 2 Select an option To navigate back to the starting point of your activity along the path you traveled select TracBack If you do not have a supported map or are using direct routin...

Page 26: ...average pace or speed lap data and optional ANT sensor information NOTE When the device memory is full your oldest data is overwritten Using History History contains previous activities you have saved...

Page 27: ...hat appear on your Descent Mk1 device Select an option If you are using an Apple smartphone use the notification center settings on your smartphone to select the items to show on the device If you are...

Page 28: ...n with Descent Mk1 devices If your connections have other compatible devices you can see them on the map The other devices may not be able to display GroupTrack riders on the map 1 Go outside and turn...

Page 29: ...activities your weekly intensity minutes goal and progress toward your goal Heart rate Displays your current heart rate in beats per minute bpm and a graph of your heart rate Performance Displays your...

Page 30: ...ed speed Enabling Auto Pause page 26 Auto Climb Enables the device to detect elevation changes automatically using the built in altimeter Auto Run Enables the device to detect ski runs automatically u...

Page 31: ...each activity Hold UP select Settings Activities Apps select an activity select the activity settings and select Map Configure Maps Shows or hides data from installed map products Use Sys Settings Ena...

Page 32: ...n turn on the Lap Key setting to record a lap or a rest during an activity using BACK You can turn off the Lap Key setting to avoid recording laps due to accidental key presses during an activity 1 Ho...

Page 33: ...s Setting the North Reference You can set the directional reference used in calculating heading information 1 Hold UP 2 Select Settings Sensors Accessories Compass North Ref 3 Select an option To set...

Page 34: ...ted time remaining until you reach your final destination select Final ETE 4 Select Status to turn on the alert 5 Enter a distance or time value and select System Settings Hold UP and select Settings...

Page 35: ...such as Vector tempe wireless temperature sensor tempe page 30 For information about compatibility and purchasing additional sensors go to http buy garmin com Pairing ANT Sensors The first time you c...

Page 36: ...Select your foot pod 4 Select Speed or Distance 5 Select an option Select Indoor when you are training with GPS turned off usually indoors Select Always to use your foot pod data regardless of the GP...

Page 37: ...s with an extra long band you can wear over a thick exposure suit Metal Watch Band Adjustment If your watch includes a metal watch band you should take your watch to a jeweler or other professional to...

Page 38: ...n Devices page 8 Turn off wrist based heart rate monitoring Turning Off the Wrist Heart Rate Monitor page 8 NOTE Wrist based heart rate monitoring is used to calculate vigorous intensity minutes and c...

Page 39: ...both moving and stopped speeds Avg PCO The average platform center offset for the current activity Avg R PP The average power phase angle for the right leg for the current activity Avg R PPP The aver...

Page 40: ...the current interval Intensity Factor The Intensity Factor for the current activity Interval Lengths The number of pool lengths completed during the current interval Interval Time The stopwatch time f...

Page 41: ...top speed for the current activity Max Power The top power output for the current activity Min Elevation The lowest elevation reached since the last reset Moving Time The total time moving for the cur...

Page 42: ...ed classifications for VO2 max estimates by age and gender Males Percentile 20 29 30 39 40 49 50 59 60 69 70 79 Superior 95 55 4 54 52 5 48 9 45 7 42 1 Excellent 80 51 1 48 3 46 4 43 4 39 5 36 7 Good...

Page 43: ...pecific prior written permission THIS SOFTWARE IS PROVIDED BY THE COPYRIGHT HOLDERS AND CONTRIBUTORS AS IS AND ANY EXPRESS OR IMPLIED WARRANTIES INCLUDING BUT NOT LIMITED TO THE IMPLIED WARRANTIES OF...

Page 44: ...3 language 28 layup 7 lengths 6 lifetime athlete 14 LiveTrack 22 locations 18 deleting 18 editing 18 saving 18 19 M main menu customizing 23 man overboard MOB 19 map 3 19 25 27 28 map points See point...

Page 45: ...ertical oscillation 9 10 vertical ratio 9 10 VIRB remote 23 24 Virtual Partner 17 VO2 max 10 12 36 W watch faces 23 26 27 watch mode 26 water resistance 31 waypoints 20 projecting 18 wheel sizes 36 Wi...

Page 46: ...support garmin com November 2017 190 02244 00_0A...

Reviews: