


Product Updates
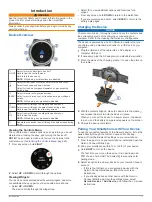
On your computer, install Garmin Express
™
(
). On your smartphone, install the Garmin Connect
Mobile app.
This provides easy access to these services for Garmin
®
devices:
• Software updates
• Data uploads to Garmin Connect
• Product registration
Setting Up Garmin Express
1
Connect the device to your computer using a USB cable.
2
Go to
.
3
Follow the on-screen instructions.
Diving
Dive Warnings
WARNING
• The diving features of this device are for use by certified
divers only. This device should not be used as a sole dive
computer. Failure to input the appropriate dive-related
information into the device can lead to serious personal injury
or death.
• Make sure that you fully understand the use, displays, and
limitations of your device. If you have questions about this
manual or the device, always resolve any discrepancies or
confusion before diving with the device. Always remember
that you are responsible for your own safety.
• There is always a risk of decompression sickness (DCS) for
any dive profile even if you follow the dive plan provided by
the dive tables or a diving device. No procedure, diving
device, or dive table will eliminate the possibility of DCS or
oxygen toxicity. An individual's physiological make up can
vary from day to day. This device cannot account for these
variations. You are strongly advised to remain well within the
limits provided by this device to minimize the risk of DCS.
You should consult a physician regarding your fitness before
diving.
• Do not dive with a gas if you have not personally verified its
contents and input the analyzed value to the device. Failure
to verify tank contents and input the appropriate gas values
to the device will result in incorrect dive planning information
and could result in serious injury or death.
• Diving with more than one gas mixture presents a much
greater risk than diving with a single gas mixture. Mistakes
related to the use of multiple gas mixtures may lead to
serious injury or death.
• Always ensure a safe ascent. A rapid ascent increases the
risk of DCS.
• Disabling the deco lockout feature on the device can result in
an increased risk of DCS, which can result in personal injury
or death. Disable this feature at your own risk.
• Violating a required decompression stop may result in
serious injury or death. Never ascend above the displayed
decompression stop depth.
• Always perform a safety stop between 3 and 5 meters for 3
minutes, even if no decompression stop is required.
Dive Modes
The Descent Mk1 device supports five dive modes. Each dive
mode has four phases: dive pre-check, surface display, in-dive,
and post-dive.
Single-Gas
: Allows you to dive with a single gas blend.
Multi-Gas
: Allows you to configure multiple gas blends and
switch gases during your dive. This mode supports one
bottom gas, and up to five additional gases for
decompression or backup.
NOTE:
Backup gases are not used in no-decompression limit
(NDL) and time to surface (TTS) decompression calculations
until you activate them during a dive.
Gauge
: Allows you to dive with basic bottom timer features.
NOTE:
After diving in gauge mode, the device can only be
used in gauge or apnea mode for 24 hours.
Apnea
: Allows you to free dive with apnea-specific dive data.
This mode has a higher data refresh rate.
Apnea Hunt
: Similar to the Apnea dive mode, but tuned
specifically for spearfishers. Start and stop tones are
disabled.
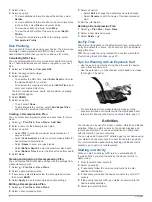
Dive Setup
You can customize the dive settings based on your needs. Not
all settings are applicable for all dive modes. You can also edit
the settings before you start a dive.
Hold
UP
, and select
Dive Setup
.
Gases
: Sets the gas blends.
Conservatism
: Sets the level of conservatism for
decompression calculations. Higher conservatism provides a
shorter bottom time and a longer ascent time. The Custom
option allows you to set a custom gradient factor.
Water Type
: Allows you to select the water type.
PO2
: Sets the maximum partial pressure of oxygen in bars.
Alerts
: Allows you to set alerts for depth and time. You can
enable different alerts for different dive modes.
Apnea Surf. Alert
: Allows you to set alerts for apnea surface
intervals.
Safety Stop
: Allows you to set the safety stop duration.
End Dive Delay
: Allows you to set the length of time before the
device ends and saves a dive after surfacing.
Backlight
: Allows you to adjust the backlight settings for dive
activities.
Heart Rate
: Allows you to enable the wrist heart rate monitor or
a chest heart rate monitor for dives.
NOTE:
You can only view wrist heart rate monitor data during
a dive. You can view chest heart rate monitor data on your
Garmin Connect account after you complete the dive.
Double Tap to Scroll
: Allows you to double tap the device to
scroll through the dive data screens.
Deco Lockout
: Disables the decompression lockout feature,
which prevents too many decompression dives in a short
time period.
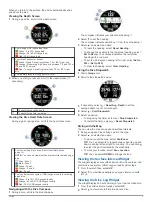
Starting a Dive
1
From the watch face, select .
2
Select a dive mode (
).
3
If necessary, select
DOWN
to edit the dive settings, such as
the gases, water type, and alerts (
).
4
Select .
5
Descend to start your dive.
The activity timer starts automatically when you reach a
depth of 1.2 m (4 ft.).
NOTE:
If you start a dive without selecting a dive mode, the
device uses the most recently used dive mode.
6
Select
DOWN
to scroll through the data screens and dive
compass.
TIP:
You can also double tap the device to scroll through the
screens.
2
Diving
Summary of Contents for IPH-A3095
Page 1: ...DESCENT MK1 Owner sManual...
Page 6: ......
Page 46: ...support garmin com November 2017 190 02244 00_0A...