10.7
Chapter 10
Setting Connection and Network Preferences
Creating a Login Script
A login script is a series of commands that automates logging into your ISP. You can create login script files by selecting
commands from in the Login Script dialog box. Some commands, such as Send, require additional information and have a
parameter field to add the necessary data. You can also use non-ASCII and literal characters in your login script. See
ASCII Characters in Login Scripts”
for more information.
To create a login script:
1. With a service template selected in the Network Preferences screen, tap
Details
.
2. In the Details dialog box, tap
Script
.
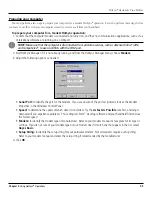
3. In the Login Script screen, tap the
End
pick list.
4. In the pick list, tap any of the following commands to select them, and then enter additional information if a field ap-
pears:
•
Wait For:
to instruct your handheld to wait for specific characters from the TCP/IP server before executing the next
command.
•
Send:
to transmit specific characters to the TCP/IP server to which you are connecting.
•
Send CR:
to transmit a carriage return or LF character to the TCP/IP server to which you are connecting.
•
Send User ID:
to transmit the User ID information entered in the User ID field of the Network Preferences screen.
•
Send Password:
to transmit the password entered in the Password field of the Network Preferences screen. If
you did not enter a password, this command prompts you to enter one. The Password command is usually fol-
lowed by a Send CR command.
•
Delay:
to instruct your handheld to wait a specific number of seconds before executing the next command in the
login script.
•
Get IP (for SLIP connections):
to read an IP address and uses it as the IP address for your handheld.
•
Prompt:
to open a dialog box and prompts you to enter text of some kind (for example, a password or a security
code).
•
End:
to identify the last line in the login script.
5. Repeat steps 2 and 3 until you have completed the login script.
6. Tap
OK
, and then tap
OK
in the Details dialog box.
Setting Network Preferences


