background image

1.20

Chapter 1 Introduction

Using Your Handheld with Another Personal Information Manager

If you want to use another Personal Information Manager (PIM), such as Microsoft

®

 Outlook, you need to install connection 

software for your PIM, called a conduit.  Conduits allow you to synchronize data between your handheld and a PIM instead of the 
Palm Desktop.  The Setup CD includes free and evaluation versions of Palm software applications for use with your iQue 3200.  For 
example, the DataViz Mail conduit allows you to view and edit your Microsoft Outlook or Lotus Notes e-mail on your handheld.

To install a conduit:

1.  Insert the iQue 3200 Setup CD in your computer’s CD-ROM drive.  Select 

Install Software

 from the menu.

2.  Select 

Bonus Software

, then 

Productivity Software

, and then select the name of the conduit you wish to install.

3.  The InstallShield Wizard begins installing the software. Follow the on-screen instructions to complete the installation. 

Introduction: Palm

 Desktop Software
Summary of Contents for iQue 3200

Page 1: ...iQue 3200 integrated handheld operating instructions ...

Page 2: ...N WITHIN 10 DAYS OF THE DATE YOU ACQUIRED IT FOR A FULL REFUND 1 LICENSE Garmin we or us provides you with storage media containing the Software which may also include digital cartographic data and online or electronic documentation and printed materials together called the Product and grants you a limited non exclusive license to use the Product in accordance with the terms of this License Agreem...

Page 3: ...E MEASUREMENT OF DIRECTION DISTANCE OR LOCATION DO NOT ATTEMPT TO ENTER INFORMATION INTO THE PRODUCT OR CONTROL THE PRODUCT WHILE OPERATING A VEHICLE 6 U S GOVERNMENT RESTRICTED RIGHTS I THE PRODUCT and documentation are provided with RESTRICTED RIGHTS Use duplication or disclosure by the United States Government is subject to restrictions as set forth in subparagraph c 1 and 2 of the Commercial C...

Page 4: ...pply to you Garmin retains the exclusive right to repair or replace the unit or software or offer a full refund of the purchase price at its sole discretion SUCH REMEDY SHALL BE YOUR SOLE AND EXCLUSIVE REMEDY FOR ANY BREACH OF WARRANTY To obtain warranty service call your local Garmin authorized dealer Or call Garmin Customer Service at one of the numbers listed below for shipping instructions and...

Page 5: ... the battery has a limited life span Replace when usage time between charges become short If there are any problems with the battery immediately keep the battery in a safe place and contact Garmin If the unit must be disposed of contact your local waste disposal department for information on properly disposing of lithium ion batteries ESD Caution To prevent electrostatic discharge discharge of sta...

Page 6: ...esetting Your iQue 1 6 Opening Applications 1 7 Using the Handheld Interface 1 8 Using Menus and Menu Commands 1 9 Displaying Tips 1 10 Entering Data 1 10 Customizing Your Handheld 1 11 Personalizing Your Handheld 1 11 Setting the Date Time and Time Zone 1 12 Formatting the Date Time and Numbers 1 14 Setting the Auto Off Delay Time 1 15 Setting Your Handheld to Stay On While in the Cradle 1 15 Set...

Page 7: ...pter 3 Managing Applications 3 1 Using the Applications Launcher 3 1 Selecting Applications 3 1 Categorizing Applications 3 2 Changing the Applications Launcher Display 3 2 Setting Preferences for Applications 3 3 Assigning Applications to Buttons 3 3 Installing Add On Applications 3 6 Removing Applications 3 8 Removing Palm Desktop Software 3 8 Assigning Security Options 3 8 Masking and Hiding Re...

Page 8: ...Using the To Do List 4 16 Creating To Do List Items 4 17 Setting To Do List Priorities 4 18 Changing Priorities and Due Dates 4 19 Displaying Completed and Due Items 4 20 Using the Address Book 4 21 Adding and Using Address Book Entries 4 22 Duplicating an Entry 4 23 Selecting Different Types of Phone Numbers and Addresses 4 23 Editing Address Book Entries 4 24 Changing the Address Book Display 4 ...

Page 9: ... 4 Understanding the Blinking Alarm Indicator 6 4 Chapter 7 Using an Expansion Card 7 1 Displaying Contents of a Card 7 1 Using Card Info 7 5 Using an SDIO Compatible Device 7 6 Chapter 8 Beaming Information 8 1 Beaming a Business Card 8 1 Beaming a Record 8 1 Beaming an Application 8 2 Receiving Beamed Information 8 2 Turning Off Beaming 8 2 Chapter 9 Exchanging and Updating Data using HotSync Op...

Page 10: ...Operation via a Modem 9 11 Conducting a HotSync Operation via a Network 9 11 Network HotSync Software Requirements 9 11 Using File Link 9 12 Chapter 10 Setting Connection and Network Preferences 10 1 Connection Preferences 10 1 Connection Types 10 1 Setting Modem Configurations 10 2 Network Preferences 10 3 Customizing Service Templates 10 5 Entering DNS Numbers and IP Addresses 10 6 Creating a Log...

Page 11: ...oritize them so you don t overlook them and assign them a due date Ensure that you don t lose any of this important information simply by synchronizing your data with Palm Desktop software on your computer to create a backup copy Customize your handheld and set different levels of security to prevent unauthorized users from viewing your data SYSTEM REQUIREMENTS To install and operate Palm Desktop ...

Page 12: ...ttery is charging iQue Screen Displays the applications and data stored in your handheld It is touch sensitive and stylus sensitive Text Input Area Write letters and numbers in this area using the Graffiti 2 alphabet Chapter 2 explains how to enter data using Graffiti 2 characters Application Buttons Activate the individual handheld applications that correspond to the icons marked on the buttons Dat...

Page 13: ...are and SD input output SDIO compatible devices such as wireless devices and digital cameras Bottom View Interface Connector AC Charger Connector AC Charger Connector Connects to the AC wall charger for battery recharge only Interface Connector Connects your handheld to the cradle which in turn connects to a USB port on your computer and to the wall current through the AC adapter This allows you t...

Page 14: ...be dramatically reduced Speaker Internal speaker for listening to voice guided navigation commands USING THE STYLUS Just as you use a mouse pointer to click elements on your computer s screen you use the stylus to tap elements on your handheld s touch sensitive screen Tapping is the basic action used to execute tasks on your handheld IMPORTANT Always use the point of the stylus for tapping or maki...

Page 15: ...hose when you installed you Palm Desktop software you could suffer data loss If you are not sure insert the Setup CD and re install the Palm Desktop software WARNING In order to change to another language you have to perform a hard reset which will erase all data on your handheld If there is data on your handheld that you need to save perform a HotSync operation before you change languages To sele...

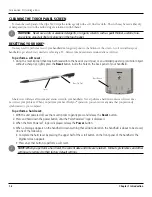
Page 16: ...f your handheld Stylus Reset Tip Tool Reset Button A hard reset will erase all records and entries stored in your handheld Never perform a hard reset unless a soft reset does not correct your problem When you perform your next HotSync operation you can restore any data that you previously synchronized to your computer To perform a hard reset 1 With the unit powered off use the reset tip tool to ge...

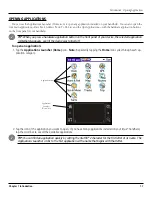
Page 17: ... appears even if the device was turned off To open an application 1 Tap the Applications Launcher Home icon Note Repeatedly tapping the Home icon cycles through each ap plication category Applications Launcher Home Icon Application Icons 2 Tap the icon of the application you want to open If you have many applications installed on your iQue handheld tap the scroll bar to see all the available appli...

Page 18: ...t area activates the alphabetic keyboard when tapped note that the cursor must be in an input field for this option to work The 1 dot in the input area displays the numeric keyboard when tapped note that the cursor must be in an input field for this option to work The menu bar contains a set of menu commands specific to the application Not all applications have a menu bar The command bar lets you tap...

Page 19: ...play a menu bar and choose a command 1 Do one of the following Open an application such as the Date Book then tap the Menu icon Select the desired command from the menu Tap the inverted tab in the upper left corner of the screen Tap the desired command from the menu In the text input area of your device s screen drag a diagonal line from the lower left to upper right to display the Command toolbar...

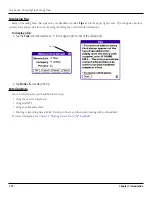
Page 20: ... tip 1 Tap the Tips icon the lowercase i in the upper right corner of the dialog box Tips Icon 2 Tap Done after reading the tip Entering Data You can enter data into your handheld in four ways Using the on screen keyboard Using Graffiti 2 Using an external keyboard Entering or importing data in Palm Desktop software and then synchronizing with your handheld For more information see Chapter 2 Enteri...

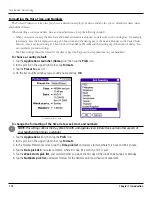
Page 21: ...held If you use the Security application to turn off and lock your handheld with a password information that you enter in the Owner Preferences appears the next time you turn on your handheld To change owner preferences on your handheld 1 From the Preferences screen tap Owner from the pick list in the upper right corner 2 On the Owner Preferences screen enter the text you want to associate with yo...

Page 22: ...ent year 4 Tap the month then tap the current date The screen closes and the date you selected displays To set the time 1 Tap the Applications Launcher Home icon then tap the Prefs icon 2 From the pick list in the upper right corner tap Date Time 3 On the Date Time screen tap the Set Time box then tap the UP or DOWN arrow to change the hour 4 Tap each minute number and then tap an arrow to change ...

Page 23: ...ne window TIP Choose the time zone from the list that corresponds to where you are When you travel use this dialog to change time zones If you are not sure what time zone you are in find out what time it is and select the time zone which shows the current new time Do not use the time zone dialog to switch between daylight savings time and standard time Use the Daylight Saving pick list To set dayli...

Page 24: ...choose a country default 1 Tap the Applications Launcher Home icon then tap the Prefs icon 2 In the pick list in the upper right corner tap Formats 3 Tap the Preset To pick list 4 On the Set Country window tap a country name and tap OK Formats Preferences screen To change the formatting of the time date week start and numbers NOTE This setting controls the Day Week Month and Agenda views in Date B...

Page 25: ...o off After pick list Tap an option 30 seconds 1 minute 2 minutes or 3 minutes General Preferences screen Setting Your Handheld to Stay On While in the Cradle In order to save battery power your handheld will shut off after the time interval that is set in your General Preferences For devices with rechargeable batteries battery power is not a issue when your device is in the cradle So you may choo...

Page 26: ...t On or Off 4 Tap the Alarm LED pick list and select On or Off When you enable the Alarm Vibrate and Alarm LED settings your handheld vibrates and the LED blinks to notify you of alarms This is useful when you want the Alarm Sound off but still be notified of alarms Turning Beam Receive On and Off Beaming is discussed in Chapter 8 For information on using the Beam Receive preference see Turning off...

Page 27: ...gy and synchronize the data on your Palm Desktop software Synchronization is a one step procedure that ensures your data is always safe and up to date See Exchanging and Updating Data using HotSync Operations in Chapter 9 for more information Import and export data so you can easily transfer data from other desktop applications into any of your main applications See Importing Data in Chapter 2 for...

Page 28: ...your handheld 1 Synchronize your old handheld with your old Palm Desktop software to ensure that the latest information from your handheld is on your desktop computer 2 Optional To prevent data loss go to the folder that stores the Palm Desktop software copy the folder and its con tents rename it for example Palm Backup and store the copy outside the Palm Desktop software folder 3 Follow the instr...

Page 29: ...ne For more information see Customizing HotSync Application Settings in Chapter 9 Installing Palm Desktop Software The following instructions guide you through installing Palm Desktop software so that you can transfer data from your computer to your handheld After installation refer to the online Help in Palm Desktop software for information on how to use the software To ensure a safe and uninterr...

Page 30: ...on versions of Palm software applications for use with your iQue 3200 For example the DataViz Mail conduit allows you to view and edit your Microsoft Outlook or Lotus Notes e mail on your handheld To install a conduit 1 Insert the iQue 3200 Setup CD in your computer s CD ROM drive Select Install Software from the menu 2 Select Bonus Software then Productivity Software and then select the name of t...

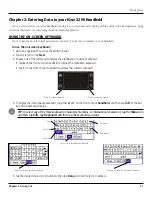
Page 31: ...ap A on the front of your handheld to display the alphabetic keyboard Tap 1 on the front of your handheld to display the numeric keyboard Tap A for alphabet keyboard Tap 1 for numeric keyboard 4 To display the international keyboard tap either A or 1 on the front of your handheld and then tap Int l at the bot tom of the keyboard display TIP To select any of the three keyboards Characters Numbers o...

Page 32: ... and some characters are formed using more than one stroke to form a single character The Graffiti 2 demo shows how to use the handwriting software The first time you turn on your handheld or perform a hard reset the Welcome application will automatically guide you through the setup process When you complete setup the iQue 3200 invites you to learn how to use the handwriting software You should try ...

Page 33: ... characters a temporary character is displayed after the first stroke to show that the stroke was recognized For example after the first vertical stroke of t a temporary l is shown There is a short time delay during which the second stroke must be drawn Otherwise the temporary stroke is recorded NOTE Rather than making uppercase letters by using the Shift stroke uppercase letters are made in the cen...

Page 34: ...aw the stroke shape as it appears in the tables 5 Lift the stylus from the screen at the end of the stroke shape 6 Your handheld recognizes your stroke immediately and displays the letter at the on screen insertion point As soon as you lift the stylus from the screen you can begin the stroke for the next character you want to write Graffiti 2 Tips When using Graffiti 2 writing keep the following tip...

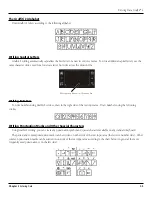
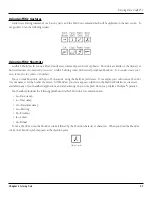
Page 35: ... line Writing Numbers To write numbers using Graffiti 2 strokes draw in the right side of the text input area Draw numbers using the following strokes Writing Punctuation Marks and Other Special Characters Using Graffiti 2 writing you can create any punctuation symbol and special character available on any standard keyboard The period and comma punctuation marks can be written on either side of the ...

Page 36: ...s TIP Using an additional Shift stroke to finish writing the character as shown in the demo is optional but will make the character appear more quickly Draw punctuation and symbols using the punctuation shift command and the following strokes Note that the punctuation characters are repeated as punctuation shift characters where they can be entered on either side of the text input area Even though ...

Page 37: ...numbers You can create ShortCuts with up to 45 characters using the ShortCut preferences For example you could create a ShortCut for your name or for the header of a memo All ShortCuts you create appear on the list in the ShortCut Preferences screen are available in any of your handheld applications and are backed up on your computer when you perform a HotSync operation Your handheld includes the ...

Page 38: ...etters you want to use to activate the ShortCut 7 Tap the ShortCut Text area then enter the text that will appear when you write the ShortCut characters You can add a space character after the last word in your ShortCut text so that a space automatically follows the ShortCut text 8 Tap OK To edit a ShortCut 1 In the ShortCut Preferences screen tap the ShortCut you want to edit 2 Tap Edit 3 Make th...

Page 39: ...p on one of the letters available for you to tune Tap on Graffiti 2 here Tap on a letter to tune USING YOUR COMPUTER KEYBOARD At times you may prefer to use your computer keyboard rather than the on screen keyboard to enter information or add new records to your handheld You can enter information from your computer keyboard using Palm Desktop software or any supported personal information manager P...

Page 40: ...Desktop software 2 Click the application into which you want to import data 3 If you are importing records that contain a field with category names do the following Select All in the Category box Make sure that the same categories that appear in the imported file also exist in the application If the categories do not exist create them now otherwise the records will be imported into the Unfiled catego...

Page 41: ...cation category Menu icon Selecting Applications Your iQue handheld is equipped with a variety of applications All the applications installed on your handheld appear in the Applications Launcher To open an application 1 Choose from the following options Tap the Applications Launcher Home icon then tap the icon of the application you want to open If you have many applications installed on your iQue...

Page 42: ...dd the category Tap OK 5 Tap Done To display applications by category 1 Tap the Applications Launcher Home icon 2 Do one of the following Tap the Applications Launcher Home icon repeatedly to cycle through all the categories Tap the pick list in the upper right corner of the screen then tap the category you want to display Changing the Applications Launcher Display By default the Applications Laun...

Page 43: ...g Applications to Buttons Buttons preferences let you assign different applications to the buttons on the front of the handheld and to the HotSync button on the cradle For example if you find that you seldom use the To Do List and often use the Memo Pad you can assign the To Do List button to start the Memo Pad application You can also change whether the full screen pen stroke activates the Graffiti...

Page 44: ...the pick list in the upper right corner tap Buttons 3 In the Buttons Preferences screen tap HotSync 4 Tap the pick list next to the button you want to assign 5 Tap the application you want to assign to each button The default setting for each button is the HotSync setting which means the cradle and optional modem accessory perform their normal HotSync functions 6 Tap OK ...

Page 45: ...ap Pen 6 Tap the pick list and tap one of the following settings for the full screen pen stroke Backlight turns on the backlight of your handheld Keyboard opens the on screen keyboard for entering text characters Graffiti 2 Help opens a series of screens that show the complete Graffiti character set Turn Off Lock turns off and locks the handheld You must assign a password to lock the handheld When l...

Page 46: ... applications you want to add to your iQue and they will be installed the next time you perform a HotSync operation A variety of additional third party applications are available for your device such as games and other software from the following web site http applications palmsource com To install add on applications on your handheld on Windows 1 From your computer desktop copy or download the ap...

Page 47: ...tall on your handheld then click Open The file appears in the Palm Install Tool dialog box 6 If you decide not to install an application select it in the list of files in the Palm Install Tool dialog box and click Remove The application is removed from the dialog box list but not from your computer 7 Click Done A message appears to indicate that the application or applications will be installed the ...

Page 48: ...sktop software then click Add Remove NOTE You must retain the HotSync Manager from the installation CD to synchronize data with another PIM ASSIGNING SECURITY OPTIONS Your handheld includes a Security application that allows you to protect entries from unauthorized users in a variety of ways The Security application lets you Mask or hide entries you have defined as private The Mask option displays ...

Page 49: ...Records 4 When you return to the Address Book records marked as private are not in cluded in the display of names NOTE You can mask or hide records without assigning a password or you can assign a password if you want records to remain masked or hidden until a password is entered Assigning and Editing Passwords You can assign a password to protect your private records and to lock your handheld Onc...

Page 50: ...fore using the Turn Off Lock option 2 Tap Turn Off Lock Device The System Lockout dialog box appears 3 Tap Off Lock You device is turned off and is locked To turn on and unlock your handheld 1 Turn on your device 2 Enter your password at the prompt then tap OK Recovering From a Forgotten Password If the Off Lock option is not active and you forget your password you can delete the forgotten passwor...

Page 51: ...current date and a list of times for a standard business day Use the Date Book to Schedule events timed events which have both times and dates untimed events for example birthdays or anniversaries repeating events such as a weekly meeting held on the same day at the same time continuous events such as a vacation or three day conference and all day events which reflect the default hours of a day as ...

Page 52: ...one untimed event on the same date Repeating events such as a weekly meeting that is held on the same day at the same time each week Continuous events such as a vacation or three day conference All day events which reflect the default length of the day as set by the user Scheduling Timed Events You can schedule timed events for the current date or for future dates To schedule a timed event for the ...

Page 53: ...f the text input area 5 Set the duration of the event in either of the following ways Tap the time columns in the Set Time dialog box to set the Start Time Tap End Time then tap the time col umns to set the End Time Tap All Day if the event lasts all day The default hours of a standard business day are set by the user and may be changed using the Preferences command in the Date Book application Se...

Page 54: ...any date Untimed events appear at the top of the list of times marked with a diamond To schedule an untimed event 1 Select the event date you want as described in the previous procedure To schedule a timed event for another date 2 Tap New 3 In the Set Time dialog box tap No Time NOTE You can tap OK instead but make sure nothing is entered for start or end time TIP You can create a new untimed even...

Page 55: ...o the event Typically a continuous event is an un timed event 2 Tap Details 3 Tap the Repeat box to open the Change Repeat dialog box Tap the Repeat box 4 Tap Day Week Month or Year to set how often the event repeats For a continuous event tap Day 5 Enter a number that corresponds to how often you want the event to repeat on the Every line For example if you select Month and enter the number 2 the...

Page 56: ...s screen opens 3 Tap Delete The Repeating Event screen opens asking for confirmation of the delete TIP You can also select Delete Event from the Record menu This opens the Repeating Event screen Tap Delete 4 Select one of the following options Current deletes a single occurrence of this event Future deletes the current event and all future occurrences of this event All deletes all past current and ...

Page 57: ...er repeat settings for example time alarm private of a repeating event and apply the change to all occurrences your handheld creates a new event The start date of this new event is the day on which the setting is changed Past occurrences prior to the day of the change are not changed If you apply a change to a single occurrence of a repeating event e g time that occurrence no longer shows the Repe...

Page 58: ...s before midnight of the day on which the untimed event begins For example you set a 5 minute alarm for an untimed event that occurs on February 4 The reminder message will appear at 11 55 p m on the night of February 3 The reminder remains on screen until you turn on your handheld and tap OK to turn off the reminder To set an alarm for an event 1 Tap the event to which you want to assign an alarm...

Page 59: ...Book tap the Menu icon Tap the inverted tab at the top of the Date Book screen to display the menu bar In the text input area drag a diagonal line from the lower left to upper right to display the Command toolbar Type an R the Graffiti 2 shortcut for the Preferences command 2 In the Options menu tap Preferences 3 Select from the following options Tap Alarm Preset to set an alarm for each new event ...

Page 60: ...ate Book views 1 Do one of the following Press the Date Book application button repeatedly to cycle through all the Date Book views Tap a view icon in the lower left area of the Date Book screen Date Book View icons To display the current time 1 Tap and hold down the stylus on the date in the date bar to display the time When you release the stylus the menu bar appears Date Book Changing the View ...

Page 61: ...mes displayed Next Week Previous Week Bar indicates earlier event Dot indicates untimed event 3 Tap an event to display a description of the event at the top of the screen Tips for Using Week View Keep the following points in mind when using Week view To reschedule an event while in Week view tap and drag the event to a different time or day Tap a blank time on any day to move to that day and have...

Page 62: ...es for any event it is possible to schedule events that overlap an event that starts before a previous event finishes Event conflicts An event conflict time overlap appears in the Week view as overlapping time bars and in the Day view as overlapping brackets to the left of the conflicting times Date Book Event Conflicts ...

Page 63: ... lines that appear in the Month View See Changing the Date Book Display later in this chapter for more information Tips for Using Month View Keep the following points in mind when using the Month view Tap a day in the Month view to display that day in the Day view Tap the scroll arrows in the upper right corner to move forward or backward a month Tap Go To to open the date selector and select a di...

Page 64: ...ress the Date Book button until the Agenda view appears Agenda View icon 2 Use the navigation bars to move forward or backward a day at a time or to display more To Do items Tips for Using Agenda View Tap any appointment while in Agenda view to display the Day View of the appointment Check off completed To Do List items in the Agenda view or click a description of an item to go directly into the T...

Page 65: ...Daily Repeating events 5 Tap OK Changing the Displayed Start and End Times You can change the preferences used for new entries Preferences include display starting time display ending time and alarm characteristics See Setting Alarm Options earlier in this chapter for more information on alarm preferences To change the start and end time in the Date Book 1 In the Date Book tap the Menu icon 2 Tap ...

Page 66: ...m in logical groups For more information see Categorizing Records in Chapter 5 Sort your To Do List items either by due date priority level or category Attach notes to individual To Do List items for a description or clarification of the task For more information see Attaching Notes in Chapter 5 To open the To Do List 1 Press the To Do List application button on the front panel of your handheld The...

Page 67: ...our handheld to display the To Do List 2 Tap New 3 Enter the text of the To Do List item The text can be longer than one line TIP You can add a name address and phone number to a To Do List item using the Phone Lookup option For more information see Using Phone Lookup in Chapter 5 4 Tap anywhere on screen to deselect the To Do List item TIP If no To Do List item is currently selected writing in th...

Page 68: ...ties aren t visible in the To Do List tap Show at the bottom of the list tap Show Priorities and tap OK 2 Tap the Priority number on the left side of the To Do List item 3 Tap the Priority number that you want to set with 1 the most important and 5 the least important Tap here Tap to select priority number To check off a completed To Do List item 1 In the To Do List tap Show Tap Show Completed Ite...

Page 69: ... remove the due date from the item or Choose Date to display the date selector and select a date 5 Tap Private to hide this item when Security is turned on For more information see Making Records Private in Chapter 5 6 Tap OK TIP If you turn on the Show Due Dates option in the To Do Preferences dialog box you can tap directly on the due date in the To Do List to open the pick list shown in step 3 ...

Page 70: ... the list but are kept in the memory of your handheld You must purge com pleted items to remove them from memory Tap Show Only Due Items to show only the items that are currently due past due or have no due date speci fied When this setting is active items that are not yet due do not appear in the list until their due date Tap Record Completion Date to replace the due date with the actual date when...

Page 71: ...ach name Define which phone number appears in the Address List for each Address Book entry Attach a note to each Address Book entry in which you can enter additional information about the entry Assign Address Book entries to categories so that you can organize and view them in logical groups To open the Address Book 1 Press the Address Book button on the front panel of your handheld to open the Add...

Page 72: ... the First Name field to move to it You can move to any field by tapping it directly Enter the individual s first name in the First Name field 5 If you want to be able to sort the Address Book by company name enter the information you want in the Company field 6 Enter any other information that you want to include in the entry 7 Tap the scroll arrows to move to the next page of information 8 To attach ...

Page 73: ...rag a diagonal line from the lower left to upper right to display the Command toolbar then write a T in the text input area to initiate the Duplicate Record command 3 Edit the record as necessary 4 Tap Done when finished Selecting Different Types of Phone Numbers and Addresses You can select the types of phone numbers or e mail addresses that an Address Book entry displays Any changes you make appl...

Page 74: ... assign to the entry Tap Private to hide the entry when Security is turned on 5 To attach a note to an entry tap Note enter information in the text input area and tap OK 6 To delete an entry tap Delete 7 Tap OK Changing the Address Book Display You can change how Address Book lists are sorted and you can add custom fields for entering additional information using preferences You can also have the A...

Page 75: ... the Rename Custom Fields dialog box 6 Tap Done To control the Address Book display on returning to the application 1 In the Address list or in Address view tap the Menu icon 2 Tap Options and then tap Preferences 3 In the Address Book Preferences dialog box select an option To have the Address Book re display the last category you selected on returning to the application tap the Re member Last Ca...

Page 76: ... tap on the Memo Pad icon Creating Memos A record in the Memo Pad is called a memo A memo can contain up to 4 000 characters The number of memos you can store is limited only by the memory available on your handheld When you create a new memo you can add information to it from the Address Book application such as a phone number or address using the Phone Lookup option See Using Phone Lookup in Cha...

Page 77: ...t line of a memo This makes it easy to locate and review your memos You can easily sort memos in the Memo List or move through memos using Memo options To review a memo 1 In the Memo List tap the name of the desired memo 2 Review or edit the text in the memo 3 Tap Done Using the Memo Pad ...

Page 78: ...mo 3 Tap and drag the scroll bar to move the memo up or down To change the order in which memos appear in the Memo List 1 In the Memo List tap the Menu icon in the lower left corner of the screen of your handheld 2 Tap Options 3 Tap Preferences and choose one of the following options Tap Manual to sort new memos in the sequence in which you create them Tap Alphabetical to sort new and existing mem...

Page 79: ...his button enables you to re enter the number without starting the calculation over The C button clears the entire calculation and enables you to begin a fresh calculation The Plus Minus button toggles the current number between a negative and positive value If you want to enter a negative number enter the number first and then press the button The M button places the current number in memory Each ...

Page 80: ...ps you confirm a chain of calculations To display recent calculations 1 In the Calculator application tap the Menu icon 2 Tap Options and then tap Recent Calculations 3 When you have finished reviewing the calculations tap OK USING THE QUE APPLICATIONS For detailed instructions on using the Que applications please refer to the Que Applications Guide Calculator ...

Page 81: ...mation and the information appears on a dotted gray line called an edit line You can enter text in any of the ways described in Chapter 2 Entering Data in your iQue handheld Selecting Text Select the text you want to edit using one of the following techniques Double tap on a word in a field to select the word Triple tap on any word on a line to select the entire line Drag across a line of text to s...

Page 82: ...n the Record menu and then tap the Delete command The Delete command differs depending on the application you re using For example Delete Event appears in the Record menu while you re in the Date Book and Delete Item appears when you re using the To Do List Tap the inverted tab at the top of the screen open the Record menu then select the desired Delete command In the Details dialog box of the app...

Page 83: ...k or To Do list select Save Archive Copy on PC to save a copy of purged records in an archive file on your desktop Selecting this option transfers purged records to an archive file the next time you perform a HotSync operation Tap OK Categorizing Records You can categorize records in the Address Book To Do List and Memo Pad applications for easy retrieval The Date Book does not have categories When ...

Page 84: ...want to display Address Book category pick list TIP Pressing the Address Book To Do List or Memo Pad button on your handheld toggles through the categories assigned to the application respectively To add or edit application categories 1 In the Address Book To Do List or Memo Pad application choose from the following options Tap the pick list in the upper right corner of the screen and tap Edit Cat...

Page 85: ...ategory tap it in the list to select it Tap Rename enter a new name in the text input area and Tap OK To delete a category tap it in the list to select it Tap Delete 3 Tap OK To rename a category 1 Tap the pick list in the upper right corner of the screen then tap Edit Categories 2 Select the category you want to rename then tap Rename 3 Enter the new name for the category and tap OK 4 Tap OK to e...

Page 86: ...creen enter the first few letters of the name you want to locate Use the scroll button on the front of the device to scroll a screen at a time Holding down the scroll button acceler ates scrolling Using the Find Option The Find option lets you locate text in any standard Palm OS applications on your iQue handheld For example if the text dog appears in the Address Book and the Date Book the Find opt...

Page 87: ...to insert a phone number The record can be in the Date Book the To Do List or the Memo Pad 2 Do one of the following Tap the Menu icon Tap Options and then tap Phone Lookup Tap the inverted tab at the top of the screen then tap Options and tap Phone Lookup In the text input area drag a diagonal line from the lower left to upper right to display the Command toolbar In the text area write an L the s...

Page 88: ...on 4 Tap OK To sort records in the Address Book and Memo Pad 1 Open the application to display the list screen 2 Do one of the following Tap the Menu icon From the Options menu tap Preferences Tap the inverted tab at the top of the screen then tap Preferences in the Options menu In the text input area drag a diagonal line from the lower left to upper right to display the Command toolbar In the tex...

Page 89: ... records remain visible and accessible until you select a security setting to Hide records Private record names are covered with a gray bar when the security setting is set to Mask records If you have assigned a password to your device you must enter it before private records are displayed See Assigning Security Options in Chapter 3 for more information To make a record private 1 In your applicati...

Page 90: ...vacy pick list tap Hide Records then tap OK To display private records 1 Do one of the following Tap the Applications Launcher Home icon then tap Security From within an application tap the inverted tab at the top of the screen then tap Security in the Options menu From within any application bring up the Command Bar and tap the padlock icon To bring up the Command Bar drag your stylus diagonally ...

Page 91: ...ntry to which you want to add a note 2 In Address Book only tap Edit 3 Tap Details 4 Tap Note then enter the desired note 5 Tap Done A note icon appears to the right of any item containing a note To review or edit a note The note icon indicates that a note is attached to this event 1 Tap the note icon To delete a note 1 Tap the note icon 2 Tap Delete then tap Yes to delete the note Performing Comm...

Page 92: ...t to display the Command toolbar In the text area write an F the shortcut for the Font command 3 Tap the font style you want then tap OK Getting Information on an Application You can get information on any application by displaying its About box The About box displays the name and version number of the application To display the About box 1 Tap the Menu icon from any location 2 In the Options menu...

Page 93: ...n Alarms continue until you snooze or dismiss them If the sound can be interrupted you can tap anywhere on the screen or push any button to silence it Attention Manager will always open immediately when new insistent alarms are posted Using the Reminder Dialog Screen The Reminder dialog screen has three buttons for responding to an alarm OK Makes the reminder go away with no further notification Sn...

Page 94: ... menu Setting Alarm Sound Effects Some applications allow you to set the song or sound effect to use and how many times to play it with a pause in between For example to set alarm preferences for the Date Book 1 While displaying the Date Book application tap the Menu icon 2 Tap the Options menu and select Preferences 3 Tap the Alarm Preset check box if you want alarms to sound then select the foll...

Page 95: ...e Reminders list screen displays three buttons that are used to respond to all of the items in the list Done If the Reminders list appeared because of more than one insistent alarm tapping Done closes the Reminders list screen although the events will remain in the application that created them The Reminders list screen will not appear again unless you tap the blinking alarm indicator in the menu ...

Page 96: ...plications that allow it under the following conditions While viewing a Reminders dialog screen you tap the Done or the Snooze button A subtle alarm is present The indicator appears in three different states Off The indicator is not shown at all when the list is empty Blinking two states When the list is not empty but there are no new items then the star indicator will blink on and off until the l...

Page 97: ...t reading data from or writing to the card 2 Gently push the SD card down into the slot then release it so the card pops partially out of the slot 3 Pull the card out of the iQue Displaying Contents of a Card When an expansion card is inserted all applications listed in the card s launcher directory is automatically added to a new Launcher category This category is assigned the name of the expansi...

Page 98: ... in main memory it is not copied again just launched To display information about an application on a card 1 Press the Applications Launcher Home icon on the front of your iQue 2 Tap Card from the pick list in the upper right corner of the screen 3 The Applications screen displays the applications on the card Tap in the upper left corner of the screen to bring up the App menu 4 Tap Info 5 In the D...

Page 99: ...Applications pick list in the upper right corner of the screen 3 Tap Card on the menu 4 The Applications screen displays the applications on the card 5 Tap in the upper left corner of the screen to bring up the App menu 6 Tap Copy 7 Select the source and the destination using the From and the Copy To pick lists 8 Select the application and then tap Copy The application is copied to the selected de...

Page 100: ... Card from the Beam From pick list 8 Select the application you want to beam then tap Done The application is beamed to the other handheld TIP Some applications and databases are copy protected and cannot be beamed These are listed with a lock icon next to them To delete an application on an expansion card 1 Tap the Applications Launcher Home icon on your handheld 2 Tap the Applications pick list ...

Page 101: ...in ROM for example Memo Pad cannot be deleted and are not listed Using Card Info The Card Info Application displays summary information for each known directory type found on the expansion card To use Card Info 1 Tap the Card Info icon on the Applications menu The expansion card information displays 2 To rename the card tap on the Card Info tab in the upper left corner of the screen ...

Page 102: ...play help for Card Info tap Card Info in the upper left corner of the screen 7 Select Help from the menu and scroll through the tips that are displayed 8 To display About Card Info tap Card Info and tap About Card Info Using an SDIO Compatible Device The iQue 3200 allows you to use SDIO Secure Digital Input Output compatible devices in the expansion card slot Simply slide the device into the slot ...

Page 103: ...ifferent Beaming a Business Card To select a business card for beaming 1 Press the Address Book button on the front of your device 2 In the Address List create a new entry or select an entry that contains the information you want on your business card See Adding and using Address Book Entries in Chapter 4 for more information 3 In Address view tap Record Then tap Select Business card Tap the Menu ...

Page 104: ...ion To receive beamed information 1 Turn on your handheld 2 Verify that Beam Receive is turned On in the General Preferences screen 3 Point the IR port directly at the IR port of the transmitting handheld to open the Beam Status dialog box 4 Tap Yes 5 Wait for the Beam Status dialog box to indicate that the transfer is complete and then tap OK to display the new entry Incoming records are placed i...

Page 105: ...ogy synchronizes only the needed portions of files thus reducing synchronization time You can synchronize your data by connecting your handheld directly to your computer with the cradle or indirectly with a modem or network You can also perform HotSync operations using the IR port on your organizer This chapter describes how to select HotSync options and perform a HotSync operation via infrared com...

Page 106: ...nc Manager is not running click the Start button on the Windows desktop and choose Programs Navigate to the Palm Desktop software program group and choose HotSync Manager Alternatively you can start the Palm Desktop software which automatically opens the HotSync Manager 3 Press the HotSync button on the cradle NOTE If you are using an optional HotSync cable instead of a cradle tap the HotSync icon...

Page 107: ...fore you assign a User ID to a particular handheld To create a user profile 1 Open Palm Desktop software 2 From the Tools menu choose Users 3 Click Profiles 4 Click New Enter a unique name for the profile and click OK 5 Click OK to return to Palm Desktop software 6 Select the profile from the User list and create the data for the profile for example company phone list and so on To use a profile for the ...

Page 108: ...onitors the communication port for synchronization requests from your handheld With this option the HotSync Manager synchronizes data even when Palm Desktop software is not running Available Only When Palm Desktop software Is Running starts HotSync Manager and monitors requests automatically when you open Palm Desktop software Manual monitors requests only when you select HotSync Manager from the ...

Page 109: ... attached to a network click the Network tab to display the network settings and adjust the options as needed See Performing a HotSync Operation via a Network later in this chapter for more information 9 Click OK Customizing HotSync Application Settings For each application you can define a set of options that determines how records are handled during synchronization These options are called a cond...

Page 110: ...of the standards for infrared communication established by the Infrared Data Association IrDA This means that you can beam data to any other device that supports the IrCOMM implementation of the IrDA standards Most importantly you can use the IR port to perform HotSync operations You don t need a cradle to do this This is very useful if you travel with an infrared enabled laptop You simply enable ...

Page 111: ...by the HotSync Manager 5 Make a note of which port is listed as Providing application support You need this information to configure the HotSync Manager for infrared communication This port is the simulated port It is the channel through which the actual infrared communication takes place between your computer and your handheld 6 Deselect all other check boxes in the Options tab 7 Click Apply then ...

Page 112: ...ust press the HotSync button on the cradle You can leave the HotSync application on your handheld set to perform IR HotSync operations and still use the cradle This is useful if you perform HotSync operations with both your desktop computer and a laptop that you travel with When you travel you don t have to carry a cradle or cable When you are in the office just place your organizer in the cradle a...

Page 113: ...the following options as needed Serial Port to identify the port for the modem If you are unsure of the port assignment look at the Modem Properties in the Windows Control Panel Speed to determine the speed at which data is transferred Try the As Fast As Possible rate first and adjust downward if you experience problems This setting lets Palm Desktop software and your handheld find and use the faste...

Page 114: ...ing card to place the call select the check box and enter the calling card number 5 Tap OK 6 Tap the Menu icon 7 Tap Options and then tap Modem Setup 8 Enter the settings See Setting Modem Configurations in Chapter 10 Setting Connection and Network Prefer ences for more information Selecting Conduits for a Modem HotSync Operation You can define which files applications or both on your handheld synchr...

Page 115: ...ents Your computer has TCP IP support installed Both your company s network system and its remote access server support TCP IP Your System Administrator has this information You have a remote access account If you don t have an account consult your System Administrator Everything you need to connect to your company s dial in server network modem is included with Palm Desktop software and the handh...

Page 116: ...ormation on configuring Net work HotSync preferences USING FILE LINK The File Link feature lets you import Address Book and Memo Pad information into your handheld from a separate external file such as a company phone list HotSync Manager stores the data in a separate category on your Palm Desktop software and your handheld You can set the File Link feature to check for changes to the external file w...

Page 117: ...The Connection Preferences screen displays a list of available configurations that can be modified to reflect the required settings This list will vary depending on the software you have added to your handheld Connection Types There are three basic types of connections you can choose from when configuring your preferences They are described here Cradle Cable This connection type defines the direct crad...

Page 118: ...screen 4 Tap the Connect to pick list and select the device to connect to 5 Tap the Via pick list and select the type of connection 6 In the Dialing pick list tap TouchTone or Rotary Select Rotary only if your telephone service does not support TouchTone dialing 7 Tap the Volume pick list and select the speaker volume for the modem 8 Tap the Details button at the bottom of the screen for the follo...

Page 119: ...the upper right corner of the Preferences screen tap Network 3 Tap the Service pick list Tap the predefined service template you want to use 4 Tap the User Name field Only two lines appear on screen but the field can contain multiple lines of text 5 Enter your user name that identifies you on logging in to your ISP or dial in server Do not enter spaces in your user name unless your dial in server acce...

Page 120: ...ial Prefix check box and enter the prefix For example many offices require that you dial 9 to dial a number outside the building To turn off Call Waiting tap the Disable call waiting check box to select it and enter the code to turn off Call Waiting If you don t know the code contact your local telephone company for the appropriate code Call Wait ing can end your network session if you receive a call...

Page 121: ...etwork Preferences screen tap the Service pick list Tap the predefined service template you want to dupli cate 4 Tap the Menu icon 5 Tap Service and then tap Duplicate A copy of the service template is added to the Service pick list To edit a service template 1 In the Network Preferences screen select a service template 2 Tap Details 3 Tap the Connection Type pick list and select a connection type ...

Page 122: ...es DNS numbers and if so what they are NOTE Many systems do not require that you enter a DNS 2 In the Network Preferences screen with a service template selected tap Details 3 Tap the Query DNS check box to deselect it 4 Choose one of the following options If your system does not require a DNS or you are not sure whether it does leave the DNS field blank To enter the Primary DNS number tap the spac...

Page 123: ...P server before executing the next command Send to transmit specific characters to the TCP IP server to which you are connecting Send CR to transmit a carriage return or LF character to the TCP IP server to which you are connecting Send User ID to transmit the User ID information entered in the User ID field of the Network Preferences screen Send Password to transmit the password entered in the Pass...

Page 124: ...efore executing the next command in the script You can use the backslash character to specify that the next character be transmitted as a literal character and not be subject to any special processing ordinarily associated with that character For example Includes a caret as part of the string Includes a as part of the string Includes a backslash as part of the string Connecting to Your ISP or Dial...

Page 125: ...th your system administrator whether a DNS number if required If a number is required but not entered the connection may fail See Entering DNS Numbers and IP Addresses in this chapter To expand the display of progress messages during login 1 In the Network Preferences screen tap Connect 2 To see expanded Service Connection Progress messages press the lower half of the Scroll button during login Se...

Page 126: ...1 12 1 13 Date Book 4 1 4 15 6 2 Agenda View 4 14 4 15 Alarm Options 4 9 4 10 Display Options 4 15 4 16 Month View 4 13 4 14 Opening 4 1 Repeating or Continuous Events 4 5 4 7 Scheduling Events 4 2 4 7 Setting Alarms 4 8 4 10 Timed Events 4 2 4 4 Untimed Events 4 4 4 5 View 4 10 4 11 4 13 4 14 View Options 4 10 4 14 Week View 4 11 4 12 Daylight Savings Time 1 13 Delete 7 4 Record 5 2 Dial in 10 8 ...

Page 127: ... HotSync 1 18 3 4 3 7 9 1 9 4 9 5 9 6 9 7 9 8 9 9 9 10 9 11 Cradle 9 8 Customizing Settings 9 5 9 6 File Link 9 12 First Time 9 1 9 2 Icon 9 11 Infrared IR HotSync Operations 9 6 9 9 IR 9 6 9 8 Modem 9 8 9 10 9 11 Network 9 11 Operations 9 1 10 1 Setup Options 9 4 9 5 Software Requirements 9 11 User Profile 9 3 Via a Modem 9 8 9 11 Via a Network 9 11 9 12 With Palm Desktop Software 9 1 9 5 I Icons ...

Page 128: ...eaming 8 1 Categorizing 5 3 5 5 Creating 5 1 Deleting 5 2 Editing 5 1 5 5 Finding 5 6 5 7 Hiding 3 9 Masking 3 9 Notes 5 11 Phone Lookup 5 7 Private 5 9 5 10 Purging 5 3 Sorting 5 8 5 9 Repeating Events 4 5 4 7 Resetting your iQue 1 6 Reset Button 1 4 1 6 S Scheduling Events 4 5 4 10 Screen 1 5 Scroll Bar 1 8 Scroll Buttons 1 2 SD 1 3 Card 7 1 7 6 Input output 1 3 SDIO 1 3 7 6 Secure Digital 1 3 I...

Page 129: ...tems 4 17 4 18 4 19 Opening 4 16 Priorities 4 18 4 20 U Unlock 1 11 Untimed Events 4 4 4 5 Updating Data 9 1 Upgrade 1 18 User Profile 9 3 V Volume 1 16 W Warranty iv Week View 4 11 4 12 Windows 1 1 Writing 2 2 2 3 2 5 2 6 ...

Page 130: ...www garmin com Copyright 2004 Garmin Ltd or its subsidiaries Garmin International Inc 1200 E 151st Street Olathe KS 66062 U S A Garmin Europe Ltd Unit 5 The Quadrangle Abbey Park Industrial Estate Romsey SO51 9DL U K Garmin Corporation No 68 Jangshu 2nd Road Shijr Taipei County Taiwan www garmin com Part Number 190 00327 00 Rev B ...

Reviews: