background image

NOTE: 

The pairing instructions differ for each Garmin 

compatible device. See your owner's manual.

TIP: 

To stop broadcasting your heart rate data, select any 

key, and select Yes.

Broadcasting Heart Rate Data During an Activity

You can set up your MARQ device to broadcast your heart rate 

data automatically when you begin an activity. For example, you 

can broadcast your heart rate data to an Edge

®

 device while 

cycling, or to a VIRB

®

 action camera during an activity.

NOTE: 

Broadcasting heart rate data decreases battery life.

1

From the heart rate widget, hold 

MENU

.

2

Select 

Options

 > 

Broadcast During Activity

.

3

Begin an activity (

Starting an Activity

, page 3

).

The MARQ device starts broadcasting your heart rate data in 

the background.

NOTE: 

There is no indication that the device is broadcasting 

your heart rate data during an activity.

4

If necessary, pair your MARQ device with your Garmin ANT+ 

compatible device.

NOTE: 

The pairing instructions differ for each Garmin 

compatible device. See your owner's manual.

TIP: 

To stop broadcasting your heart rate data, stop the 

activity (

Stopping an Activity

, page 3

).

Setting an Abnormal Heart Rate Alert

You can set the device to alert you when your heart rate 

exceeds a certain number of beats per minute (bpm) after a 

period of inactivity.

1

From the heart rate widget, hold 

MENU

.

2

Select 

Options

 > 

Abnormal HR Alert

 > 

Status

 > 

On

.

3

Select 

Alert Threshold

.

4

Select a heart rate threshold value.

Each time you exceed the threshold value, a message appears 

and the device vibrates.

Turning Off the Wrist-based Heart Rate Monitor

The default value for the Wrist Heart Rate setting is Auto. The 

device automatically uses the wrist-based heart rate monitor 

unless you pair an ANT+ heart rate monitor to the device.

NOTE: 

Disabling the wrist-based heart rate monitor also 

disables the on-wrist detection feature for Garmin Pay 

payments, and you must enter a passcode before making each 

payment (

Garmin Pay

, page 9

).

NOTE: 

Disabling the wrist-based heart rate monitor also 

disables the wrist-based pulse oximeter sensor.

1

From the heart rate widget, hold 

MENU

.

2

Select 

Options

 > 

Status

 > 

Off

.

Running Dynamics

You can use your compatible MARQ device paired with the 

HRM-Tri

 accessory or other running dynamics accessory to 

provide real-time feedback about your running form.
The running dynamics accessory has an accelerometer that 

measures torso movement in order to calculate six running 

metrics.

Cadence

: Cadence is the number of steps per minute. It 

displays the total steps (right and left combined).

Vertical oscillation

: Vertical oscillation is your bounce while 

running. It displays the vertical motion of your torso, 

measured in centimeters.

Ground contact time

: Ground contact time is the amount of 

time in each step that you spend on the ground while 

running. It is measured in milliseconds.

NOTE: 

Ground contact time and balance are not available 

while walking.

Ground contact time balance

: Ground contact time balance 

displays the left/right balance of your ground contact time 

while running. It displays a percentage. For example, 53.2 

with an arrow pointing left or right.

Stride length

: Stride length is the length of your stride from one 

footfall to the next. It is measured in meters.

Vertical ratio

: Vertical ratio is the ratio of vertical oscillation to 

stride length. It displays a percentage. A lower number 

typically indicates better running form.

Training with Running Dynamics

Before you can view running dynamics, you must put on a 

running dynamics accessory, such as the HRM-Tri accessory, 

and pair it with your device (

Pairing Your Wireless Sensors

page 34

).

1

Hold 

MENU

.

2

Select 

Activities & Apps

.

3

Select an activity.

4

Select the activity settings.

5

Select 

Data Screens

 > 

Add New

.

6

Select a running dynamics data screen.

NOTE: 

The running dynamics screens are not available for 

all activities.

7

Go for a run (

Starting an Activity

, page 3

).

8

Select 

UP

 or 

DOWN

 to open a running dynamics screen to 

view your metrics.

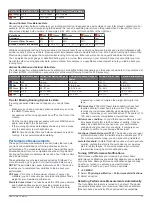
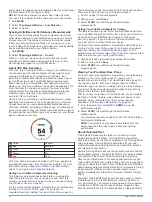
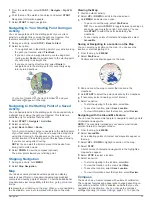
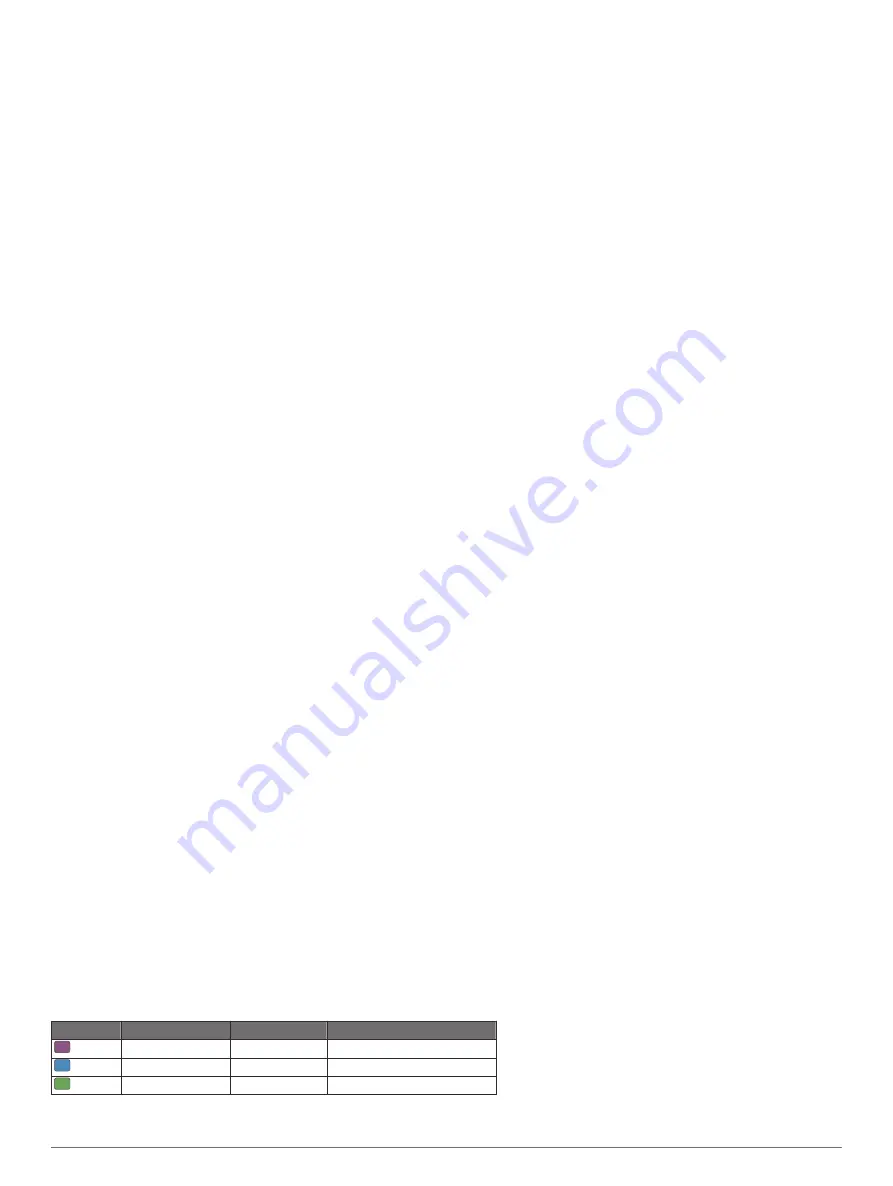
Color Gauges and Running Dynamics Data

The running dynamics screens display a color gauge for the primary metric. You can display cadence, vertical oscillation, ground 

contact time, ground contact time balance, or vertical ratio as the primary metric. The color gauge shows you how your running 

dynamics data compare to those of other runners. The color zones are based on percentiles.
Garmin has researched many runners of all different levels. The data values in the red or orange zones are typical for less 

experienced or slower runners. The data values in the green, blue, or purple zones are typical for more experienced or faster 

runners. More experienced runners tend to exhibit shorter ground contact times, lower vertical oscillation, lower vertical ratio, and 

higher cadence than less experienced runners. However, taller runners typically have slightly slower cadences, longer strides, and 

slightly higher vertical oscillation. Vertical ratio is your vertical oscillation divided by stride length. It is not correlated with height.
Go to 

www.garmin.com/runningdynamics

 for more information on running dynamics. For additional theories and interpretations of 

running dynamics data, you can search reputable running publications and websites.

Color Zone Percentile in Zone Cadence Range Ground Contact Time Range

 Purple

>95

>183 spm

<218 ms

 Blue

70–95

174–183 spm

218–248 ms

 Green

30–69

164–173 spm

249–277 ms

12

Heart Rate Features

Summary of Contents for MARQ DRIVER

Page 1: ...MARQ DRIVER Owner sManual ...

Page 2: ...ithout the express permission of Garmin Android is a trademark of Google Inc Apple iPhone iTunes and Mac are trademarks of Apple Inc registered in the U S and other countries The BLUETOOTH word mark and logos are owned by the Bluetooth SIG Inc and any use of such marks by Garmin is under license The Cooper Institute as well as any related trademarks are the property of The Cooper Institute Di2 is ...

Page 3: ...cts 8 Turning Incident Detection On and Off 8 Requesting Assistance 8 Starting a GroupTrack Session 8 Tips for GroupTrack Sessions 8 GroupTrack Settings 9 Wi Fi Connected Features 9 Connecting to a Wi Fi Network 9 Connect IQ Features 9 Downloading Connect IQ Features Using Your Computer 9 Garmin Pay 9 Setting Up Your Garmin Pay Wallet 9 Paying for a Purchase Using Your Watch 9 Adding a Card to You...

Page 4: ...rsonal Records 23 Clocks 23 Setting an Alarm 23 Deleting an Alarm 23 Starting the Countdown Timer 23 Saving a Quick Timer 23 Deleting a Timer 23 Using the Stopwatch 23 Adding Alternate Time Zones 24 Navigation 24 Saving Your Location 24 Editing Your Saved Locations 24 Projecting a Waypoint 24 Navigating to a Destination 24 Navigating to a Point of Interest 24 Points of Interest 24 Creating and Fol...

Page 5: ...ifications 35 Battery Information 35 Data Management 35 Deleting Files 35 Device Maintenance 35 Device Care 35 Cleaning the Device 35 Changing Integrated QuickFit Accessories 35 Tips for Adjusting the Hybrid Metal Bracelet 36 Troubleshooting 36 My device is in the wrong language 36 Is my smartphone compatible with my device 36 My phone will not connect to the device 36 Can I use my Bluetooth senso...

Page 6: ......

Page 7: ...ect UP or DOWN The device scrolls through the widget loop Select START to view additional options and functions for a widget From any screen hold BACK to return to the watch face If you are recording an activity select BACK to return to the activity data pages Charging the Device WARNING This device contains a lithium ion battery See the Important Safety and Product Information guide in the produc...

Page 8: ...Hold MENU 6 Select Lap Record Using the Tachymeter You can use the tachymeter to determine speed or distance 1 Hold START 2 Select START to start the timer 3 Select an option To determine speed select STOP at a distance of 1 mi or 1 km To determine a distance traveled of 1 mi or 1 km determine your speed and select STOP when the number on the bezel is equal to your speed The chronograph displays t...

Page 9: ...y Activity to create your custom activity starting from one of your saved activities Select Other to create a new custom activity 3 If necessary select an activity type 4 Select a name or enter a custom name Duplicate activity names include a number for example Bike 2 5 Select an option Select an option to customize specific activity settings For example you can customize the data screens or auto ...

Page 10: ...udio Prompts During an Activity You can enable your MARQ device to play motivational status announcements during a run or other activity Audio prompts play on your connected headphones using Bluetooth technology if available Otherwise audio prompts play on your smartphone paired through the Garmin Connect app During an audio prompt the device or smartphone mutes the primary audio to play the annou...

Page 11: ...P to start a rest The display reverses to white text on a black background and the rest screen appears 2 During a rest select UP or DOWN to view other data screens optional 3 Select LAP and continue swimming 4 Repeat for additional rest intervals Training with the Drill Log The drill log feature is available only for pool swimming You can use the drill log feature to manually record kick sets one ...

Page 12: ...ur MARQ device when you connect the device to a compatible smartphone using Bluetooth wireless technology Some features require you to install the Garmin Connect Mobile app on the connected smartphone Go to www garmin com apps for more information Some features are also available when you connect your device to a wireless network Phone notifications Displays phone notifications and messages on you...

Page 13: ...e and the Bluetooth signal strength displays on the MARQ device screen The Bluetooth signal strength increases as you move closer to your mobile device 3 Select BACK to stop searching Garmin Connect Your Garmin Connect account allows you to track your performance and connect with your friends It gives you the tools to track analyze share and encourage each other You can record the events of your a...

Page 14: ...k directly on screen and in real time Adding Emergency Contacts Emergency contact phone numbers are used for the incident detection and assistance features 1 From the Garmin Connect app select or 2 Select Safety Tracking Incident Detection Assistance Add Emergency Contact 3 Follow the on screen instructions Turning Incident Detection On and Off 1 Hold MENU 2 Select Safety Tracking Incident Detecti...

Page 15: ...pages Widgets Provide information at a glance including sensor data and notifications Apps Add interactive features to your watch such as new outdoor and fitness activity types Downloading Connect IQ Features Using Your Computer 1 Connect the device to your computer using a USB cable 2 Go to apps garmin com and sign in 3 Select a Connect IQ feature and download it 4 Follow the on screen instructio...

Page 16: ...r device 3 Select Music 4 Select an option To connect to an installed provider select a provider and follow the on screen instructions To connect to a new provider select Get Music Apps locate a provider and follow the on screen instructions Downloading Audio Content from a Third Party Provider Before you can download audio content from a third party provider you must connect to a Wi Fi network Co...

Page 17: ...ilable your device uses the chest heart rate data Wrist based Heart Rate Wearing the Device Wear the device above your wrist bone NOTE The device should be snug but comfortable For more accurate heart rate readings the device should not move while running or exercising For pulse oximeter readings you should remain motionless NOTE The optical sensor is located on the back of the device See Tips for...

Page 18: ...ing It displays the vertical motion of your torso measured in centimeters Ground contact time Ground contact time is the amount of time in each step that you spend on the ground while running It is measured in milliseconds NOTE Ground contact time and balance are not available while walking Ground contact time balance Ground contact time balance displays the left right balance of your ground conta...

Page 19: ...ly while running It is not calculated while walking Performance Measurements These performance measurements are estimates that can help you track and understand your training activities and race performances The measurements require a few activities using wrist based heart rate or a compatible chest heart rate monitor Cycling performance measurements require a heart rate monitor and a power meter ...

Page 20: ...rough the performance measurements Getting Your VO2 Max Estimate for Cycling This feature requires a power meter and wrist based heart rate or a compatible chest heart rate monitor The power meter must be paired with your MARQ device Pairing Your Wireless Sensors page 34 If you are using a chest heart rate monitor you must put it on and pair it with your device For the most accurate estimate compl...

Page 21: ...tely the same time and under the same conditions every day 1 If necessary select START Add HRV Stress to add the stress app to the apps list 2 Select Yes to add the app to your list of favorites 3 From the watch face select START HRV Stress START 4 Stand still and rest for 3 minutes Performance Condition As you complete your activity such as running or cycling the performance condition feature ana...

Page 22: ... complete the guided test complete the cool down stop the timer and save the activity Your FTP appears as a value measured in watts per kilogram your power output in watts and a position on the color gauge 7 Select an option Select Accept to save the new FTP Select Decline to keep your current FTP Training Status These measurements are estimates that can help you track and understand your training...

Page 23: ...ain or improve your fitness level The optimal range is determined based on your individual fitness level and training history The range adjusts as your training time and intensity increase or decrease Training Load Balance In order to maximize performance and fitness gains training should be distributed across three categories low aerobic high aerobic and anaerobic Training load balance shows you ...

Page 24: ...oxygen saturation and your elevation The elevation profile helps indicate how your pulse oximeter readings are changing relative to your to elevation On the device your pulse oximeter reading appears as an oxygen saturation percentage and color on the graph On your Garmin Connect account you can view additional details about your pulse oximeter readings including trends over multiple days The oxyg...

Page 25: ...mate your lactate threshold Lactate Threshold page 15 You can use the Auto Detection feature to automatically record your lactate threshold during an activity Detecting Performance Measurements Automatically page 13 5 Select Resting HR and enter your resting heart rate You can use the average resting heart rate measured by your device or you can set a custom resting heart rate 6 Select Zones Based...

Page 26: ...ove your health organizations such as the World Health Organization recommend at least 150 minutes per week of moderate intensity activity such as brisk walking or 75 minutes per week of vigorous intensity activity such as running The device monitors your activity intensity and tracks your time spent participating in moderate to vigorous intensity activities heart rate data is required to quantify...

Page 27: ... After you send a Garmin Coach training plan to your device the Garmin Coach widget appears in your widget loop 1 From the watch face select UP or DOWN to view the Garmin Coach widget If a workout for this activity is scheduled for today the device shows the workout name and prompts you to start it 2 Select START 3 Select View to view the workout steps optional 4 Select Do Workout 5 Follow the on ...

Page 28: ...a pace or speed value 7 Select UP or DOWN to change the location of the Virtual Partner screen optional 8 Start your activity Starting an Activity page 3 9 Select UP or DOWN to scroll to the Virtual Partner screen and see who is leading Setting a Training Target The training target feature works with the Virtual Partner feature so you can train toward a set distance distance and time distance and ...

Page 29: ...cklight with the alarm Select Label and select a description for the alarm Deleting an Alarm 1 From the watch face hold MENU 2 Select Clocks 3 Select UP or DOWN to scroll to the alarms screen 4 Select START 5 Select an alarm 6 Select Delete Starting the Countdown Timer 1 From the watch face hold MENU 2 Select Clocks 3 Select UP or DOWN to scroll to the timers screen 4 Select Set Quick Timer 5 Ente...

Page 30: ... installed on your device includes points of interest you can navigate to them 1 From the watch face select START 2 Select an activity 3 Hold MENU 4 Select Navigation Points of Interest and select a category A list of points of interest near your current location appears 5 If necessary select an option To search near a different location select Search Near and select a location To search for a poi...

Page 31: ...l map data and view compatibility information go to garmin com maps represents your location on the map When you are navigating to a destination your route is marked with a line on the map Viewing the Map 1 Start an outdoor activity 2 Select UP or DOWN to scroll to the map screen 3 Hold MENU and select an option To pan or zoom the map select Pan Zoom TIP You can select START to toggle between pann...

Page 32: ...tion to view weekly or monthly totals Using the Odometer The odometer automatically records the total distance traveled elevation gained and time in activities 1 From the watch face hold MENU 2 Select History Totals Odometer 3 Select UP or DOWN to view odometer totals Deleting History 1 From the watch face hold MENU 2 Select History Options 3 Select an option Select Delete All Activities to delete...

Page 33: ...an activity 1 Hold MENU 2 Select Activities Apps 3 Select the activity to customize 4 Select the activity settings 5 Select Data Screens Add New Map Alerts You can set alerts for each activity which can help you to train toward specific goals to increase your awareness of your environment and to navigate to your destination Some alerts are available only for specific activities There are three typ...

Page 34: ...ing Laps by Distance You can use Auto Lap to mark a lap at a specific distance automatically This feature is helpful for comparing your performance over different parts of an activity for example every 1 mile or 5 kilometers 1 Hold MENU 2 Select Activities Apps 3 Select an activity NOTE This feature is not available for all activities 4 Select the activity settings 5 Select Auto Lap 6 Select an op...

Page 35: ...ne Some widgets are not visible by default You can add them to the widget loop manually Customizing the Widget Loop page 30 ABC Displays combined altimeter barometer and compass information Alternate time zones Displays the current time of day in additional time zones Body Battery Displays your current Body Battery level and a graph of your Body Battery levels for the last several hours Calendar D...

Page 36: ...e VIRB widget 3 If necessary select START to pair your MARQ watch with your VIRB camera 4 Wait while your watch connects to your camera 5 Select an option To record video select Start Recording The video counter appears on the MARQ screen To take a photo while recording video select DOWN To stop recording video select STOP To take a photo select Take Photo To take multiple photos in burst mode sel...

Page 37: ...ce select Data To add or change an accent color for the watch face select Accent Color To change the background color select Bkgd Color To save the changes select Done Sensors Settings Compass Settings Hold MENU and select Sensors Accessories Compass Calibrate Allows you to manually calibrate the compass sensor Calibrating the Compass Manually page 31 Display Sets the directional heading on the co...

Page 38: ...color Detail Sets the amount of detail shown on the map Showing more detail may cause the map to redraw more slowly Marine Sets the map to display data in marine mode Marine Map Settings page 32 Draw Segments Shows or hides segments as a colored line on the map Draw Contours Shows or hides contour lines on the map Marine Map Settings You can customize how the map appears in marine mode Hold MENU a...

Page 39: ...g Time Alerts page 33 Sync With GPS Allows you to manually sync the time with GPS when you change time zones and to update for daylight saving time Syncing the Time with GPS page 33 Setting Time Alerts 1 Hold MENU 2 Select System Time Alerts 3 Select an option To set an alert to sound a specific number of minutes or hours before the actual sunset occurs select Til Sunset Status On select Time and ...

Page 40: ...ment mode Situational Awareness Your MARQ device can be used with the Varia Vision device Varia smart bike lights and rearview radar to improve situational awareness See the owner s manual for your Varia device for more information NOTE You may need to update the MARQ software before pairing Varia devices Updating the Software Using Garmin Connect Mobile page 7 Foot Pod Your device is compatible w...

Page 41: ...not delete it Your device memory contains important system files that should not be deleted 1 Open the Garmin drive or volume 2 If necessary open a folder or volume 3 Select a file 4 Press the Delete key on your keyboard NOTE Mac operating systems provide limited support for MTP file transfer mode You must open the Garmin drive on a Windows operating system You should use the Garmin Express applic...

Page 42: ...use my Bluetooth sensor with my watch The device is compatible with some Bluetooth sensors The first time you connect a sensor to your Garmin device you must pair the device and sensor After they are paired the device connects to the sensor automatically when you start an activity and the sensor is active and within range 1 Hold MENU 2 Select Sensors Accessories Add New 3 Select an option Select S...

Page 43: ...t a second hand Customizing the Watch Face page 31 Limit the smartphone notifications the device displays Managing Notifications page 7 Stop broadcasting heart rate data to paired Garmin devices Broadcasting Heart Rate Data to Garmin Devices page 11 Turn off wrist based heart rate monitoring Turning Off the Wrist based Heart Rate Monitor page 12 NOTE Wrist based heart rate monitoring is used to ca...

Page 44: ... The average pace for the current activity Average Power The average power output for the current activity Average Right Power Phase The average power phase angle for the right leg for the current activity Average Speed The average speed for the current activity Average Stride Length The average stride length for the current session Average Stroke Rate Paddle sports The average number of strokes p...

Page 45: ...the current swim interval Interval Average Max The average percentage of maximum heart rate for the current swim interval Interval Average Heart Rate The average heart rate for the current swim interval Interval Distance The distance traveled for the current interval Interval Lengths The number of pool lengths completed during the current interval Interval Maximum HRR The maximum percentage of hea...

Page 46: ...ke Rate The average number strokes per minute spm during the last completed pool length Last Length Strokes The total number of strokes for the last completed pool length Last Length Stroke Type The stroke type used during the last completed pool length Last Length Swolf The swolf score for the last completed pool length Lat Lon The current position in latitude and longitude regardless of the sele...

Page 47: ...Time of Day The time of day based on your current location and time settings format time zone daylight saving time Timer The current time of the countdown timer Time Seated The time spent seated while pedaling for the current activity Time Seated Lap The time spent seated while pedaling for the current lap Time Standing The time spent standing while pedaling for the current activity Time Standing ...

Page 48: ... 3 8 1615 22 1 3 8 1770 22 1 1 2 1785 24 1 1753 24 3 4 Tubular 1785 24 1 1 8 1795 24 1 75 1890 24 1 1 4 1905 24 2 00 1925 24 2 125 1965 26 7 8 1920 26 1 1 0 1913 26 1 1952 26 1 25 1953 26 1 1 8 1970 26 1 40 2005 26 1 50 2010 26 1 75 2023 26 1 95 2050 26 2 00 2055 26 1 3 8 2068 26 2 10 2068 26 2 125 2070 26 2 35 2083 26 1 1 2 2100 26 3 00 2170 27 1 2145 27 1 1 8 2155 Tire Size Wheel Circumference m...

Page 49: ...onitor 11 14 17 pairing sensors 11 12 zones 13 19 26 history 2 26 deleting 26 sending to computer 7 8 I incident detection 8 indoor training 3 inReach remote 30 inReach remote 30 intensity minutes 20 intervals 5 workouts 21 J jumpmaster 4 K keys 1 33 customizing 29 L lactate threshold 13 15 language 33 layup 6 lengths 5 LiveTrack 8 locations 24 deleting 24 editing 24 saving 24 25 M main menu custo...

Page 50: ...ar 21 plans 20 21 Training Effect 13 14 training load 16 17 training status 14 16 17 treadmill 3 triathlon training 4 troubleshooting 11 13 18 36 37 U UltraTrac 29 unit ID 33 units of measure 33 updates software 7 uploading data 8 USB 7 user data deleting 35 user profile 19 V vertical oscillation 12 13 vertical ratio 12 13 VIRB remote 30 Virtual Partner 22 VO2 max 13 14 16 41 W wallet 9 watch face...

Page 51: ......

Page 52: ...support garmin com March 2019 190 02359 00_0A ...

Reviews: