background image

Setting Display Preferences 

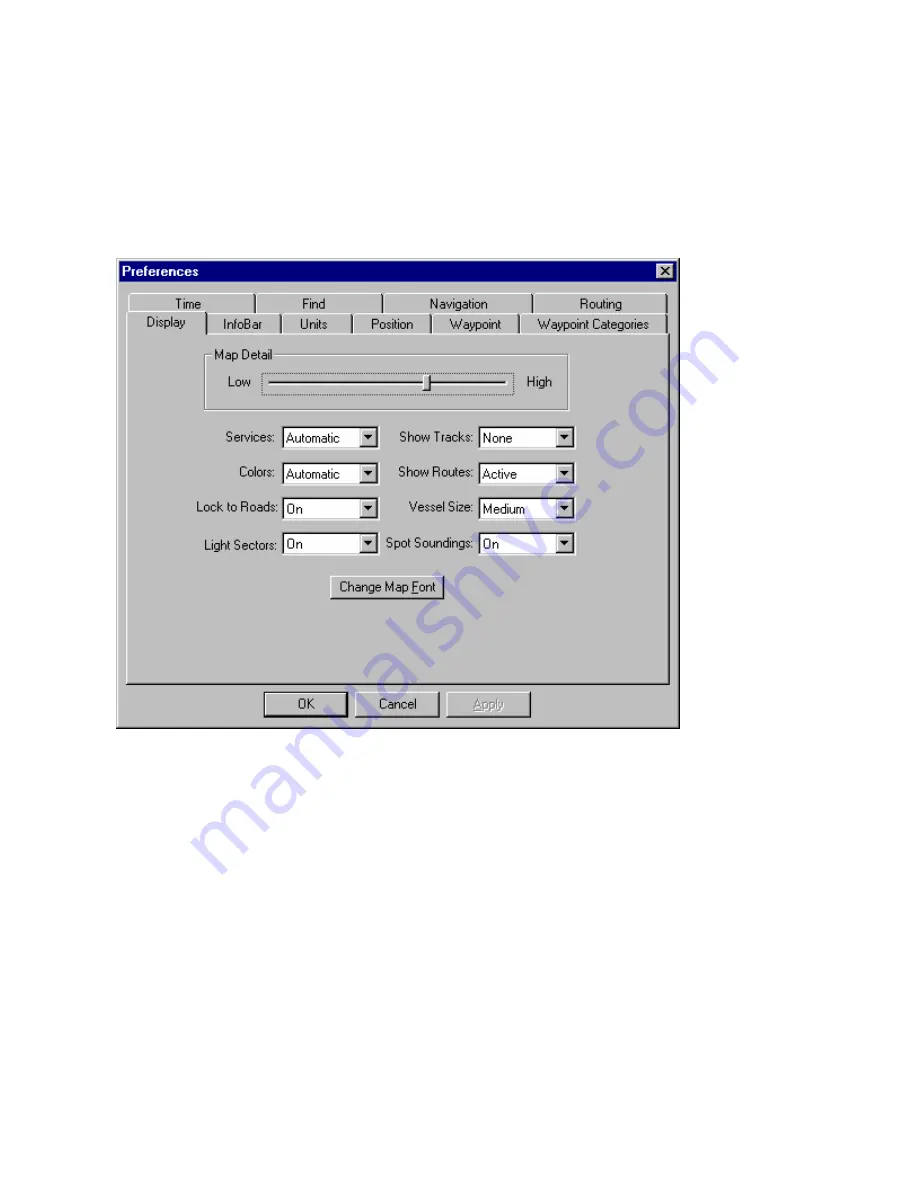
You can customize the way the Graphic Map appears, including the level of map detail, visible routes, and 
colors. 

To set display preferences: 

1. Select 

Preferences 

from the 

Edit

 menu.  The Preferences window appears. 

2. Click 

the 

Display

 tab.  The Display Preferences tab appears. 


3.  Make the desired changes to the following fields: 

Map Detail

—move the slider to adjust the amount of detail (streets, Points of Interest, waypoints, etc.) 

displayed on the Graphic Map. 

Services

—Use this option to display services and Points of Interest if they are loaded as part of your 

detailed maps.  Select 

Automatic

 to display these items when the map is zoomed in to a low scale.  Select 

On

 to display these items regardless of the map zoom scale.  Select 

Off

 if you do not want these items 

displayed. 

Colors

—this item changes the color of the text and background of the Graphic Map and the Information 

Tabs.  Select 

Day

 for a light background with darker text, 

Night

 for a dark background with lighter text, or 

Automatic

 to automatically switch between the Day and Night settings at the appropriate time of day.


Lock to Roads

—select 

On

 to keep the Vessel icon attached to the nearest road on the map, or select 

Off


to allow the Vessel icon to go off-road. 

Show Tracks

—select 

All

 to show all tracks, 

Active 

to show only the active track, or 

None

 to show no 

tracks. 

Show Routes

—select 

All

 to show all saved and active routes or 

Active

 to show only the active route. 

Vessel Size

—select the size of the Vessel icon displayed on the Graphic Map. 


28 

Summary of Contents for nRoute

Page 1: ...nRoute GPS navigation software help contents...

Page 2: ...ided further that any unauthorized commercial distribution of this manual or any revision hereto is strictly prohibited Information in this document is subject to change without notice Garmin reserves...

Page 3: ...eferences 28 Legend of Map Symbols 30 Legend Businesses and Attractions 30 Legend Points of Interest 31 Legend Map Lines 32 Legend Map Areas 33 Using the Find Feature 34 Understanding the Find Feature...

Page 4: ...ng a Route to Selected Waypoints 71 Routing to Your Home Waypoint 72 Saving an Active Route 73 Using the Saved Routes Tab 74 Activating and Deactivating a Route 75 Using the Driving Directions Tab 76...

Page 5: ...Right Click Menu 107 Waypoint Right Click Menu 108 Saved Routes Right Click Menu 109 Favorite Finds Right Click Menu 110 Tracks Right Click Menu 111 Important Information 112 Cautions and Warnings 11...

Page 6: ...sibility and risk for using this software This Help system provides you with basic instructions on how to use the features of nRoute NOTE The graphics in this Help system are optimized for monitor dis...

Page 7: ...ortions of the map not currently displayed Change the Way the Map Looks Select Preferences from the Edit menu then click the Display tab From there you can change many features of the map display incl...

Page 8: ...a Route Click the Stop Route button in the Routes Toolbar See Activating and Deactivating a Route for more information Track my Travel Click the Tracks Tab F6 and check the Record Track box in the low...

Page 9: ...It displays the basemap and any detailed maps you have installed It also shows your current location indicated by the Vessel icon a map of the surrounding area and any waypoints routes or tracks you...

Page 10: ...click a waypoint in the Waypoints Tab the Status Bar shows the distance and bearing from your current position to the selected waypoint If you are using the Distance Bearing Tool the Status Bar shows...

Page 11: ...regions to redeem an 8 character coupon code to unlock maps for a second GPS unit and to purchase additional unlock codes To unlock a map region 1 Select Unlock Regions from the Utilities menu or pre...

Page 12: ...s plugged in to the vehicle s 12 volt receptacle and is receiving power If there is a discrepancy between the GPS s clock and the clock on your computer nRoute prompts you to select the correct time I...

Page 13: ...sor configuration program is available on the Garmin Web site to further configure your GPS See the GPS 18 Tech Specs document GPN 190 00307 00 also available on the Garmin Web site for more informati...

Page 14: ...e your GPS is receiving fewer than three GPS satellites and cannot determine your location accurately 2D Navigation your GPS is receiving three GPS satellites and has determined your 2D location latit...

Page 15: ...ls except untinted glass tall buildings and dense overhead tree cover can block satellite signals In order to receive satellite signals you must be outdoors or in a vehicle and have a clear view of th...

Page 16: ...remaining battery power Charging Battery Indicates that the GPS unit is connected to an external power supply and the battery is charging External Power Indicates that the GPS unit is connected to an...

Page 17: ...en the ending point of the route is red Graphic Map Tips To view the name of a Point of Interest click the Selection Tool then hold the mouse cursor over the desired Point of Interest on the map If mu...

Page 18: ...de See Changing Map Orientation for more information You can change the color of the text and the background of the Graphic Map by setting your display preferences You can show or hide the toolbars In...

Page 19: ...e direction you want to move the Graphic Map Use the scroll bars on the right side and at the bottom of the Graphic Map Click any point on the Graphic Map then use the Up Down Left and Right arrow key...

Page 20: ...desired map scale using the Map Scale Selector Click the Zoom Tool move the mouse cursor over the Graphic Map then click and hold the left mouse button and move the mouse cursor to draw a box around...

Page 21: ...ay need to adjust your printer s dpi settings in order to print the Graphic Map display Select Print Setup from the File menu to select a printer and set printing options Select Print Preview from the...

Page 22: ...ick the Keep Next Maneuver Visible button to automatically show the next maneuver while navigating along a route Click both buttons or press Ctrl B to keep the Vessel icon visible on the map and autom...

Page 23: ...g but the Vessel icon remains pointed towards the top of the screen In Track Up mode an arrow appears in the upper left hand corner of the Graphic Map indicating which way is North There are three way...

Page 24: ...PS connected but it has not acquired satellites the InfoBar displays the message Searching for satellites If you have a GPS connected and it has acquired satelltes the InfoBar displays the message Rea...

Page 25: ...of arrival at the next maneuver Heading shows your current heading Speed shows your current speed Time Destination shows the total time remaining until you reach your destination Time Maneuver shows t...

Page 26: ...the top of the compass indicates your current heading When you are navigating on a direct route a black arrow showing the direction to the next waypoint appears on the compass See Understanding Routes...

Page 27: ...ious trip click the drop down arrow and select the desired trip Trip Odometer the total mileage you have accumulated on the trip Avg Speed your average speed during trip including stopped time Driving...

Page 28: ...ur computer These files can be used to back up your data or share data with Garmin MapSource You can save files as gdb default or mps files To save waypoints routes and tracks 1 Select Export File fro...

Page 29: ...a with your current data To open a saved file 1 Select Import File from the File menu 2 Select the desired file type in the Files of type field 3 Browse to the desired file on your computer 4 Click Op...

Page 30: ...a low scale Select On to display these items regardless of the map zoom scale Select Off if you do not want these items displayed Colors this item changes the color of the text and background of the G...

Page 31: ...ption to toggle Light Sectors on or off Spot Soundings BlueChart users use this option to toggle Spot Soundings on or off Change Map Font click this button to select a new font style and size for map...

Page 32: ...Legend of Map Symbols Legend Businesses and Attractions 30...

Page 33: ...Legend Points of Interest 31...

Page 34: ...Legend Map Lines 32...

Page 35: ...Legend Map Areas 33...

Page 36: ...items and also use the Containing field to find an item based on all or part of the item s name See Finding Items Near Your Current Location for more information Click the Recently Found Places button...

Page 37: ...y typing only the first few letters in the Name field For example if you are searching for a store called Sam Mart type Sam 5 Enter the City State Province and Country to refine your search if desired...

Page 38: ...To close the Find Places window and leave the selected Point of Interest centered on the Graphic Map click OK To close the Find Places window and return to the previous map display click Cancel 36...

Page 39: ...your search if desired 5 Click the Find button A list of cities appears in the Places field 6 Click the desired city in the list The selected city is centered on the Graphic Map 7 After selecting the...

Page 40: ...r the desired City State Province Postal Code and or Country 7 Click the Find button A list of addresses appears in the Places field 8 Click the desired address in the list The selected address is cen...

Page 41: ...39...

Page 42: ...City State Province Postal Code and or Country to refine your search if desired 7 Click the Find button A list of intersections appears in the Places field 8 Click the desired intersection in the lis...

Page 43: ...41...

Page 44: ...ints appears in the Places field 4 Click the desired waypoint in the list The selected waypoint is centered on the Graphic Map 5 After selecting the desired waypoint you can do any of the following To...

Page 45: ...ocation 4 Enter the name or part of the name of the Point of Interest in the Containing field if desired For example to find the nearest Texaco gas station enter Texaco in the Containing field NOTE If...

Page 46: ...Route To It nRoute generates a route from your current location to the selected Point of Interest To close the Find Nearest Places window and leave the selected Point of Interest centered on the Graph...

Page 47: ...of the following To view the address and telephone number of the item click the Properties button To mark the item as a waypoint click Make Waypoint The Waypoint Properties window appears See Editing...

Page 48: ...Map by entering the desired latitude and longitude To find a latitude longitude position 1 Select Go To Position from the View menu The Go To Position window appears 2 Enter the desired latitude and l...

Page 49: ...rs 3 Make any desired changes to the following fields Show this many found places enter the number of items you want displayed in the Find list when you are searching for an item Remember this many fo...

Page 50: ...ur Favorite Finds by name For example you can create Favorite Finds to locate the nearest Texaco gas station or Hilton hotel Items you add to your Favorite Finds are displayed in the Favorite Finds Ta...

Page 51: ...se used to describe the Favorite Find NOTE nRoute does not use this name when finding the item If you want nRoute to search for an item by name enter the appropriate information in the Containing fiel...

Page 52: ...em by name enter the name of the item in the Containing field 3 Select the appropriate Place Category and if desired Place Subcategory 4 Enter the Maximum Search Distance in miles This is the radius o...

Page 53: ...ing the desired Point of Interest you can do any of the following To view the address telephone number and Place Category and Subcategory of the Point of Interest click the Properties button To mark t...

Page 54: ...vorite Finds To edit a Favorite Find 1 Right click on the desired item in the Favorite Finds Tab and select Favorite Find Properties The Favorite Find Properties window appears 2 Make the desired chan...

Page 55: ...the desired Favorite Find and click the Delete button Right click on the desired Favorite Find and select Delete Favorite Find from the right click menu Click the desired Favorite Find and select Dele...

Page 56: ...ou can edit waypoint properties after they have been marked You can select multiple waypoints in the Waypoints Tab and view or change their properties as a group Waypoint Tips To display a waypoint on...

Page 57: ...aypoint symbol that appears on the Graphic Map Comment displays any comments you entered for the waypoint Position the latitude and longitude of the waypoint Altitude the altitude of the waypoint Dept...

Page 58: ...int Properties window See Editing Waypoint Properties for more information To create a waypoint category 1 Select Preferences from the Edit menu The Preferences window appears 2 Click the Waypoint Cat...

Page 59: ...the map and in the Waypoints Tab at the bottom of the screen To mark a waypoint using the Find feature 1 Find the desired item using the Find feature 2 Click the Make Waypoint button in the Find wind...

Page 60: ...int in the Waypoints tab then select Waypoint s Properties The Waypoint Properties window appears 2 Enter Home in the Name field then click OK Method 3 1 Click the Route to Home button A message appea...

Page 61: ...oint s select Waypoint s Properties from the Edit menu Right click the desired waypoint in the Waypoints Tab or on the Graphic Map then select Waypoint s Properties from the right click menu The Waypo...

Page 62: ...ol name or symbol description You can change the default display setting in the Waypoint Preferences window Date Modified the date and time the waypoint was created or modified if available Categories...

Page 63: ...t on the Graphic Map then select Move Waypoint A small waypoint button and a curved arrow are displayed next to the mouse cursor 3 Click the new location on the map The waypoint moves to the new locat...

Page 64: ...these symbols with a graphic editor and use them as templates for creating your own symbols You can add up to 64 custom waypoint symbols These symbols must be in bmp format and must be named numerical...

Page 65: ...f you are sending waypoints to another GPS device that only accepts limited character names Name Prefix enter the desired prefix you want displayed in front of waypoint names The Example Name field ch...

Page 66: ...te button Right click on the desired waypoint and select Delete Waypoint from the right click menu Click the desired waypoint and select Delete Waypoint from the Edit menu Click the desired waypoint a...

Page 67: ...screen or by pressing F9 See Using the Driving Directions Tab for more information The Status Tab provides you with information about the route and navigation tools to help you reach your destination...

Page 68: ...uts that allow you to perform many of the tasks described in this chapter For more information on routes see the following topics Setting Route Preferences Creating a Route Using the Selection Tool Cr...

Page 69: ...Right click on the item or point on the Graphic Map that you want to route to then select Route To It from the right click menu The route is created activated and displayed on the Graphic Map Driving...

Page 70: ...erest To create a route using the Find Places feature 1 Click the Find Places Find Nearest or Recently Found Places button 2 Find the desired item See Understanding the Find Feature for more informati...

Page 71: ...thods Click the Find Places Find Nearest or Recently Found Places button in the toolbar find the desired item and click Add to Route See Understanding the Find Feature for more information If you have...

Page 72: ...it click OK The route is created and automatically named using the first and last waypoints The route appears in the Saved Routes Tab at the bottom of the screen NOTE A message may appear stating tha...

Page 73: ...e route as necessary See Editing a Route for more information NOTE To change the order of the Via points in the route select the desired Via point then click the Move Up and Move Down Arrows to move t...

Page 74: ...ave already set your home waypoint the route is created activated and displayed on the Graphic Map If you have not set your home waypoint a message appears prompting you to set your home waypoint by r...

Page 75: ...aces feature are not automatically saved To save an active route 1 Select Save Active Route from the Route menu The route appears in the Saved Routes Tab The default route name is Saved Active Route 2...

Page 76: ...route in the list See Saved Routes Right Click Menu for more information The Route Tab contains the following features Name the name of the route Length the total length of the route Time the estimat...

Page 77: ...es Tab 2 Right click on the desired route and select Activate Route The route appears on the Graphic Map Driving Directions are automatically generated The route will remain active until you deactivat...

Page 78: ...om one maneuver to the next Leg Time the estimated time from one maneuver to the next Maneuver Preview Window when you click a maneuver in the list a graphic preview of that maneuver appears in the Ma...

Page 79: ...ome and ends at 113 Pine Street is autonamed Home to 113 Pine Street To rename the route uncheck the Autoname box and enter the desired name in the Name field Directions this tab provides you with a l...

Page 80: ...f the Via points NOTE This feature is only available on MapSource products that contain elevation data Center Map on Selected Item check this box to show the selected Via point in the center of the Gr...

Page 81: ...and elevation information from the starting point to the ending point of your route The graph also includes symbols to represent waypoints along the route 4 Use the Zoom Tool and the Zoom In and Zoom...

Page 82: ...7 Click Close to exit the Vertical Profile window 80...

Page 83: ...Activate a saved route or create a new route using any of the methods described in the Routing section A message box appears asking if you want to simulate the route 3 Click Yes nRoute simulates the r...

Page 84: ...Direct Routes to generate straight line as the crow files routes Calculation Style select Faster Time or Shorter Distance NOTE Faster Time routes usually utilize highways instead of side streets Vehic...

Page 85: ...the Delete button Right click on the desired route and select Delete Route from the right click menu Click the desired route and select Delete Route from the Edit menu Click the desired route and pre...

Page 86: ...an record a track whether or not you are navigating along a route Tracks can be viewed on the Graphic Map saved and edited as desired Tracks you have created are shown in the Tracks Tab along the bott...

Page 87: ...elapsed while the track was being recorded Length the total length of the track Area the total area of the track in square feet Avg Speed the average speed of the vehicle along the track Record Active...

Page 88: ...the Tracks Tab 2 Check the Record Active Track box on the right hand side of the Tracks Tab nRoute begins recording the track 3 To stop recording uncheck the Record Track box nRoute stops recording th...

Page 89: ...at which the track point was recorded Altitude the altitude of the track point Leg Length the distance to the next track point Leg Time the time elapsed until the next track point was reached Leg Spe...

Page 90: ...ve track and immediately begin a new track without stopping recording To save an active track 1 While a track is being recorded click the Tracks Tab 2 Click the Save Active Track Now button The track...

Page 91: ...in the track Invert click to reverse the order of the points in the track Filter click to display the Track Filter See Setting the Track Filter for more information Show Profile click to display a pr...

Page 92: ...ite dotted lines NOTE You may receive a message saying that the selection will not be visible because of the current preference setting Click Yes to change your display preferences to show all tracks...

Page 93: ...option for filtering the track None nRoute adds a new point to the track every second Time nRoute adds a new point to the track based on the time interval that you enter If you enter 30 seconds a new...

Page 94: ...e Delete button Right click on the desired track and select Delete Track from the right click menu Click the desired track and select Delete Track from the Edit menu Click the desired track and press...

Page 95: ...ides a true north heading as determined by the Position Format When User is selected the field to the right is activated for manual entry of a magnetic variation When Cardinal Direction is selected yo...

Page 96: ...oice prompts for the next maneuver in an active route Select Route Guidance and Status to hear voice prompts for the next maneuver in the active route as well as voice prompts about satellite signals...

Page 97: ...to Zoom In and Out select a specific Zoom Scale keep the vessel and or maneuver visible and change map orientation If you have multiple MapSource products installed on your computer the product selec...

Page 98: ...int The Select GPS button allows you to choose the type of GPS your are using The Speak button activates the voice prompt See Utilities Menu for more information Undocking the Toolbars The toolbars ca...

Page 99: ...Menus nRoute contains the following menus which are accessible via the Menu Bar across the top of the screen File Menu Edit Menu View Menu Find Menu Route Menu Tools Menu Utilities Menu Help Menu 97...

Page 100: ...l E allows you to save your data on your computer See Saving Your Data for more information Print Ctrl P prints the Graphic Map to the selected scale as displayed on the screen Print Preview shows a p...

Page 101: ...create a new route using the Route Properties window See Creating a Saved Route Using the Route Properties Window for more information Create Route Using Selected Waypoint s Ctrl Shift R creates a ro...

Page 102: ...e map showing a smaller area and more detail Zoom Out zooms out on the map showing a larger area and less detail Zoom In Max Ctrl zooms in to the smallest possible scale Zoom Out Region Ctrl zooms out...

Page 103: ...standing the Find Feature for more information Find Nearest Places Ctrl Shift F allows you to find features nearest to your current position See Finding Items Near Your Current Location for more infor...

Page 104: ...t H select this option to create a route to your home waypoint See Routing to Your Home Waypoint for more information Find Home Location this option allows you to set your home waypoint using the Find...

Page 105: ...ou to create waypoints by clicking on the Graphic Map See Marking Waypoints for more information Distance Bearing D activates the Distance Bearing Tool which allows you to measure the distance and bea...

Page 106: ...e a GPS this option allows nRoute to simulate GPS signals If you are indoors or do not have a GPS connected you can use this feature to simulate driving a route See Simulating a Route for more informa...

Page 107: ...e s Software Update Page select this option to open a Web browser and access Garmin s nRoute Software Update page NOTE An Internet connection is required to access the software update Web page About n...

Page 108: ...st of those features appears first with the name and type of feature Select the desired feature from the list and the right click menus for that feature appears The Route To It Find Nearest Places New...

Page 109: ...rom one point to another on the Graphic Map With the Distance Bearing Tool selected click a point on the Graphic Map then click the point on the map you want to find the distance bearing to The distan...

Page 110: ...o find the distance bearing to The distance and bearing between the two points are shown in the Status Bar at the bottom of the nRoute application window To stop using the Distance Bearing Tool press...

Page 111: ...lt If you have renamed the route this option will not change the route name See Editing a Route for more information Recalculate Route if you have modified the Auto routing Preferences in the Route Pr...

Page 112: ...Finding an Item Using the Favorite Finds Feature for more information Delete Favorite Find deletes the selected Favorite Find Favorite Find Properties activates the Favorite Find Properties window for...

Page 113: ...d the distance bearing to The distance and bearing between the two points are shown in the Status Bar at the bottom of the nRoute application window To stop using the Distance Bearing Tool press the E...

Page 114: ...accident Do not mount the GPS receiver over air bag panels or in the field of air bag deployment Air bags expand with a rapid force that can propel objects in their path toward the driver or passenge...

Page 115: ...ING THIS PRODUCT INSTALLING COPYING OR OTHERWISE USING THIS PRODUCT INDICATES YOUR ACKNOWLEDGMENT THAT YOU HAVE READ THIS LICENSE AND AGREE TO ITS TERMS IF YOU DO NOT AGREE RETURN THE COMPLETE PRODUCT...

Page 116: ...PPLY WHETHER OR NOT THE ALLEGED BREACH OR DEFAULT IS A BREACH OF A FUNDAMENTAL CONDITION OR TERM OR A FUNDAMENTAL BREACH SOME STATES COUNTRIES DO NOT ALLOW THE EXCLUSION OR LIMITATION OF LIABILITY FOR...

Page 117: ...ations may not apply to you Garmin retains the exclusive right to repair or replace the unit or software or offer a full refund of the purchase price at its sole discretion SUCH REMEDY SHALL BE YOUR S...

Page 118: ...Points to Routes 67 75 Addresses 24 37 38 Closest to Your Current Location 24 Creating Routes to 66 Finding 38 Altitude Elevation 91 of Waypoints 53 57 Areas 91 Arrow Keys 17 Attempting Connection to...

Page 119: ...the Selection Tool 65 Creating Waypoint Categories 54 Creating Waypoints 55 61 Using the Find Places Feature 35 37 38 39 41 43 Current Status 7 22 24 Customer Service 110 Customizing 28 Cut 97 D Datum...

Page 120: ...Right Click Menu 108 Finding 49 Properties 108 File Menu 96 Files 5 26 27 Find 5 34 35 36 37 38 39 40 41 42 43 44 45 46 47 48 49 50 51 91 92 108 Addresses 5 38 Basemap 34 Cities 34 37 Creating Routes...

Page 121: ...Moving Waypoints on 59 Orientation 21 Showing the Vehicle on 20 Showing Waypoints on 52 53 Tips 15 Understanding 15 Zooming In and Out 18 Grid 91 H Hand Tool 17 101 Heading 24 91 Help Menu 103 Hide 7...

Page 122: ...ame 61 Lists 7 Favorite Finds 7 Saved Routes 7 Tracks 7 Waypoints 7 8 Lock to Roads 28 Longitude 8 44 M Map Feature Right Click Menu 105 Map Features Points of Interest 35 Creating Routes to 65 66 Fin...

Page 123: ...Map 15 105 N Name Prefix 61 NAVAIDs 110 Navigation 15 74 91 92 Preferences 91 Next Street 22 24 North Up 15 21 nRoute 4 9 103 Interface 7 Software Version 103 O Odometer 25 Off Route Recalculation 91...

Page 124: ...Right Click Menus 53 65 83 105 106 107 108 109 Favorite Finds Right Click Menu 108 Map Feature Right Click Menu 105 Saved Routes Right Click Menu 107 Tracks Right Click Menu 83 109 Waypoint Right Clic...

Page 125: ...ypoints 5 26 52 Scroll Bars 17 Searching for Satellites 10 22 Select Device 10 Select GPS 102 Selecting a Mapsource Product 9 97 Selection Tool 15 59 65 93 101 105 Creating Routes Using 65 Creating Wa...

Page 126: ...16 98 Status Information Tab 24 Stop Route 5 73 93 100 Stopping Navigation 5 73 93 100 Streets 38 39 Switch Maps 9 93 98 Symbols 15 30 31 32 33 For Waypoints 61 T Tabs 7 24 25 47 53 72 74 83 Driving D...

Page 127: ...bars 94 Units 91 Unlocking Maps 9 102 USB GPS 10 102 Drivers 102 Using the Favorite Finds Tab 47 Using the InfoBar 15 22 Using the Saved Routes Tab 72 Using the Status Tab 24 UTC offset 91 Utilities M...

Page 128: ...2 Displaying 52 61 106 Finding 40 Home 56 70 Marking 52 55 105 Moving 59 106 Preferences 91 Properties 52 54 55 57 59 60 Renaming 57 Right Click Menu 53 Saving 6 26 Selecting 52 53 69 105 Setting Pref...

Page 129: ......

Page 130: ...ional Inc 1200 East 151st Street Olathe Kansas 66062 U S A Garmin Europe Ltd Unit 5 The Quadrangle Abbey Park Industrial Estate Romsey SO51 9DL U K Garmin Corporation No 68 Jangshu 2nd Road Shijr Taip...

Reviews: