


Taking a Detour
Before you can take a detour, you must be navigating a route
and you must add the change route tool to the map tools menu
(
).
You can take a detour for a specified distance along your route
or detour around specific roads. This is useful if you encounter
construction zones, closed roads, or poor road conditions.
1
From the map, select >
Change Route
.
2
Select an option:
• To detour your route for a specific distance, select
Detour
by Distance
.
• To detour around a specific road on the route, select
Detour by Road
.
Stopping the Route
From the map, select > .
Viewing Route Activity
Viewing a List of Turns
While navigating a route, you can view all of the turns and
maneuvers for your entire route and the distance between turns.
1
While navigating a route, select the text bar on the top of the
map.
2
Select a turn.
The details for the turn appear. If available, an image of the
junction appears for junctions on major roadways.
Viewing the Entire Route on the Map
1
While navigating a route, select anywhere on the map.
2
Select .
Viewing the Next Turn
While navigating a route, a preview of the next turn, lane
change, or other maneuver appears in the upper-left corner of
the map.
The preview includes the distance to the turn or maneuver and
the lane in which you should be traveling, if available.
From the map, select
to view the next turn on the map.
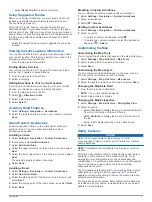
Active Lane Guidance
As you approach a turn while navigating a route, a detailed
simulation of the road appears beside the map, if available. A
colored line indicates the proper lane for the turn.
Viewing Junctions
While navigating a route, you can view the junctions on major
roadways. When you approach a junction in a route, the image
of that junction appears briefly, if available.
From the map, select
to view the junction, if available.
Up Ahead
You can view upcoming businesses and services along your
route or the road on which you are traveling.
Services are listed by category.
Gas stations
Restaurants
Lodging
Rest areas
Parking
Banks and ATMs
Finding Upcoming Points of Interest
1
From the map, select >
Up Ahead
.
2
Select a tab.
3
Select a point of interest.
Customizing the Up Ahead Categories
You can change the categories you search for, rearrange the
order of the categories, and search for a specific business or
category.
1
From the map, select >
Up Ahead
.
2
Select a service icon.
3
Select .
4
Select an option:
• To move a category up or down in the list, select and drag
the arrow to the right of the category name.
• To change a category, select the category.
• To create a custom category, select a category, select
Custom Search
, and enter the name of a business or
category.
5
Select
Done
.
Trip Information
Viewing Trip Data from the Map
Before you can view trip data on the map, you must add the tool
From the map, select >
Trip Data
.
Customizing the Trip Data Fields
Before you can customize the data that appears in the trip data
fields on the map, you must add the Trip Data tool to the map
tools menu (
).
1
Select
View Map
.
2
Select >
Trip Data
.
3
Select a trip data field.
4
Select an option.
The new trip data field appears in the trip data list.
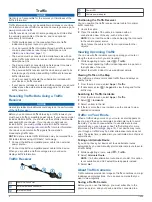
Viewing the Trip Information Page
The trip information page displays your present speed and
provides statistics about your trip.
NOTE:
If you make frequent stops, leave the device turned on,
so it can accurately measure elapsed time during the trip.
From the map, select
Speed
.
Viewing the Trip Log
Your device keeps a trip log, which is a record of the path you
have traveled.
1
Select
Settings
>
Map & Vehicle
>
Map Layers
.
2
Select the
Trip Log
check box.
Resetting Trip Information
1
From the map, select
Speed
.
2
Select >
Reset Field(s)
.
3
Select an option:
• When not navigating a route, select
Select All
to reset
every data field except the speedometer, on the first page.
• Select
Reset Trip Data
to reset the information on the trip
computer.
• Select
Reset Max. Speed
to reset the maximum speed.
6
Navigation