


• GPI custom POI files from Garmin POI Loader (
Installing a Memory Card
You can install a memory card to increase the storage space for
maps and other data on your device. You can purchase memory
cards from an electronics supplier, or go to
to purchase a memory card with pre-loaded Garmin
mapping software. The device supports microSD memory cards
from 4 to 32 GB, formatted using the FAT32 file system.
1
Locate the map and data memory card slot on the bottom of
your device.
2
Insert a memory card into the slot.
3
Press it in until it clicks.
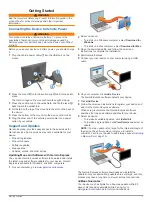
Connecting the Device to Your Computer
You can connect the device to your computer using a USB
cable.
1
Plug the small end of the USB cable into the port on the
device.
2
Plug the larger end of the USB cable into a port on your
computer.
A picture of your device connected to a computer appears on
the device screen.
Depending on your computer operating system, the device
appears as either a portable device, a removable drive, or a
removable volume.
Transferring Data From Your Computer
1
Connect the device to your computer (
Depending on your computer operating system, the device
appears as either a portable device, a removable drive, or a
removable volume.
2
On your computer, open the file browser.
3
Select a file.
4
Select
Edit
>
Copy
.
5
Browse to a folder on the device.
NOTE:
For a removable drive or volume, you should not
place files in the Garmin folder.
6
Select
Edit
>
Paste
.
Disconnecting the USB Cable
If your device is connected to your computer as a removable
drive or volume, you must safely disconnect your device from
your computer to avoid data loss. If your device is connected to
your Windows computer as a portable device, it is not necessary
to safely disconnect.
1
Complete an action:
• For Windows computers, select the
Safely Remove
Hardware
icon in the system tray, and select your device.
• For Mac computers, drag the volume icon to the trash.
2
Disconnect the cable from your computer.
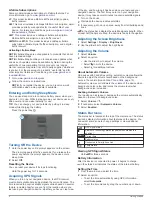
Customizing the Device
Map and Vehicle Settings
To open the Map and Vehicle settings, from the main menu,
select
Settings
>
Map & Vehicle
.
Vehicle
: Sets the icon that represents your position on the map.
Go to
for more icons.
Driving Map View
: Sets the perspective on the map.
Map Detail
: Sets the level of detail on the map. More detail may
cause the map to draw slower.
Map Theme
: Changes the color of the map data.
Map Tools
: Sets the shortcuts that appear in the map tools
menu.
Map Layers
: Sets the data that appears on the map page
(
myMaps
: Sets which installed maps the device uses.
Enabling Maps
You can enable map products installed on your device.
TIP:
To purchase additional map products, go to
.
1
Select
Settings
>
Map & Vehicle
>
myMaps
.
2
Select a map.
Navigation Settings
To open the Navigation settings page, from the main menu,
select
Settings
>
Navigation
.
Calculation Mode
: Sets the route calculation method.
Avoidances
: Sets road features to avoid on a route.
Custom Avoidances
: Allows you to avoid specific roads or
areas.
Toll Roads
: Sets preferences for avoiding toll roads.
Tolls and Fees
: Sets preferences for avoiding toll roads and toll
stickers.
NOTE:
This feature is not available in all areas.
Safe Mode
: Disables all functions that require significant
operator attention and could become a distraction while
driving.
GPS Simulator
: Stops the device from receiving a GPS signal,
and saves battery power.
Calculation Mode Settings
Select
Settings
>
Navigation
>
Calculation Mode
.
The route calculation is based on road speeds and vehicle
acceleration data for a given route.
Faster Time
: Calculates routes that are faster to drive but can
be longer in distance.
Shorter Distance
: Calculates routes that are shorter in distance
but can take more time to drive.
Less Fuel
: Calculates routes that could use less fuel than other
routes.
Off Road
: Calculates a direct line from your location to your
destination.
Avoiding Toll Roads
1
Select
Settings
>
Navigation
.
2
Select an option:
NOTE:
The menu changes based on your area and the map
data on your device.
• Select
Toll Roads
.
• Select
Tolls and Fees
>
Toll Roads
.
3
Select
Always Ask
,
Avoid
, or
Allow
, and select
Save
.
Avoiding Toll Stickers
NOTE:
This feature is not available in all areas.
The map data on your device may contain detailed toll sticker
information for some countries. You can avoid or allow toll
stickers for each country.
1
Select
Settings
>
Navigation
>
Tolls and Fees
>
Toll
Stickers
.
2
Select a country.
14
Customizing the Device


