background image

• GPI custom POI files from Garmin POI Loader (

Installing POI 

Loader

, page 5

).

Installing a Memory Card

You can install a memory card to increase the storage space for 

maps and other data on your device. You can purchase memory 

cards from an electronics supplier, or go to 

www.garmin.com

/maps

 to purchase a memory card with pre-loaded Garmin 

mapping software. The device supports microSD memory cards 

from 4 to 32 GB, formatted using the FAT32 file system.

1

Locate the map and data memory card slot on the bottom of 

your device.

2

Insert a memory card into the slot.

3

Press it in until it clicks.

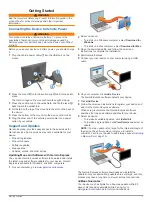
Connecting the Device to Your Computer

You can connect the device to your computer using a USB 

cable.

1

Plug the small end of the USB cable into the port on the 

device.

2

Plug the larger end of the USB cable into a port on your 

computer.
A picture of your device connected to a computer appears on 

the device screen.
Depending on your computer operating system, the device 

appears as either a portable device, a removable drive, or a 

removable volume.

Transferring Data From Your Computer

1

Connect the device to your computer (

Connecting the Device 

to Your Computer

, page 14

).

Depending on your computer operating system, the device 

appears as either a portable device, a removable drive, or a 

removable volume.

2

On your computer, open the file browser.

3

Select a file.

4

Select 

Edit

 > 

Copy

.

5

Browse to a folder on the device.

NOTE: 

For a removable drive or volume, you should not 

place files in the Garmin folder.

6

Select 

Edit

 > 

Paste

.

Disconnecting the USB Cable

If your device is connected to your computer as a removable 

drive or volume, you must safely disconnect your device from 

your computer to avoid data loss. If your device is connected to 

your Windows computer as a portable device, it is not necessary 

to safely disconnect.

1

Complete an action:
• For Windows computers, select the 

Safely Remove 

Hardware

 icon in the system tray, and select your device.

• For Mac computers, drag the volume icon to the trash.

2

Disconnect the cable from your computer.

Customizing the Device

Map and Vehicle Settings

To open the Map and Vehicle settings, from the main menu, 

select 

Settings

 > 

Map & Vehicle

.

Vehicle

: Sets the icon that represents your position on the map. 

Go to 

www.garmingarage.com

 for more icons.

Driving Map View

: Sets the perspective on the map.

Map Detail

: Sets the level of detail on the map. More detail may 

cause the map to draw slower.

Map Theme

: Changes the color of the map data.

Map Tools

: Sets the shortcuts that appear in the map tools 

menu.

Map Layers

: Sets the data that appears on the map page 

(

Customizing the Map Layers

, page 7

).

myMaps

: Sets which installed maps the device uses.

Enabling Maps

You can enable map products installed on your device.

TIP: 

To purchase additional map products, go to 

http://buy.garmin.com

.

1

Select 

Settings

 > 

Map & Vehicle

 > 

myMaps

.

2

Select a map.

Navigation Settings

To open the Navigation settings page, from the main menu, 

select 

Settings

 > 

Navigation

.

Calculation Mode

: Sets the route calculation method.

Avoidances

: Sets road features to avoid on a route.

Custom Avoidances

: Allows you to avoid specific roads or 

areas.

Toll Roads

: Sets preferences for avoiding toll roads.

Tolls and Fees

: Sets preferences for avoiding toll roads and toll 

stickers.

NOTE: 

This feature is not available in all areas.

Safe Mode

: Disables all functions that require significant 

operator attention and could become a distraction while 

driving.

GPS Simulator

: Stops the device from receiving a GPS signal, 

and saves battery power.

Calculation Mode Settings

Select 

Settings

 > 

Navigation

 > 

Calculation Mode

.

The route calculation is based on road speeds and vehicle 

acceleration data for a given route.

Faster Time

: Calculates routes that are faster to drive but can 

be longer in distance.

Shorter Distance

: Calculates routes that are shorter in distance 

but can take more time to drive.

Less Fuel

: Calculates routes that could use less fuel than other 

routes.

Off Road

: Calculates a direct line from your location to your 

destination.

Avoiding Toll Roads

1

Select 

Settings

 > 

Navigation

.

2

Select an option:

NOTE: 

The menu changes based on your area and the map 

data on your device.
• Select 

Toll Roads

.

• Select 

Tolls and Fees

 > 

Toll Roads

.

3

Select 

Always Ask

Avoid

, or 

Allow

, and select 

Save

.

Avoiding Toll Stickers

NOTE: 

This feature is not available in all areas.

The map data on your device may contain detailed toll sticker 

information for some countries. You can avoid or allow toll 

stickers for each country.

1

Select 

Settings

 > 

Navigation

 > 

Tolls and Fees

 > 

Toll 

Stickers

.

2

Select a country.

14

Customizing the Device

Summary of Contents for nüvi 2709 Series

Page 1: ...n vi 2709 Series Owner s Manual Models 010 01316 00 August 2020 Printed in Taiwan...

Page 2: ...armin BaseCamp Garmin Express HomePort MapSource myGarmin ecoRoute myTrends trafficTrends n Maps Guarantee and n Maps Lifetime are trademarks of Garmin Ltd or its subsidiaries These trademarks may not...

Page 3: ...mizing the Up Ahead Categories 6 Trip Information 6 Viewing Trip Data from the Map 6 Viewing the Trip Information Page 6 Viewing the Trip Log 6 Resetting Trip Information 6 Using Suggested Routes 7 Vi...

Page 4: ...ce 14 Map and Vehicle Settings 14 Enabling Maps 14 Navigation Settings 14 Calculation Mode Settings 14 Avoiding Toll Roads 14 Avoiding Toll Stickers 14 Bluetooth Settings 15 Disabling Bluetooth 15 Dis...

Page 5: ...stall the latest map and software updates for your device Garmin Express is available for Windows and Mac computers 1 On your computer go to www garmin com express 2 Select an option To install on a W...

Page 6: ...the current location The time required to acquire satellite signals varies based on several factors including how far you are from the location where you last used your navigation device whether you h...

Page 7: ...ss name enter all or part of the name To search for an address near you enter the house number and street name To search for an address in another city enter the house number street name city and stat...

Page 8: ...aved menu Going Home Select Where To Go Home Editing Your Home Location Information 1 Select Where To Saved Home 2 Select 3 Select Edit 4 Enter your changes 5 Select Done Editing a Saved Location 1 Se...

Page 9: ...oute will be calculated as a straight line to the location Starting a Route to a Saved Location 1 Select Where To Saved 2 If necessary select a category or select All Saved Places 3 Select a location...

Page 10: ...oad on which you are traveling Services are listed by category Gas stations Restaurants Lodging Rest areas Parking Banks and ATMs Finding Upcoming Points of Interest 1 From the map select Up Ahead 2 S...

Page 11: ...t the ending point of the road section and select Next 5 Select Done Disabling a Custom Avoidance You can disable a custom avoidance without deleting it 1 Select Settings Navigation Custom Avoidances...

Page 12: ...on Traffic Receiver Mini USB connector External antenna connector Internal antenna Power LED Vehicle power adapter Positioning the Traffic Receiver You can position the traffic receiver power cable fo...

Page 13: ...rends feature if enabled trafficTrends page 9 1 Select Settings Traffic 2 Select the Traffic check box Voice Command NOTE Voice command is not available for all languages and regions and may not be av...

Page 14: ...he list and select OK 7 If necessary on your phone confirm the device is allowed to connect 8 If necessary enter the device Bluetooth PIN into your phone Tips After Pairing the Devices After the initi...

Page 15: ...e button to start navigating to a location see the owner s manual for your phone 2 From the application menu select Smartphone Link The next time you connect your device to your phone the location is...

Page 16: ...ts on the device TIP You can connect the device to your computer and access mileage reports in the Reports folder on the device 1 Select Apps ecoRoute Mileage Report 2 Select a report Resetting ecoRou...

Page 17: ...his feature you must purchase Advanced Weather service using Smartphone Link 1 Select Apps Weather 2 If necessary select a city 3 Select Road Conditions Planning a Trip You can use the trip planner to...

Page 18: ...he icon that represents your position on the map Go to www garmingarage com for more icons Driving Map View Sets the perspective on the map Map Detail Sets the level of detail on the map More detail m...

Page 19: ...ice prompts Text Language Sets all on screen text to the selected language NOTE Changing the text language does not change the language of user entered data or map data such as street names Keyboard L...

Page 20: ...eld by the suction cup Do not keep your unit in the glove compartment Register your device at http my garmin com Mounting on Your Dashboard NOTICE The permanent mounting adhesive is extremely difficul...

Page 21: ...Player 10 My device does not appear as a portable device on my computer On Mac computers and some Windows computers the device connects using USB mass storage mode In USB mass storage mode the device...

Page 22: ...Garmin Live Services 11 subscribing to 11 geocaching 4 going home 4 GPS 2 H hands free phone calls 10 help 11 See also product support home calling 11 editing location 4 going 4 phone number 11 settin...

Page 23: ...theft avoiding 16 time settings 2 15 traffic 8 9 15 activating a subscription 9 adding subscriptions 9 alternate route 8 cameras 8 9 incidents 8 lifetime subscriptions 2 map 8 receiver 8 searching fo...

Page 24: ...support garmin com GUID 3678F568 6C55 4A0D AA6B BA4BA04141A8 v3 August 2020...

Reviews: