5-2
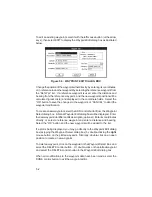
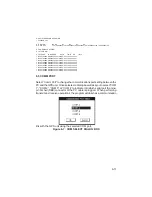
To edit an existing waypoint, select it with the left mouse button (or the arrow
keys), then select EDIT to display the Waypoint Edit dialog box as illustrated
below.
Figure 5-3: WAYPOINT EDIT DIALOG BOX
Change the position of the waypoint either directly, by entering its coordinates,
or in reference to another waypoint by selecting the reference waypoint from
the “Ref Wpt:” list. If a reference waypoint is used, enter the distance and
bearing from the reference waypoint, and the new waypoint position will be
calculated (great circle) and displayed in the coordinate fields. Select the
“OK” button to save the changes to the waypoint, or “CANCEL” to abort the
waypoint modification.
To create a new waypoint, select the ADD control button from the Waypoint
Select dialog box. A blank Waypoint Edit dialog box will be displayed. Enter
the new waypoint identifier and its description (optional). Enter its coordinates
directly, or select a reference waypoint and enter a distance and bearing.
Select the “OK” button and the new waypoint will be added to the list.
If a plot is being displayed, you may go directly to the Waypoint Edit dialog
box (skipping the Waypoint Select dialog box) by double-clicking the right
mouse button on the plotted waypoint. Similarly, double-click on an open
position to create a new waypoint.
To delete a waypoint, click on the waypoint in the Waypoint Select Box, and
select the DELETE control button. Or, double-click on the plotted waypoint
and select the DELETE control button in the Waypoint Edit dialog box.
When all modifications to the waypoint data have been made, select the
DONE control button to exit the waypoint editor.


