Peak transmit power
48 W
Operating voltage
From 10 to 35 Vdc
Operating temperature range*
From -10 to 40°C (from 14 to
104°F)
Storage temperature range
From -40 to 70°C (from -40 to
158°F)
Material
ASA plastic
Maximum range**
91.4 m (300 ft.)
Frequency
417 kHz
Fuse rating
4.0 A mini 32 Vdc
*When the transducer is used out of the water, the transducer
monitors the internal temperature and suspends operation until
the temperature returns to the operating range.
**Dependent upon transducer placement, water salinity, bottom
type, and other water conditions.
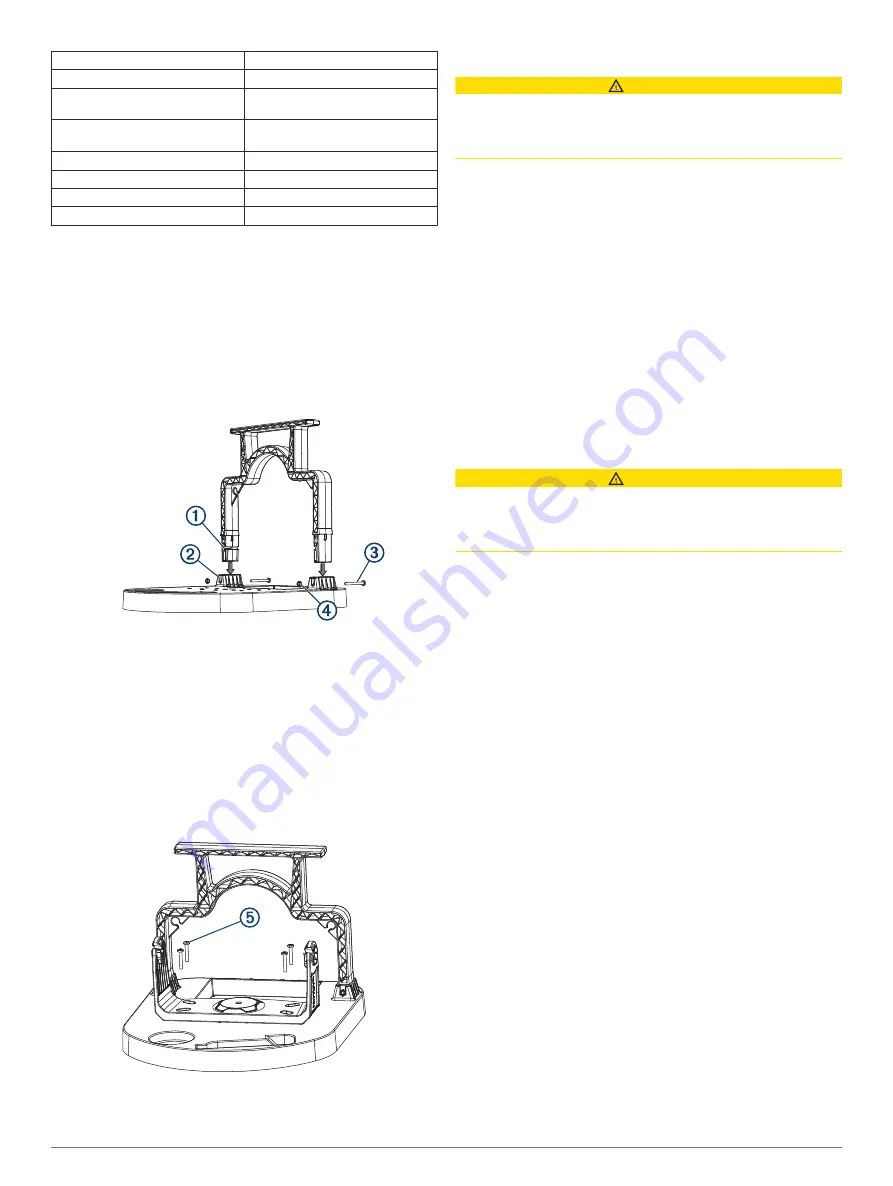
Assembling the Portable Mount
You need a Phillips screwdriver to assemble the portable mount.
1
Insert the handle
À
into the two openings on the portable
mount base
Á
.
2
Secure the handle to the base using the two longer machine
screws
Â
and two nuts
Ã
.
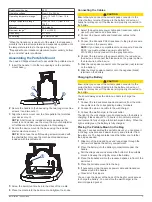
3
Align the device mount over the hole pattern that matches
your device mount.
NOTE:
A bail mount is included in some packages. If a
mount is not included, use the mount from your chartplotter
or fishfinder and the screws included in this package.
4
Secure the device mount to the base using the included
shorter machine screws
Ä
.
NOTE:
Do not use the self-threading screws included with
the chartplotter. Only use the machine-threaded screws
included with this portable kit.
5
Screw the bail-mount knobs into the sides of the cradle.
6
Place the cradle into the bail mount and tighten the knobs.
Connecting the Cables
CAUTION
Ensure that you connect the correct spade connector to the
correct battery terminal. Damage to the battery or device, or
bodily harm may occur if the device is improperly connected to
the battery.
1
Select the appropriate power cable and transducer cable to
use with your device and transducer.
2
Connect the power cable and transducer cables to the
device.
3
Connect the Panoptix PS22 transducer to the gray bare wire
connectors on the power cable.
NOTE:
If you have a compatible unit and connect a Panoptix
PS22, you must purchase a power cable (GPN
010-12676-35) and connect it to the gray connector.
4
Connect the red wire on the power cable to the red wire on
the device, and connect the black wire on the power cable to
the black wire on the device.
5
Slide the red spade connector onto the positive (red) terminal
on the battery.
6
Slide the black spade connector onto the negative (black)
terminal on the battery.
Charging the Battery
CAUTION
Ensure that you connect the correct spade connector to the
correct battery terminal. Damage to the battery or device, or
bodily harm may occur if the device is improperly connected to
the battery.
You should always use the all-in-one cable to charge the
battery.
1
Connect the red and black spade connectors from the all-in-
one cable onto the corresponding battery terminals.
2
Connect the all-in-one cable to the wall charger.
3
Connect the wall charger to the wall outlet.
The light on the wall charger is solid orange when the battery is
charging. It takes about 8 to 10 hours in a room-temperature
environment to fully charge a fully discharged battery. When the
light is solid green, the battery is fully charged.
Placing the Portable Mount in the Bag
After you have assembled the portable mount, you can place it
in the bag, which makes it easier to carry and protects it from
the elements. The bag contains loops that allow you to tether
the bag as needed.
1
Slide two of the included hook and loop straps through the
narrow slots beside the battery compartment.
2
Place the battery into the battery compartment under the
handle.
3
Pull the straps under and around the bottom of the portable
mount, and wrap them tightly around the battery.
4
Place the transducers into the recessed spaces in front of the
bail mount.
5
Place the portable mount into the bag.
6
If necessary, wrap the excess power cable and transducer
cables around the handle.
7
Close all of the zippers.
You can use the zipper at the back of the bag for quick access
to charge the battery. You can store the wall charger in the
interior zippered pocket.
Installation Instructions
3


