


Introduction
WARNING
See the
Important Safety and Product Information
guide in the
product box for product warnings and other important
information.
Always consult your physician before you begin or modify any
exercise program.
Getting Started
You can use the Varia HL (headlight) and Varia TL (taillight)
alone, with the optional wireless remote, or with your compatible
Edge
®
device. This list provides an overview of the installation
and setup tasks.
• Charge the device (
Charging the Device
, page 1
).
• Install the headlight using the out-front mount (
Installing the
Out-Front Mount
, page 1
).
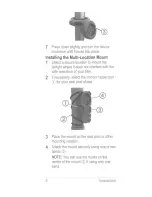
• Install the taillight using one of the included mounts:
◦ Install the seat-post mount (
Installing the Seat-Post
Mount
, page 1
).
◦ Install the multi-location mount (
Installing the Multi-
Location Mount
, page 2
).
TIP:
If you are using two taillights as turn signals, you can
install two multi-location mounts on the seat stays of your
bike.
• If you are using the wireless remote, install it on your bike
stem or handlebar (
Using the Mounts
, page 4
).
• If you are using the wireless remote, pair the devices (
Pairing
the Remote with Your Varia Device
, page 4
).
• If you are using a compatible Edge device, pair the devices
(
Pairing Varia Bike Lights with Your Edge 1000
, page 3
).
• If you are using a compatible Edge device, customize the
bike light settings (
Customizing Varia Device Settings with
Your Edge 1000
, page 3
).
Charging the Device
NOTICE
To prevent corrosion, thoroughly dry the USB port, the weather
cap, and the surrounding area before charging or connecting to
a computer.
The device is powered by a built-in lithium-ion battery that you
can charge using a standard wall outlet or a USB port on your
computer.
NOTE:
The device does not charge when outside the approved
temperature range (
Specifications
, page 5
).
1
Pull up the weather cap from the USB port.
2
Plug the small end of the USB cable into the USB port on the
device.
3
Plug the large end of the USB cable into an AC adapter or a
computer USB port.
4
Plug the AC adapter into a standard wall outlet.
5
Charge the device completely.
The status LED flashes green while charging. The status LED is
solid green when charging is complete.
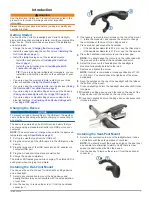
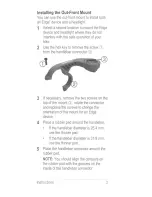
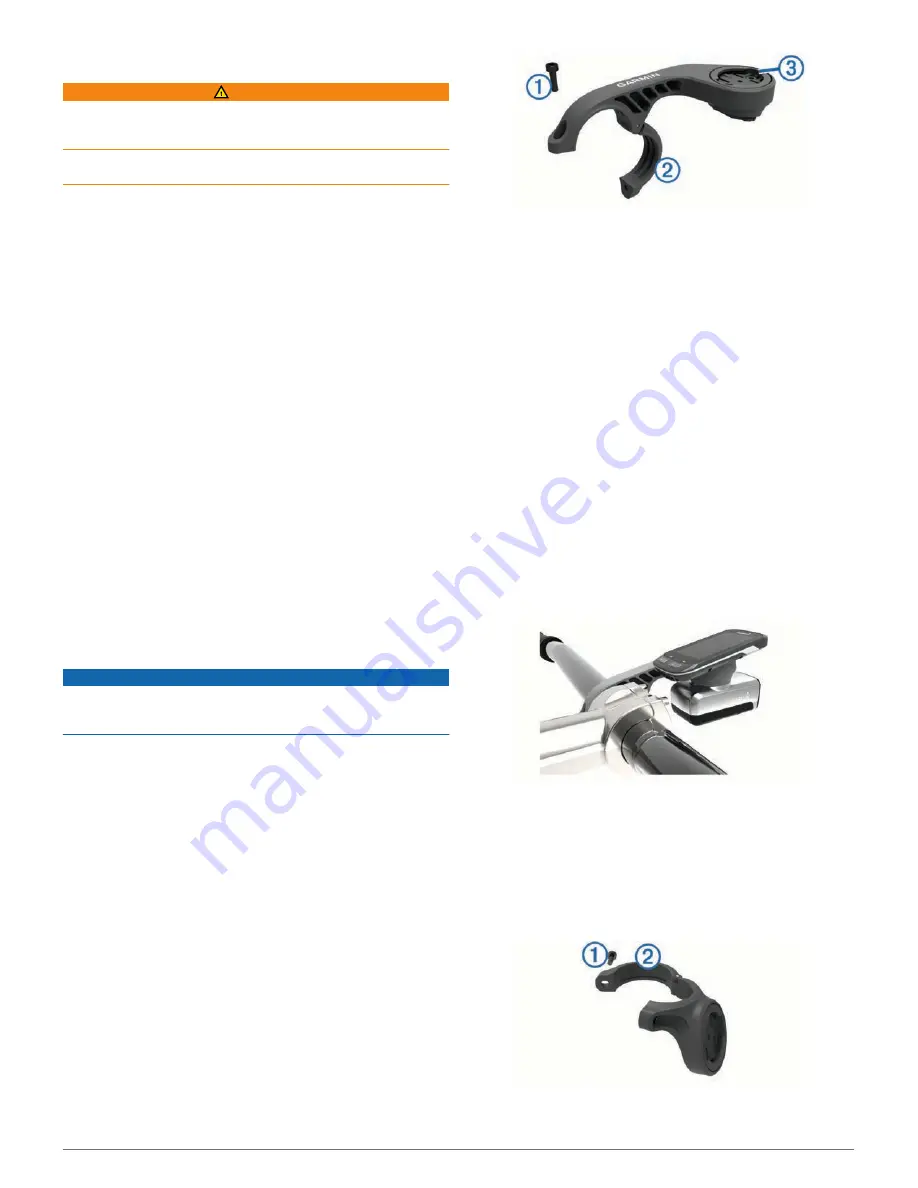
Installing the Out-Front Mount
You can use the out-front mount to install both an Edge device
and a headlight.
1
Select a secure location to mount the Edge device and
headlight where they do not interfere with the safe operation
of your bike.
2
Use the hex key to remove the screw
À
from the handlebar
connector
Á
.
3
If necessary, remove the two screws on the top of the mount
Â
, rotate the connector, and replace the screws to change
the orientation of the mount for an Edge device.
4
Place a rubber pad around the handlebar:
• If the handlebar diameter is 25.4 mm, use the thicker pad.
• If the handlebar diameter is 31.8 mm, use the thinner pad.
5
Place the handlebar connector around the rubber pad.
NOTE:
You should align the contours on the rubber pad with
the grooves on the inside of the handlebar connector.
6
Adjust the mount on the handlebar so the headlight is
mounted horizontally, parallel to the road.
7
Replace and tighten the screw.
NOTE:
Garmin
®
recommends a torque specification of 7 lbf-
in. (0.8 N-m). You should check the tightness of the screw
periodically.
8
Align the notches on the top of the headlight with the tabs on
the bottom of the mount.
9
Press up slightly and turn the headlight clockwise until it locks
into place.
10
If installing an Edge device, align the tabs on the back of the
Edge device with the notches on the top of the mount.
11
Press down slightly and turn the Edge device clockwise until
it locks into place.
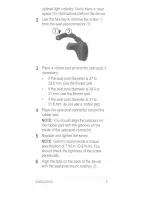
Installing the Seat-Post Mount
1
Select a secure location to mount the taillight where it does
not interfere with the safe operation of your bike.
NOTE:
You should mount the device as high on the seat post
as possible for optimal light visibility. Verify there is clear
space (no obstructions) behind the device.
2
Use the hex key to remove the screw
À
from the seat-post
connector
Á
.
Introduction
1
Summary of Contents for Varia
Page 1: ...Varia Bike Lights Owner s Manual August 2015 Printed in Taiwan 190 01906 00_0A...
Page 4: ......
Page 33: ......


