background image

Using the Hailer

Before you can use the hailer function, you must provide and install a hailer horn on your boat deck or tower 
(optional). For more information, see the Installation Instructions.
The hailer allows you to make on-boat or ship-to-shore announcements, and allows two-way communications 
between connected radios. You can address the ship using the radio or handset, and sounds received through 
the horn can be heard through the radio speaker. For vessels with enclosed cabins, the hailer allows you to hear 
sounds from the deck.
NOTE: Hailer functionality is not available on all VHF radio models.
NOTE: When the radio is in hailer mode, it does not receive broadcasts from the currently active channel.
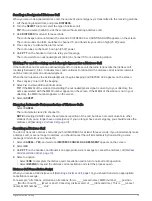
Select PA > HAILER.

Sounds received through the horn are heard through the radio speaker.

Hold PTT.
Select an option:

• To make an announcement, speak into the handset.
• To adjust the volume of the hailer broadcast, turn the SELECT dial on the radio, or select   or   on the 

handset.

Release PTT to stop broadcasting and listen for broadcasts from other connected radios on the ship.

Foghorn

NOTE: Foghorn functionality is not available on all VHF radio models.
Before you can use the foghorn, you must provide and install a hailer horn (optional) on the deck or tower of 
your boat. For more information, see the Installation Instructions.
The foghorn is part of the public address system of your radio. You can sound the foghorn through a hailer horn 
or an external speaker. Your radio can sound the horn automatically using standard patterns, or you can sound 
the horn manually. When you manually operate the foghorn, sounds received through the horn can be heard 
through the radio speaker between soundings.

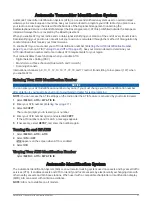
Sounding the Foghorn Automatically

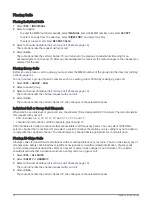
Select PA > FOG > AUTO.
Select a foghorn-type option.

The radio alternates between sounding the pattern of tones or rings and receiving radio broadcasts.

Turn the SELECT dial to adjust the volume of the horn (optional).

Sounding the Foghorn Manually

NOTE: When you sound the horn manually, the radio does not receive broadcasts between horn soundings.
Select PA > FOG > MANUAL.

Sounds are received through the horn and heard through the radio speaker.

Hold PTT.

NOTE: The horn stops sounding when you release PTT.

Turn the SELECT dial to adjust the volume of the horn (optional).

Adjusting the Sound Frequency of the Foghorn

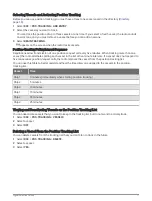
You can increase or decrease the sound frequency of the foghorn. The pitch of the tone rises with an increase in 
frequency, and falls with a decrease in frequency. The minimum setting is 200 Hz, and the maximum setting is 
850 Hz. The default setting is 350 Hz. Regulations dictate the correct frequency of foghorns, which correlate 
with the size of your vessel.
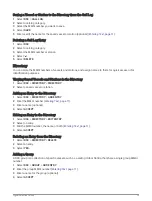
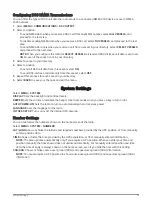
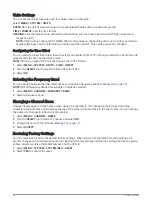
Select MENU > SYSTEM > FOG FREQUENCY.
Turn the SELECT dial to adjust the frequency in 50 Hz increments.
Select ACCEPT.

10

Basic Operation
Summary of Contents for VHF 11 Series

Page 1: ...VHF11X 21XSERIESOWNER SMANUAL 110 110i 115 115i 210 210i 210AIS 210iAIS 215 215i 215AIS 215iAIS...

Page 2: ...arks of Garmin Ltd or its subsidiaries registered in the USA and other countries GHS is a trademark of Garmin Ltd or its subsidiaries These trademarks may not be used without the express permission of...

Page 3: ...ng Your MMSI Number 12 Viewing Your MMSI Number 12 Distress Calls 12 Sending an Undesignated Distress Call 12 Sending a Designated Distress Call 13 Waiting For and Receiving and Acknowledgment for a D...

Page 4: ...tomatic Identification System 21 Turning On and Off AIS 22 NMEA 0183 and NMEA 2000 22 Additional Functionality with Other Garmin Devices 22 Communicating Over NMEA 0183 or NMEA 2000 22 Configuring DSC...

Page 5: ...Introduction WARNING See the Important Safety and Product Information guide in the product box for product warnings and other important information Radio Overview VHF 110 115 Introduction 1...

Page 6: ...creen press the dial to toggle weather channels NOAA Weather Broadcasts and Alerts page 11 Rotate the dial to highlight an item in a list Press the dial to select an item PWR North America 16 9 Intern...

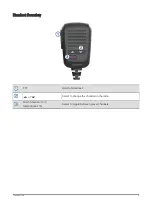
Page 7: ...Handset Overview PTT Hold to broadcast or Select to change the channel on the radio North America 16 9 International 16 Select to toggle between preset channels Introduction 3...

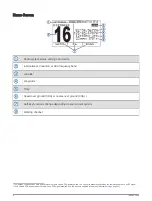
Page 8: ...2 Soft key functions change depending on your current activity Working channel 1 The latitude longitude and time appear when the radio has a GPS signal acquired You can enter data manually when the ra...

Page 9: ...ice to turn on automatically System Settings page 23 Adjusting the Radio Volume 1 Set the squelch level to MIN before you adjust the radio volume optional 2 Turn the VOL SQ dial to increase or decreas...

Page 10: ...Commission FCC and international guidelines 3 Hold PTT on the handset appears at the top of the screen 4 Speak into the handset NOTE Five minutes is the maximum time allowed for transmission After fiv...

Page 11: ...can save an unlimited number of channels 1 Select SCAN 2 Turn the SELECT dial until you find a channel you want to save 3 Select SAV CH appears above a saved channel Removing a Saved Channel 1 Select...

Page 12: ...ond Priority Channel You can select a channel other than channel 9 as your second priority channel 1 Select MENU CHANNEL 2ND PRIORITY 2 Select an option On the radio turn the SELECT dial to the prefer...

Page 13: ...hannels 13 17 67 and 77 must be low 1 W by default In the Canadian channel band transmissions on channels 13 15 17 20 1066 67 75 76 and 77 must be low 1 W by default In the International channel band...

Page 14: ...ructions The foghorn is part of the public address system of your radio You can sound the foghorn through a hailer horn or an external speaker Your radio can sound the horn automatically using standar...

Page 15: ...while continuing to monitor weather alerts Digital Selective Calling Digital Selective Calling NOTE Before you can use DSC capabilities you must enter a Mobile Marine Safety Identity MMSI number Ente...

Page 16: ...ake a distress call your call is transmitted to all DSC capable radios within receiving range Your current GPS position latitude and longitude and the current time are included in the transmission if...

Page 17: ...I number appears on the screen If the MMSI of the station is not in your directory the MMSI number appears on the screen 3 Select ACCEPT Stopping Automatic Retransmission of Distress Calls Select CANC...

Page 18: ...ected channel Individual Call or Group Call Channels When placing an individual or group call you should select from designated DSC channels The radio transmits this request with your call USA channel...

Page 19: ...nsmissions page 23 NOTE When a distress call is received the radio switches to channel 16 automatically after ten seconds When a distress call is received select an option To view additional informati...

Page 20: ...its POSITION SENT appears on the screen When you receive a position request with automatic position replies disabled POS REQUEST appears on the screen When you receive a position request with automati...

Page 21: ...at five minute intervals If a vessel does not respond to five consecutive position request calls the radio removes the vessel from the position tracking list You can use this table to better understan...

Page 22: ...of calls If the calling station is not saved in your directory the MMSI number appears in the list of calls A symbol indicates the station type Symbol Meaning MMSI Number Format Ship station XXXXXXXXX...

Page 23: ...elect DSC DIRECTORY DIRECTORY 2 Select a saved vessel or station Adding an Entry to the Directory 1 Select DSC DIRECTORY ADD ENTRY 2 Enter the MMSI number Entering Text page 11 3 Enter a name optional...

Page 24: ...data and you should update it immediately Entering Position Information Manually 1 Select MENU SYSTEM MANUAL GPS 2 Enter your current coordinates and the present time Entering Text page 11 3 Select AC...

Page 25: ...ional channels 6 8 10 11 12 13 14 71 72 74 and 77 restrict transmitting to low power 1 W when you enable ATIS Entering Your ATIS Identification Number NOTICE You can enter your ATIS identification num...

Page 26: ...OTE You may need to upgrade your Garmin chartplotter software to use NMEA 0183 or NMEA 2000 features When you connect the radio to a Garmin chartplotter using either NMEA 0183 or NMEA 2000 your chartp...

Page 27: ...m Settings Select MENU SYSTEM DISPLAY Sets the backlight and contrast levels BEEPER Sets the volume or disables the beeper tone that sounds when you press a key or turn a dial AUTO POWER ON Sets the r...

Page 28: ...K Selecting the Frequency Band You can switch between the USA International or Canadian frequency bands Channel Lists page 25 NOTE Not all frequency bands are available on all device models 1 Select M...

Page 29: ...etwork or position data entered manually is more than 23 5 hours old Manual Position Information page 20 POSITION TRACKING Appears after five consecutive failed attempts to request position informatio...

Page 30: ...rating IEC 60529 IPX71 Antenna connector S0 239 50 ohms Operating voltage 12 0 Vdc Wireless frequency 156 to 162 MHz 44 dBm 25 W maximum Standby current draw 350 mA Receive current draw 600 mA Transm...

Page 31: ...on information 129799 Radio frequency mode power 129808 DSC call information Receive PGN Description 059392 ISO acknowledgment 059904 ISO request 060160 ISO transport protocol data transfer 060416 ISO...

Page 32: ...t Sentence Description DSC Digital selective calling DSC information DSE Expanded digital selective calling VDM AIS model only AIS VHF data link message Receive Sentence Description DTM Datum referenc...

Page 33: ......

Page 34: ...support garmin com GUID B7A0C5D8 4F64 4F06 BA16 2206EFCAF537 v4 February 2022...

Reviews: