Recording Light
: Turns the recording LED on or off. This can
be useful to eliminate ambient light from the LED when
recording in darker environments.
Tones
: Turns the camera tones on or off. When this setting is
enabled, tones play to indicate various camera actions and
statuses, such as capturing a photo, starting recording, or
connecting to a device.
Microphone
: Allows you to change the microphone mode or
turn the microphones off (
).
Units
: Sets the units of measure used to display G-Metrix data
in the Garmin VIRB app.
About
: Displays information about the Garmin VIRB app,
including the version, license information, and the privacy
agreement.
Allow anonymous usage reporting
: Shares anonymous data
to Garmin to help improve the app.
Photo Exposure Types
You can use several photo exposure types to take single
photos.
Standard
: Takes a single photo at standard exposure. This
option is useful for most daytime photos.
Bracket
: Takes three consecutive photos automatically, using
three different exposure values (exposure bracketing). This
option is useful for composing high dynamic range
(HDR) photos.
Recording 5.7K RAW Video
Using the Garmin VIRB app, you can set the camera to record
high-bitrate RAW video at 5.7K resolution. This mode allows you
to capture the highest level of detail in all directions.
When recording in RAW mode, the camera records separate
hemispherical video files from each lens. You can stitch these
files into a spherical video using video editing software.
NOTE:
5.7K mode is a highly demanding mode that causes your
camera to work harder. The camera's battery run time, memory
card recording time, and ability to operate in hot environments
are reduced. The camera protects itself from overheating and
shuts down automatically if the internal temperature exceeds the
operating temperature threshold.
1
Connect the camera to the Garmin VIRB app.
2
From the app viewfinder, select >
Lens Mode
>
RAW
.
3
Scroll to the
Video Settings
section, and select
Resolution
>
5.7K
.
Recording a Video Loop
You can use the Garmin VIRB app to set your camera to record
a video loop. Loop recording allows you to record video
continuously but save only the most recent video footage. You
can select the number of minutes of video to save. This enables
you to save storage space when you want to capture key
moments but do not want to save all footage of an activity. This
feature is useful when using the device as a driving recorder or
when you want to save only the highlights of an event.
1
Connect your camera to the Garmin VIRB app.
2
From the app viewfinder, select >
Loop
.
3
Select the number of minutes of video to save.
4
Start recording video.
The most recent footage is saved on the memory card, up to the
number of minutes selected in step 2.
Recording a Time-Lapse or Travelapse
™
Video
You can use the Garmin VIRB app to set up the time-lapse
recording mode for your camera. Time-lapse mode captures
individual video frames at longer intervals and creates a video
that plays much faster than real time. You can record a standard
time-lapse video or a Travelapse video.
Standard time-lapse mode captures individual video frames at
set time intervals, and it is useful for recording movements,
changes, or events that take place slowly over a long period of
time. Travelapse mode captures video frames at a set distance
interval. For example, you can capture one video frame for
every kilometer or mile you travel on a road trip. This allows you
to record and share a short video of your whole road trip and the
places you traveled.
1
Use an appropriate tripod or mounting accessory to mount
the camera in a fixed position.
2
Connect your camera to the Garmin VIRB app.
3
From the app viewfinder, select >
Video Mode
>
Time-
lapse
.
4
Select
Type
, and select an option.
• To record standard time-lapse videos, select
Standard
.
• To record your travels at a distance interval, select
Travelapse
.
5
Select
Interval
, and select the time or distance interval
between video frames.
6
Start recording a video.
The camera records video frames at the selected interval.
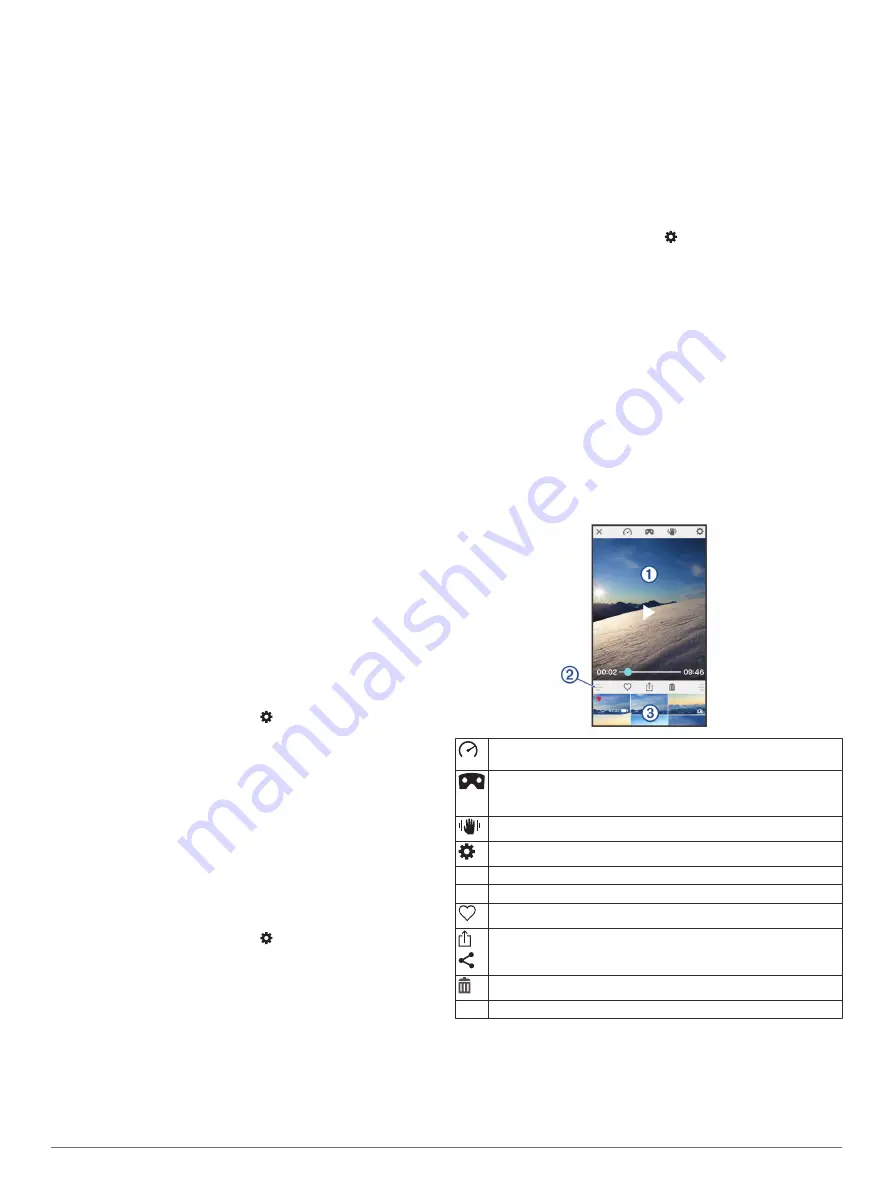
Garmin VIRB App Gallery
You can use the Garmin VIRB app to view, edit, and share
videos and photos stored on your camera.
With your camera connected to the app, from the viewfinder,
select the thumbnail image in the lower left corner.
Select to change the G-Metrix gauge overlays for the selected
video.
Select to change the viewing mode for 360-degree video. You
can view 360-degree videos on the screen or in a virtual reality
(VR) headset.
Select to apply image stabilization to the selected video.
Select to change the camera settings.
À
Displays a preview of the selected photo or video.
Á
Drag up or down to expand or shrink the library.
Select to mark the selected video or photo as favorite.
Select to edit, save, and share the selected photo or video.
Select to delete the selected video or photo.
Â
Select a photo or video thumbnail to preview it.
Viewing a Photo or Video
1
From the Garmin VIRB app viewfinder, select the thumbnail
image in the lower-left corner.
2
From the library in the lower half of the gallery, select a video
or photo thumbnail.
A preview of the item appears.
Garmin VIRB App
9


