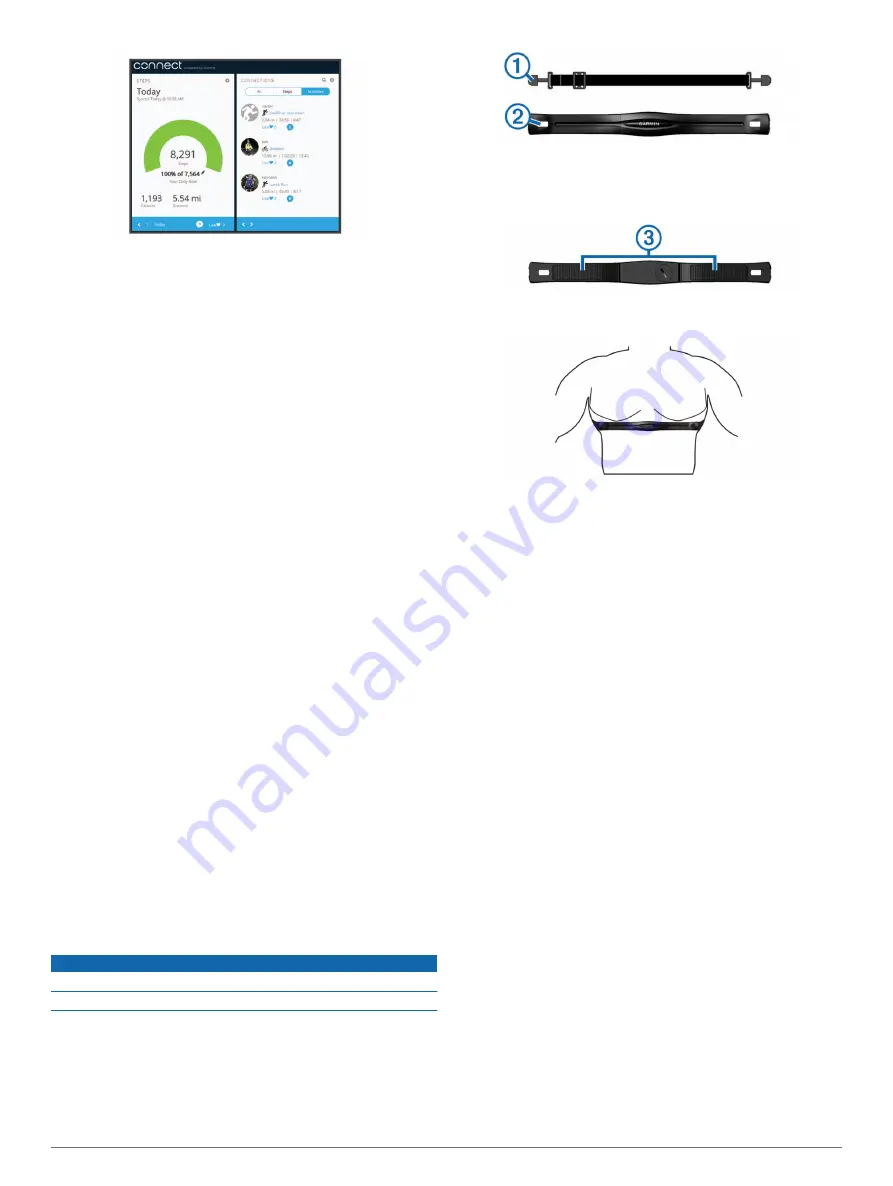
Share your activities
: You can connect with friends to follow
each other's activities or post links to your activities on your
favorite social networking sites.
Manage your settings
: You can customize your device and
user settings on your Garmin Connect account.
Customizing Your Device
Device Settings
You can customize your device settings and user settings on
your Garmin Connect account. From the devices widget, select
Device Settings.
Visible Screens
: Allows you to customize the screens that
appear on your device.
Default Screen
: Sets the default home screen on the device.
Alert Tones
: Allows you to turn alert tones on and off. The
device beeps when alert tones are turned on.
Auto Goal
: Allows your device to determine your step goal
automatically.
NOTE:
After you disable this feature, you must enter your
step goal manually.
Time Format
: Sets the device to display time in a 12-hour or 24-
hour format.
Units
: Sets the device to display the distance traveled in
kilometers or miles.
Custom Step Length
: Allows your device to more accurately
calculate the distance traveled using your custom step
length.
Heart Rate
: Allows you to estimate your maximum heart rate
and determine custom heart rate zones.
ANT+ Heart Rate Monitor
Your device can be used with wireless ANT+ sensors. For more
information about compatibility and purchasing optional sensors,
go to
Putting On the Heart Rate Monitor
NOTE:
If you do not have a heart rate monitor, you can skip this
task.
NOTE:
The device may cause chafing when used for long
periods of time. To alleviate this issue, apply an anti-friction
lubricant or gel to the center of the module where it contacts
your skin.
NOTICE
Do not apply anti-friction gel or lubricant on the electrodes.
Do not use gels or lubricants that contain sunscreen.
You should wear the heart rate monitor directly on your skin, just
below your sternum. It should be snug enough to stay in place
during your activity.
1
Push one tab
À
of the strap through the slot
Á
in the heart
rate monitor module.
2
Press the tab down.
3
Wet the electrodes
Â
on the back of the module to create a
strong connection between your chest and the heart rate
monitor module.
4
Wrap the strap around your chest and attach it to the other
side of the heart rate monitor module.
The Garmin
®
logo should be right-side up.
5
Bring the device within 3 m (10 ft.) of the heart rate monitor.
After you put on the heart rate monitor, it is active and sending
data.
Pairing Your ANT+ Heart Rate Monitor
Before you can pair your heart rate monitor, you must enable
the heart rate data screen on your vívofit 2 device. For more
information about customizing the device screens, see
.
NOTE:
If your device was packaged with a heart rate monitor,
the heart rate data screen is already enabled and the heart rate
monitor is paired.
1
Put on the heart rate monitor.
2
Bring the device within 3 m (10 ft.) of the sensor.
NOTE:
Stay 10 m (33 ft.) away from other ANT+ sensors
while pairing.
3
Select the device key until
HEART
appears.
When the sensor is paired with your device, your heart rate
and heart rate zone appear.
About Heart Rate Zones
Many athletes use heart rate zones to measure and increase
their cardiovascular strength and improve their level of fitness. A
heart rate zone is a set range of heartbeats per minute. The five
commonly accepted heart rate zones are numbered from 1 to 5
according to increasing intensity. Generally, heart rate zones are
calculated based on percentages of your maximum heart rate.
Fitness Goals
Knowing your heart rate zones can help you measure and
improve your fitness by understanding and applying these
principles.
• Your heart rate is a good measure of exercise intensity.
• Training in certain heart rate zones can help you improve
cardiovascular capacity and strength.
• Knowing your heart rate zones can prevent you from
overtraining and can decrease your risk of injury.
vívofit 2 Owner's Manual
3


