background image

Viewing the Session Summary

The session summary shows a list of statistics for your current session.

Select an option:
• To view a summary of the current session, press OK, and select SESSION SUMMARY.
• To view a summary of a previous session, select HISTORY, select a session, and select SESSION 

SUMMARY.

Viewing Session History

You can view your shot details for previously recorded sessions.
From the main menu, select HISTORY.
Select a session.
Select an option:

• To view a summary of the session data, select SESSION SUMMARY.
• To view a full list of shots recorded during the selected session, select SHOT LIST.
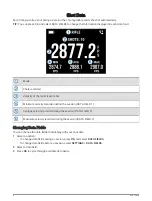
ShotView App

You can download the ShotView app on your smartphone to view detailed statistics and shot analyses that are 
recorded on your Xero C1 chronograph.
You can go to 

garmin.com/shotviewapp

 for more information.

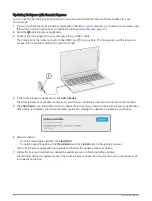
Pairing Your Smartphone

To use the connected features of the Xero C1 chronograph, it must be paired directly through the ShotView app, 
instead of from the Bluetooth

®

 settings on your smartphone.

Turn on your Xero C1 chronograph, and place the chronograph and your smartphone within 3 m (10 ft.) of 

each other.

On your Xero C1 chronograph, select SETTINGS > CONNECTIVITY.
Enable the STATUS option, and select PAIR PHONE.
Using your phone, scan the QR code to download and install the ShotView app.

TIP: You can use the camera app on most phones to scan the QR code.

Follow the on-screen instructions to sign in to a Garmin

®

 account and complete the pairing and setup 

process.

Settings

Changing the Units of Measure

Select SETTINGS > UNITS.
Select a unit of measure, and press OK.

Changing the Display Color

Select an option:

• To change the display color during a session, press OK, and select DISPLAY COLOR.
• To change the display color outside of a session, select SETTINGS > DISPLAY COLOR.

Press OK to cycle through the color options.

10

ShotView App

Summary of Contents for XERO C1

Page 1: ...XERO C1 Owner sManual...

Page 2: ...logo and Xero are trademarks of Garmin Ltd or its subsidiaries registered in the USA and other countries Garmin Express and ShotView are trademarks of Garmin Ltd or its subsidiaries These trademarks m...

Page 3: ...Settings 10 Changing the Units of Measure 10 Changing the Display Color 10 Changing the Backlight Brightness 11 Pro Settings 11 Changing the Device Language 11 Clearing Device Data 11 Device Informati...

Page 4: ......

Page 5: ...ays maintain awareness of your shooting environment and do not stare at the display or become distracted by the display Failure to account for your shooting environment could cause property damage inj...

Page 6: ...fore charging or connecting to a computer The device is powered by a built in lithium ion battery that you can charge using a standard AC adapter or a USB port on your computer NOTE The device will no...

Page 7: ...y damage the chronograph When you use the chronograph for archery you should use a target that is at least 4 meters or 4 yards away from you 1 Select NEW SESSION BOW 2 If you have enabled the PROJECTI...

Page 8: ...your bullet select YES and enter the weight of your bullet To continue without calculating kinetic energy and power factor select SKIP 4 If necessary observe the alignment diagram and press OK to cont...

Page 9: ...n option To calculate the kinetic energy and power factor of your bullet select YES and enter the weight of your bullet To continue without calculating kinetic energy and power factor select SKIP 4 If...

Page 10: ...ct YES and enter the weight of your projectile To continue without calculating kinetic energy and power factor select SKIP 3 If necessary observe the alignment diagram and press OK to continue 4 Posit...

Page 11: ...ntinue without calculating kinetic energy select SKIP 4 Point the chronograph at the target with the screen facing you 5 Position the weapon next to the chronograph within 15 cm 5 in to 35 cm 15 in of...

Page 12: ...d during the session DATA FIELD 1 Average velocity recorded during the session DATA FIELD 2 Maximum velocity recorded during the session DATA FIELD 3 Changing Data Fields You can change the data field...

Page 13: ...e recorded velocities are more spread out from the average velocity recorded A low standard deviation means that the recorded velocities are close to the average velocity recorded Viewing the Shot Lis...

Page 14: ...our Smartphone To use the connected features of the Xero C1 chronograph it must be paired directly through the ShotView app instead of from the Bluetooth settings on your smartphone 1 Turn on your Xer...

Page 15: ...factory default values Select SETTINGS RESET ALL SETTINGS YES Device Information Software Updates Software updates provide changes and improvements to the device features and operation Software update...

Page 16: ...cation click Add a Device The Garmin Express application searches for your device and displays the device name and serial number 5 Click Add Device and follow the on screen instructions to add your de...

Page 17: ...amage to the USB port Avoid extreme shock and harsh treatment because it can degrade the life of the product Cleaning the Outer Casing NOTICE Avoid chemical cleaners and solvents that can damage plast...

Page 18: ...graph isn t detecting your velocity Verify the chronograph is facing the target With the screen facing you the large flat side of the chronograph should point at the target Verify the target is at lea...

Page 19: ...the chronograph If the language files are missing from your Xero C1 chronograph you can reinstall them using the Garmin Express application 1 Download and install the Garmin Express application on you...

Page 20: ...support garmin com GUID 76BF3BAE 91A9 4BF6 9196 26F824CA8CAD v1 October 2023...

Reviews: