background image

zūmo 200 Series Owner’s Manual

Appendix

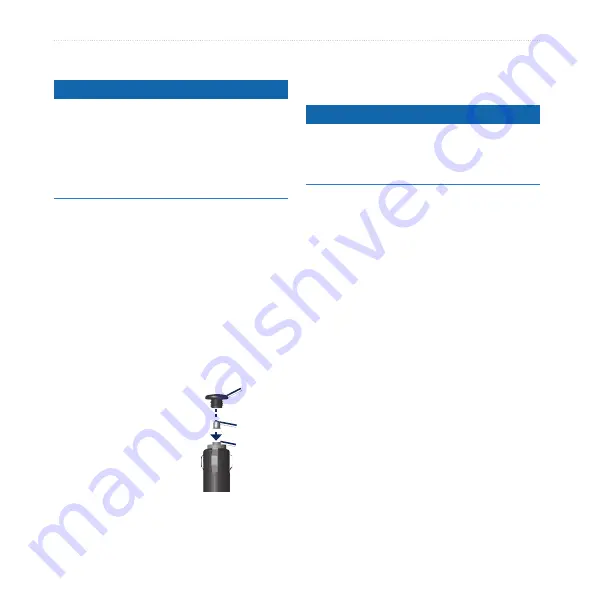
Changing the Fuse

Notice

When replacing the fuse, do not lose any 

of the small pieces and make sure they 

are put back in the proper position. The 

vehicle power cable does not work unless 

it is assembled correctly.
If your unit will not charge in your 

vehicle, you might need to replace the 

fuse located at the tip of the vehicle 

adapter. 

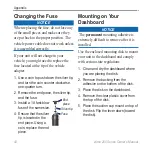
1.  Use a coin to push down the silver tip, 

and turn the coin counter‑clockwise, 

one‑quarter turn.

2.  Remove the end piece, the silver tip, 

and the fuse. 

3.  Install a 1 A fast‑blow 

fuse of the same size.

4.  Ensure that the silver 

tip is located in the 

end piece. Using a 

coin, replace the end 

piece.

Mounting on Your 

Dashboard

Notice

 The 

permanent

 mounting adhesive is 

extremely difficult to remove after it is 

installed. 
Use the enclosed mounting disk to mount 

your unit to the dashboard and comply 

with certain state regulations. 

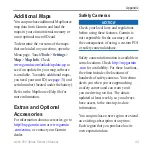
1.  Clean and dry the dashboard where 

you are placing the disk.

2.  Remove the backing from the 

adhesive on the bottom of the disk.

3.  Place the disk on the dashboard.
4.  Remove the clear plastic cover from 

the top of the disk.

5.  Place the suction cup mount on top of 

the disk. Flip the lever down (toward 

the disk).

End 

piece

Silver tip

Fuse

Summary of Contents for Zumo 200 Series

Page 1: ...z mo 200 series owner s manual for use with the z mo 220...

Page 2: ...ocument is subject to change without notice Garmin reserves the right to change or improve its products and to make changes in the content without obligation to notify any person or organization of su...

Page 3: ...me 13 Finding Recently Found Places 14 Favorites 14 Using Custom Routes 15 Entering Coordinates 16 Finding a Place Using the Map 17 Using TracBack 17 Searching Near Another Location 17 Using the Main...

Page 4: ...tion Information 36 Restoring All Settings 37 Appendix 38 Registering Your z mo 38 Caring for Your z mo 38 Cleaning the Unit 38 Locking Your z mo 39 Calibrating the Screen 40 Resetting the z mo 40 Upd...

Page 5: ...nder the battery Mini USB connector under the weather cap microSD card slot under the battery Release key Slide up to open the battery cover Battery contacts Power button Press and hold to turn z mo o...

Page 6: ...mounting the device see the Important Safety and Product Information guide for information about laws pertaining to windshield mounting Installing the z mo Battery 1 Locate the lithium ion battery tha...

Page 7: ...back the weather cap from the mini USB connector located on the back of your z mo Weather cap Power cable 2 Plug the vehicle power cable into the mini USB connector 3 Snap the cradle onto the suction...

Page 8: ...orrectly wiring the power cable with bare wire leads can result in damage to the vehicle or the battery and can cause bodily injury Garmin strongly recommends having an experienced installer with the...

Page 9: ...cure the base Do not overtighten NOTE The recommended torque is 50 lbf in Do not exceed torque of 80 lbf in Handlebar base Handlebar U bolt Installing the handlebar base to the clutch brake clamp brac...

Page 10: ...shers the cradle the spacers and base plate 2 Tighten the nuts to secure the base plate Attaching the Base Plate to the Handlebar Base 1 Align the ball of the handlebar base and the ball of the base p...

Page 11: ...e mount to release the z mo 2 Lift out the z mo Configuring the z mo To turn on your z mo press and hold Follow the on screen instructions Acquiring Satellites Go outdoors to an open area out of garag...

Page 12: ...Bluetooth 2 Enable Bluetooth technology on your z mo 3 Under connections touch Add or Change 4 Enable Find Me Discoverable Visible mode on your headset 5 Touch OK on the z mo 6 Select your headset and...

Page 13: ...r Pages appear differently based on your usage mode and settings Selecting a Usage Mode Driving Walking Bicycling Motorcycling Scootering Your z mo offers several usage modes for different modes of tr...

Page 14: ...creen brightness Touch the box next to Mute to turn off the audio Resetting Your z mo If your z mo stops functioning reset your z mo by pressing and holding the Power button Finding Points of Interest...

Page 15: ...ch Go 4 Touch Add as Via Point to add this stop before your destination OR Touch Set as new Destination to make this your new final destination Taking a Detour If the road ahead is closed you can take...

Page 16: ...data provides postal code searching If you are unsure of the city touch Search All 4 Enter the number of the address and touch Done 5 Enter the street name and touch Done 6 Select the correct street...

Page 17: ...n screen keyboard You can also enter letters contained in the name to narrow the search 1 Touch Where To Points of Interest Spell Name 2 Using the on screen keyboard enter letters in the name Touch Do...

Page 18: ...Clear all items from the list are removed This process does not delete the actual place from your z mo Fa vorites You can save places in your Favorites so that you can quickly find them and create ro...

Page 19: ...ges 43 Using Custom Routes Touch Where To Custom Routes Select the route you want to take and touch Go Creating a Custom Route Use your z mo to create and save custom routes before your next trip You...

Page 20: ...g Coordinates If you know the geographic coordinates of your destination you can use your z mo to navigate to your destination using the latitude and longitude coordinates or other coordinate formats...

Page 21: ...ect Touch Save to save this location Touch Go to navigate to the location If the GPS mode is off touch Set Loc to set your location to the selected location See page 31 Using TracBack Touch Where To T...

Page 22: ...map and directions at the top of the map A checkered flag marks your destination If you deviate from the original route your z mo recalculates the route and provides new directions Touch to view the n...

Page 23: ...ng a route the turn list displays turn by turn instructions for your entire route and the distance between turns Touch the text bar on the top of the map to open the turn list Touch a turn on the list...

Page 24: ...g the compass rotates The bug indicator shows your current heading Your heading is also shown in degrees in the center of the compass The information fields display the speed the elevation the time of...

Page 25: ...ypes JPEG JPG PNG BMP and GIF image files see page 23 Maps routes and waypoints files from MapSource see page 43 GPI custom POI files from the Garmin POI Loader see page 44 Loading Files Mini USB conn...

Page 26: ...ork drives cannot display the z mo drives See your operating system Help file to learn how to map the drives Transferring Files to Your z mo Copy and paste files from your computer into the z mo drive...

Page 27: ...z mo to your computer 2 Go to http connect garmin com photos and sign in 3 Select a photo 4 Follow the on screen instructions Deleting Files NOTICE If you do not know the purpose of a file do not dele...

Page 28: ...cation information This feature is helpful if you need to tell emergency personnel your location Touch a button on the right to view the nearest locations in that category Touch Save Location to save...

Page 29: ...ing pictures to your z mo Custom Routes For information about custom routes see page 15 My Data Use this tool to manage and delete your saved data such as your Favorites If you have transferred a rout...

Page 30: ...Touch to make the number a percent 0 01 Touch C to clear the entry 5 Touch 6 Touch C to make a new calculation Unit Converter 1 Touch Tools Unit Converter 2 Touch Conversion select a type of measurem...

Page 31: ...h Currency and touch OK 3 Touch the currency buttons and select the currencies you want to update 4 Touch Update 5 Touch the boxes next to the currencies to enter new rates 6 Touch Save to save the ne...

Page 32: ...the traffic receiver and connected to vehicle power and you are in a coverage area the z mo can receive traffic delay information For more information go to www garmin com traffic NOTE Garmin is not r...

Page 33: ...atically optimizes the route for the shortest time If a severe traffic delay occurs on your route while you are navigating the z mo automatically recalculates the route You might still be routed throu...

Page 34: ...a map To return to the normal map from the Traffic map touch the traffic icon and touch Show Normal Map Viewing Traffic Delays 1 On the Map page touch the traffic icon 2 Touch Traffic Search to view...

Page 35: ...imulator to turn off the GPS mode and simulate navigation and to save battery power Units change units of measure to Kilometers or Miles Keyboard Layout select a preference Standard Mode an alphabetic...

Page 36: ...Off turn off the recalculate function Prompted enable a prompt when you deviate from your route Restore restore the original navigation settings Display Settings Touch Tools Settings Display Color Mod...

Page 37: ...nk is low enough to trigger the Remaining Fuel Alarm a red fuel pump icon appears on the map Touch the icon to view a list of nearby gas stations Time Settings Touch Tools Settings Time Time Format se...

Page 38: ...s 2D with your direction of travel at the top North Up display the map in 2D with North at the top 3D View display the map in three dimensions 3D with your direction of travel at the top Map Autozoom...

Page 39: ...Bluetooth turn on the Bluetooth component To prevent a headset from automatically connecting touch Disabled Restore restore the original Bluetooth settings This does not clear the pairing information...

Page 40: ...FM traffic subscriptions and expiration dates are listed Touch Add to add a subscription European Options Auto select to use the best provider for the area You can also select a specific provider Sear...

Page 41: ...d 3 Write down the traffic receiver unit ID 4 Go to www garmin com fmtraffic to purchase a subscription and get a 25 character code 5 Touch Next on the z mo enter the code and touch Done The traffic s...

Page 42: ...an be permanently damaged if exposed to excessive shock or vibration To minimize the risk of damage to your z mo avoid dropping your unit and operating it in high shock and high vibration environments...

Page 43: ...compartment Register your product at http mygarmin com Use the Garmin Lock feature Locking Your z mo Garmin Lock is a theft deterrent system that locks your z mo Each time you turn on the z mo enter...

Page 44: ...z mo should operate normally You can also remove the battery and reinstall it Updating the Software In order to connect the z mo to your computer you must have the optional mini USB cable For informat...

Page 45: ...ormation Your z mo contains a user replaceable lithium ion battery To maximize the lifetime of the battery do not leave your z mo in direct sunlight and avoid prolonged exposure to excessive heat The...

Page 46: ...d the fuse 3 Install a 1 A fast blow fuse of the same size 4 Ensure that the silver tip is located in the end piece Using a coin replace the end piece Mounting on Your Dashboard NOTICE The permanent m...

Page 47: ...out accessories go to http buy garmin com or www garmin com extras or contact your Garmin dealer Safety Cameras NOTICE Check your local laws and regulations before using these features Garmin is not r...

Page 48: ...touch Tools Settings Proximity Points Proximity Alerts To delete the custom POIs from your z mo connect your z mo to your computer Open the Garmin poi folder in the z mo drive or the microSD card dri...

Page 49: ...signals the signal strength bars on the Menu page are green When it loses satellite signals the bars turn red or clear For more information about GPS go to www garmin com aboutGPS Contacting Garmin C...

Page 50: ...e that the Software is the property of Garmin and is protected under the United States of America copyright laws and international copyright treaties You further acknowledge that the structure organiz...

Page 51: ...rage Internal memory and optional removable microSD card Data stored indefinitely Computer interface USB 2 0 full speed 12 Mbit mass storage plug and play Charge time Approximately 4 hours Power input...

Page 52: ...the z mo is placed in direct sunlight or in a hot environment it cannot charge My battery does not stay charged for very long To maximize the time between charges turn down the backlight Touch Tools S...

Page 53: ...ter and into your z mo The z mo automatically turns on and goes into USB mass storage mode Ensure that your z mo is connected to a USB port and not a USB hub I cannot see any new removable drives in m...

Page 54: ...rent location saving 14 customizing the z mo 31 37 custom POIs 44 custom routes 15 D deleting all user data 41 character 13 custom POIs 44 files 23 recent finds list 14 detours 11 diacritical characte...

Page 55: ...3 48 My Data 25 N navigation mode 31 settings 31 next turn 19 O off road routing 20 32 on screen keyboard 13 P photo navigation 15 loading photos 23 pictures 24 types 21 PIN Garmin Lock 39 POI Loader...

Page 56: ...ols 24 27 touch screen calibrating 40 49 cleaning 38 settings 32 TracBack 17 traffic 27 28 30 adding subscriptions 36 transferring files 21 23 trip computer 19 trip data reset 19 trip log 34 troublesh...

Page 57: ......
Page 58: ...2010 Garmin Ltd or its subsidiaries Garmin International Inc 1200 East 151st Street Olathe Kansas 66062 USA Garmin Europe Ltd Liberty House Hounsdown Business Park Southampton Hampshire SO40 9LR UK G...

Reviews: