background image

2.  Install/ replace 2 x AAA size batteries in the compartment. It is 

recommended that only alkaline batteries are used. Do not use 
rechargeable batteries. 

3.  The weather station is capable of receiving up to 3 different channels. 

Select the channel number (1, 2, or 3) by sliding the 

CHANNEL 123


switch (RTS 5). If you only have 1 remote temperature sensor, select 
1. 

4.  Press the 

RESET

 button (RTS 4) once and the red light will flash once. 

5.  Replace the battery compartment on the back of the unit by tightening 

the two screws (RTS 2). 


Installation 

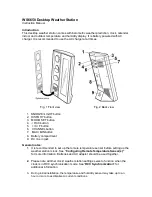
1.  Place the remote temperature sensor at a desired place by mounting 

the unit’s hang hole (RTS 1) on a screw (screw not included). 
Alternatively, the unit can be place on a flat horizontal surface. 

2.  The  unit  can  be  placed  indoor  or  outdoor.  The  unit  is  weather  proof. 

Do  not  submerge  unit  in  water.  Do  not  expose  unit  to  water  for 
prolonged periods. Avoid accumulation of water and or snow on unit. 
Avoid exposing unit to direct sunlight. Remove unit from the exterior in 
extreme  or  harsh  weather,  including  but  not  limited  to  hurricane, 
typhoon, and cyclones seasons. Do not place the unit in area of high 
winds.  

3.  Do not place the remote temperature sensor more than 30 meters (98 

feet)  from  the  receiving  weather  station.  The  remote  temperature 
sensor  is  most  effective  if  there  are  no  obstruction  and  interference 
between the remote temperature sensor and the weather station. The 
remote temperature sensor might have to closer than 30 meters if the 
weather  station  is  not  able  to  receive  any  signals.    This  is  due  to 
obstructions and interference. The user might need to experiment with 
various locations to get the best reception.  


Configuring Weather Station to receive remote temperature signals. 
 

1.  Follow the above instructions to set up remote temperature sensor. 
2.  Press and hold 

CHANNEL 

button (6) on weather station for 3 

seconds. 

will flash. This will reset all temperature memories.  

3.  The weather station will begin scanning for signals for channel 1. As 

soon as signals are received for channel 1, the temperature will be 
displayed. The weather station will automatically scans for the other 
channels. It will scan each channel for approximately 3 seconds 
before skipping to the next channel.  

4.  Once all your channels are received press 

CHANNEL 

button (6) once 

to confirm the channel. 

will no longer be displayed. 

5.  The weather station will receive a new signal automatically every 30 

seconds to update the remote temperature.  

6.  Press 

CHANNEL

 button (6) on weather station repeatedly to toggle 

between channel 1 

CH1

, channel 2

 CH2

, and channel 3 

CH3

.  

Summary of Contents for WS6650

Page 1: ...6 CHANNEL button 7 MAX MIN button 8 Battery compartment 9 DC line in jack General notes 1 It is recommended to set up the remote temperature sensor before setting up the weather station clock See Configuring Remote Temperature Sensor s for more information Batteries and AC adapter should be used together 2 Please note all other clock weather station settings seize to function when the clock is in ...

Page 2: ...before use 2 Install batteries correctly by matching the polarities 3 Always replace a complete set of batteries 4 Never mix used and new batteries 5 Remove exhausted batteries immediately 6 Remove batteries when not in use 7 Do not recharge and do not dispose of batteries in fire as the batteries may explode 8 Ensure batteries are stored away from metal objects as contact may cause a short circui...

Page 3: ... Glowing weather icons Lit weather forecast icons will glow from dim to bright and back to dim at a regular interval Adjusting the weather station 1 Press HISTORY button 2 for 3 seconds until a beep sound is heard 2 Press RCC button 4 or C F button 5 to toggle between absolute ABS and relative REL atmospheric pressure 3 Press HISTORY button 2 to confirm 4 Press RCC button 4 or C F button 5 to togg...

Page 4: ...s attempting to synchronize with the radio control will flash when a strong signal is received and the clock will synchronize with the radio control This process can take up to 7 minutes will stop flashing and will be displayed once the signal is received and in synchronization will not be displayed if the clock is not able to synchronize within this period of time User may manually synchronize ag...

Page 5: ...tting Press MODE SET button 3 again Press Press RCC button 4 or C F button 5 to change the minute setting Press MODE SET button 3 again Press RCC button 4 or C F button 5 to change the year setting Press MODE SET button 3 again Press RCC button 4 or C F button 5 to change the month date and date month setting Press MODE SET button 3 again Press RCC button 4 or C F button 5 to change the month sett...

Page 6: ... back of the clock to deactivate the alarm Please note that alarm time setting seize to function when the clock is in RCC synchronization mode Wait until synchronization has ended before setting the alarm time Configuring the thermometer This weather station is equipped to synchronize up to 3 remote temperature sensors One remote temperature sensor is included Additional remote temperature sensor ...

Page 7: ...re than 30 meters 98 feet from the receiving weather station The remote temperature sensor is most effective if there are no obstruction and interference between the remote temperature sensor and the weather station The remote temperature sensor might have to closer than 30 meters if the weather station is not able to receive any signals This is due to obstructions and interference The user might ...

Page 8: ...channel 3 4 When is shown the display will automatically show through all the remote sensors channel Press CHANNEL button 6 to cancel Celsius Fahrenheit 1 Press C F button 5 to toggle between displaying the temperature in Celsius and Fahrenheit Temperature Trend 1 indicates the temperature is in a increasing trend 2 indicates the temperature is in a no change trend 3 indicates the temperature is i...

Page 9: ... Barometeric pressure range 930 mb to 1050 mb Power 3 x AAA Micro 1 5V batteries Consideration of duty according to the battery law Old batteries don t belong to domestic waste because they could cause damages of health and environment End user are committed by law to bring back needed batteries to distributors and other collecting points ...

Reviews: