background image

13 


повинна проглядатися підкачана паливна суміш. Якщо паливна суміш не заповнила ковпачок, 
натисніть на кнопку ручної підкачки палива ще кілька разів. 
4.1.3 

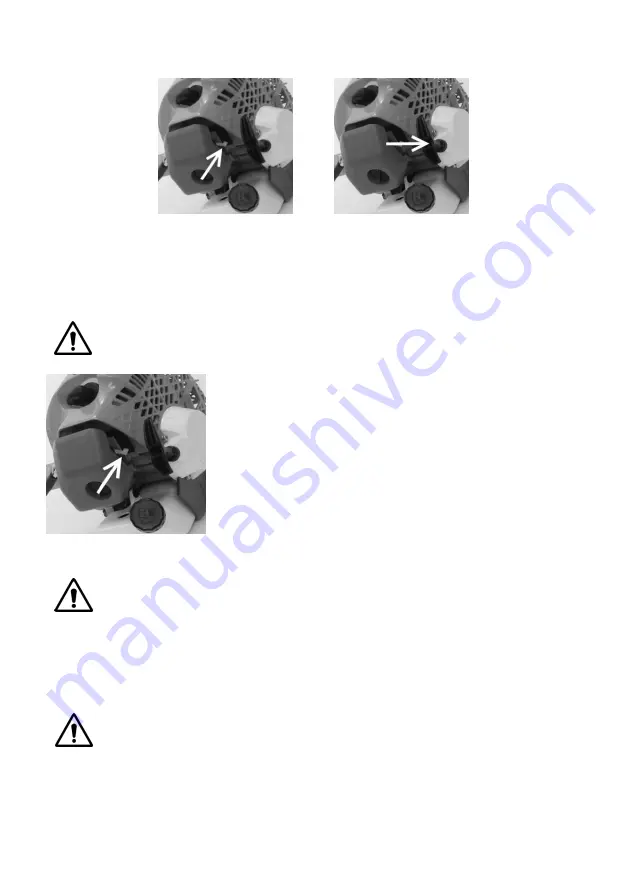
Важіль повітряної заслінки переведіть вгору, у положення «ХОЛОДНИЙ ЗАПУСК» (рис.9).                           


Рисунок 9 


Рисунок 10 


4

.1.4 На ручці управління встановіть запалювання 14 у положення «ВКЛЮЧЕНЕ», «ON». 

4.1.5 

На ручці управління натисніть курок акселератора 17 і заблокуйте його блокатором 16. 

4.1.6 

Притримуйте виріб однією рукою, вільною рукою потягніть за ручку стартера до його "

зачеплення". Кілька разів потягніть рукоятку стартера без ривка (рис.10) до появи перших ознак 
запалювання суміші в циліндрі двигуна. 


УВАГА!


Надмірні ривки шнура, а також витягування шнура до упору можуть 

викликати поламку механізму стартера. 


4.1.7 

Встановіть важіль повітряної засувки в середнє положення 

(

рис.11). 

4.1.8 

Декілька разів енергійно потягніть за ручку стартера, поки не 

заведеться двигун. Дайте двигуну прогрітися 5-10 секунд. 
4.1.9 

Важіль повітряної засувки переведіть вниз, потім натисніть на 

курок акселератора для розблокування. 
4.1.10 

Плавно натисніть на курок акселератора, доведіть двигун до 

необхідних обертів і приступайте до роботи. Косіть міцно тримаючи 
виріб обома руками за ергономічні рукоятки. 
4.1.11 

Для запуску прогрітого двигуна, скористуйтесь стартером не 

користуючись насосом. Повітряна засувка повинна бути відкрита, 
важіль в нижньому положенні. 


Рисунок 11 


УВАГА! Виріб обладнаний системою напівавтоматичного подання жилки. Під час 
роботи виробу на максимальних обертах злегка стукніть тримерною котушкою 
по ґрунту, довжина ріжучої жилки збільшиться приблизно на 25 міліметрів. 


4.2 

Зупинка двигуна виробу


4.2.1. 

Відпустіть курок акселератора. Двигун повинен трохи охолонути, працюючи на холостих 

обертах. 
4.2.2 

Переведіть вимикач запалювання за напрямком стрілки, вказаної на рукоятці управління, в 

положення «STOP». 
 

ПОПЕРЕДЖЕННЯ!  

Після закінчення паливної суміші у паливному баку необхідно дати двигуну охолонути 
перед наступною заправкою паливною сумішшю. 

 
Після закінчення робіт у паливному баку може залишитися невитрачена паливна суміш. 
Обов'язково злийте її в каністру. Не допускається залишати паливну суміш в баку виробу більш 
ніж на 12 годин. Це може призвести до нестабільної роботи двигуна. 


Summary of Contents for BCG-2917

Page 1: ...BCG 2917 Gasoline brush cutter BCG 2917 BCG 2917 UA EN RU...

Page 2: ...2 CONTENTS 1 3 2 Instruction manual english 22 3 37...

Page 3: ...3 G RTNER G RTNER BCG 2917 BCG 2917 BCG 2917 1 1 1 1 1 1 1 18 3 0...

Page 4: ...4 15 1 1 2 9 1 1 3...

Page 5: ...5 5 10 15 20 2 4 3 5 1 1 4 76 13...

Page 6: ...6 1 1 5 1 2 1 3 15...

Page 7: ...7 2 2 1 2 1 1 BCG 2917 1 0 1 3 2 1 2 2 1 3 5 40 80 2 1 3 3 2 BCG 2917 1 1 2 52 3000 300 8000 300 2900 3 9 92 30 1 1 2 1 2 1500 28 1530 9 20 30 300 420 96 107...

Page 8: ...8 6 5 8 0 1 2 3 2 3 BCG 2917 1 1 1 2 3 4 5 6 7 8 9 10 11 12 13 14 15 16 17 18 19 20 21 22 23 24...

Page 9: ...9 2 4 BCG 2917 8 18 20 22 19 20 21 23 10 3 3 1 3 1 1 2 2 3 3...

Page 10: ...10 4 4 3 1 3 5 5 3 1 4 6 6 7 7 8 8 3 1 5...

Page 11: ...11 3 1 6 7 3 1 7 3 2 3 2 1 API API JASO FB JASO FC 30 1 3 3 API JASO 2 30 2 0 5 17 1 0 33 2 0 67 3 0 100 5 0 167 3 2 2 92 93 95...

Page 12: ...12 15 30 1 3 2 3 30 1 3 2 4 4 4 1 4 1 1 4 1 2...

Page 13: ...13 4 1 3 9 9 10 4 1 4 14 ON 4 1 5 17 16 4 1 6 10 4 1 7 11 4 1 8 5 10 4 1 9 4 1 10 4 1 11 11 25 4 2 4 2 1 4 2 2 STOP 12...

Page 14: ...14 3 4 3 4 3 1 4 3 2 4 3 3 20 4 3 4 20 4 3 5 4 3 6 12 12 4 3 7...

Page 15: ...15 5 5 1 10 5 1 1 13 5 1 2 2 3 5 1 3 13 5 2 0 635 50 5 2 1 5 2 2 5 2 3 0 635 5 2 4 12 3 13 5 5 3 5 4 5 5 14 14...

Page 16: ...16 5 6 5 6 1 5 6 2 30 G RTNER 5 6 3 3 3 10 50 1...

Page 17: ...17 G RTNER 6 6 1 4 4 FF N 5 7...

Page 18: ...18 10 6 2 1 7 7 1 3 7 2 5 40 80 7 3 8 8 1 03039 14 7 32 044 369 57 00 056 375 43 22 8 2 G RTNER 8 3 G RTNER 1...

Page 19: ...19 38 056 375 43 22 8 4 1 2 3 4 5 6 7 30 1 20 9 BCG 2917 5 5 2 52 3000 300 8000 300 2900 3 9 92 30 1 1 2 1 2...

Page 20: ...20 1500 28 1530 9 20 30 300 420 96 107 6 5 8 0 1 2 3 03039 14 7 32 044 369 57 00 056 375 43 21 22 3 10 10 5 40 80 1 056 375 43 22 G RTNER 10 BCG 2917 6 6 1 1 1 1 4 1 1 1 1 4 1 1 1...

Page 21: ...1 1 11 G RTNER G RTNER G RTNER G RTNER 14 7 32 044 369 57 00 056 375 43 21 22 1 056 375 43 22 30 044 206 60 07 238 032 242 41 75 032 242 41 76 138 7 0472 32 72 12 067 588 90 35 69 1 067 622 33 51 56 0...

Page 22: ...mage is not completely eliminated to prevent injury to the user the third parties as well as failure of the product check the correctness of installation and fastening of all the elements of the produ...

Page 23: ...ool or blade does not touch the processing surface use the product only in daylight or good artificial light when starting the engine keep the steady position use only serviceable tool Use the product...

Page 24: ...n immediately stop the engine The increased level of vibration indicated a malfunction of the product Before proceeding check the availability and reliability of the bolts and nuts If necessary repair...

Page 25: ...thick Use of the product for any other purpose is a violation of the manual 2 1 2 The manufacturer seller is not responsible for any damages resulting from improper use or defects caused by making any...

Page 26: ...ithout load dB 107 Net gross weight engine kg 6 5 8 0 Weight rod kg 1 2 Service life years 3 These specifications were current at the time of publication of the manual The manufacturer reserves the ri...

Page 27: ...objects thrown away during operation When using a cutting string spool the string length limiting string cutting is performed by the blade installed on the guard To facilitate the work the product is...

Page 28: ...r convenience in use Fig 5 3 1 4 Blade installation align the hole in the shaft hub with the hole in the gear cup fig 6 insert the metal stop pin in the hole in the gear cup and the hole in the shaft...

Page 29: ...top pin in the gear cup hole and the shaft hub hole remove the nut from the hub of the product remove the cup from the shaft leaving the hub fig 7 holding the pin tighten the spool counterclockwise un...

Page 30: ...fuel tank refuel the product with the fuel mixture placing it in a horizontal position with the fuel tank cover facing up refuel the fuel tank of the product when the engine is shut off and far from...

Page 31: ...l mixture in the brush cutter tank for more than 12 hours This can lead to unstable operation of the engine WARNING Use only the trimmer string recommended by the manufacturer String diameter must not...

Page 32: ...this transport 5 PRODUCT MAINTENANCE 5 1 Air filter Clean or replace the foam rubber element of the air filter every 10 hours of operation The air filter state is one of the basic conditions of the en...

Page 33: ...of fuel This ensures removal of residual fuel from the carburetor unscrew the spark plug and pour into a cylinder about 30 ml of any high quality motor oil or oil for 2 cycle engines Pull the starter...

Page 34: ...uirements and the product has not lost its functional properties Certificate is issued by the authorized service centers of TM G RTNER 6 ROUTINE MAINTENANCE OF THE PRODUCT PARTS 6 1 Troubleshooting Li...

Page 35: ...ING When using the product keep to the following rules follow the instructions for preparing the fuel mixture use only the fuel mixture of gasoline oil in the ratio of 30 1 do not use the product cont...

Page 36: ...ed for environmentally clean disposal recycling of waste to the enterprises that meet the criteria of environmental safety ATTENTION Repair modification and inspection of TM G RTNER products should be...

Page 37: ...37 G RTNER G RTNER BCG 2917 BCG 2917 BCG 2917 BCG 2917 1 1 1 1 1 1 1 18...

Page 38: ...38 3 0 15 1 1 2 9 1 1 3...

Page 39: ...39 5 10 15 20 2 4 3 5 1 1 4 76 13...

Page 40: ...40 1 1 5 1 2 1 3 15...

Page 41: ...41 2 2 1 2 1 1 BCG 2917 1 0 1 3 2 1 2 2 1 3 5 40 80 2 1 3 2 2 1 1 2 52 3000 300 8000 300 2900 3 9 92 30 1 1 2 1 2 1500 28...

Page 42: ...42 1530 9 20 30 300 420 96 107 6 5 8 0 1 2 3 2 3 BCG 2917 1 1...

Page 43: ...43 1 2 3 4 5 6 7 8 9 10 11 12 13 14 15 16 17 18 19 20 21 22 23 24 2 4 BCG 2917 8 18 20 22 19 20 21 23 10 3 3 1 3 1 1 2 2...

Page 44: ...44 3 3 3 1 2 4 4 3 1 3 5 3 1 4 6 6 7 7...

Page 45: ...45 8 8 3 1 5 3 1 6 7 3 1 7 3 2 3 2 1...

Page 46: ...46 API API JASO FB JASO FC 30 1 3 3 2 API JASO 2 30 2 0 5 17 1 0 33 2 0 67 3 0 100 5 0 167 3 2 2 92 93 95 3 2 3 15 30 1 30 1...

Page 47: ...47 3 2 4 4 4 1 4 1 1 4 1 2 4 1 3 9 9 10 4 1 4 14 ON 4 1 5 17 16 4 1 6 10 4 1 7 11 4 1 8 5 10 11...

Page 48: ...48 4 1 9 4 1 10 4 1 11 25 4 2 4 2 1 4 2 2 STOP 12 3 0 4 3 4 3 1 4 3 2 4 3 3 20 4 3 4 20 4 3 5...

Page 49: ...49 4 3 6 12 4 3 7 12 5 5 1 10 5 1 1 13 5 1 2 2 3 5 1 3 13 5 2 0 635 50 5 2 1 5 2 2 5 2 3 0 635...

Page 50: ...50 5 2 4 12 3 13 5 5 3 5 4 5 5 14 14 5 6 5 6 1 5 6 2 2 30 2...

Page 51: ...51 G RTNER 5 6 3 3 3 10 50 1 G RTNER 6 6 1 4...

Page 52: ...52 4 FF N 5 7 10 6 2 1...

Page 53: ...53 7 7 1 3 7 2 5 40 80 7 3 8 8 1 03039 14 7 32 044 369 57 00 056 375 43 22 8 2 G RTNER 8 3 G RTNER 1 38 056 375 43 22 8 4 1 2...

Page 54: ...54 3 4 5 6 7 30 1 20 9 BCG 2917 5 5 2 52 3000 300 8000 300 2900 3 9 92 30 1 1 2 1 2 20 30 1500 28...

Page 55: ...55 1530 9 300 420 96 107 6 5 8 0 1 2 03039 14 7 32 044 369 57 00 056 375 43 22 3 10 10 5 40 80 1 056 375 43 22 G RTNER 10 BCG 2917 6 6 1 1 1 1 4 1 1 1 1 4 1 1 1 1 1 1 1 1 1...

Page 56: ...G RTNER G RTNER G RTNER G RTNER 14 7 32 044 369 57 00 056 375 43 21 22 1 056 375 43 22 30 044 206 60 07 238 032 242 41 75 032 242 41 76 138 7 0472 32 72 12 067 588 90 35 69 1 067 622 33 51 56 067 411...

Reviews: