
ANITA ©
29
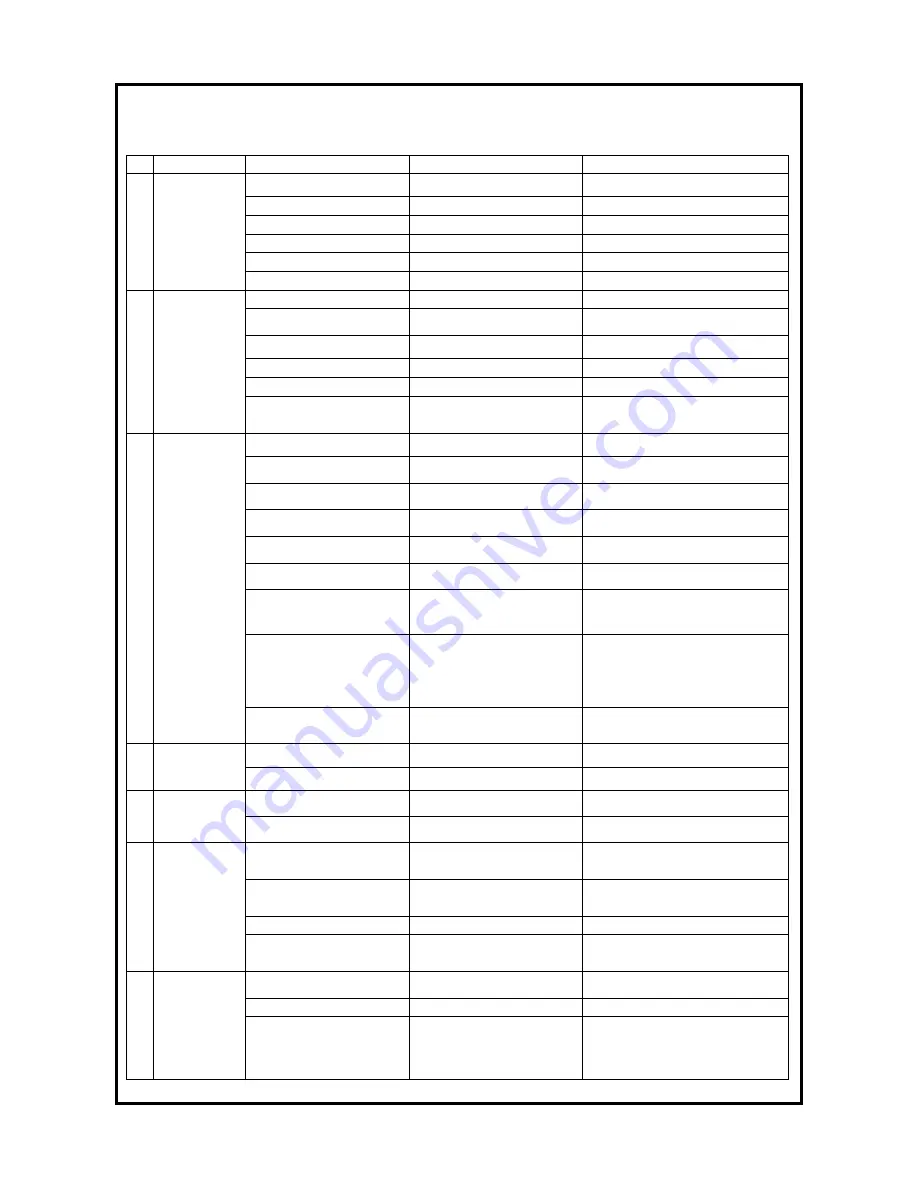
5) Cause of troubles and troubleshooting
1) Sewing machine troubleshooting
No
Symptom
Checkpoints
Root cause
Corrective action
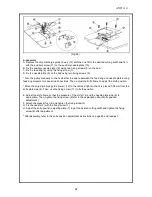
Direction and height of needle
Needle is inserted into wrong
position.
Reinsert the needle correctly.
Needle
Needle is bent.
Change the needle.
Bad timing of feed dog.
Adjust the timing of feed dog.
1
Needle breaks
Ascending level of needle bar
Bad timing of needle and hook.
Adjust the timing of needle and hook.
Height of needle
Bad timing of needle and hook.
Adjust the timing of needle and hook.
Gap between needle and hook Bad timing of needle and hook.
Adjust the timing of needle and hook.
Threading method
Wrong threading.
Thread the needle correctly.
Needle
Bent needle or broken needle
tip.
Change the needle.
Direction and height of needle
Needle inserted in the wrong
position.
Insert the needle correctly.
2
Thread breaks
Upper thread tension
Too tight upper thread tension.
Reduce tension of upper thread.
Lower thread tension
Too loose lower thread tensin.
Reduce tension of lower thread.
Working capacity of take-up lever
Loose upper thread.
Adjust take-up lever spring.
spring
Direction and height of needle
Needle inserted in the wrong
position.
Reinsert the needle in the right direction.
Needle
Bent needle or broken needle
tip.
Change the needle.
Threading
Thread passing at wrong
position.
Change the needle.
Ascending level of needle bar
Wrong timing of needle and
hook.
Adjust the timing of needle and hook.
Height of needle bar
Wrong timing of needle and
hook.
Adjust the timing of needle and hook.
Gap between needle and hook
Wrong timing of needle and
hook.
Adjust the timing of needle and hook.
3
Stitch skips
Remaining length of upper
thread
Adjust the thread adjusting device.
is short.
Due to bobbin racing during
Racing-proof spring
trimming, lower thread dropping
Change the racing protection
of bobbin case
from bobbin case becomes too
spring.
short to go up.
Take-up lever spring
Unable to lift lower thread due to Adjust the working capacity
weak take-up lever spring.
of take-up lever spring.
4
Upper thread
Too tight upper thread tension.
Reduce tension of upper thread.
does not sink.
Too loose lower thread tension.
Increase tension OF lower thread.
5
Lower thread
Too tight upper thread tension.
Too strong lower thread tension.
does not sink.
Increase tension of upper
thread.
Decrease tension of lower thread.
Tension of fixed blade
Tension not aligned between
Adjust tension of movable and fixed blade.
movable and fixed blade.
Trimming
Edge of movable and fixed
Abrasion in blade groove of
Replace movable and fixed blade.
errors
blades
movable and fixed blade.
Direction of needle
Wrong needle insertion.
Reinsert the needle correctly.
Check the crossing of trimmer Insufficeient crossing quantity of Adjust the stroke of movable and
cam notch mark and blade
movable and fixed blade.
fixed blade.
Upper thread
Too strong upper thread
tension.
Adjust tension of upper thread.
is pulled out
Too thick a needle for thread.
Check thickness of needle.
7
when sewing
Take-up lever pulls out the
upper
Adjust the up-stop position
commences.
Check th up-stop position
thread because the needle up
of needle.
of needle
and down position is too high.
Summary of Contents for GF-1116 Series
Page 30: ...ANITA 30...


