


4
2
、
Installation Guideline
★
Installation should be followed below requirements
:
The walls on top of the working face and next to the installation of induction cooker
must be heat-proof.
The laminated boards and adhesive used for installation must be heat-resistant.
For any installation method, the air under the cooker and behind the cooking range
should have enough space for cooling in order to ensure the safety of operating the
induction cooker.
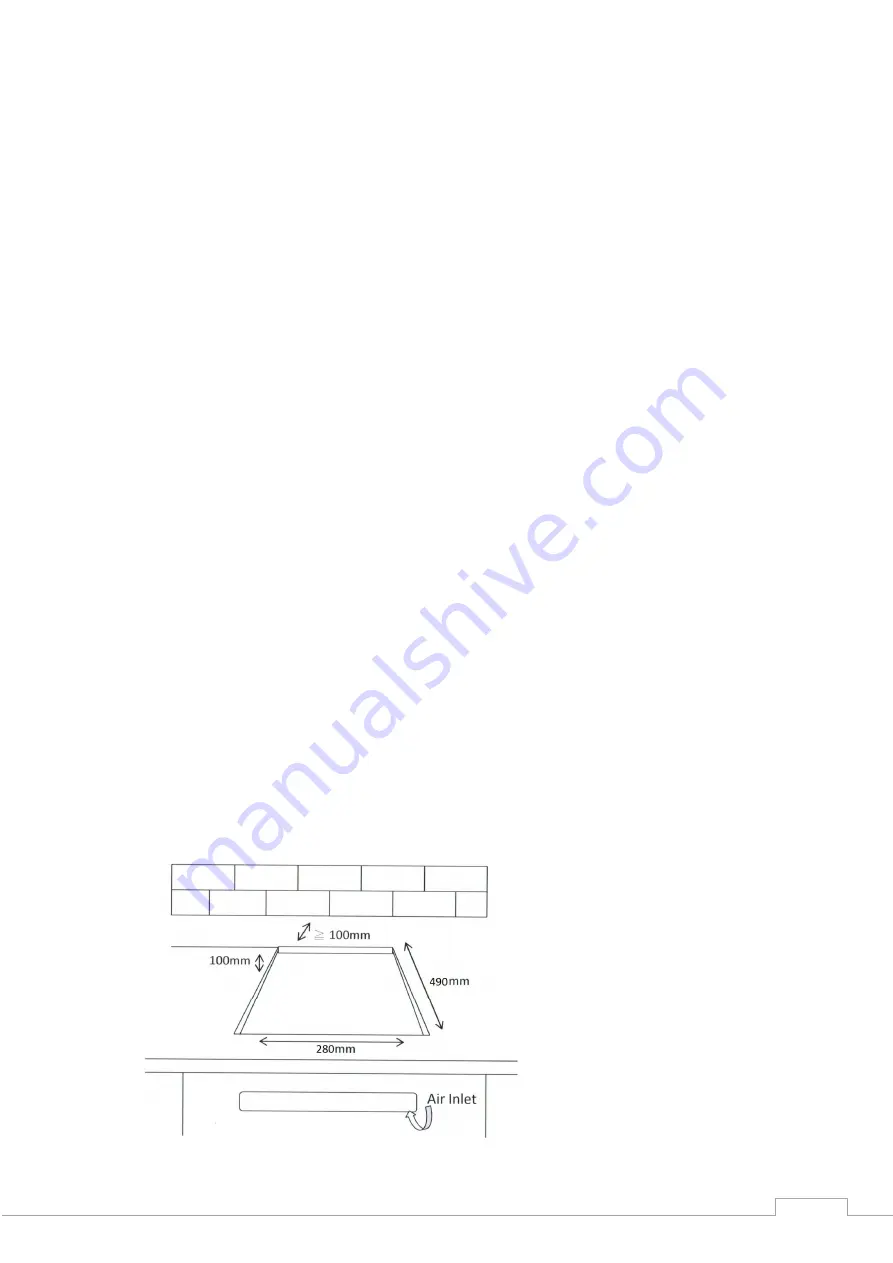
Based on the prescribed dimensions, a square hole is opened on the work table. Ensure
the distance between any side of the work table and the walls is
100mm.
Protect the opening: If in contact with damp, the laminated boards used in marking the
work table will easily expand more. It is required to stick varnish or special adhesive onto
the edge of the opening in order to prevent any steam from condensation under the
work table.
For any condition of installation, the induction cooker should have a good ventilation
condition with air inlet and air outlet not blocked.
Don’t place other equipments on the working face of the double cooking zones of the
induction cooker and within the range of 30cm around the working face.
If choosing a table-top installation, ventilation hole shall be at least 100mm from wall
surface.
The induction cooker must be complied with a 13A power outlet.
★
Steps on Installation
:
~ Open an installation hole on the worktop of cabinet as per
illustration 1
.
(Note : The height shall be more than 100mm)
Cut out dimensions(unit/mm)
(W) 280 x (D) 490 x (H) 100
illustration 1
Summary of Contents for EC-2368IC
Page 1: ...1 Two Zone Induction Cooker Model EC 2368IC Installation Operating Instructions...
Page 14: ...14 15 I II 16 18 19 20 22 I II III IV V 23 I II 24 24 25 I II...
Page 15: ...15 I Garwoods EC EC 2368IC II 99 1 2 3 4 5 6 7 8...
Page 16: ...16 1 2 3 4 100mm 5 6 7 30cm 8 100mm 9 13 1 100mm mm 280 x 490 x 100...
Page 17: ...17 2 100c 3...
Page 18: ...18 3 4 15cm 100c...
Page 22: ...22 IV 1 2 3 4 5 6 7 V 4 20 LED E2...
Page 23: ...23 I II...
Page 24: ...24 EC 2368IC AC220 50 2800 x x 288x 510x 65 7...
Page 25: ...25 I LED E0 E1 E2 E3 E4 IGBT E5 E6 II z 789 IMO D e D 789 789 789 S D IY G S D 78 9G 789e D...


