background image

-19-

RECOMMENDS SYNTHETIC

2 CYCLE ENGINE OIL:

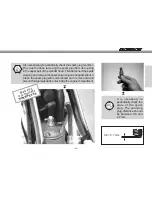
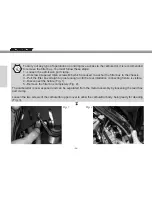
The fuel tank cap is of the quick release type. To open the

cap, lift the tab and turn it 1/4 turn in counterclockwise

direction. To close it, place cap with the words GAS GAS in

the upper position, and turn the tab in clockwise direction.

It is important to check periodically the condition of the cap

sealing O’ring to insure proper sealing.

This engine is

designed tu burn

a   m i x t u r e   o f

combustible fuels,

lead free petrol and oil.

C

C

8

Summary of Contents for 206 TXT PRO

Page 1: ...MANUAL DEL USUARIO USER MANUAL MANUEL D ENTRETIEN LIBRETTO D USO BETRIEBSANLEITUNG ...

Page 2: ......

Page 3: ...ENGLISH USER MANUAL USER MANUAL ...

Page 4: ......

Page 5: ...ny years of competition and experimentation in this demanding discipline as well as the many great successes achieved thanks to great trial riders who have contributed with their expertise to the basic data that have allowed us to create a high level motorbike a GAS GAS which counts on its low weight as a significant key factor Congratulations for making the right choice With your skills at the co...

Page 6: ...ld these warnings not be heeded the guarantee may be automatically invalidated Various notes These are the indications necessary for the optimal control and adjustment operations together with those tasks of conservation and maintenance of the motorbike in order that you may obtain the greatest possible satisfaction from your vehicle The aim of this Manual is to help the user to minimise or avoid ...

Page 7: ... cleaning 23 Fuel tank dismantle 24 Radiator fill in 24 Spark dismantle 25 Spark check 25 Air filter box dismantle 26 Carburettor dismantle 27 Carburettor capacity check 27 Carburettor cleaning 27 Inlet valves dismantle 28 Inlet valves 28 Clutch operations 29 Discs and clutch spring 29 Air bleed 29 Water pump draining 29 Front suspension 30 31 Rear suspension 31 Swing arm articulations 32 Articula...

Page 8: ...ts that become apparent within the period established in the Law decree 23 2003 on the 10th of July covering Warranties on Consumer Goods Sold from the time of delivery and in accordance with the Directive 1999 44 EC for other members of the European Community For countries outside the European Community the Warranty Period will be determined by the existing regulations in those countries Neverthe...

Page 9: ... the specifications set out in the User s Manual e The vehicle has been altered or modified in any way or fitted with components other than those expressly authorised by GG as accepted components of the vehicle f The vehicle has been stored or transported in a way that is not in accordance to the corresponding technical requirements g The vehicle has been used for special purposes other than ordin...

Page 10: ...of a claim under Warranty or to arrange an inspection of the defect by an expert from GG Any additional obligations arising out of guarantees on parts replaced free of charge or any other service rendered free of charge are excluded from the effects of this present warranty The Warranty on parts replaced within the Warranty Period will end at the expiry date for the Warranty Period of the product ...

Page 11: ...e recommended in order to guarantee the correct working of the engine It is important to warm the engine to the optimum working temperature every time the motorbike is used Synthetic or semi synthetic 2 stroke oil should be used at 2 in the oil petrol mix 9 RECOMMENDS THE USE OF OIL ...

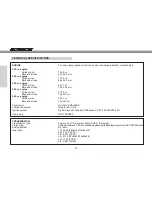
Page 12: ...6 x 60 mm 300 cc engine Cylinder size 294 1 cc Bore and stroke 79 x 60 mm Carburettor Dell Orto PHBL26BS Lubrication system Mixture 50 1 2 Ignition system Digital magnetic flywheel CDI Kokusan 125 200 250 280 300 Spark plug NGK BPR5ES TRANSMISSION Transmission type 6 gears Four Six system by GAS GAS Patented Clutch type Hydraulic command 1 3 discs variable progressive with diaphragm system by GAS ...

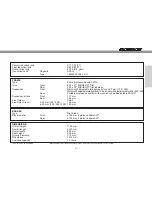
Page 13: ...nium bars 250 280 300 Rear Variable progressive system with mono shock multiadjustable SACHS Suspension stroke Front 177 mm Rear 164 mm Front fork oil SAE 5 Front fork oil level ø 40 mm 125 200 160 mm ø 40 mm 250 280 300 180 mm BRAKES Type Disc brake Disc diameter Front ø185 mm 4 piston calipers AJP Rear ø150 mm 2 piston calipers AJP DIMENSIONS Overall height 1180 mm Overall lenght 2015 mm Overall...

Page 14: ...dlight 13 Front tyre 14 Front brake disc cover 15 Front brake disc 16 Cylinder 17 Gear pedal 18 Carburettor 19 Left foot peg 20 Chain guide 21 Chain slide 22 Chain 23 Rear sprocket cover 24 Rear sprocket 25 Rear rim 26 Rear tyre 28 Exhaust protection 29 Frame 30 Exhaust 31 Radiator 32 Handlebar 33 Headlight 34 Front tyre air valve 35 Front brake disc 36 Sidestand lever 37 Swingarm 38 Right foot pe...

Page 15: ...ition cover 51 Fuel tank 52 Fuel tank cap 53 Left hanle grip 54 Clutch lever 55 Light controls 56 Clutch pump 57 Handlebar 58 Left bottle regulation 59 Multifunction 60 Warning indicators 61 Right bottle regulation 62 Front brake pump 63 Throttle cover 64 Front brake lever 65 Throttle grip 66 Silencer 67 Right foot peg 68 Rear brake pedal 69 Exhaust pipe elbow 70 CDI Switch 70 ...

Page 16: ...Lubricate Adjust Every year 30 hours Every race Every race Every race Every race Every race 30 hours Every race Every race Every race 30 hours 60 hours Every race Every race Every race If is necessary 30 hours If is necessary If is necessary If is necessary If is necessary First 5 hours If is necessary First 5 hours Every cleaning Every cleaning Every cleaning Every cleaning Clean Every 2 years 60...

Page 17: ...ery race Every race Every race 60 hours Every race Every race Every race Every race Every race Every race If is necessary If is necessary If is necessary If is necessary 5 hours If is necessary If is necessary If is necessary If is necessary Every cleaning Every cleaning Every cleaning Every cleaning 500 hours 200 hours If is damaged Every 2 years Every year If is damaged If is damaged If is damag...

Page 18: ...n printed on the front and this information must coincide with that contained in the vehicle documents We recommend that this information be entered in the box below Key identification numbers The moped carries one key set The identification number appears right on the key joints This number may be quoted when ordering a spare to replace a lost key 16 The new GAS GAS TXT Pro carries the a p p r o ...

Page 19: ...en located on the underside of the left hand grip This is an orange colour button To start the right hand indicator move this switch to the right and likewise to start the left hand indicator move this switch to the left All light controls have been located on the left hand grip the various positions available are reached by sliding the main switch which is on the left end of the grip C C C ...

Page 20: ...locking system could be damaged I Use premium gasoline with an octane rating equal to or higher than that shown in the table Gasoline is extremely flammable and can be explosive under certain conditions Always stop the engine and do not smoke Make sure the area is well ventilated and free from any source of flame or sparks this includes any appliance with a pilot light C OCTANE RATING METHOD Antik...

Page 21: ...turn in counterclockwise direction To close it place cap with the words GAS GAS in the upper position and turn the tab in clockwise direction It is important to check periodically the condition of the cap sealing O ring to insure proper sealing This engine is designed tu burn a mixture of combustible fuels lead free petrol and oil C C 8 ...

Page 22: ... fuel tap A must be forward rearward for normal operation When turned upwards it opens the reserve downwards it turns off the fuel 8 A B C C Reserve Open Closed The choke B is a device for aiding the engine start if this is cold The enigne w i l l g e t a g o o d temperature in a short time and it won t damage 8 C ...

Page 23: ...m This play must never be eliminated Like the c l u t c h lever the front brake lever must be in the ideal position Again the play must not exceed 3mm This play must never be eliminated 7 3 mm maximum C 7 3 mm maximum This is the position the kick start should be in when not being used 8 I C ...

Page 24: ...ait a few minutes To check the oil level unscrew the cap B and examine the level of oil using the dip stick The level should be between the marked maximum and minimum levels If it is too high drain the excess If it is too low add the necessary quantity by opening the oil cap Use the same type and make of lubricant as that which is already in the engine When topping up the oil open the cap A 8 E n ...

Page 25: ...Clean with water and detergent then dry and lubricate with oil designed for filters Ensure its correct collocation once clean In the lower part of the filter chamber there is a leaf that acts as the escape valve for the liquids and or other materials that may build up in the filter chamber Check this valve is working properly C ...

Page 26: ...ck that the gasoline cap and fuel cock are closed properly Next pull out the fuel tube end A which is inserted in the fuel cock The third step is to unscrew the Allen screw M4 B fastening the front upper part of the tank Once the fuel tank is released lift it at the front section and remove the tank completely out the inside of the chassis C The engine must be cool before removing the radiator cap...

Page 27: ...y check the spark plug condition This must be done removing the spark plug from its housing in the upper part of the cylinder head First disconnect the spark plug cap and remove the spark plug using an adequate wrench Clean the spark plug with compressed air to remove dirt and prevent foreign material to enter inside the engine compartment C I Spark plug recommended NGK BPR5 ES ...

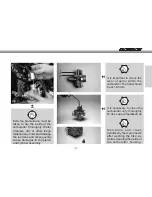
Page 28: ...r the filter box to the chassis 3 Pull the filter box straight up just enough until the rear intallation connecting fixture is visible 4 Disconnect the fixture Fig 1 5 Remove the filter box completely Fig 2 C Fig 1 Fig 2 The carburettor is now exposed and can be separated from the motor assembly by loosening the reed box port clamp Loosen the two screws of the carburettor upper cover to allow the ...

Page 29: ...tor very thoroughly To do so use compressed air It is important to check the level of petrol within the carburettor The float should be at 18 5mm C C C I Extreme precautions must be taken to dry the inside of the carburettor thoroughly Water droplets dirt or other forign material may enter and damage the reed box and consequently cause damages to the piston and cylinder assembly Fig 3 ...

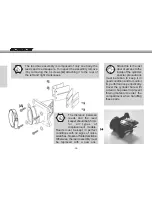
Page 30: ...ling these parts The reed box assembly is composed of only one body the reeds and reed keepers To inspect the assembly remove it by removing the 4 screws A attaching it to the rear of the left and right crankcases C I A C The distance between reeds and the reed keeper should be 6 5 mm for all types of displacement models Reeds must be kept in perfect conditions with no signs of nicks scratches bro...

Page 31: ... air bleeder Check clutch discs for possible wear after many hours of use For correct operation the minimum measure should be between 9 75 to 9 85 mm C 17 1 9 75 0 1 0 A C A The circle indicates the location of drainage of the water pump 29 C Spring height of the clutch stack should measure between 4 4 and 4 5 mm C 7 7 7 ...

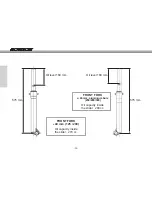
Page 32: ...Oil level 180 mm 575 mm Oil level 160 mm 575 mm FRONT FORK ø 40 mm 125 200 Oil capacity inside the slider 270 cc FRONT FORK ø 40 mm aluminium bars 250 280 300 Oil capacity inside the slider 290 cc 30 ...

Page 33: ...lider C The front suspension is adjusted manually Right hydraulic extension Left hydraulic compression C A B 7 7 The length of the shock absorber spring can be adjusted by turning the toothed ring C using a special wrench 7 C shock absorber The shock absorber compression can be adjusted by turning the screw D located in the lowest area of the shock absorber 7 C D ...

Page 34: ...te to periodically remove and verify the condition of the swingarm bearings and holders 7 The link adjustments at the lower part of rear suspension must be periodically cleaned verified and lubricated with grease 7 C C 32 ...

Page 35: ...ase to the footrests springs and fixtures 8 Use special oil to lubricate the following 1 All linkages of the brake and clutch levers C 2 The linkage of the gear shift lever C 8 C 8 8 3 Also the rear brake pedal bearings ...

Page 36: ...allow smooth operation of the gasoline control C 7 6 The secondary chain must be cleaned and lubricated thouroughly and frequently since it is exposed to inclemency and constant rubbing 8 C 34 C 5 Apply grease to the linkage of the engine starting lever 8 ...

Page 37: ...requently lubricate the chain tensor spring because ii is under great stress C 7 9 The gas control must be frequently cleaned and lubricated this should be done especially after washing the motorcycle with pressurizad water washers C 7 ...

Page 38: ... in opposite direction of the wheel travel C 7 To regulate the chain slack and center the rear wheel use the shaft excentrics which can be easily graduated C 7 7 The chain tension must allow a slack near the tensor of about 2 cm C 36 ...

Page 39: ...50 bar normal 0 420 bar competition Rear wheel pressure 0 350 bar normal 0 300 bar competition 7 A l l t y r e s c o n d i t i o n s must checked to insure optimum road adherence possible Fig 1 Bad condition Fig 2 Good condition C Front tyre MICHELIN TRIAL 2 75 x 21 Rear tyre MICHELIN TRIAL 4 00 x 18 tebeless Fig 1 Fig 2 ...

Page 40: ...te the air trapped in the brake circuit 7 The front brake fluid level can be verified watching through the transparent inspection window 7 7 Pad brakes wear front and rear must be checked from time to time to insure an efficient braking power under all circumstances C 8 C C ...

Page 41: ...nder support Verify fluid level periodically and refill if necessary C To verify the reservoir level you must remove the fuel tank and place de oil reservoir in horizontal position to check the real fluid level Must be filled between the marks MIN MAX C MIN MAX ...

Page 42: ...7 8 7 8 25 7 8 3 4 7 8 7 8 7 8 40 10 7 8 12 12 13 7 8 11 5 13 25 PART NAME Front wheel axle Chassis to swingarm fastener Upper shock absorber fastener Lower shock absorber fastener Connecting rods caps Handlebars Hand levers Radiator fasteners Front bridge wing Brake pedal Muffler fasteners Rear wheel axle Rear brake caliper fastener Front brake caliper fastener Exhaust pipe elbow fastener Engine ...

Page 43: ...e wheels do not touch the ground if possible place cardboards under the wheels Cover the motorcycle to protect it from dust and dirt When starting off after an extended storage Remove the plastic bag from the exhaust pipe Tighten the spark plug Fill the fuel tank General lubrication Inspect tyre pressure and inflate to the specified pressure if necessary To avoid excessive ageing of the plastic pa...

Page 44: ...ourney kilometres travelled time average speed maximum speed length of time with motor running and total time and fuel level The data relative to the distance travelled and total time of use is stored in the memory even when the apparatus is switched off When the multifunction apparatus is not activated it displays a clock The wheel circumference value is adaptable as is the measuring system metri...

Page 45: ...er 1 2 TRIP 1 2 0 999 9 km or 0 624 9 miles 0 1 km or miles Mileometer ODO 0 999 999 km or 0 624 999 miles 0 1 km or miles Time in use RT 0 00 00 99 59 59 1 second Total time TT 0 00 9999 59 1 minute Clock 0 00 00 23 59 59 1 second 1 minute 1 o 0 1 km h m h 1 o 0 1 km h m h 1 o 0 1 km h m h 0 1 0 1 50 ppm 50 ppm 50 ppm Initial voltage 12v CC Speed sensor Non contact magnetic sensor Tachometer entr...

Page 46: ...the second row The digital tachometer displays up to 19 900 rpm The tachometer signal can be read from the CDI Capacitator Discharge Ignition or the ignition coil Gear change indicator according to rpm This function permits setting an indicator for changing gear at a specific rpm level The tachometer bar flashes when the rpm reaches the specific level and stops flashing when the gear is changed MA...

Page 47: ...RIP 2 MAX and MAX RPM to zero separately 2 Return the data in TRIP 1 AVG and RT at the same time The data of the ODO CLOCK and TT cannot be returned to zero OPERATION OF THE GEAR CHANGE ACCORDING TO RPM 1 Press the MODE button to switch to the RPM screen accelerate to the rpm which is desired for the gear change indicator to be activated 2 Press the RESET button to confirm and establish the gear c...

Page 48: ...and the configuration of the clock digits opens Press the RESET button to increase the value of the flashing digit one by one press the MODE button to confirm the configuration and pass on to the following digit Press the MODE button to switch to the adjustment screen of the gear change according to rpm once the clock has been configured The screen will show RPM rXXX00 Press the RESET button to in...

Page 49: ... 47 11 Press the RESET button to increase the value of the flashing digit one by one press the MODE button for 2 seconds to confirm the digit change and pass on to the following digit ...

Page 50: ...nce of 30 centimeters minimum this will insure the correct gloss of the plastics and adherence of the self adhesive labels that decorate the motorcycle SAFE RIDING OF THIS MOTORCYCLE Safe riding of a motorcycle does not only depend on the vehicle The driver s intelligence and common sense are key factors to be taken into consideration It is recommended that you practice your favorite sport wearing...

Page 51: ...eakage or malfunction it is recommended that the owner contact his official dealer to correct this problema Besides the homologated vehicle you have received a complementary kit for a racing version of this same vehicle Be advised that this version is not homologated Manufacture identification plate 1 Catalyzed with with secondary air Available 1 Muffler Available 1 Carburettor jets Available 1 Fr...

Page 52: ...x16 12 Front left turn signal 13 Turn signal box 14 Trial license holder homologated 15 Stand spring 16 ULS screw 8x12 8 8 17 Self locking M6 nut with galvanized washer 18 Mirrors 20 Carburettor kit 1 2 3 4 5 6 7 8 11 12 13 14 15 16 17 18 20 BT280634018 BE25636015 x2 BT280634018 BT280334015 BT280634019 T2206000 x2 T0506016N x2 T0706025 x3 T0706316 x2 BT280634019 MT120690100 L300720 BT280634019 BE2...

Page 53: ......

Page 54: ......

Page 55: ......

Page 56: ...ANDE L USAGE DE L HUILE CONSIGLIA L USO D OLIO EMPFIEHLT DEN GEBRAUCH VON ÖL C UNICEF nº 17 Poligon Industrial Torremirona 17190 Salt Girona SPAIN Tel 34 902 47 62 54 Fax 34 902 47 61 60 E mail officegg gasgasmotos es partsgg gasgasmotos es JUNIO JUNE JUIN GIUGNO JUNI 2006 ...

Reviews: