


GASBOY Series 9800A
3-6
03/07/03
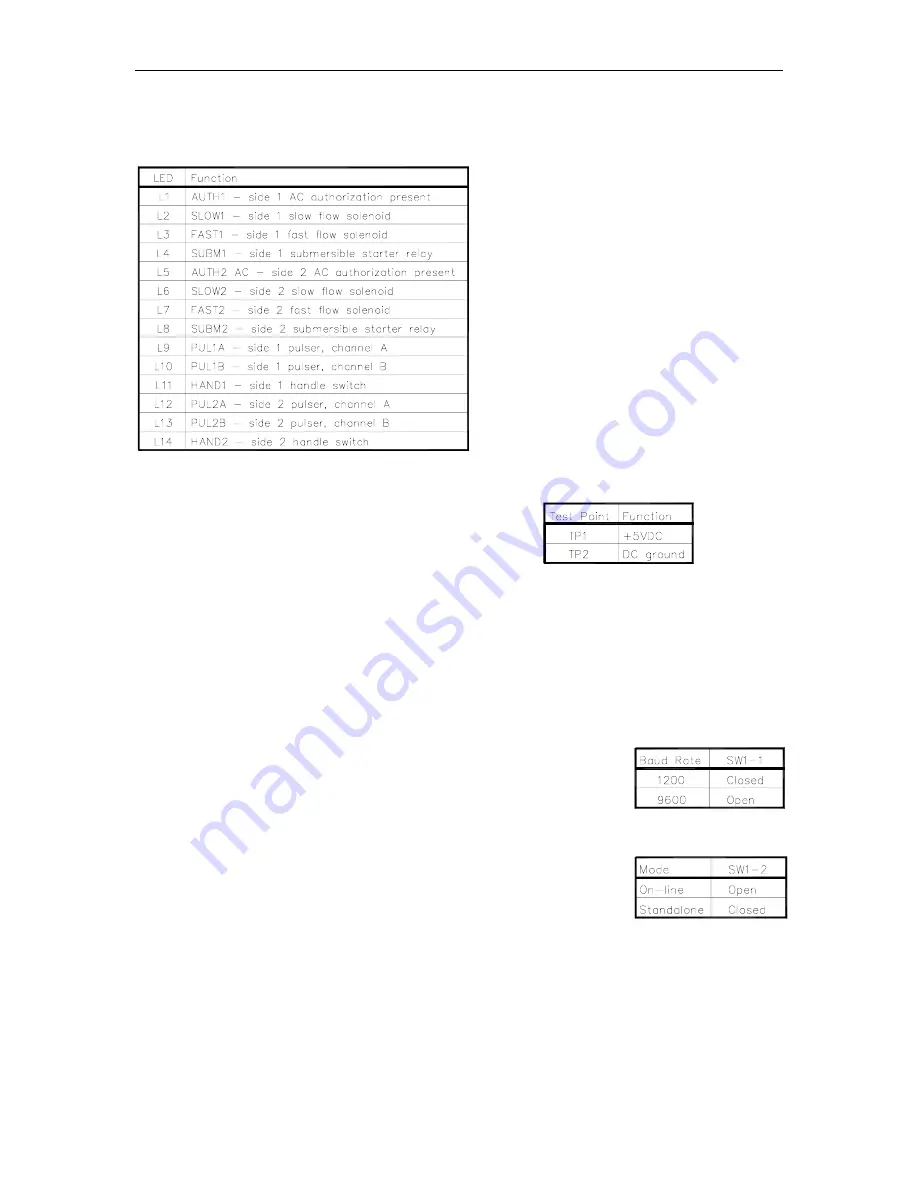
LED Indicators
The LED indicators provided enable you to monitor 9800A operations.
Test Points
Test points are provided for voltage measurements.
SW Switches
The 9800A can be configured for various operating conditions using the switches located on the
CPU PCB. Check these switches and change their settings if necessary. Switch settings should
be changed with the power switch OFF. The new settings are read by the CPU PCB when the
power is turned ON again.
SW1
SW1-1 Baud Rate
This switch is set to reflect the communication rate of the GASBOY RS-
485 pump loop; open for 9600 baud or closed for 1200 baud. The
GASBOY CFN system communicates at 9600 baud.
SW1-2 Mode
This switch should be open for the 9800A to communicate on the
GASBOY RS-485 pump loop (on-line) and closed for all other
applications (standalone).
Summary of Contents for 9800A Series
Page 8: ......
Page 11: ...Chassis Wiring 03 07 03 2 3 115VAC 60 CYCLE PUMP WIRING...
Page 12: ...GASBOY Series 9800A 2 4 03 07 03 115VAC 60 CYCLE DISPENSER WIRING...
Page 13: ...Chassis Wiring 03 07 03 2 5 230VAC 50 CYCLE PUMP WIRING...
Page 14: ...GASBOY Series 9800A 2 6 03 07 03 230VAC 50 CYCLE DISPENSER WIRING...
Page 15: ...Chassis Wiring 03 07 03 2 7 115VAC 60 CYCLE FRONT LOAD OPTION PUMP WIRING...
Page 16: ...GASBOY Series 9800A 2 8 03 07 03 115VAC 60 CYCLE FRONT LOAD OPTION DISPENSER WIRING...
Page 17: ...Chassis Wiring 03 07 03 2 9 230VAC 50 CYCLE FRONT LOAD OPTION PUMP WIRING...
Page 18: ...GASBOY Series 9800A 2 10 03 07 03 230VAC 50 CYCLE FRONT LOAD OPTION DISPENSER WIRING...
Page 19: ...Chassis Wiring 03 07 03 2 11...
Page 20: ......
Page 39: ...Electronic Head Assembly 03 07 03 3 19 Connectors Relay Drive Pump Motor Power...
Page 60: ......
Page 65: ...Replacement Instructions 03 07 03 5 5...
Page 72: ...GASBOY Series 9800A 5 12 03 07 03...
Page 75: ......
Page 76: ...APPENDIX PARTS LIST...
Page 77: ......


