background image

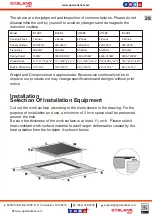
Before You Install The Cooktop, Make Sure That

• The work surface is square and level, and no structural members interfere with
   space requirements.
• The work surface is made of a heat-resistant material.
•  If the cooktop is installed above an oven, the oven has a built-in cooling fan
•  The installation will comply with all clearance requirements and applicable
   standards and regulations.
•  A suitable isolating switch providing full disconnection from the mains power
   supply is incorporated in the permanent wiring, mounted and positioned to
   comply with the local wiring rules and regulations.
   The isolating switch must be of an approved type and provide a 3 mm air gap
   contact separation in all poles(or in all active phase conductors if the local
   wiring rules allow for this variation of the requirements).
• The isolating switch will be easily accessible to the customer with the cooktop
   installed.
• You consult local building authorities and by-laws if in doubt regarding installation.
• You use heat-resistant and easy-to-clean finishes(such as ceramic tiles) for the
   wall surfaces surrounding the cooktop.

When You Have Installed The Cooktop, Make Sure 
That

• The power supply cable is not accessible through cupboard doors or drawers.
• There is adequate flow of fresh air from outside the cabinetry to the base of the
   cooktop.
• If the cooktop is installed above a drawer or cupboard space, a thermal protection
   barrier is installed below the base of the cooktop.
• The isolating switch is easily accessible by the customer

Before Locating The Fixing Brackets

The unit should be placed on a stable, smooth surface(use the packaging). Do not
apply force onto the controls protruding from the cooktop.

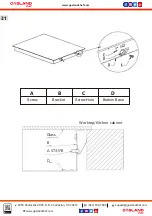
Adjusting The Bracket Position

Fix the cooktop on the work surface by screw 4 brackets on the bottom of 
cooktop(see picture) after installation.

30

(844) 538-7890

support@gaslandchef.com

www.gaslandchef.com

8350 Patriot Blvd STE B, N. Charleston, SC 29418

www.gaslandchef.com

Summary of Contents for IH12BF

Page 1: ...ons regarding the operation mainte nance service or warranty of the appliance should be directed to GASLAND Chef Electric Induction Cooktop Instruction For Installation And Use Model No IH12BF IH30BF...

Page 2: ...efully before installing or using this appliance No combustible material or products should be placed on this appliance at any time Please make this information available to the person responsible for...

Page 3: ...result in death Hot Surface Hazard During use accessible parts of this appliance will become hot enough to cause burns Do not let your body clothing or any item other than suitable cookware contact th...

Page 4: ...ructor should be satisfied that they can use the appliance without danger to themselves or their surroundings Do not repair or replace any part of the appliance unless specifically recommen ded in the...

Page 5: ...te remote control system CAUTION The cooking process has to be supervised A short term cooking process has to be supervised continuously WARNING In order to prevent tipping of the appliance this stabi...

Page 6: ...F control 6 Boost function control 7 Stop and go function control 1 Max 1500W zone 2 Max 2000W zone 3 Glass plate 4 Control panel 1 Heating zone selection controls 2 Timer control 3 Power Timer regula...

Page 7: ...2000W zone 2 Max 1500W zone 3 Max 2000W zone 4 Max 1500W zone 5 Glass plate 6 Control panel 1 Heating zone selection controls 2 Timer control 3 Power Timer regulating control 4 Key lock control 5 ON O...

Page 8: ...zone 3 Max 2000W boost 2600W zone 4 Max 1500W boost 2000W zone 5 Max 2300W boost 3000W zone 6 Glass plate 7 Control panel 1 Heating zone selection controls 2 Timer control 3 Power Timer regulating con...

Page 9: ...a base suitable for induction cooking Look for the induction symbol on the packaging or on the bottom of the pan You can check whether your cookware is suitable by carrying out a magnet test Move a ma...

Page 10: ...hey may scratch the glass Using Your Induction Cooktop To start cooking 1 Touch the ON OFF control After power on the buzzer beeps once all displays show or indicating that the induction cooktop has e...

Page 11: ...wer will increase by one stage each time till stage 9 If The Display Flashes Alternately With The Heat Setting This means that You have not placed a pan on the correct cooking zone or The pan you re u...

Page 12: ...sure the power display shows 0 then shows H 3 Turn the whole cooktop off by touching the ON OFF control 4 Beware of hot surfaces H will show which cooking zone is hot to touch It will disappear when t...

Page 13: ...ton the heating zone will begin to work at boost mode The power display will show P to indicate that the zone is boosting 3 The boost power will last for 5 minutes and then the zone will go back to th...

Page 14: ...t boost mode The power display will show P to indicate that the zone is boosting 3 The boost power will last for 5 minutes and then the zone will go back to the power stage which was set before boost...

Page 15: ...wer stage selected zone of the right zone set power stage 4 or less then set the middle zone boost If the selected zone on the right side was set higher than 4 the P and 9 symbols will flash on the di...

Page 16: ...ill activate when the total electricity loading of the cooking zones exceeds 3500W The function decreases the power to the other cooking zones Using The Pause Function STOP GO For IH12BF Pause functio...

Page 17: ...ection button that you wish to use STOP GO an indicator next to the key will flash 2 Touch the button STOP GO the cooking zone indicator will show ll And then the operation of the induction cooktop wi...

Page 18: ...r will display A 3 If you want to cancel the keep warm touch the button and hold for 3 seconds in the meantime The heating zone will go back to 0 power stage Using The Keep Warm For IH90BF Keep warm f...

Page 19: ...d all the controls except the ON OFF control are disabled To lock the controls Touch and hold the keylock control for 3 seocnd The timer indicator will show Lo To unlock the controls 1 Make sure the c...

Page 20: ...keep cooking down the induction cooktop for a further 1 minute Auto Shutdown Another safety feature of the cooktop is auto shutdown This occurs whenever you forget to switch off a cooking zone The de...

Page 21: ...he or control of the timer to decrease or increase by 10 minutes If the setting time exceeds 99 minutes the timer will automatically return to 0 minute 4 To cancel the timer touch the timer control an...

Page 22: ...will automatically return to 0 minute 4 To cancel the timer touch the heating zone selection control and then touch the timer control The minute display will show 5 When the time is set it will begin...

Page 23: ...1 Cooking Guidelines Take care when frying as the oil and fat heat up very quickly particularly if you re using Power Boost At extremely high temperature oil and fat will ignite spontaneously and thi...

Page 24: ...g The exact cooking time will depend on the thickness of the steak and how cooked you want it Times may vary from about 2 8 minutes per side Press the steak to gauge how cooked it is the firmer it fee...

Page 25: ...you Heat setting Suitability Delicate warming for small amounts of food Melting chocolate butter and foods that burn quickly Gentle simmering Slow warming 1 2 3 4 5 6 7 8 9 Reheating Rapid simmering...

Page 26: ...l at a 30 angle and scrape the soiling or spill to a cool area of the cooktop 3 Clean the soiling or spill up with a dish cloth or paper towel 4 Follow steps 2 to 4 for Everyday soiling on glass above...

Page 27: ...ur finger when touching the controls The touch controls are difficult to operate The glass is being scratched This may be caused by the construction of your cookware layers of different metals vibrati...

Page 28: ...induction cooktop off at the wall and contact a qualified technician The induction cooktop or a cooking zone has turned itself off unexpectedly a tone sounds and an error code is displayed typically a...

Page 29: ...he hole Be sure the thickness of the work surface is at least 1 inch Please select heat resistant work surface material to avoid larger deformation caused by the heat radiation from the hotplate As sh...

Page 30: ...tion cooktop is well ventilated and the air inlet and outlet are not blocked Ensure the Induction cooktop is in good work state As shown below NOTE The safety distance between the hotplate and the cup...

Page 31: ...ktop installed You consult local building authorities and by laws if in doubt regarding installation You use heat resistant and easy to clean finishes such as ceramic tiles for the wall surfaces surro...

Page 32: ...orktop Kitchen cabinet B A ST3 5 8 D A B Screw Bracket C Screw Hole D Bottom Base 31 844 538 7890 support gaslandchef com www gaslandchef com 8350 Patriot Blvd STE B N Charleston SC 29418 www gaslandc...

Page 33: ...er Supply The power supply should be connected in compliance with the relevant stan dard or a single pole circuit breaker The method of connection is shown below 1 If the cable is damaged or needs rep...

Page 34: ...Black Wire Red Red Wire Green Wire 220 240V Cable from Power Supply Cable from Appliances White Wire N L L 33 844 538 7890 support gaslandchef com www gaslandchef com 8350 Patriot Blvd STE B N Charles...

Page 35: ...Model IH60BF IH77BF IH90BF 34 844 538 7890 support gaslandchef com www gaslandchef com 8350 Patriot Blvd STE B N Charleston SC 29418 www gaslandchef com...

Page 36: ......

Reviews: